The Ultimate Bitget Exchange Tutorial: Step-by-Step Guide for Beginners
Bitget is a crypto exchange that combines spot, futures, and margin trading in one interface. It supports a wide range of assets and offers low trading fees, making it suitable for both beginners and experienced users. The layout is clean, and key features are easy to find without unnecessary steps.
The platform includes copy trading, which lets users follow and automatically replicate the trades of experienced investors. This feature lowers the entry barrier for those new to crypto trading. Bitget also supports trading bots for users who prefer automation. These tools are available without being intrusive and can run alongside manual strategies.
This tutorial explains how to use Bitget in a step-by-step manner. It covers account setup, trading options, deposits, withdrawals, and everything in between. Screenshots are included throughout to make the process clear and easy to follow. Let’s take a look:
What is Bitget?
Bitget is a Singapore-based cryptocurrency exchange launched in 2018. It was founded by a team with experience in both blockchain technology and traditional finance. While many platforms struggled through the downturn that year, Bitget focused on building quietly. Its early development took place during a slow market cycle, which gave the team time to refine the product before scaling.
As of 2025, Bitget supports users in over 150 countries and has registered more than 100 millionaccounts. In the first quarter of the year alone, it recorded over two trillion dollars in trading volume. These numbers reflect consistent platform upgrades and a clear focus on features that users actively rely on.
The exchange lists over 800 cryptocurrencies and offers more than 900 spot trading pairs. This includes leading assets like Bitcoin, Ethereum, and XRP, alongside a wide selection of smaller-cap tokens. The variety gives traders more flexibility without crowding the interface or creating confusion.
Copy trading has become one of Bitget’s standout features. It allows users to automatically follow trades placed by top-performing investors. New traders often use it to get started, while others rely on it to scale their trading activity without managing every position directly.
Bitget has expanded its ecosystem with additional products as well. Bitget Earn gives users a way to generate passive income by putting idle assets to use. Bitget Wallet provides self-custody for those who want more control over their funds. The platform also includes an education section that explains crypto basics and trading concepts in a structured way.
Security has always remained a key focus for the exchange. Bitget maintains a $300 million protection fund and reports a reserve ratio of 213%. These measures are in place to support users during market disruptions and reflect a proactive approach to risk management. The combination of wide access, consistent product updates, and security focus has helped Bitget grow steadily and earn user trust over time.
Start trading on Bitget and claim your welcome bonus of up to 6,200 USDT. Sign up now and explore one of the leading crypto trading platforms.
How to Create Your Bitget Account?
Opening an account on Bitget takes only a few minutes. The process is clear, and the platform offers multiple sign-up options depending on your preference. Below is a step-by-step guide that walks you through each part of the registration process, with subheadings for each stage to make it easy to follow.
1. Visit the Website
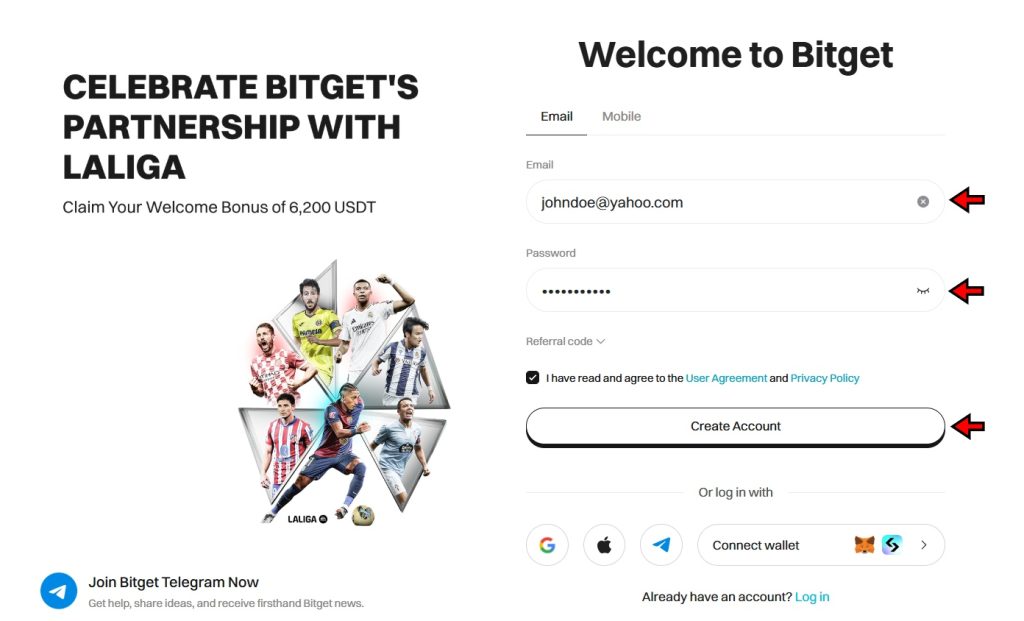
Start by heading to bitget.com. On the homepage, you’ll see a sign-up prompt offering options to register using your email or phone number. If the prompt doesn’t appear right away, look for the “Sign Up” button in the top-right corner. Clicking that will take you directly to the registration form.

2. Enter Your Details
Once on the registration page, you’ll be asked to choose how you want to sign up. Bitget gives you a few choices here. You can use an email address or a mobile number. Type in the one you prefer, then create a secure password. If you’d rather skip typing altogether, you can sign up using Gmail, Apple ID, Telegram, or Metamask. Pick the method that works best for you and continue.
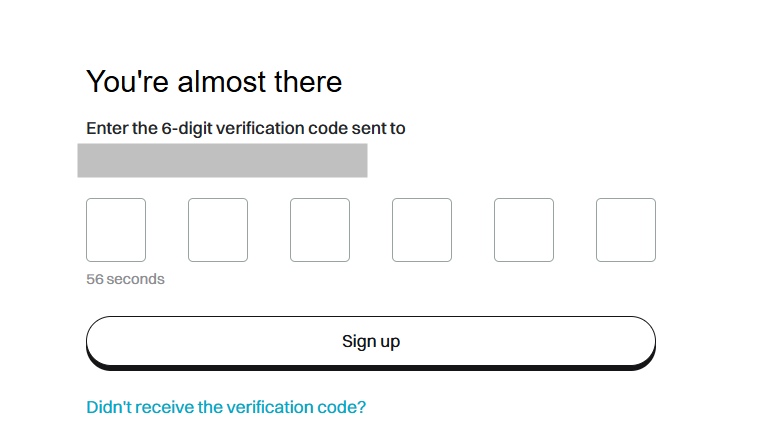
3. Verify Your Email or Phone Number
After entering your information, Bitget will send you a six-digit verification code. If you used email, check your inbox. If you used your phone, it will arrive via SMS. Type that code into the verification field on the screen. This step confirms your identity and activates your account. Once completed, your Bitget account is ready to use.
The sign-up process is quick, with no unnecessary friction. Once you're in, you can explore the exchange, but you will not be able to start trading right away as KYC is mandatory on Bitget.
How to Complete KYC on Bitget?
Bitget made identity verification mandatory starting September 2023. Whether you’re placing small trades or moving large volumes, KYC is now a requirement. The decision lines up with regulatory standards worldwide, and the process is streamlined. Users don’t need to interact with a support agent or wait in queues. Just upload your documents, and Bitget handles the rest through an automated system.
Without KYC, withdrawal limits stay locked at 20,000 USDT per day. Once verified, those limits expand dramatically—up to 15 million USDT per day, depending on your VIP level. If you’re planning to use Bitget actively, completing KYC is a necessary first step. Here’s how the process works, broken down into simple, trackable steps.
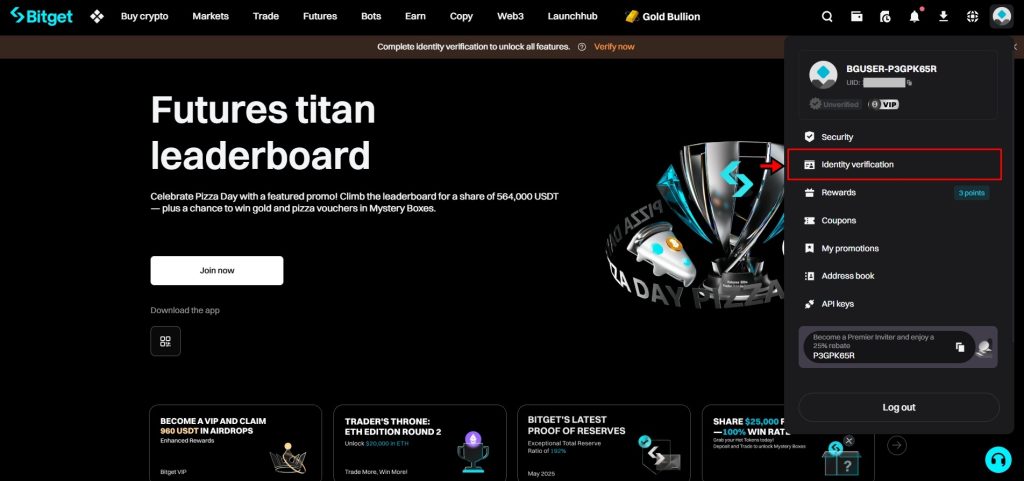
1. Go to the Identity Verification Page
Log in to your Bitget account through the main website. Once you’re signed in, move your cursor to the profile icon at the top right corner. From the dropdown, select "Identity Verification". This takes you straight to the KYC section of your account dashboard.
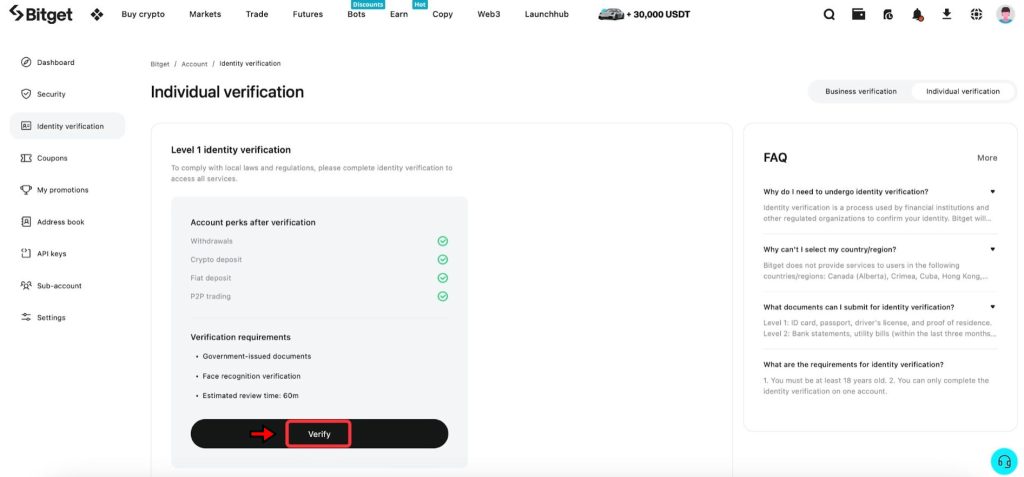
2. Start the Verification Process
On the verification page, you’ll see an overview of what’s needed. Take a moment to read through the listed requirements. Then click the "Verify" button to begin the process.
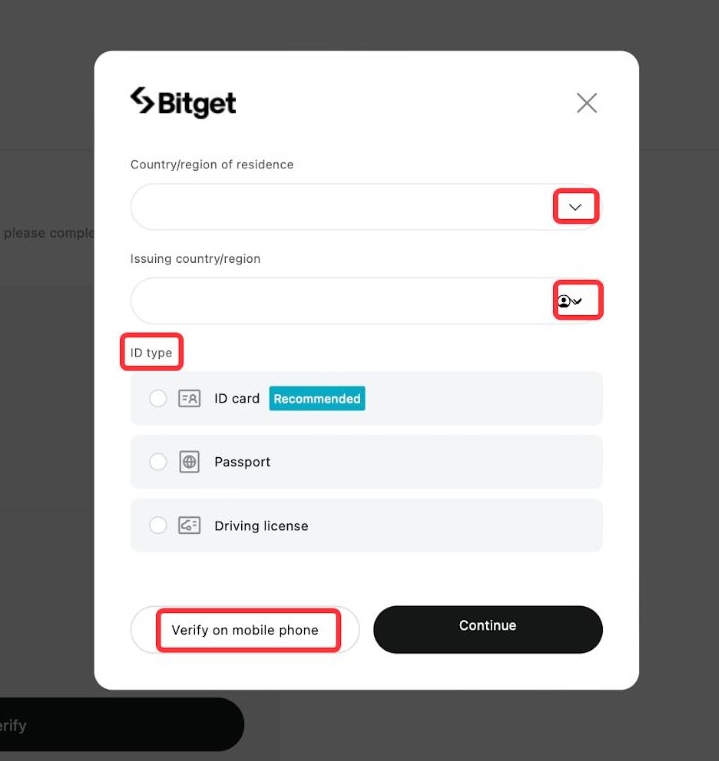
3. Choose Your Country and Document Type
The system will now ask you to select your Country/Region of Residence and the Issuing Country for your ID. These must match your actual location and the document you're submitting. Next, choose your document type, i.e., passport, national ID, driver’s license, or residence permit. Not all countries support every option, so make sure the document you select is accepted. Once everything’s filled out, click "Continue" to move forward.
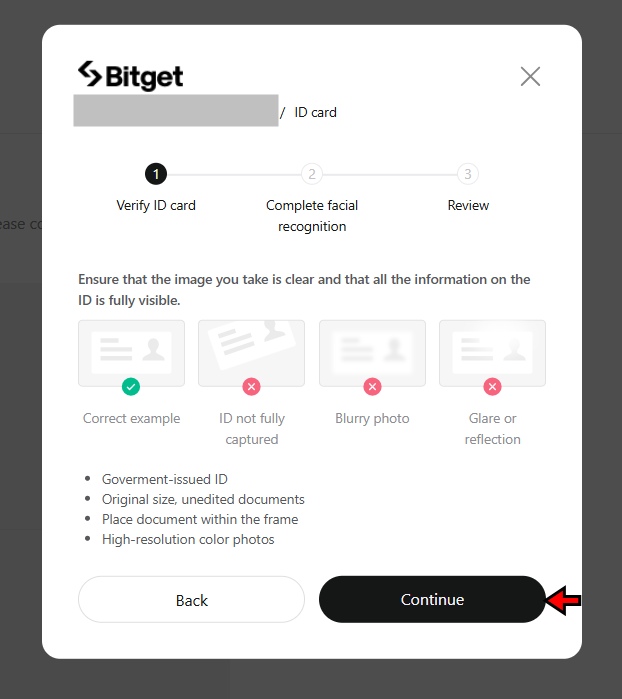
4. Upload Your ID Photos
Bitget requires three uploads here: the front and back of your chosen identity document, and a selfie. If you’re using a passport, only one side is needed, but the image must be sharp and readable. Make sure all documents are well-lit, not cropped, and free from glare or shadows. Blurry or unclear images will delay the process.
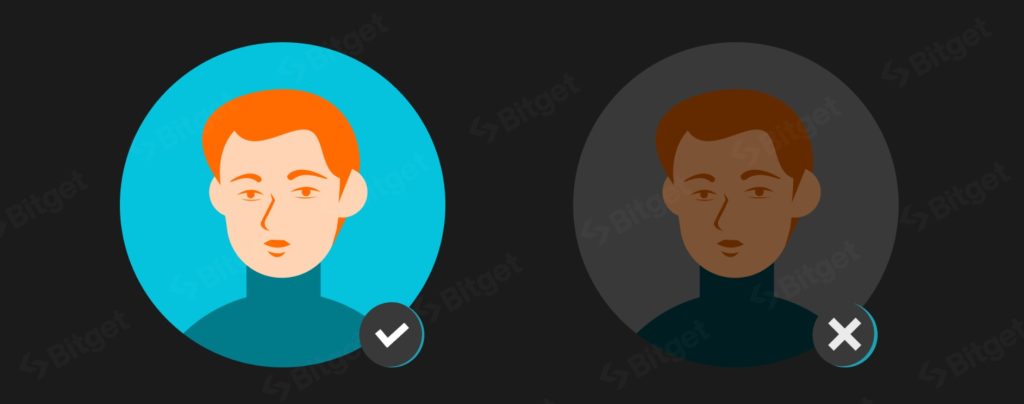
5. Take a Clear Selfie
After submitting your ID photos, the system will prompt you to take a live selfie. This step verifies that the document belongs to you. Use a camera with good resolution, find a spot with decent lighting, and follow the on-screen instructions. The system will automatically capture your image once everything lines up.
6. Submit for Review
Once all images are uploaded, you’ll see a notification confirming that the application has been submitted. Click "Confirm" to finish. Your account status will now show as "Reviewing". Bitget’s system usually processes these requests in under an hour. In most cases, you’ll get approval within four hours. After verification, your withdrawal limits are raised automatically, and your account is ready for unrestricted use.
The whole process is digital, quick, and easy to complete. As long as the submitted images are clear and accurate, the system handles everything else. Once verified, you gain full access to Bitget’s trading features, higher withdrawal limits, and all the platform’s tools.
How to Deposit on Bitget?
Before you start trading on Bitget, you will need to fund your account. Bitget supports two primary methods for funding: depositing cryptocurrency and using fiat to purchase crypto. Each method has its own steps and requirements. Which one you choose depends entirely on your preference and options available in your region.
Depositing Crypto on Bitget
Bitget allows users to deposit cryptocurrencies directly into their wallets. The process involves selecting the right asset, choosing the correct blockchain network, and sending funds from an external wallet. Here is how you can complete this process step by step.
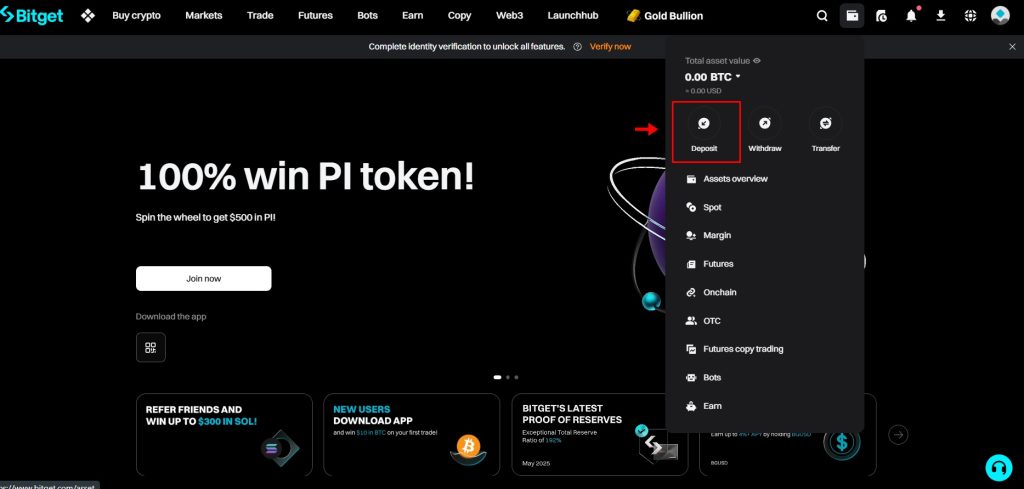
- Navigate to the Crypto Deposit Page: From the Bitget homepage, hover over the wallet icon in the navigation bar on the top right and click the “Deposit” button. This will take you to the crypto deposit page on Bitget.
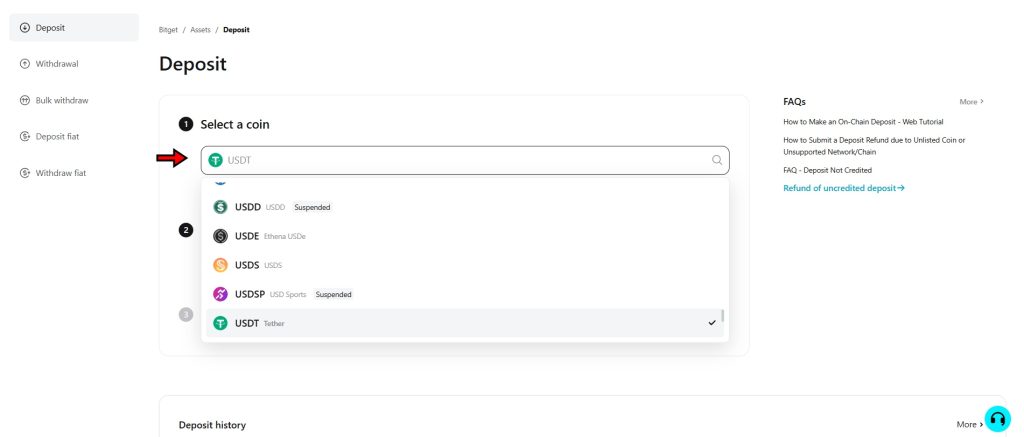
- Select the Cryptocurrency: On the deposit page, choose the cryptocurrency you want to deposit. Bitget supports a wide range of assets, including Bitcoin (BTC), Ethereum (ETH), and stablecoins like USDT.
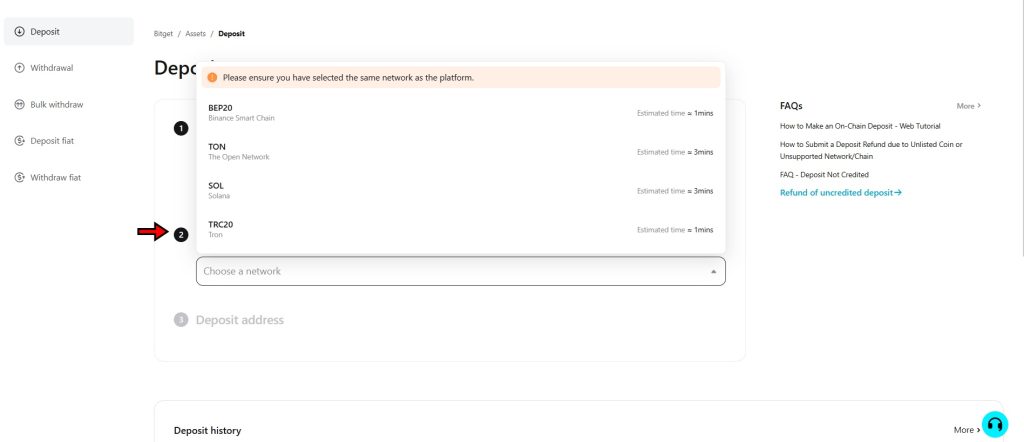
- Choose the Network: After selecting the asset, choose the blockchain network. This is a critical step. The network selected on Bitget must match the network used by the sending wallet. For example, when sending USDT, make sure both the sending wallet and Bitget use TRC20, BEP20 or ERC20, depending on your choice. The network should be the same on both wallets, or you will lose your funds.
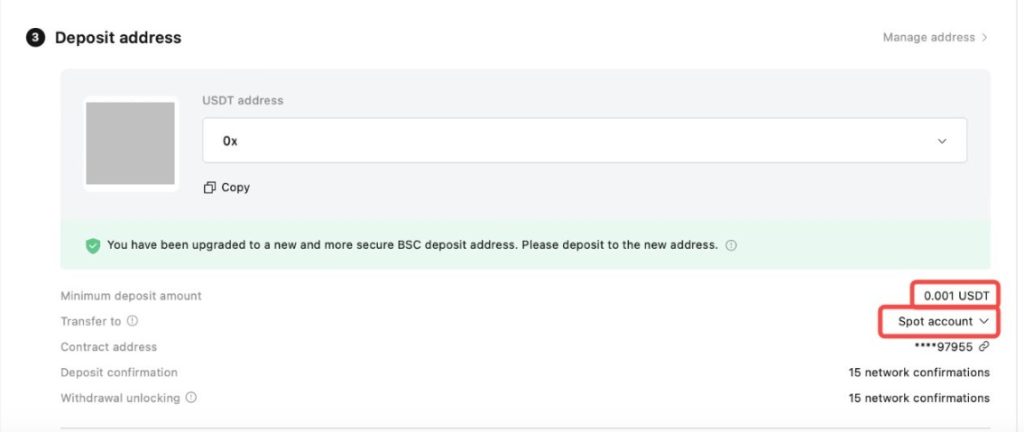
- Copy the Wallet Address: Once the network is selected, Bitget generates a deposit address. Copy this address and paste it into your external wallet’s recipient field. If you are using a mobile wallet, you can also scan the QR code provided at the bottom of the address.
Buying Crypto with Fiat on Bitget
Unlike a lot of other exchanges out there, Bitget also gives you the option to use fiat to buy crypto on the platform. You can buy crypto using fiat on Bitget by following the steps given below.
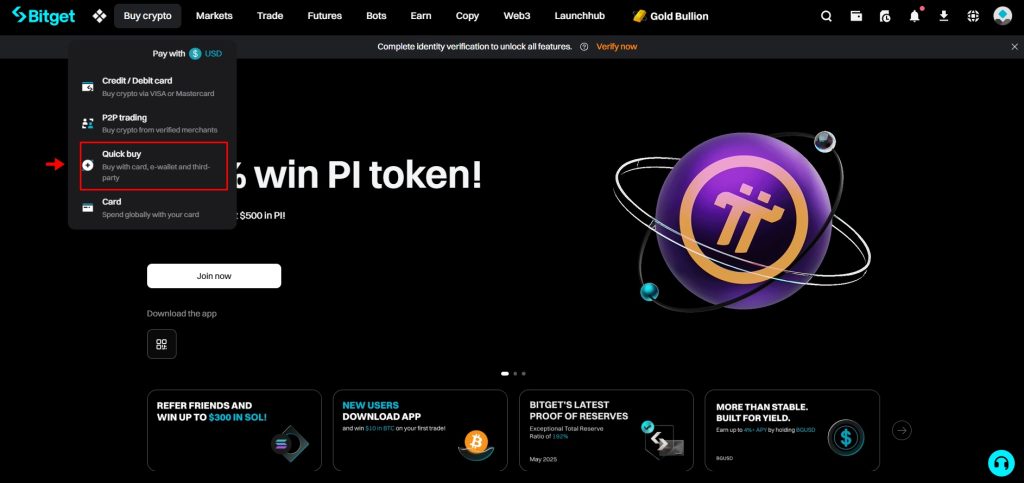
- Choose Your Payment Method: On the homepage, move your cursor to the “Buy Crypto” option in the top left and click on your preferred payment method. Here, you'll find multiple options to purchase cryptocurrency via fiat, such as credit or debit cards, bank transfers, P2P, or third-party payment methods. We will demonstrate how you can buy using credit card and other payment methods. For that, click on “Quick Buy.” We will explain P2P in the coming sections of the tutorial.
- Select Fiat and Cryptocurrency: Next, you will need to choose the fiat you will be spending and the crypto you want to buy. Once you enter the fiat amount you are spending, you will be able to see right away how much crypto you will be getting for it. Then click buy to proceed to payment methods.
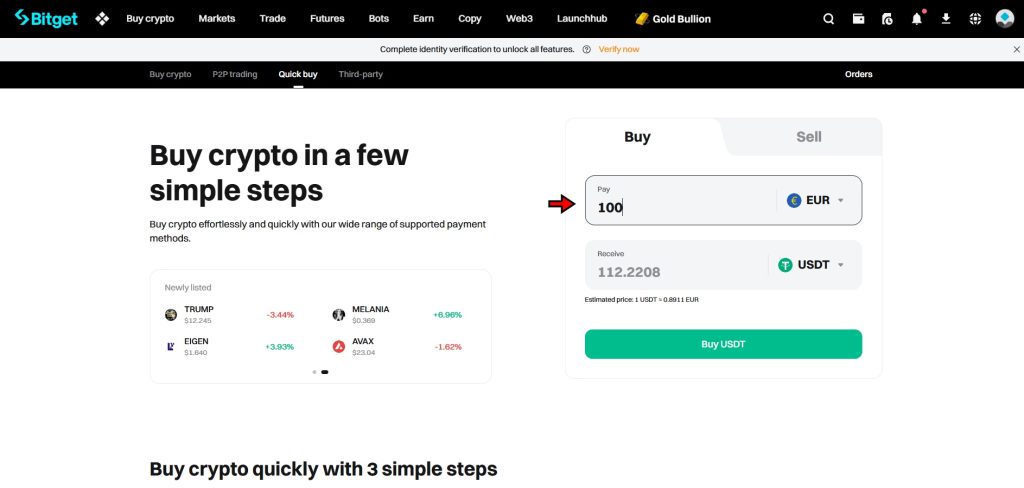
Add values for conversion
- Select a Payment Method and Complete Transaction: On the next page, you will be able to see the payment methods supported by the platform. Bitget supports multiple payment methods, including credit or debit card transfers, bank transfers, and Google Pay. You will also be able to see the cash conversion for each payment method in real time. Choose the one you prefer and click on buy to complete the transaction. If you haven’t already added your bank account or credit card details, you will be prompted to do that before confirming the transaction.
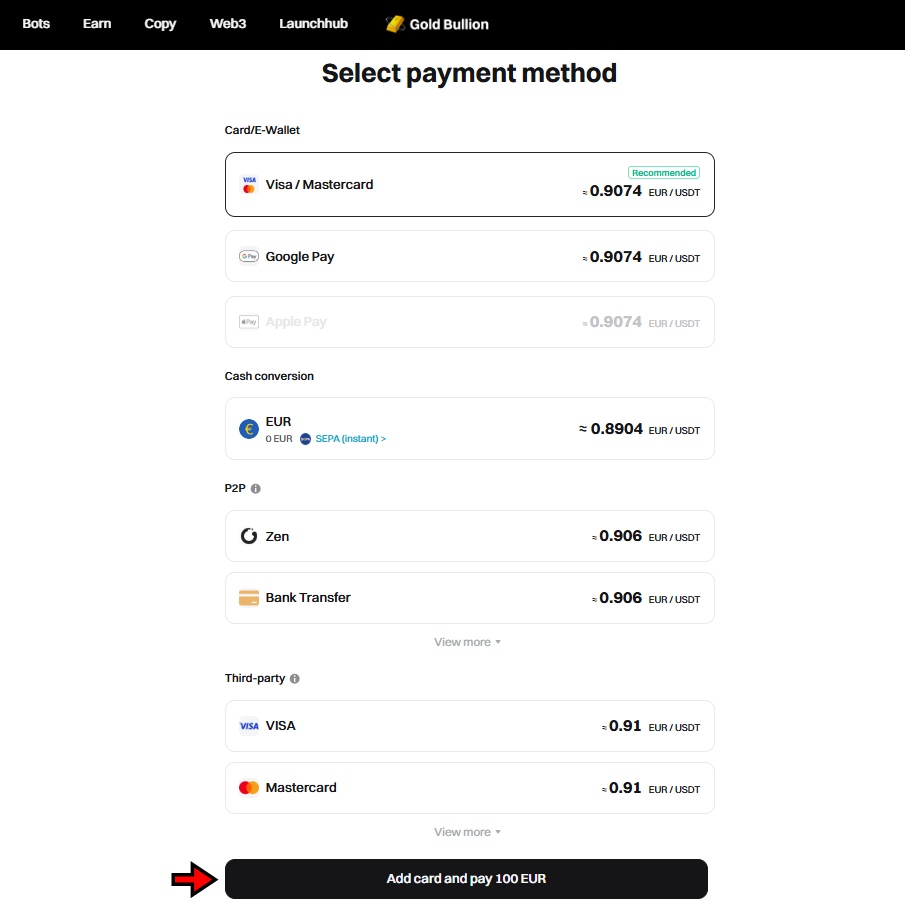
Once all the steps are done, you will receive the cryptocurrency in your Bitget wallet. While some payment methods are instant, others could take several hours, so be patient.
Bitget is giving out up to 6,200 USDT in welcome bonuses. Join now, make your first move, and start stacking rewards.
Understanding Order Types on Bitget
Trading on Bitget involves more than clicking the buy or sell button. Each order type serves a specific purpose, offering traders various levels of control, speed, and risk management. Understanding how these order types function will help you get better at trading overall.
Market Order
A market order executes immediately at the current available market price. It’s used when fast execution matters more than the exact entry price. This order type does not guarantee the price displayed at the time of placing the order, especially in fast-moving markets.
Example: If Bitcoin is trading at $100,000 and you place a market buy order for 1 BTC, the platform matches your order with the best available seller. You may end up buying slightly above or below $100,000 depending on order book liquidity.
Limit Order
A limit order lets traders specify the exact price at which they want to buy or sell an asset. The order only executes when the market price reaches the limit price or better. If the market never hits the set price, the order remains open.
Example: You want to buy Ethereum at $1,950 while it’s currently trading at $2,000. You place a limit buy order at $1,950. The order will remain pending until the market price drops to $1,950 or below.
Trigger Order
A trigger order becomes active only when the market price reaches a predefined trigger level. Once triggered, it places a regular market or limit order based on the settings chosen. Until the trigger condition is met, no funds are frozen.
Example: You expect BTC to rise after crossing $101,000. You place a trigger buy order with a trigger price of $101,000 and execution at market price. When BTC hits $101,000, the system places a market order on your behalf.
Take-Profit / Stop-Loss Order
Take-profit (TP) and stop-loss (SL) orders are conditional orders designed to close positions automatically at predefined profit or loss thresholds. Bitget allows users to set both TP and SL when entering or managing a position. This helps manage risk without needing to monitor the market constantly.
Example: You bought ETH at $2,000. You set a take-profit at $2,100 and a stop-loss at $1,950. If the price hits either level, Bitget will execute a market order to close your position at the best available price.
Post-Only Order
Post-only orders ensure that your order is added to the order book without being matched instantly with an existing order. If your order would match immediately, Bitget cancels it. This guarantees that the order is a maker order, which benefits from lower trading fees.
Example: You place a post-only limit sell order for BTC at $100,500 while the current best bid is $100,600. The order is cancelled immediately because it would have matched with an existing buy order. To maintain post-only status, you must set a price that does not match immediately.
Trailing Stop Order
Trailing stop orders dynamically adjust based on market movement. Instead of setting a fixed stop price, you define a trailing distance (percentage or value) from the market peak or trough. This helps protect profits while allowing trades to stay open during favorable price moves.
Example: BTC is trading at $100,000. You place a trailing stop sell order with a 2% trailing distance. If BTC rises to $104,000, your stop level moves up to $101,920 (2% below the peak). If BTC then drops to $101,920, the platform executes a market sell order.
Bitget Spot Trading Tutorial
Bitget supports a wide range of crypto trading pairs for spot trading. The interface is clean, functional, and easy to navigate. It features TradingView integration, which gives users access to advanced charting tools directly within the trading screen. Spot trading on Bitget involves buying or selling crypto at current market prices without leverage. Here's how to get started with step-by-step instructions.
1. Go to the Spot Trading Interface
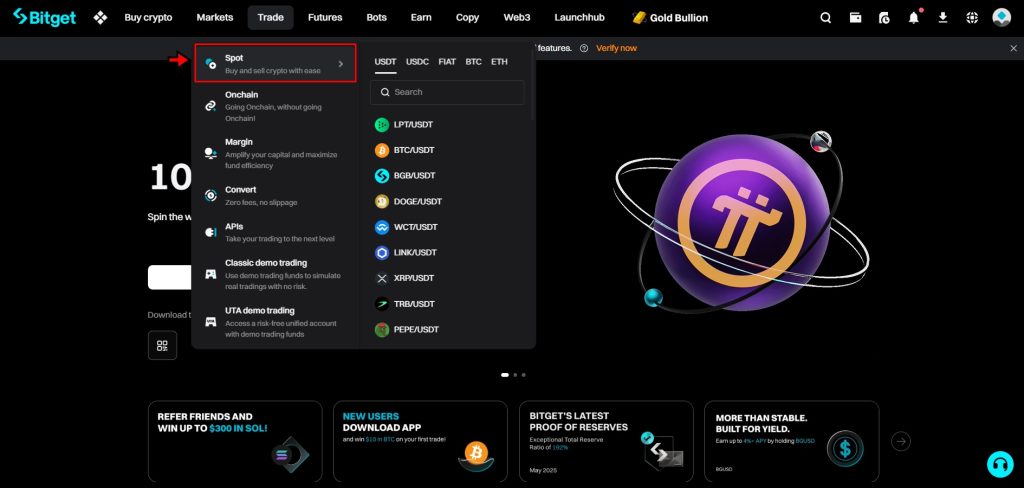
Begin by visiting Bitget’s official website. Log in with your account credentials. Once you're in, move your cursor over the “Trade” tab located at the top of the screen. A dropdown menu appears. Click on “Spot” to open the spot trading interface. This page serves as your main dashboard for placing trades, analyzing charts, and managing orders.
2. Get Familiar with the Trading Interface
Before placing any trades, take a moment to understand the layout. Each section of the interface provides specific tools or information needed for trading.
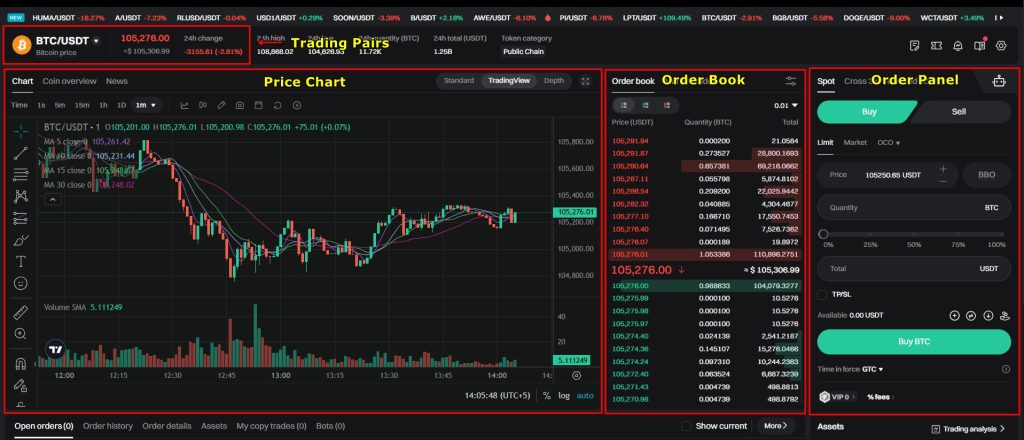
- Trading Pairs: Located at the top-left, this menu lets you choose which crypto pair to trade. Click on it to browse or search for trading pairs like BTC/USDT or ETH/USDT.
- Price Chart: Just below the trading pair selector, the chart displays real-time price movement. It’s powered by TradingView, which allows you to apply indicators, change timeframes, and analyze patterns.
- Order Book: On the right side of the chart, this section shows all active buy and sell orders placed by other traders. Green rows indicate buy orders; red rows show sell orders.
- Order Panel: Found to the far right, this is where you execute trades. It includes options for order type, price input, and trade amount. All actions related to placing orders happen here.
It is important to get familiar with the interface first, as it will help you execute your trades more swiftly without any roadblocks.
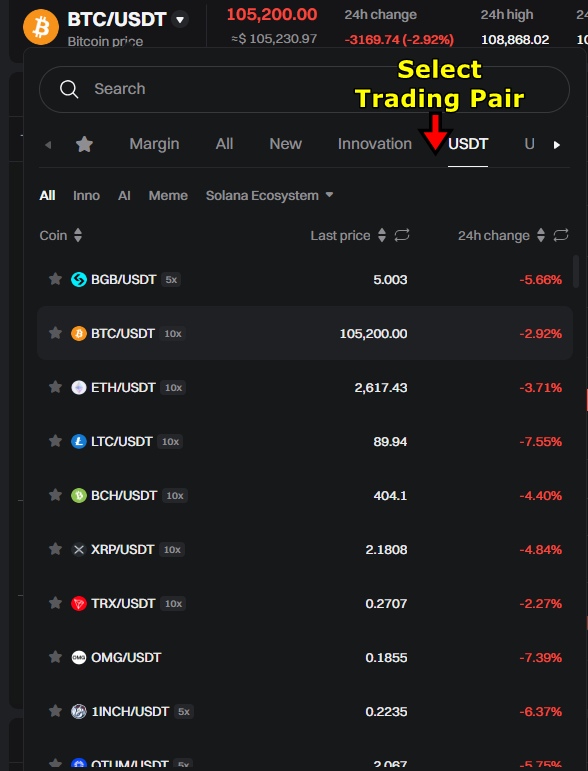
3. Select a Trading Pair
Spot trades always involve a trading pair. For example, BTC/USDT means you're using USDT to buy or sell Bitcoin. To select a pair, click on the dropdown in the top-left section labeled with the current pair. A list will appear. You can scroll or type to find your preferred pair. In this example, we are going with BTC/USDT. Once selected, the chart, order book, and trade panel update to reflect live data for that pair.
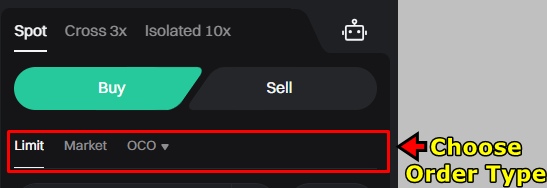
4. Choose the Order Type
Next, move to the Order Panel. Here you select the type of order you want to place. Bitget offers multiple order types, but for this tutorial, we will be demonstrating how to place a trade with a Limit Order.
Limit Orders let you define the exact price at which to buy or sell an asset. The trade will only execute when the market reaches that price. This gives better control, especially when the markets are volatile.
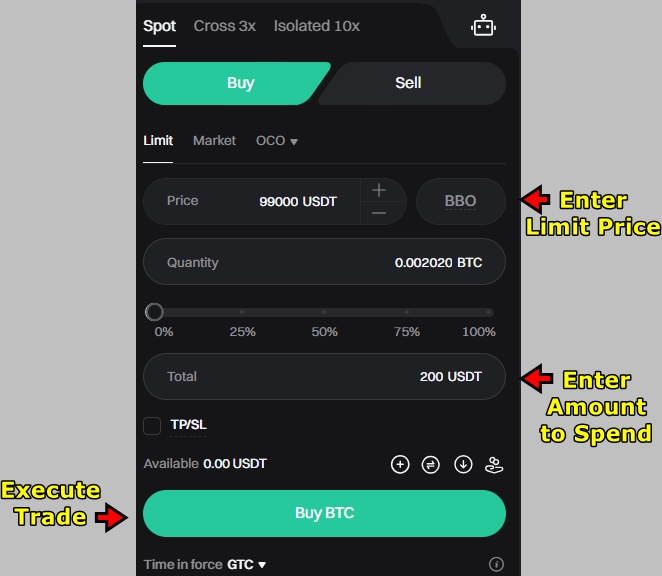
5. Enter Trade Details
After choosing Limit Order, enter your trade details.
- Limit Price: Type the price at which you want to buy Bitcoin. For example, set it at $99,000.
- Amount: Enter how much USDT you want to spend. Let’s say 200 USDT.
The system automatically calculates how much BTC you’ll receive based on your inputs. Double-check the numbers. If everything looks correct, click “Buy BTC” to place the order.
6. Monitor the Order Status
Since a limit order is price-dependent, it remains pending until the market reaches your specified value. You can track its progress in the Open Orders section located below the Order Panel.

Once the market hits $99,000, Bitget fills the order. Your BTC balance updates in the Spot Wallet, and the transaction moves to the Order History tab. If the market doesn’t reach your target price, the order stays open until it’s manually canceled or filled.
Start trading on Bitget and claim your welcome bonus of up to 6,200 USDT. Sign up now and explore one of the leading crypto trading platforms.
Bitget Futures Trading Tutorial
Futures trading on Bitget caters to users willing to take higher risks for potentially higher rewards. Bitget offers USDT-M Futures, Coin-M Futures, and USDC-M Futures. These contracts support multiple trading pairs and leverage options, with up to 125x available on some pairs. While leverage magnifies profits, it also increases liquidation risks.
To manage risk, Bitget provides two margin modes: Cross Mode and Isolated Mode. Cross uses the entire account balance to prevent liquidation across all positions. Isolated confines risk to individual trades. In this tutorial, the focus will be on trading USDT-Margined Futures using Isolated Margin at 10x leverage.
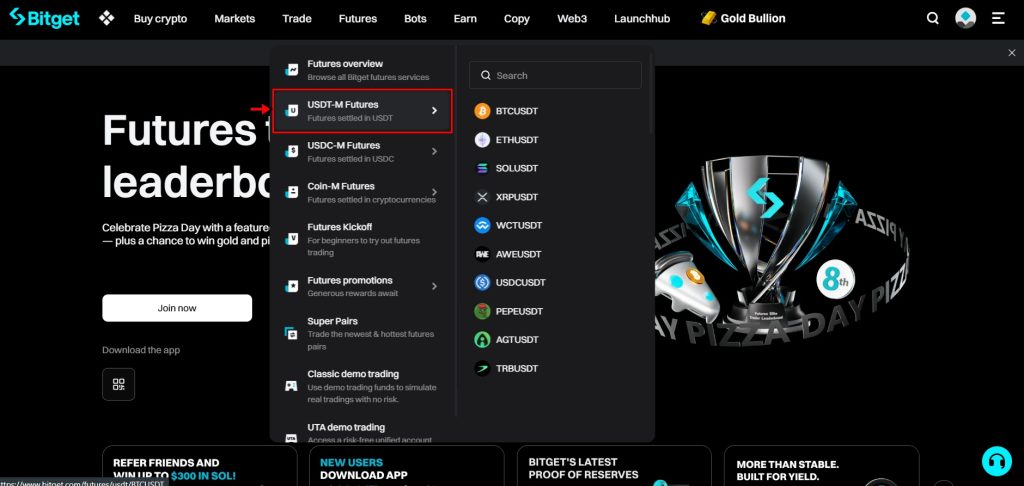
1. Go to the USDT-Margined Futures Interface
After logging in, hover over the “Futures” tab in the top navigation bar. From the dropdown, select “USDT-M Futures”. This loads the interface for perpetual futures contracts settled in USDT. You can also choose Coin-M Futures or USDC Futures if they fit your strategy.
2. Understand the Futures Interface
Futures trading requires precision. Take a moment to explore the layout and understand how the entire thing works:
- Trading Pair Selector: Top-left dropdown for choosing futures contracts like BTC-P/USDT.
- Price Chart: Below the pair selector, this chart shows live market action. Traders can apply indicators and adjust timeframes.
- Order Book: Located on the right, it shows active buy and sell orders. It helps assess liquidity and market sentiment.
- Order Panel: Far-right section where trades are placed. Users choose order type, set leverage, direction, and size here.
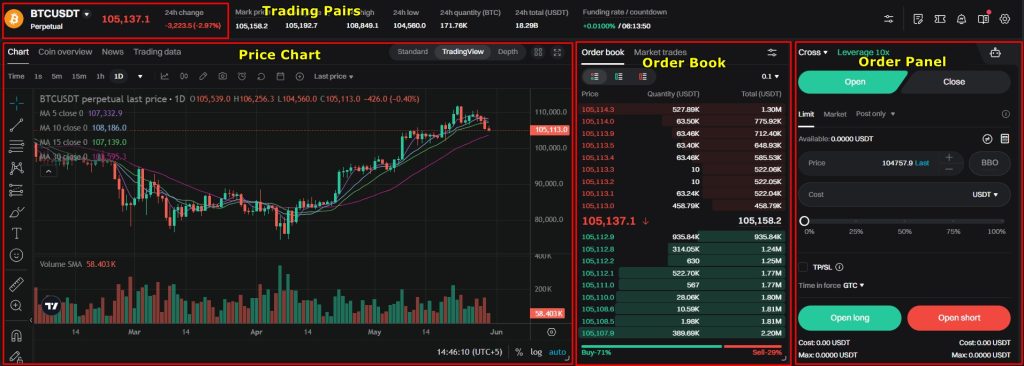
Understanding each part ensures better execution and reduces error risk.
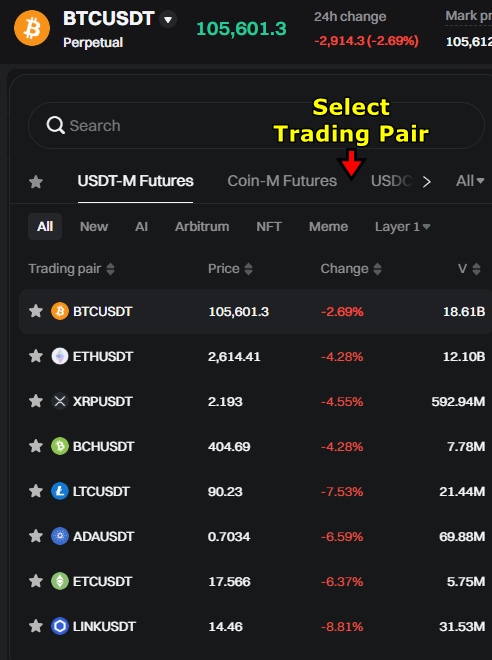
3. Select a Trading Pair
Click the current trading pair in the top-left. A list opens with available contracts. Type BTC/USDT in the search bar and select it. The chart, order book, and order panel update to show data specific to this pair.
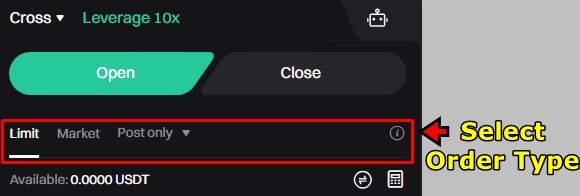
4. Choose an Order Type
In the Order Panel, Bitget supports several order types. In this tutorial, we are going with the “Limit Order,” which allows users to specify an exact entry price. The trade only executes when the market hits that price. It’s a controlled way to enter positions, especially in volatile conditions. If you want to execute the trade immediately, you can opt for “Market Order”. However, you won’t be able to define the price at which the trade executes.
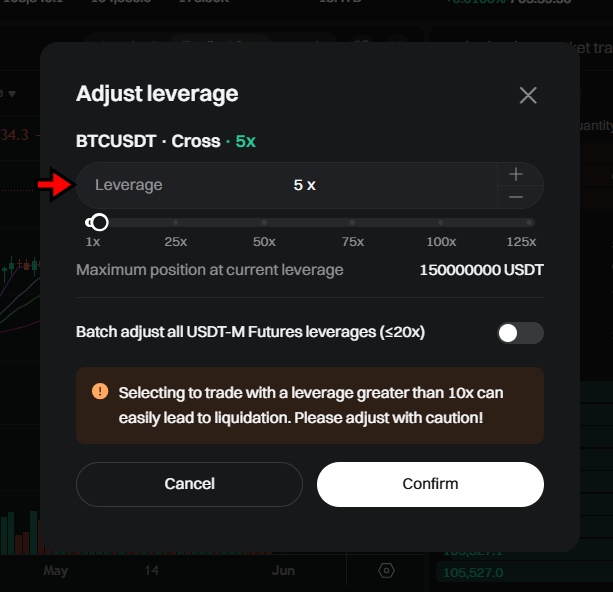
5. Set Margin Mode and Adjust Leverage
Before placing the trade, set the margin mode. Choose Isolated Margin to limit risk to the specific trade. This is ideal for new or cautious traders.
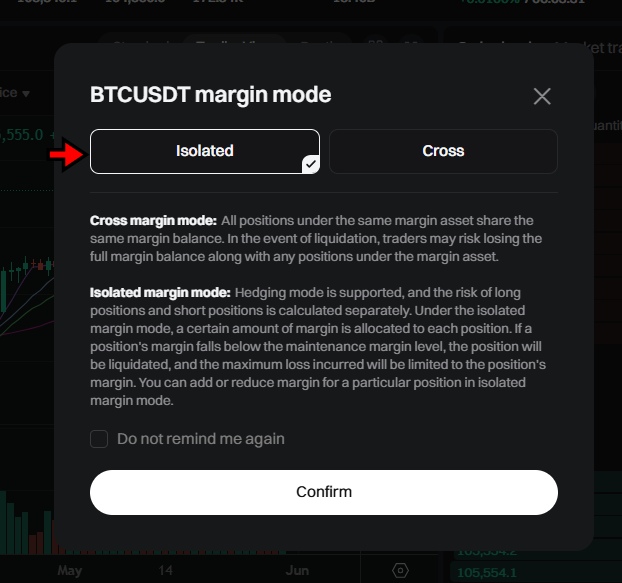
Next, click the leverage icon next to the margin setting. Use the slider or input a value manually. Set it to 10x for this example. At 10x, a $100 margin controls a $1,000 position. Higher leverage increases both profit and loss potential. Beginners should avoid excessive leverage.
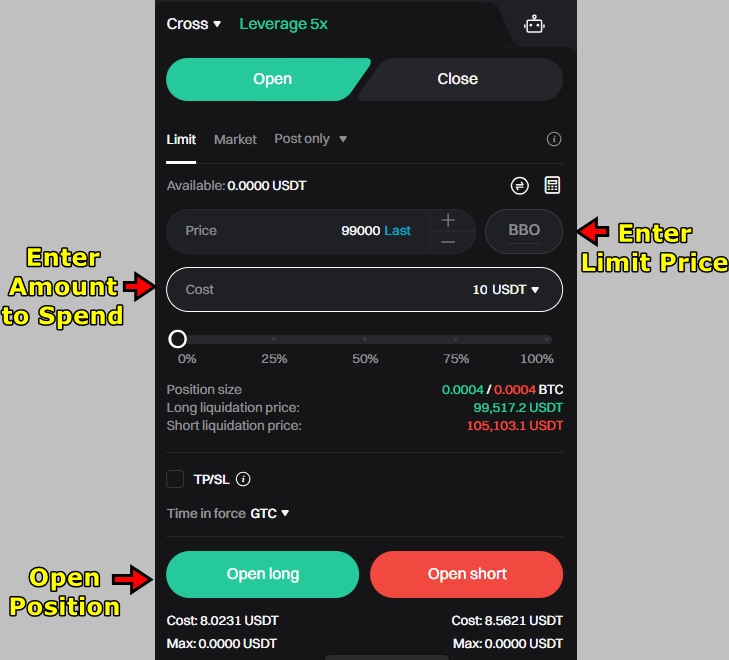
6. Enter Trade Details and Open Position
Decide the direction of the trade:
- Long: Use if expecting price to rise.
- Short: Use if expecting price to drop.
In this tutorial we are going “Long” as we are expecting the price to rise in the future.
Next, in the Order Panel:
- Set the Limit Price to $99,000.
- Enter the USDT amount, for example $10.
Review all inputs. Click “Open Long” to place the order. It appears in the Open Orders tab. When the market hits the specified price, the order fills and moves to the Positions tab.
To open a Short position, follow the same steps but click “Open Short” instead. Remember, when placing a Short order you are expecting the price to drop in the near future. Make sure to open the position at higher price and close at a lower price for profits.
Note: If your futures wallet has insufficient funds, transfer assets from your spot or main wallet. Use the wallet icon on the homepage to move funds into the futures section.
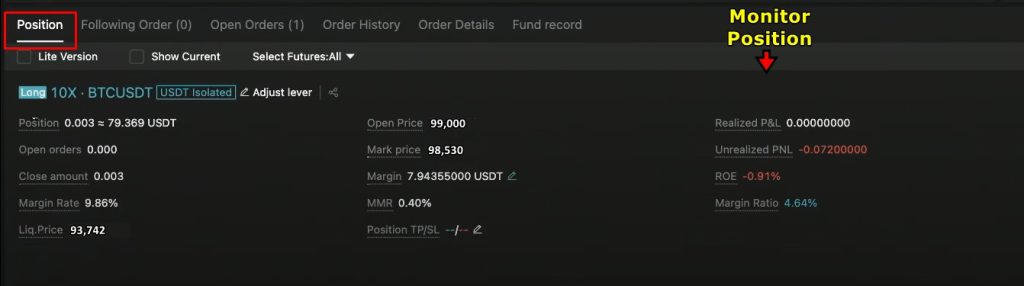
7. Monitor Your Open Position
Once active, the trade appears in the Positions tab. It displays several metrics including:
- Position Size
- Entry Price
- Unrealized PnL (Current floating profit or loss)
- Realized PnL (Closed profit or loss if any part of the trade is already settled)
- Liquidation Price (If the market hits this price, the trade auto-closes)
Track these metrics constantly. They help assess risk and performance.
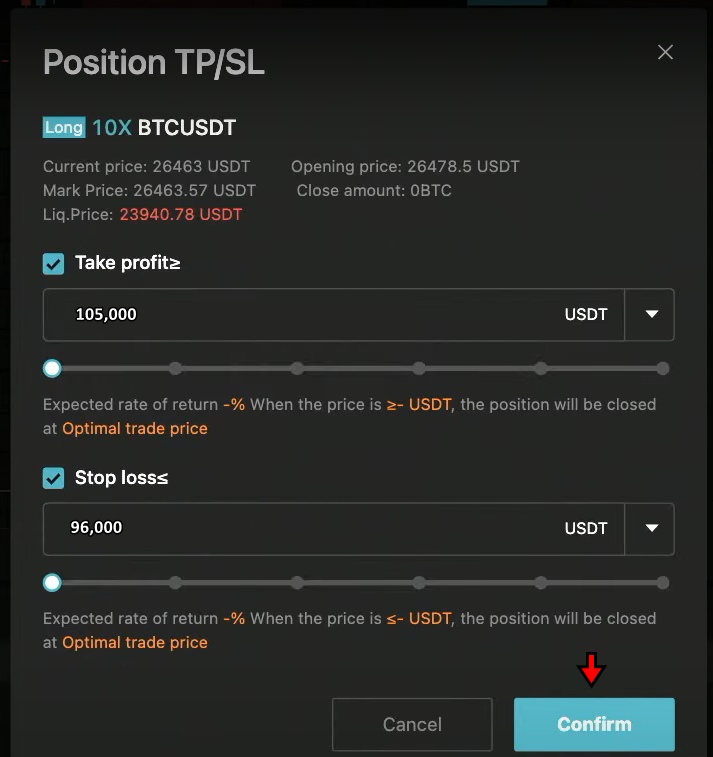
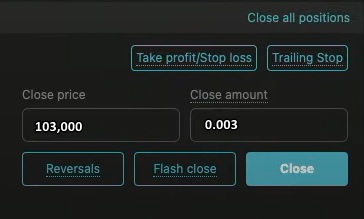
8. Add Stop-Loss and Take-Profit
Managing risk is essential in futures trading. Bitget allows setting Stop-Loss and Take-Profit levels to automate exit strategies.
- In the Positions tab, find the TP/SL column.
- Click “TP/SL” to open the input box.
- Set your Take-Profit target to secure gains.
- Set your Stop-Loss level to limit downside risk.
- Confirm the settings.
If needed, close the trade manually using “Flash Close” for immediate exit. Alternatively, use the “Close Position” box to define how much of the trade to exit at a chosen price.
Another option is “Reverse”, which closes the current position and opens an opposite one. For instance, if you're Long and market sentiment flips, Reverse will close the Long and open a Short instantly.
Bitget Copy Trading Tutorial
Bitget has turned copy trading into a feature that feels more like collaboration than automation. It connects two types of users: beginners who want to learn by following, and experienced traders who want to monetize their strategies. The entire system works like a plug-and-play model. You pick a trader, sync your settings, and Bitget takes care of the execution.
This step-by-step guide walks through how to start futures copy trading on Bitget. The process is simple, but understanding each setting helps you avoid costly mistakes.
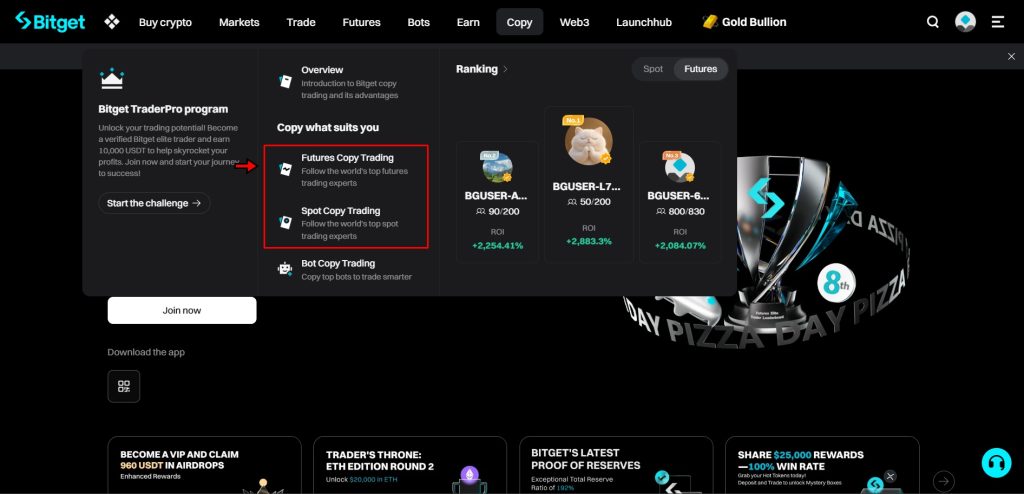
1. Access the Copy Trading Page
Log into your Bitget account. On the homepage, place your cursor over the "Copy" tab in the top menu. A dropdown will appear. Choose "Futures Copy Trading" to open the dedicated interface. This page displays the full list of traders available for copy trading. You can also switch to Spot Copy Trading if you prefer it, but this tutorial focuses on futures.
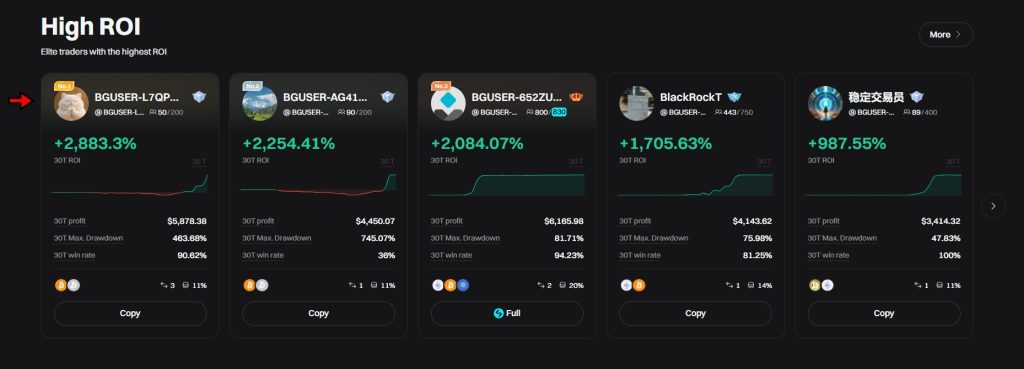
2. Choose a Trader to Follow
The copy trading page shows a leaderboard of top traders. Each profile displays key stats including return rate, win ratio, active followers, and total profit.
Click on any profile to explore deeper. You’ll see a history of trades, preferred pairs, and risk levels. Some traders take short-term positions with tight stops. Others go for larger swings with wider margins. Choose one whose approach fits your comfort level.
Once satisfied, click "Follow" to start the setup.
3. Set Copy Parameters
After choosing a trader, the system will redirect you to the Smart Copy configuration panel. This is where you define how much control you want over the copy trading behavior.
Start by entering the amount of USDT you want to allocate. This amount will be used for copying the trader’s moves.
Next, select your copy type. You can copy all trades or limit it to specific positions.
Enable Equity Guardian if you want to set a maximum loss cap. If your account value drops to the limit you define, Bitget will automatically stop copy trading, close all positions at market price, and transfer the remaining balance to your futures wallet.
4. Adjust Advanced Settings (Optional)
If you want more flexibility, open the Advanced Settings panel. This section allows deeper customization.
You can:
- Select which trading pairs to follow
- Choose whether to auto-copy all positions or only new ones
- Set your own Take-Profit and Stop-Loss levels
- Adjust leverage and margin allocation for each copied trade
These tools help you stay in control even when someone else is driving the trade direction. Beginners can leave these settings as default, but more experienced users may want to fine-tune them.
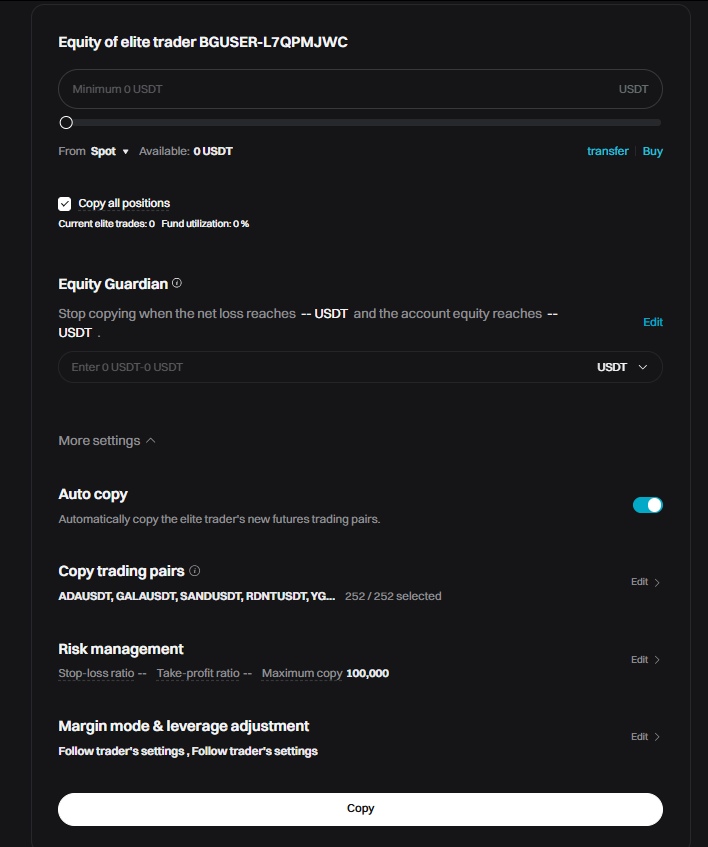
Once everything looks good, click "Copy" to activate.
Bitget is giving out up to 6,200 USDT in welcome bonuses. Join now, make your first move, and start stacking rewards.
Bitget Key Trading Features
Bitget doesn’t just stop at spot and futures markets. It adds extra tools that make the trading experience more practical, especially for users who prefer speed, automation, or flexibility with local currencies. Some features are built for efficiency, others for experimentation, but all of them aim to simplify how people interact with crypto markets.
Below is a hands-on breakdown of four key tools on Bitget and how to use them.
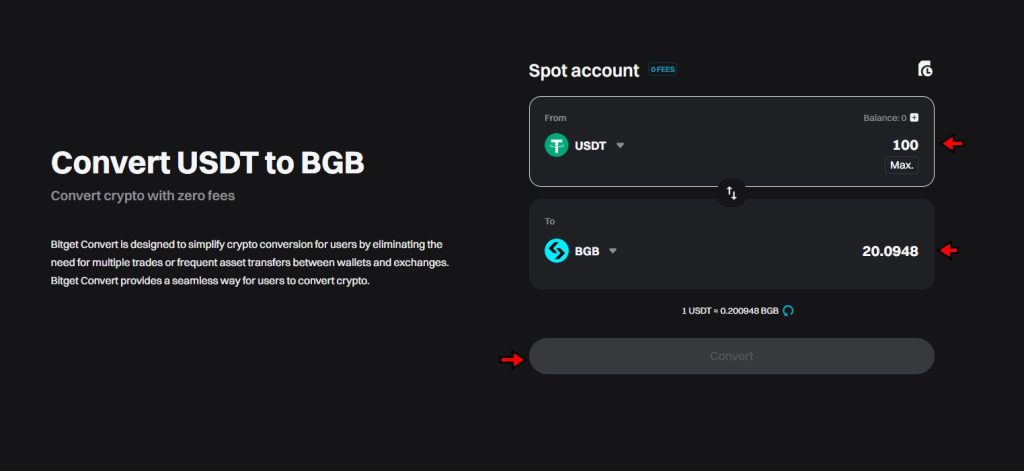
Bitget Convert
Bitget Convert is the tool you go to when you want to trade one coin for another, without getting stuck in charts, order books, or price slippage. It’s quick, clean, and built for instant swaps.
To find it, hover over the “Trade” tab on the main navigation bar and click “Convert.” You’ll land on a simple page with two dropdowns. In the first, choose the crypto you already hold. In the second, pick the one you want to receive.
Bitget will show the live conversion rate in real time. If you're happy with the numbers, click “Convert.” The new asset appears in your Bitget wallet right away. There’s no transaction fee and no waiting around. This tool is ideal for users who want to switch assets quickly, like traders rebalancing their portfolio or anyone looking to sidestep volatility without navigating the full spot market interface.
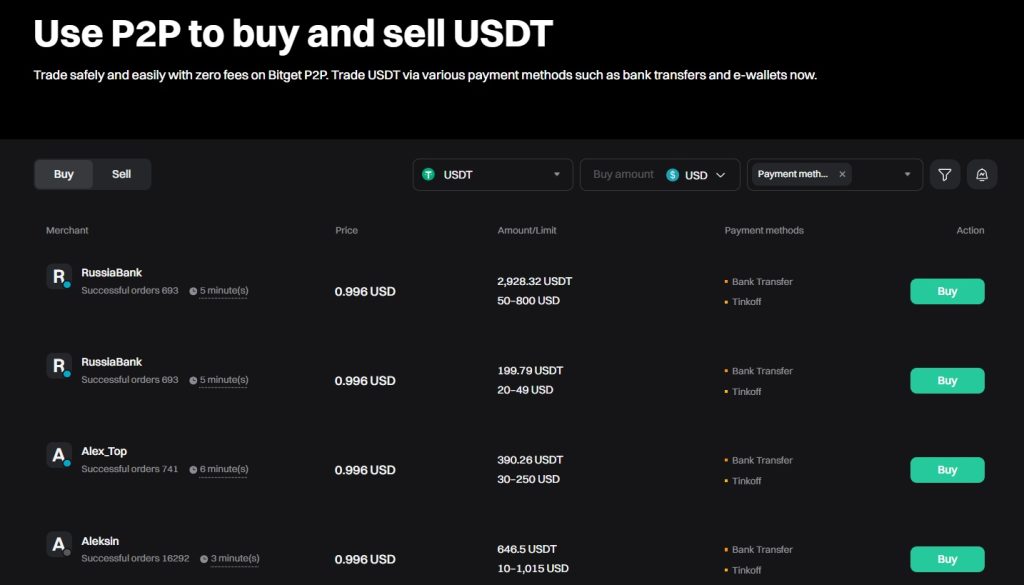
Bitget P2P Trading
The peer-to-peer (P2P) trading section on Bitget acts like a local marketplace for crypto. Instead of buying from an exchange directly, users trade with each other and use familiar payment methods LIKE bank transfers, mobile wallets, even cash in some regions.
To use it, hover over “Buy Crypto” and choose “P2P Trading.” Start by selecting your local currency and the crypto you want to buy. You’ll see a list of sellers who accept your chosen payment method, along with their rates, limits, and user ratings.
Click on an offer to view full terms. If everything checks out, proceed with the payment according to the seller’s instructions. Once the seller confirms receiving the payment, the platform releases the crypto to your Bitget wallet. This system gives users more control. You pick who to trade with. You choose the rate. You verify the seller’s credibility. It’s especially useful in regions where fiat-to-crypto ramps are hard to access.
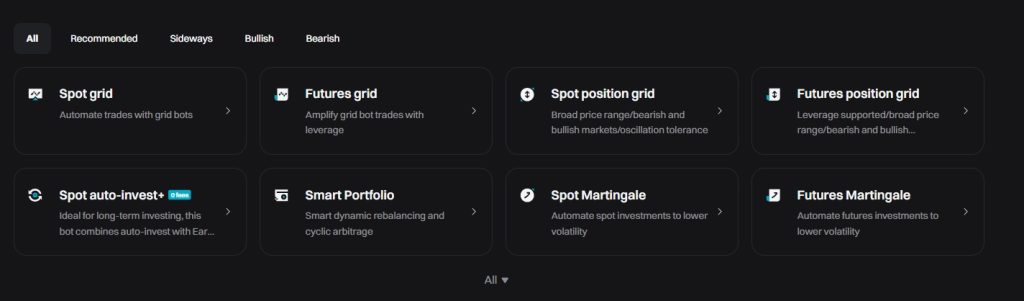
Bitget Trading Bots
Bitget’s trading bots are designed to take the repetition out of trading. Whether you're running a price-range strategy, chasing trends, or balancing your portfolio, there's a bot that can do the job without requiring you to stay glued to your screen.
Start by heading to the “Bots” option in the navigation bar on the homepage. From there, choose the bot type that fits your strategy:
- Grid Bot for buying low and selling high within a set range
- Martingale Bot for recovering losses through increasing order sizes
- CTA Bot for trend-following strategies
- Smart Portfolio Bot for automated portfolio management
You’ll select your trading pair and configure the bot’s settings. You can either go with the AI-generated suggestions or set everything manually like price range, investment amount, and order intervals. Once configured, hit Start and the bot will begin operating automatically. You stay in control, but the bot handles the execution. It’s useful for anyone who wants consistency in their strategy without micromanaging every order.
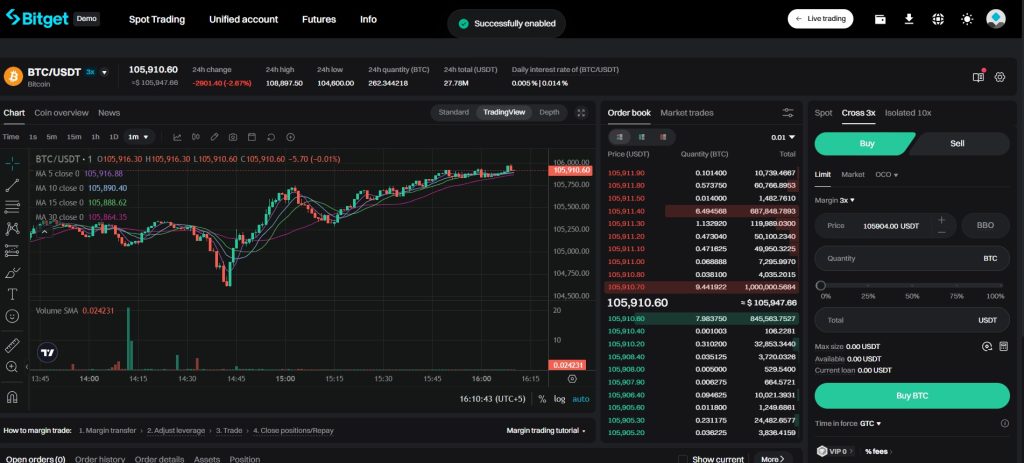
Bitget Demo Trading
Demo trading on Bitget gives users a chance to test the waters without using real money. It simulates the full experience of futures trading using virtual funds, making it a useful training ground for beginners or a sandbox for pros testing out new ideas.
To access it, go to “Trade” and select “Classic Demo Trading.” The layout and tools look exactly like the real platform. You’ll receive a simulated balance (usually around 50,000 USDT) to place trades with.
You can long, short, adjust leverage, and use market or limit orders just like you would in a live market. The only difference is the money isn’t real, so the risk isn’t either. This feature helps users build confidence with the interface, try out strategies, and troubleshoot mistakes before jumping into live trades.
How to Withdraw Funds on Bitget
Bitget lets users move their crypto and fiat funds off the platform and into external wallets or bank accounts. The withdrawal process is straightforward, but it comes with some key steps that require attention, especially when it comes to choosing the right network and address.
Below is a walkthrough of how to withdraw both crypto and fiat from Bitget, step by step.
Withdrawing Crypto from Bitget
Crypto withdrawals on Bitget follow the same pattern as other major exchanges, but you’ll want to slow down for certain steps, especially when picking networks and addresses. Mistakes here are irreversible.
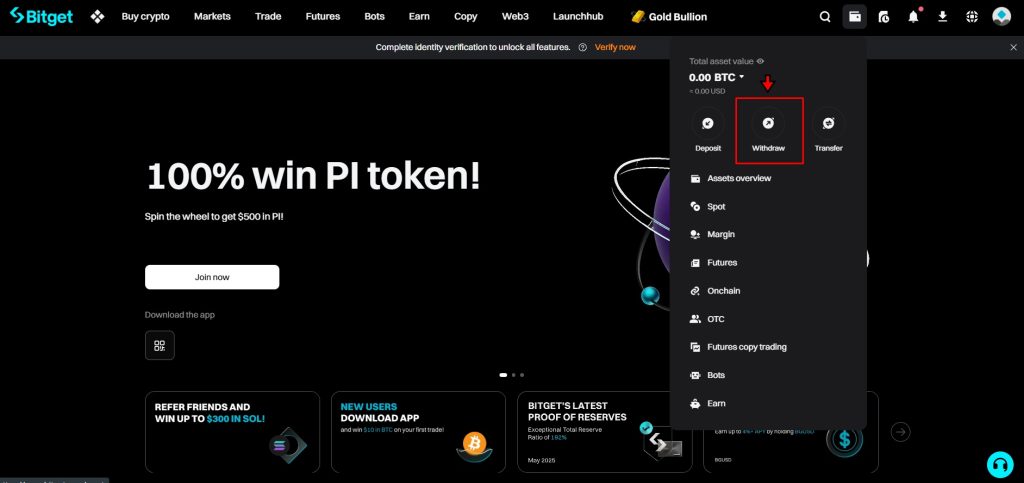
- Go to the Withdrawal Page: Start by logging into your Bitget account. On the homepage, move your cursor to the top menu and hover over the “Wallet” icon. A dropdown will appear. Click on “Withdraw” from the list. This brings up the crypto withdrawal dashboard where you’ll manage the entire process.
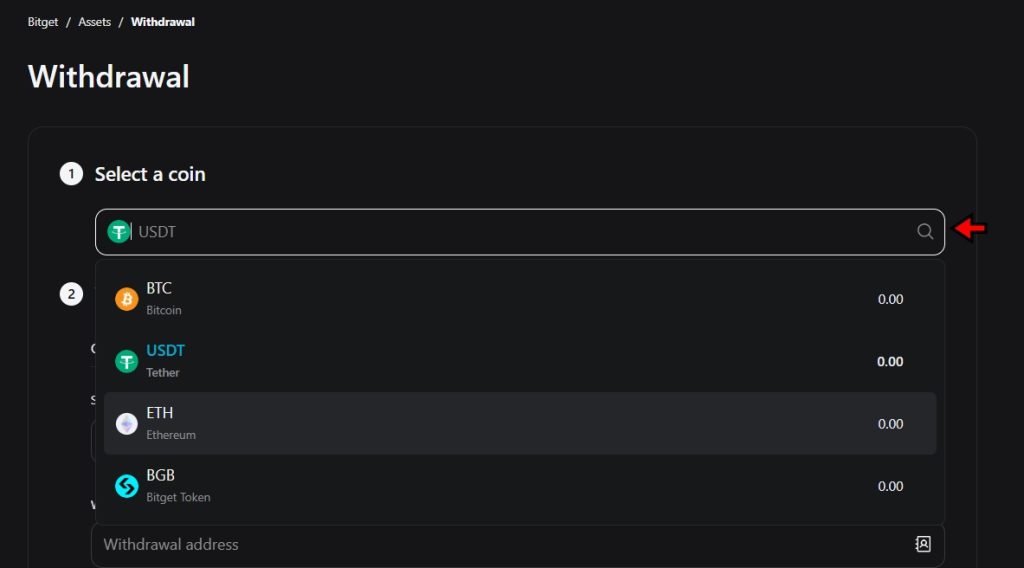
- Choose Your Crypto: Once on the withdrawal page, the first thing you’ll do is pick which cryptocurrency to send. You’ll see a dropdown with assets like USDT, BTC, ETH, and others. Select the right one. Make sure the asset you choose matches what your destination wallet supports.
- Select the Network and Paste the Wallet Address: Next, choose the blockchain network you want to use. Most tokens support multiple networks—USDT, for example, is available on ERC20, TRC20, and BEP20. Your choice must match the network supported by the receiving wallet. If you’re sending to a wallet that uses TRC20, select TRC20 here as well. Now switch over to the wallet or exchange you’re withdrawing to and copy the receiving address. Paste that into the withdrawal field on Bitget. Check it carefully. One wrong letter and your funds could end up lost.
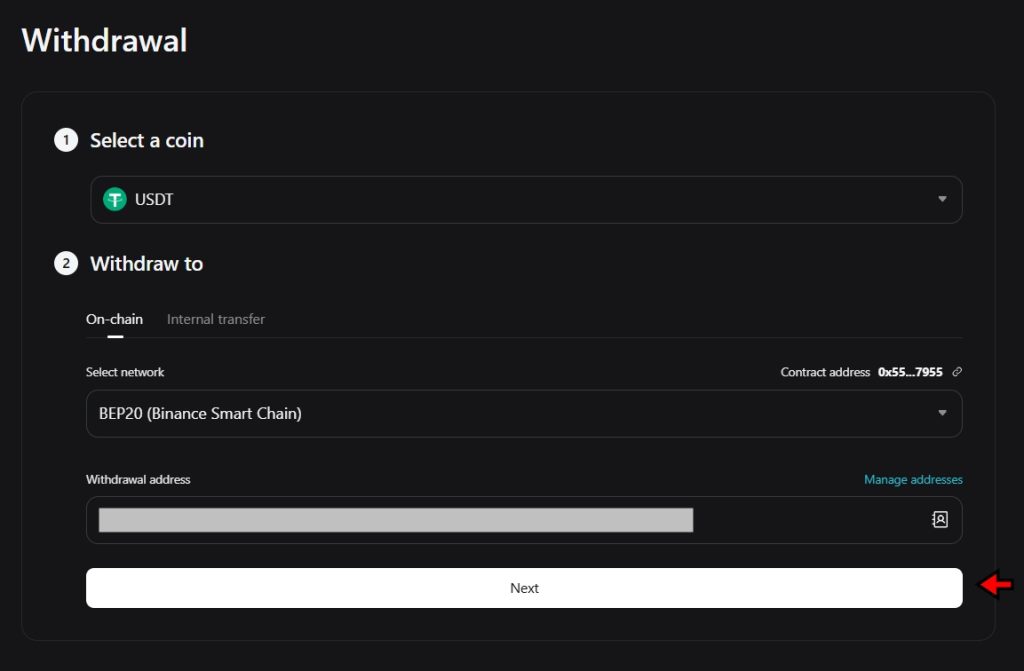
- Enter the Withdrawal Amount and Confirm: Click “Next” and you’ll be prompted to enter how much you want to withdraw. Bitget will show any minimum limits and the network fee involved. Once you’ve entered the amount and reviewed the fees, click “Withdraw” to proceed.
At this point, Bitget might ask for security verification, like a code sent to your email or authenticator app. Complete that step to finalize the withdrawal. The transaction will then be processed, and you’ll receive confirmation when it’s complete.
Withdrawing Fiat from Bitget
Fiat withdrawals are only supported in certain regions, so you’ll need to first confirm whether your country and currency qualify. If available, this feature lets you move your funds from Bitget directly into your bank account.
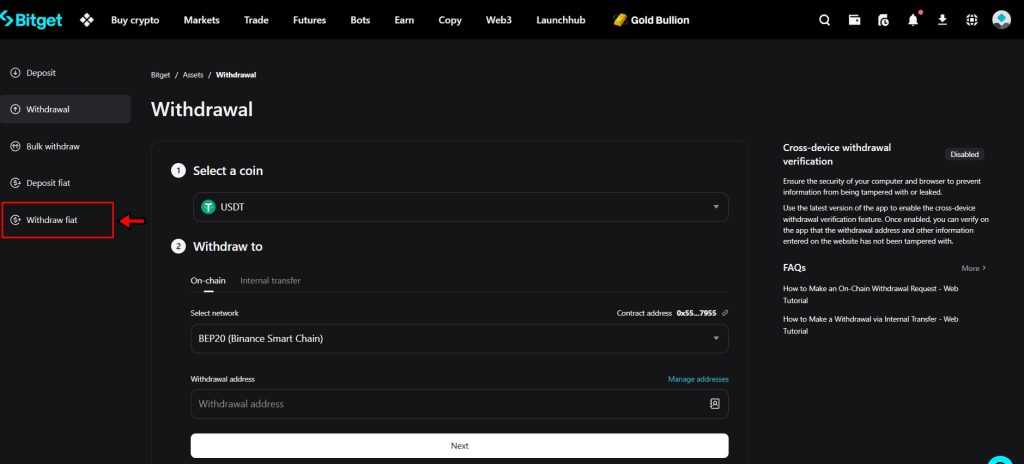
- Open the Fiat Withdrawal Tab: From the same “Withdraw” page, look to the left-hand menu. Click on the “Withdraw Fiat” tab at the bottom. This opens the fiat withdrawal interface.
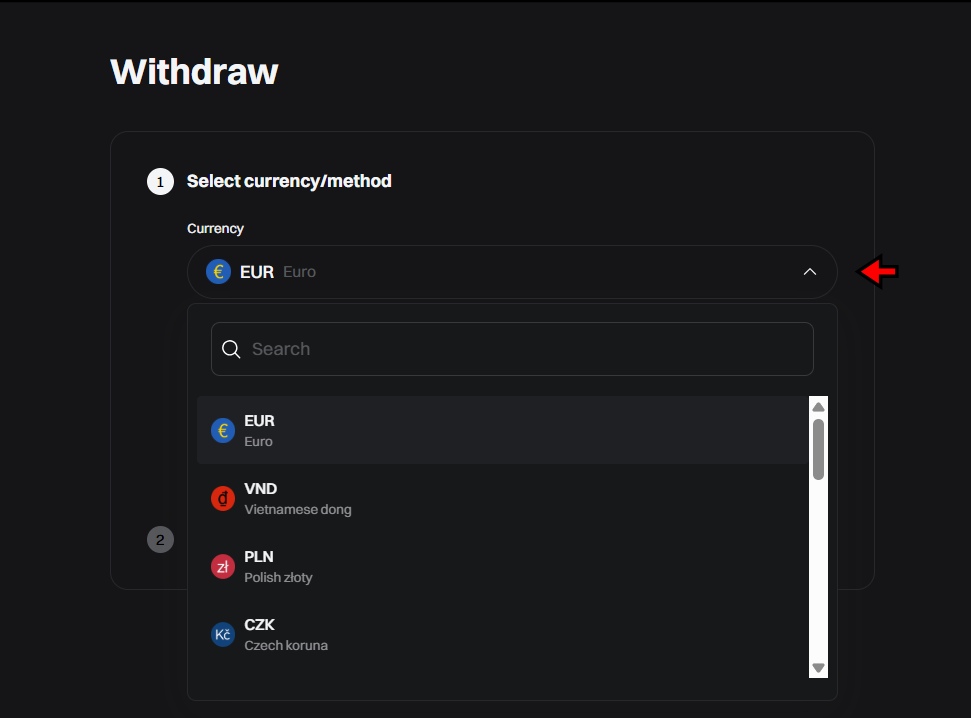
- Select the Currency: On the next screen, you’ll see a dropdown with supported fiat currencies. Choose the one that applies to you, such as EUR or BRL. Keep in mind that each currency may support different withdrawal methods depending on your region.
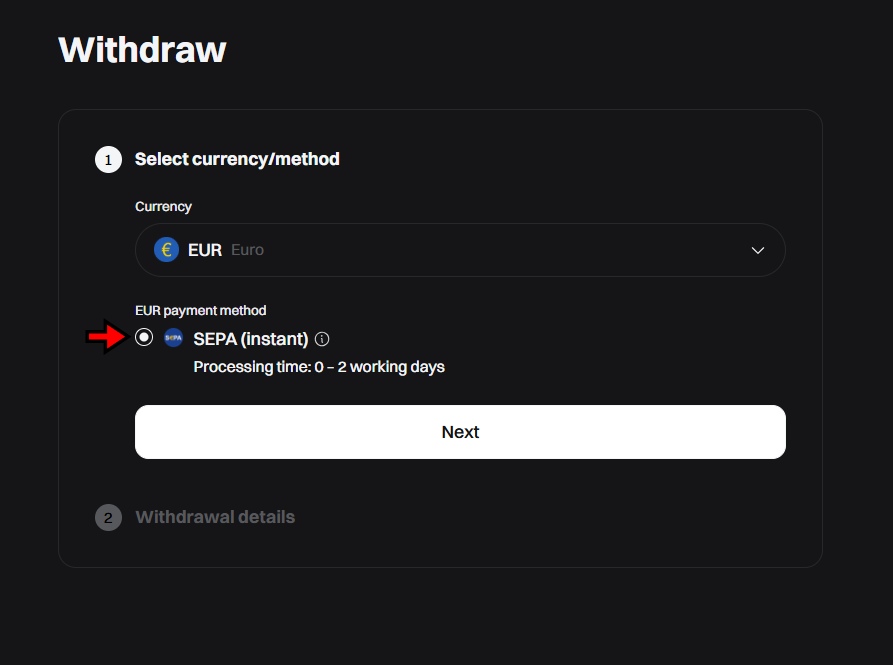
- Review or Add Payment Method: After selecting your currency, you’ll be prompted to confirm your payment method. If you're withdrawing EUR, for example, Bitget supports SEPA transfers. If you haven’t already linked your bank account, you’ll need to add one first. Once your account is added, review all the details, including withdrawal limits and fees, and then click “Confirm” to submit the withdrawal request. Funds will be sent to your selected bank account once the process is complete.
Bitget Fees
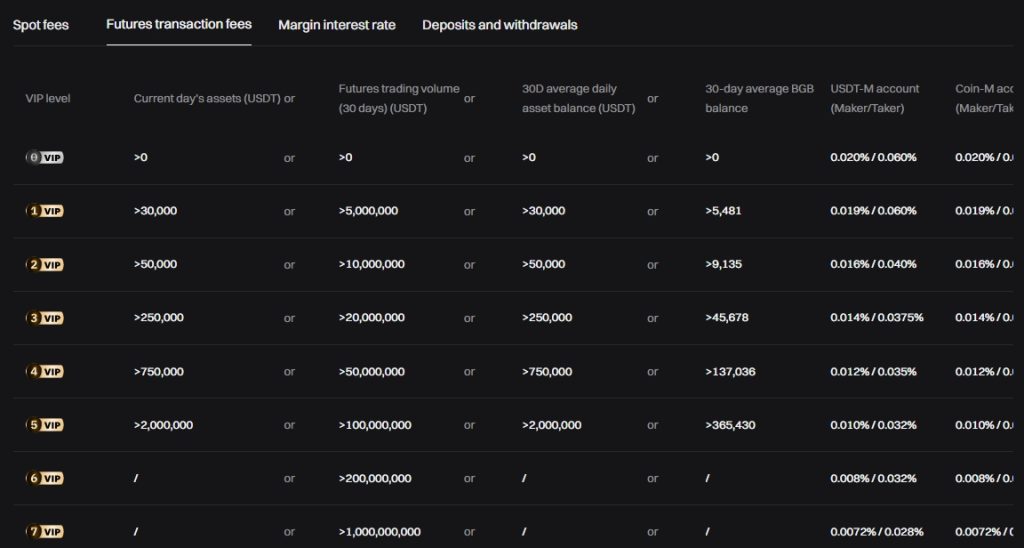
Bitget follows a maker-taker model for its trading fees, which is common among crypto exchanges. For spot and futures trading, the base rate is 0.1% for both makers (those who add liquidity) and takers (those who take liquidity). But these numbers aren’t fixed. The platform uses a tiered VIP system that adjusts fees based on trading volume and BGB token holdings. As users climb the VIP ladder, their fees drop. For example, someone at VIP Level 3 will pay just 0.050% as a maker and 0.060% as a taker, almost half the standard rate.
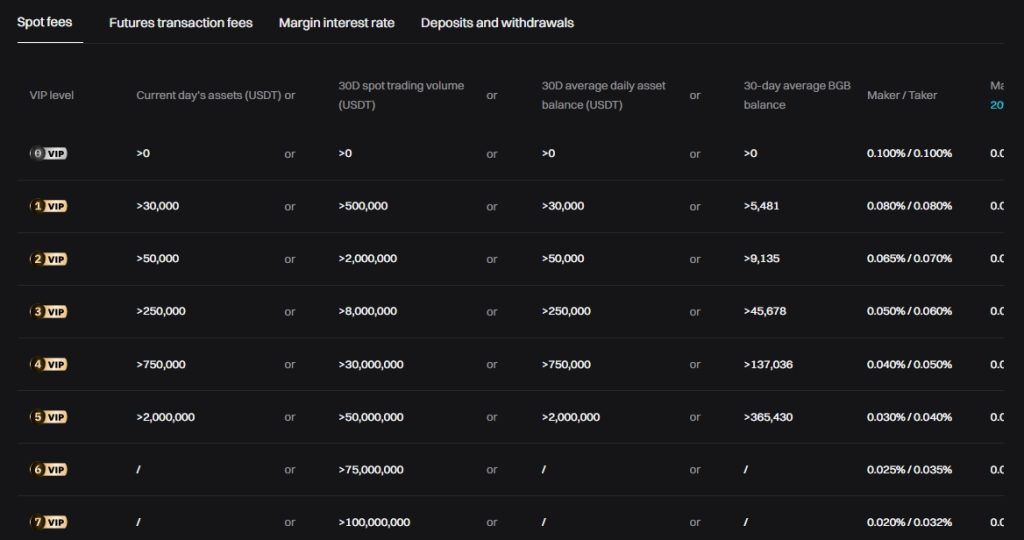
Bitget also offers a 20% discount on trading fees if users choose to pay with BGB, the exchange’s native token. This applies across both spot and futures markets, making BGB useful beyond just holding it.
Deposits on Bitget are free. Withdrawals, however, come with a fee that varies depending on the cryptocurrency and the selected blockchain network. These withdrawal fees aren’t static as they adjust based on network congestion and current market conditions. To get the most accurate fee for a specific token or network, users need to check the platform’s withdrawal fee table.
Is Bitget Secure?
Bitget covers most of the essential security bases, especially when it comes to compliance. It operates under regulatory oversight in several countries, including the UK, Italy, Poland, Lithuania, and Bulgaria. KYC is mandatory, and the platform enforces both AMLandCFT measures. That means no anonymous trading and fewer chances for shady activity to slip through.
Cold storage is part of Bitget’s security model. It says most user funds are stored in wallets disconnected from the internet. That’s a key defense against hacks. But Bitget doesn’t reveal the exact percentage of funds held offline, which leaves room for questions. A little more detail on that front would give users better peace of mind.
From a technical standpoint, the exchange gets strong marks. It holds twelve A+ scores from SSL Labs and works with cybersecurity firms like Qingsong Cloud Security, Armors, HEAP, and Suntwin Technology. On Certified’s security ranking, Bitget lands in fourth place. That puts it among the more trusted platforms in terms of digital security standards.
Its proof-of-reserves reporting came a bit late, but it eventually delivered. Current figures show a 213% reserve ratio. That suggests the platform holds more than double the assets needed to cover all user balances. On top of that, there’s a $300 million protection fund, meant to act as a financial safety net in case of system failures or unexpected losses.
So, is Bitget secure? The platform has a clean history, solid partnerships, strong technical ratings, and a large reserve fund. But the lack of full transparency on cold storage specifics might leave some cautious users wanting more.
Final Takeaway
If you’ve followed this tutorial from start to finish, you should have no trouble getting around Bitget. The exchange keeps things streamlined, from signing up and securing your account, to making your first deposit and placing trades. Spot, futures, P2P, Convert, or automated bots; each feature is built with usability in mind.
Once you understand how to navigate the Wallet tab, the Trade dropdown, and the basics of order placement, the rest flows naturally. Bitget doesn’t bury key functions behind unnecessary clicks, and tools like demo trading let you get comfortable before risking real funds.
Security-wise, the platform checks out on major points, and its tiered fees, plus BGB discounts, keep trading costs in check. Just remember to verify networks before withdrawing and stay aware of the small details when switching between fiat and crypto.
Overall, Bitget offers a well-rounded trading experience without getting in its own way. Once you’ve used it a few times, the steps become second nature.
Start trading on Bitget and claim your welcome bonus of up to 6,200 USDT. Sign up now and explore one of the leading crypto trading platforms.
Frequently Asked Questions – FAQs
Bitget is a cryptocurrency exchange offering spot and futures trading, as well as advanced features like P2P trading, automated trading bots, and options contracts.
To create an account on Bitget, visit the platform’s homepage, click on the "Sign Up" button, enter your details, and complete email verification.
Yes, Bitget is secure, using KYC verification, AML and CFT policies, cold storage for most funds, and partnerships with cybersecurity firms.
You can deposit funds by selecting "Deposit" from the Wallet dropdown, choosing your cryptocurrency, selecting the network, and copying the wallet address to make a transfer.
Bitget Convert is a quick, fee-free feature that lets you swap cryptocurrencies instantly without dealing with the spot trading interface.
P2P trading on Bitget allows users to trade crypto directly with each other by posting offers with specific terms. You select an offer, make the payment, and confirm the receipt of crypto.
Yes, Bitget offers various automated trading bots like grid bots and Martingale bots. You can set them up by selecting a trading pair, configuring settings, and letting them execute trades automatically.
To demo trade, select "Classic Demo Trading" from the "Trade" dropdown. You’ll receive virtual funds to simulate trades without risking real assets.
Go to the "Withdraw" page, select the crypto and network, paste the receiving address, enter the amount, and confirm the withdrawal.
Yes, fiat withdrawals are available in certain countries. You’ll need to select the fiat currency, confirm your payment method, and provide your bank details.
Bitget uses a maker-taker fee structure, with fees starting at 0.1%. Users can reduce fees based on VIP levels or by using BGB tokens.
To use spot trading, navigate to the "Spot" tab, select your trading pair, enter the amount, and place a market or limit order.
Yes, Bitget provides simple options like Bitget Convert and demo trading, making it easy for beginners to get started without deep knowledge.
Bitget supports a wide range of popular cryptocurrencies, but it’s important to check for specific tokens and their network compatibility.
Bitget uses KYC verification, cold wallet storage for most funds, strong SSL protection, and a $300 million protection fund to secure user assets.
Disclaimer: All content on The Moon Show is for informational and educational purposes only. The opinions expressed do not constitute financial advice or recommendations to buy, sell, or trade cryptocurrencies. Trading involves significant risk and may result in substantial losses. Always seek independent financial advice before making investment decisions. The Moon Show is not responsible for any financial losses or decisions made based on the information provided.
Please view the full disclaimer at: https://themoonshow.com/disclaimer

The Ultimate WEEX Exchange Tutorial: Step-by-Step Guide for Beginners
WEEX is not among the largest cryptocurrency exchanges. It does not match the trading volume of...

The Ultimate Bybit Exchange Tutorial - A Step-by-Step Guide for Beginners
Cryptocurrency trading continues to evolve with time. Today, crypto users can access several ex...

MEXC Exchange Tutorial: Step-by-Step Guide for Beginners
MEXC is a well-established cryptocurrency exchange that supports a wide range of trading featur...