The Ultimate KuCoin Exchange Tutorial: Step-by-Step Guide for Beginners
KuCoin Exchange, launched in August 2017, quickly became a go-to platform for crypto traders. Its rise can be credited to its smooth user experience, broad range of cryptocurrencies, and interface that doesn’t require a steep learning curve. The platform caters to everyone, from beginners making their first trade to experienced traders exploring advanced tools. Unsurprisingly, it remains one of the most popular exchanges to date.
In this tutorial, we’ll walk you through every step of using KuCoin, from setting up your account to executing both spot and futures trades. We’ll cover how to deposit funds, manage open positions, and apply leverage effectively and safely. Every step will be accompanied by clear screenshots, ensuring you can easily follow along. Whether transitioning from a different exchange or taking your first step into crypto trading, this guide will help you feel at home on KuCoin. Let’s get started.
What Is KuCoin?
KuCoin launched in 2017 and has steadily grown into one of the busiest crypto exchanges. It didn’t have a smooth journey, though, as the company started in China, moved to Singapore, and then later relocated to Seychelles. These weren’t planned moves to expand the brand, but necessary shifts made under pressure from tightening regulations, especially in the West. Still, despite those hurdles, KuCoin stayed active and gained momentum while other platforms slowed down.
One of the main reasons traders stick with KuCoin is its vast selection of coins. The exchange supports over 900 cryptocurrencies, and that number keeps growing. You’ll find all the usual names like Bitcoin and Ethereum, but KuCoin is also quick to list newer, less-known tokens. A lot of traders come here specifically to get in early on coins before they’re available on bigger platforms.
Beyond spot trading, the exchange offers leverage trading, trading bots, and other tools built for daily use. And it’s stable. Even during heavy market action, the platform rarely goes down, which says a lot given how much activity it handles every day.
You can use KuCoin through its website or mobile app. The app works on both Android and iOS, and it doesn’t feel cluttered or complicated. Everything’s easy to find. You don’t have to spend time figuring out where things are or what button does what, it just works. That simplicity, paired with the wide range of features, makes it a solid choice whether you’re trading casually or more frequently.
Of course, it’s not perfect. KuCoin still runs into regulatory barriers, and it hasn’t reached the global scale of Binance. That gap shows, especially when it comes to regional support. But it’s still home to over 40 million users. It’s active, reliable, and has managed to keep its footing while many others faded out.
How to Create Your KuCoin Account?
Getting started on KuCoin doesn’t take long. The platform gives you a few different sign-up options, including email, phone number, or third-party accounts like Google or Apple. The process is simple, and if you follow each step carefully, you can start trading crypto in minutes.
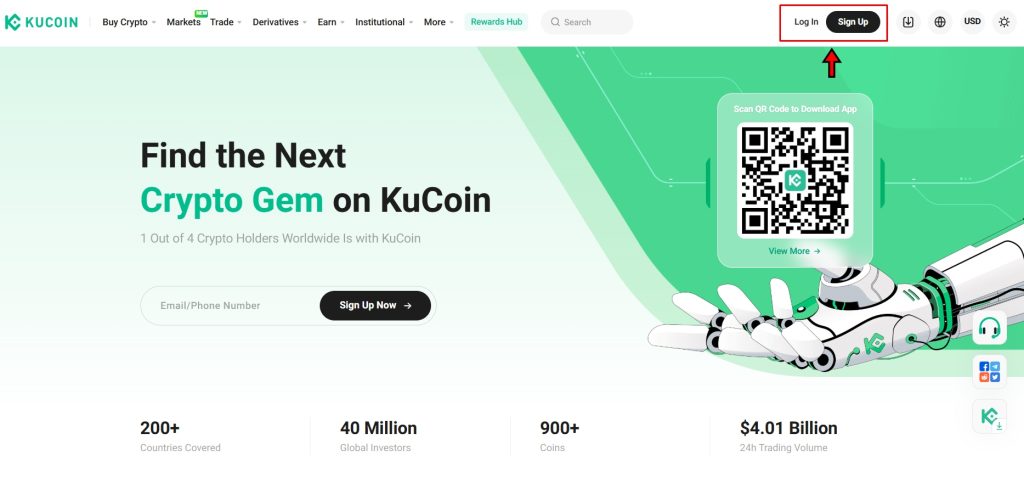
1. Visit the Website
Open your browser and head to kucoin.com. If you’re on a desktop, click on the “Sign Up” button located in the top right corner. You might also see the email or phone registration prompt on the homepage as soon as you open it. Either works, as both take you to the same sign-up form.
2. Choose a Registration Method
Once you’re on the registration page, pick how you want to sign up. KuCoin lets you register with an email address or a mobile number. If you prefer using a third-party login, you’ll also see options for Google and Apple ID.
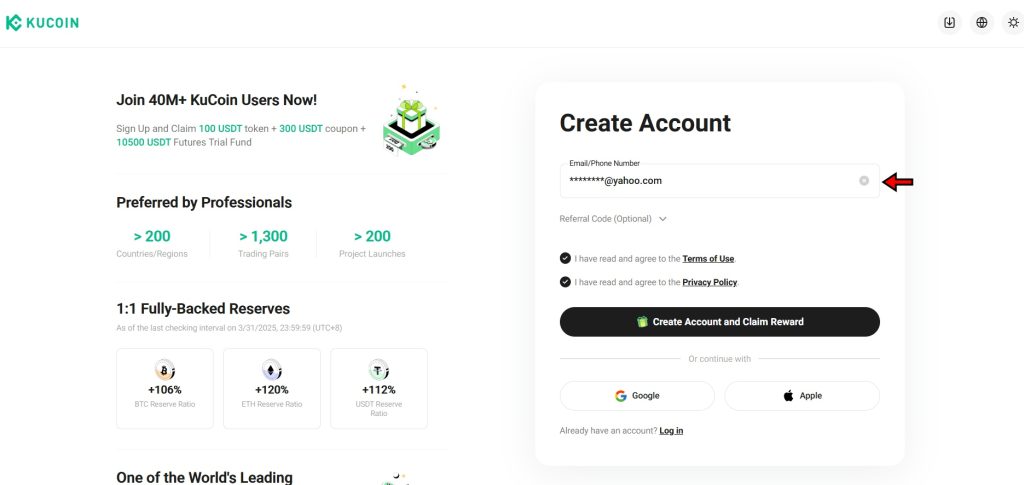
Before you continue, scroll down slightly and look for the checkbox asking you to agree to KuCoin’s Terms of Use and Privacy Policy. Tick that box as you can’t proceed without it.
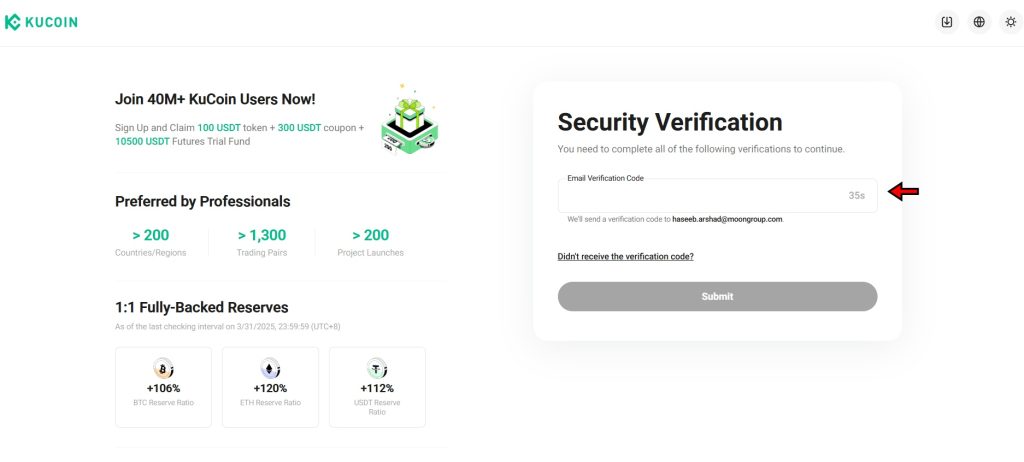
3. Verify Your Email or Phone Number
After entering your details, KuCoin will send a six-digit code to the email or phone number you provided. Check your email inbox or SMS for the code. Copy it and paste it into the verification field. If you didn’t get the message within a minute or two, use the resend option.
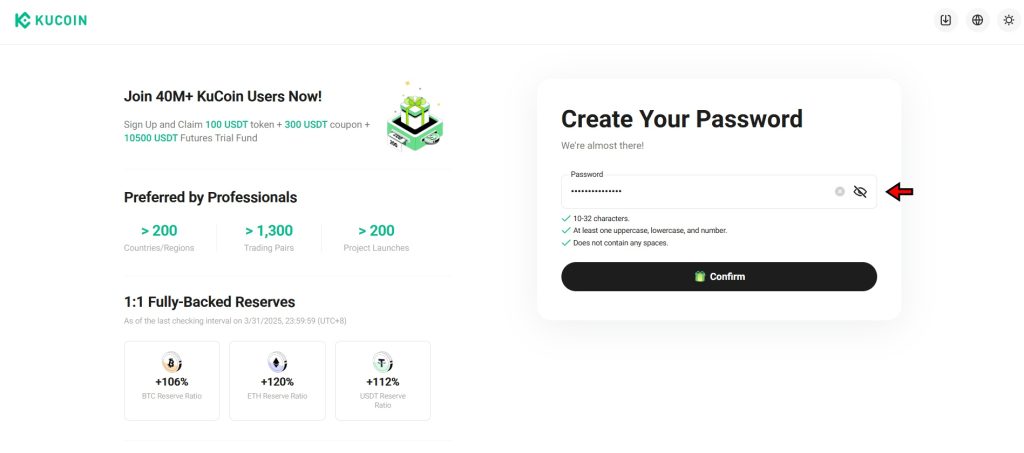
4. Set a Strong Password
Now you’ll create your password. Don’t take shortcuts here. Use a mix of uppercase and lowercase letters, numbers, and symbols. Avoid using anything too obvious or easy to guess. This will be your first line of defence, so make it solid.
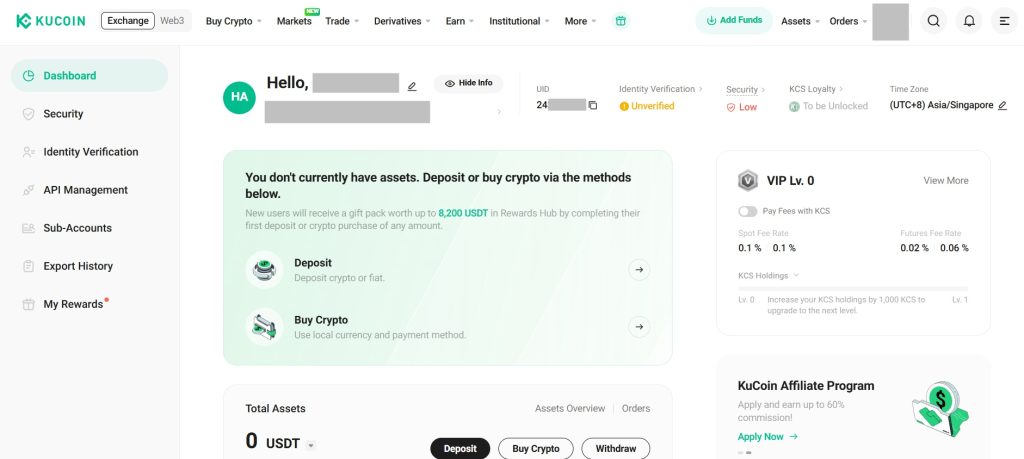
5. Access Your Account
Once your password is confirmed and verification is complete, your account is ready. You’ll be logged in automatically. From here, you can explore the dashboard, check out market prices, or start the identity verification process if you plan to trade with higher limits or access all features.
How to Complete KYC on KuCoin?
You don’t necessarily need KYC to use KuCoin, but you’ll hit a wall eventually if you skip it. Unverified accounts can trade, deposit, and withdraw crypto, but they come with strict limits. Verified users get access to much higher withdrawal caps, plus extra security in case something goes wrong. The process doesn’t take long, and once it’s done, you can enjoy all the features the platform has to offer.
It’s also worth noting that U.S. users can’t currently complete KuCoin’s KYC process. If you're based in the U.S., you can still use the platform with limited access, but complete verification won't be possible.
For those who are not in the United States, here’s how to complete identity verification on KuCoin step by step:
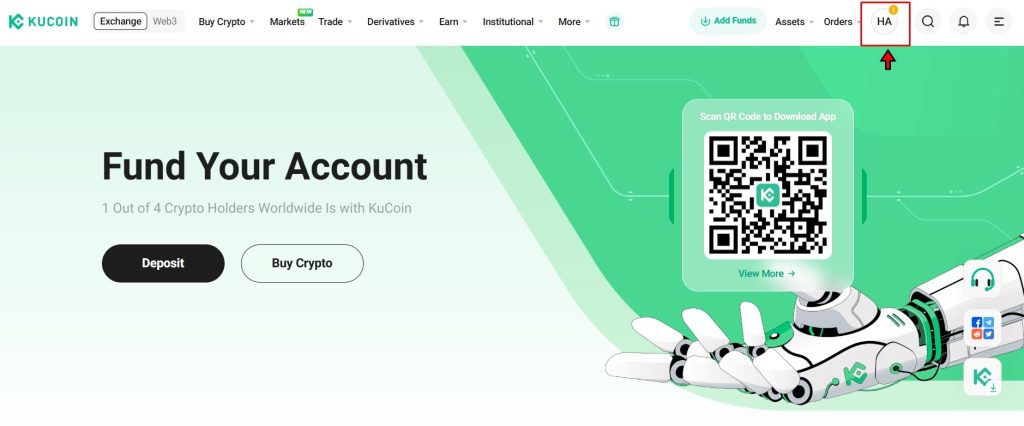
1. Open the Identification Page
Log in to your KuCoin account and head to the top-right corner of the homepage. Hover your cursor over the circular user icon that displays your initials. A dropdown menu will appear. Click on the “Identity Verification” option, and it will take you to the page where you can begin the KYC process.
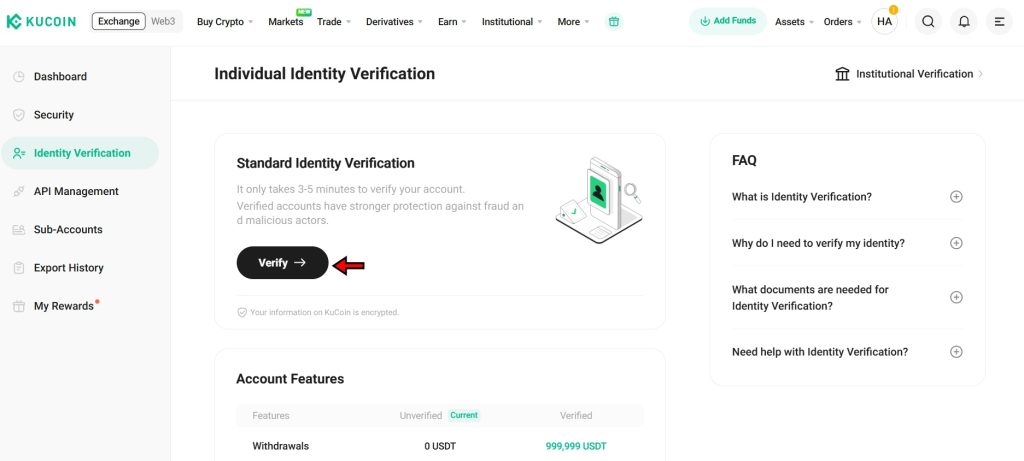
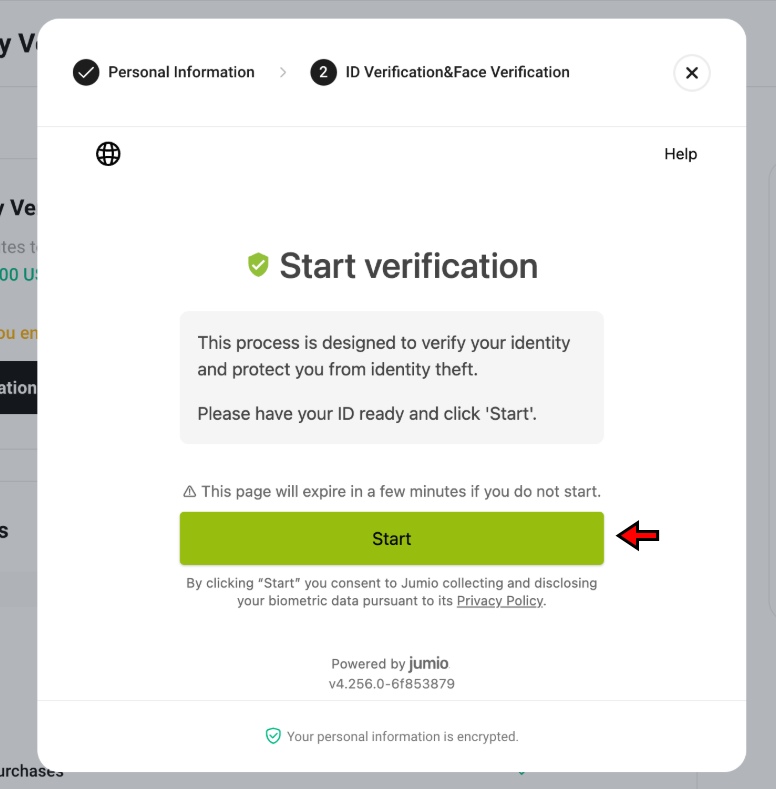
2. Click "Verify" to Start the Process
On the Identity Verification screen, you’ll see a “Verify” button in the page's centre. Click it and kick off the process. KuCoin will now guide you through a few steps requiring you to provide personal info, ID upload, and facial recognition. Make sure the details you enter match your ID exactly. Any mismatch can delay or even block your verification.
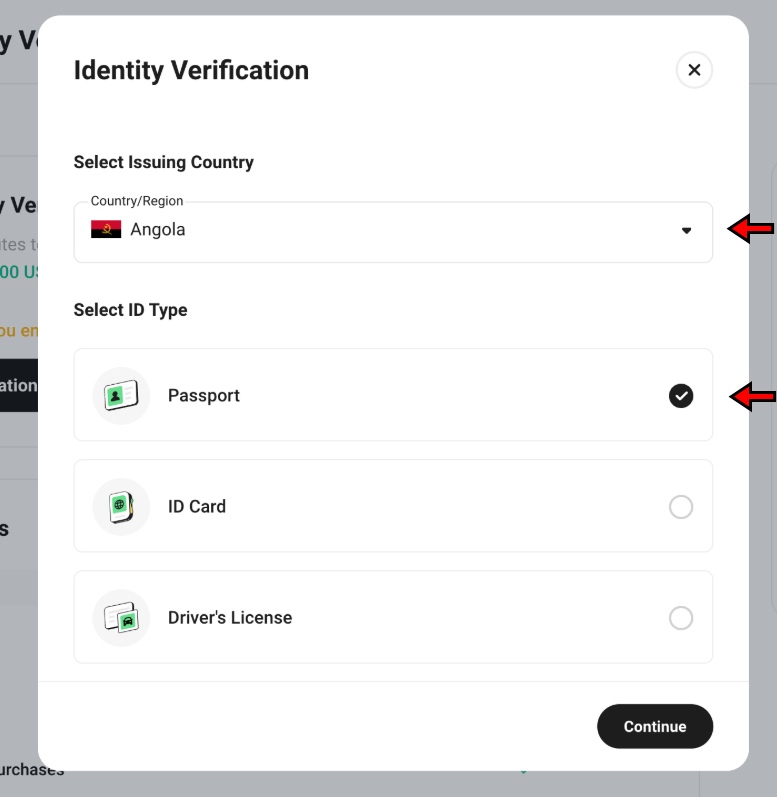
3. Provide Personal Information
A form will pop up after you click the “Verify” button. First, choose your country or region. Then select the type of ID you’ll be using, i.e., passport, driver’s license, or national ID, depending on what’s available for your region. Fill in your full name, birthdate, and the ID number exactly as shown on your document. Double-check everything before clicking “Continue.”
4. Upload Your ID Photos
Next up, KuCoin will ask for photos of your ID. Enable camera access if you’re using a phone or a device with a webcam, then click “Start” to capture the image directly. If you’ve already taken clear photos or scans of your ID, you can upload those instead. Either way, make sure the image is sharp, the text is legible, and every corner of the document is visible.
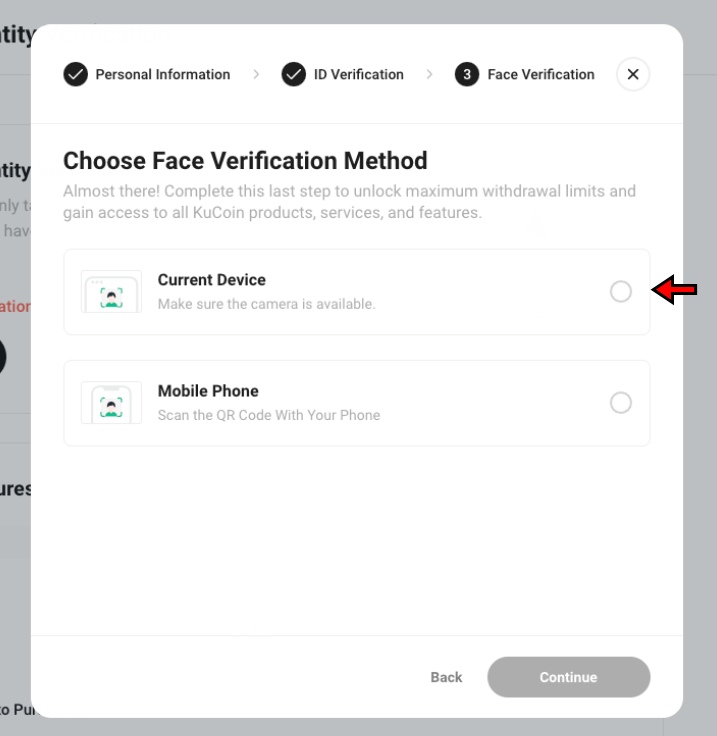
5. Complete Facial Verification and Submit for Review
Once the ID is uploaded, move to the final step of facial recognition. KuCoin will ask you to use your device camera to verify your identity in real time. Click “Continue,” follow the prompts, and complete the scan. The system will then automatically submit your info for review.
Verification usually takes anywhere from a few minutes to a few hours. Once approved, your verification status will be updated on the same page. From there, you’re officially verified and can enjoy higher limits and full platform access.
How to Deposit on KuCoin?
Before you start trading on KuCoin, you will need to fund your account. KuCoin supports two primary methods for funding:
- Depositing cryptocurrency
- Using fiat to purchase crypto
Each method has its own steps and requirements. Which one you choose depends entirely on your preference and the options available in your region.
Depositing Crypto on KuCoin
KuCoin allows users to deposit cryptocurrencies directly into their wallets. The process involves selecting the right asset, choosing the correct blockchain network, and sending funds from an external wallet. Here is how you can complete this process step-by-step.
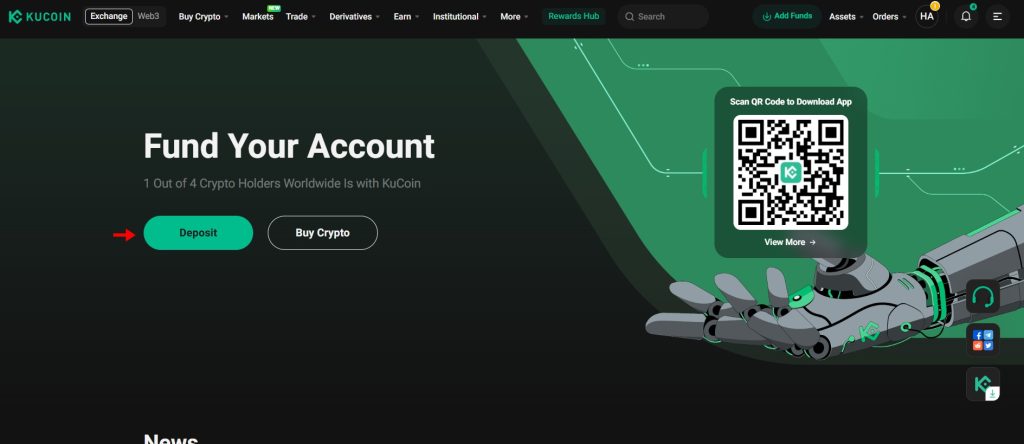
- Navigate to the Crypto Deposit Page: From the KuCoin homepage, click the “Deposit” button in the middle of the screen. Alternatively, use the “Assets” dropdown menu at the top right and select “Deposit.” This takes you to the crypto deposit section.
- Select the Cryptocurrency: On the deposit page, choose the cryptocurrency you want to deposit. KuCoin supports a wide range of assets, including Bitcoin (BTC), Ethereum (ETH), and stablecoins like USDT.
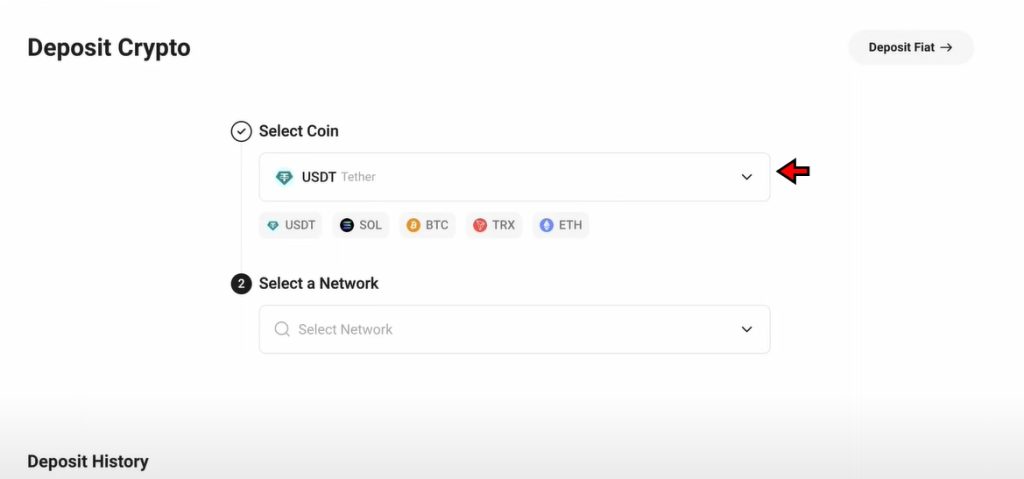
- Choose the Network: After selecting the asset, choose the blockchain network. This is a critical step. The network selected on KuCoin must match the network used by the sending wallet. For example, when sending USDT, make sure both the sending wallet and KuCoin use TRC20 or ERC20, depending on your choice. The network should be same on both wallets or you will lose your funds.
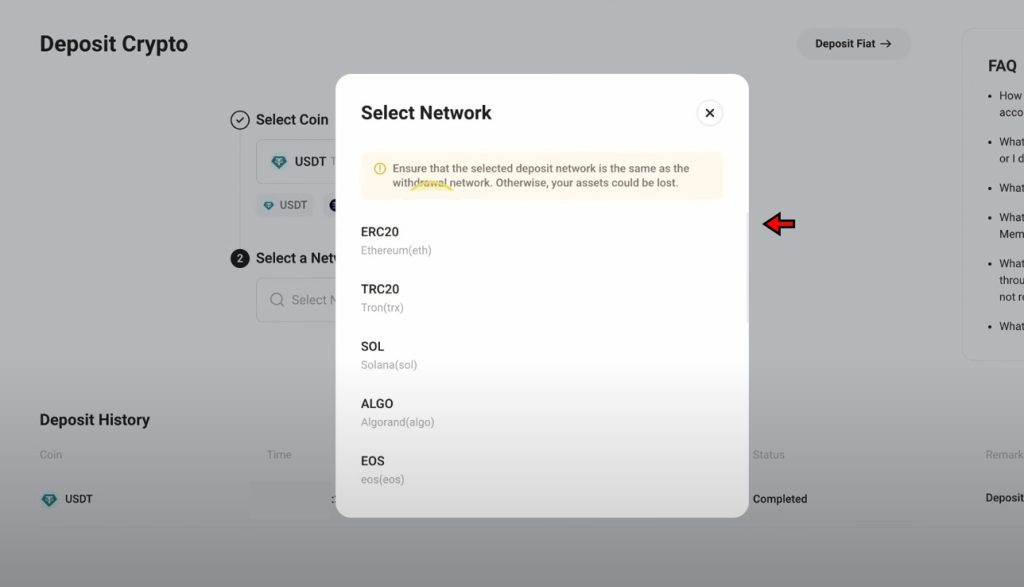
- Copy the Wallet Address: Once the network is selected, KuCoin generates a deposit address. Copy this address and paste it into your external wallet’s recipient field. If you are using a mobile wallet, you can also scan the QR code provided at the bottom of the address.
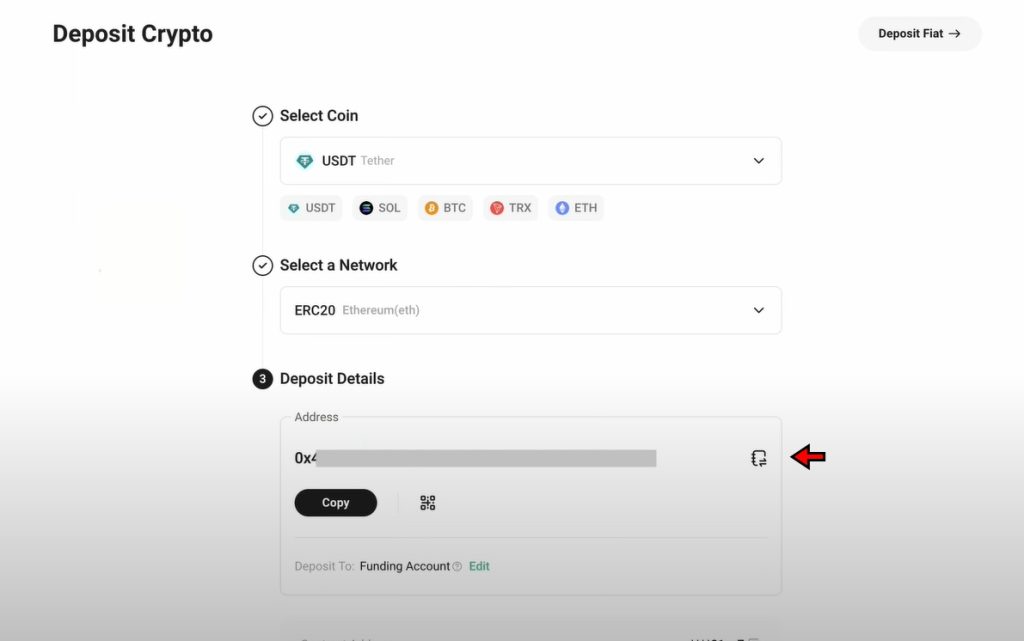
- Confirm and Send: Double-check the wallet address and selected network. After confirming, initiate the transfer from your external wallet. Once the network processes the transaction, KuCoin credits the funds to your spot wallet. From there, you can move funds to other wallets like the Futures wallet if you plan to trade derivatives.
Depos
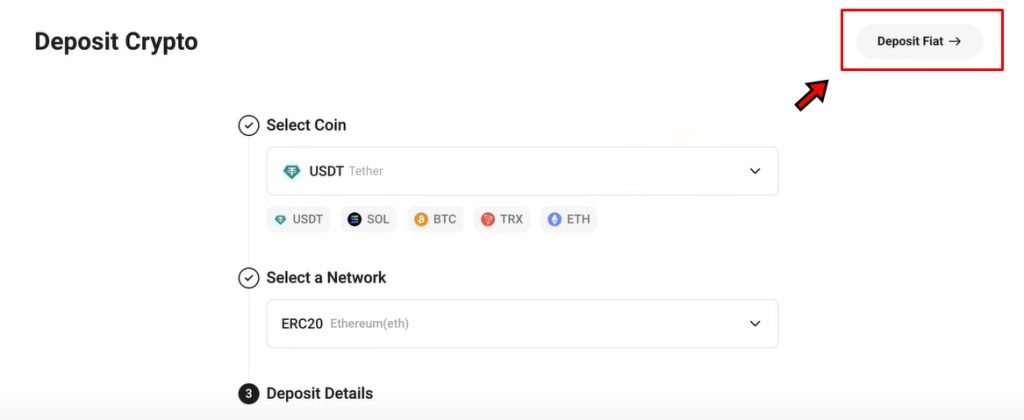
Depositing Fiat on KuCoin
Fiat deposits allow users to move traditional currency into their KuCoin account and purchase crypto. It is essential to remind our readers that this method is available in specific regions and requires full KYC verification.
- Go to the Fiat Deposit Page: Start by going to the crypto deposit page as shown in the previous section. Then click on the “Deposit Fiat” tab located at the top of the section. This opens the fiat deposit interface.
- Select Fiat Currency: Choose the fiat currency you plan to deposit. For example, select “EUR” from the list of supported currencies.
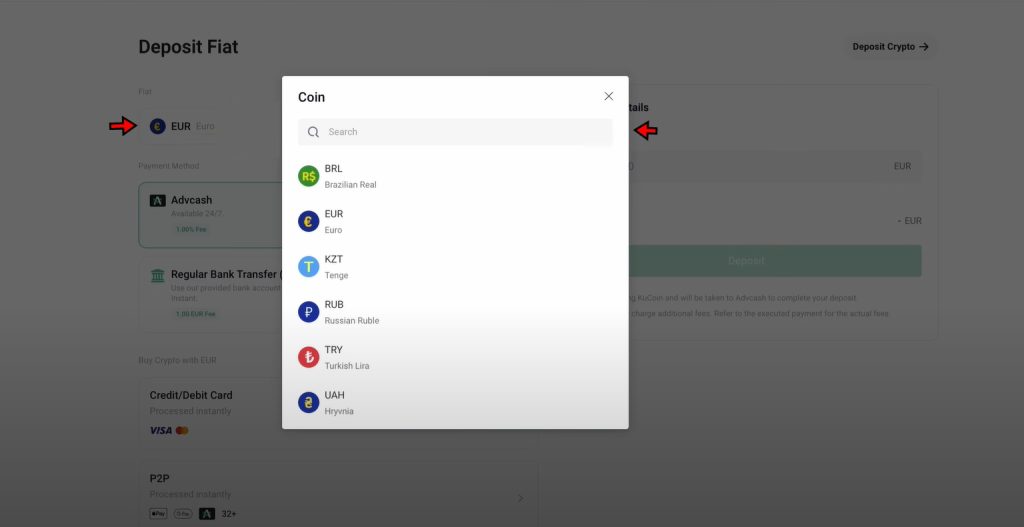
- Choose Payment Method: KuCoin displays available payment methods once the currency is selected. For EUR deposits, options typically include SEPA bank transfer and Advcash.

- Verify Account Details: After selecting the payment method, check that your account details are accurate. If using SEPA, make sure the linked bank account is correctly configured. If not, go to account settings and add a valid bank account before proceeding.
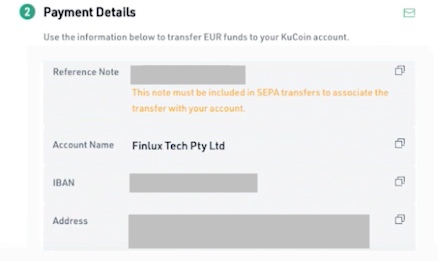
- Enter Transaction Amount and Confirm: Enter the amount you want to deposit. Review all information for accuracy. Confirm the transaction to begin the transfer. Funds will be credited once the payment is processed.
Buying Crypto with Credit or Debit Card
An alternative method is to buy crypto directly using a credit or debit card. This method is fast and convenient for users who want to avoid bank transfers.
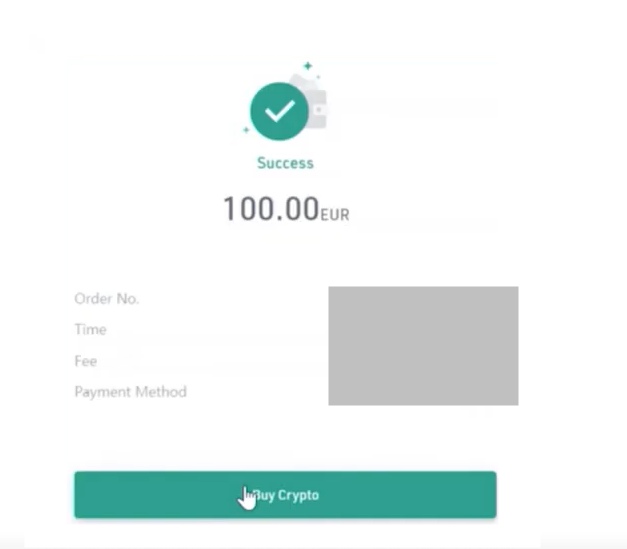
- Open the Buy Crypto Page: From the homepage, click the “Buy Crypto” option located at the center of the screen. You can also access it from the “Assets” dropdown.
- Select Currency and Crypto: On the Buy Crypto page, first choose the fiat currency you plan to spend, such as EUR. Then select the cryptocurrency you want to purchase, such as USDT. Enter the amount, and KuCoin will show how much crypto you will receive.
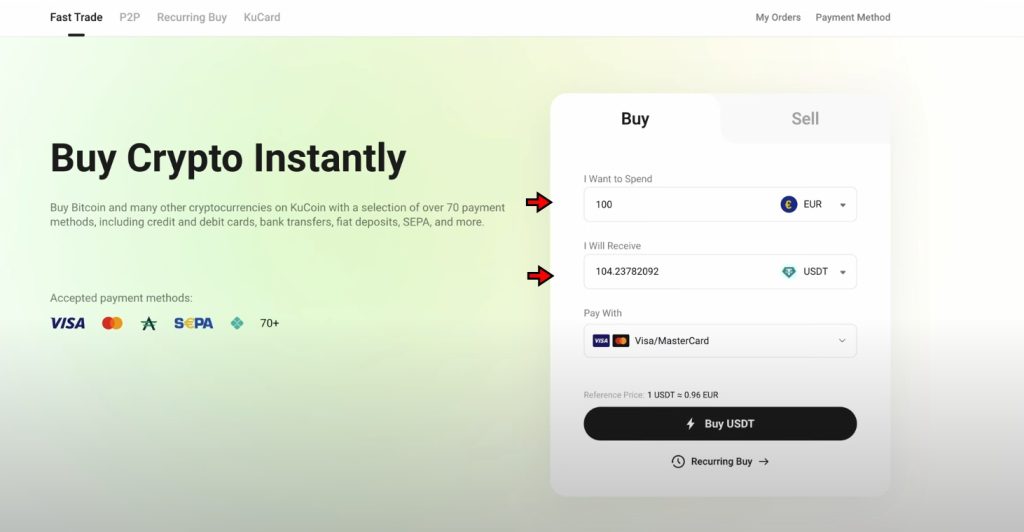
- Add Payment Card: After entering the values, click on the “Pay with” dropdown and select the “Add Card” option.
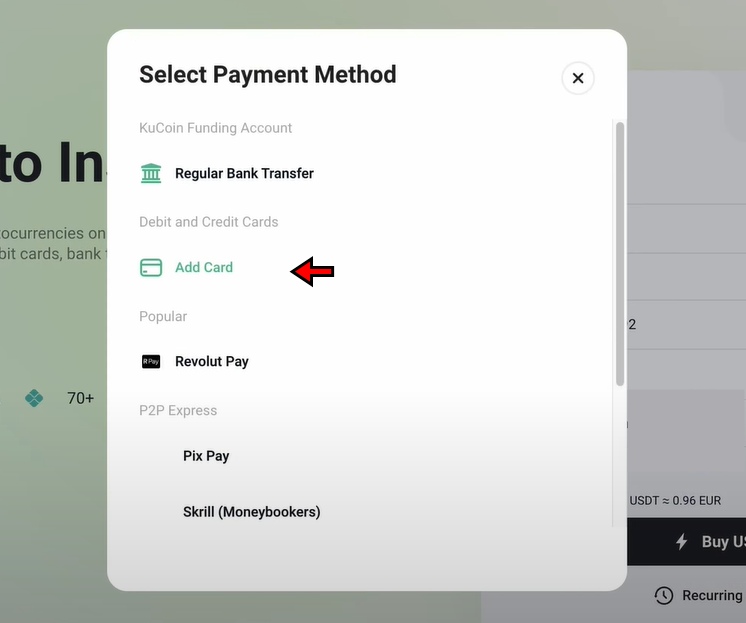
- Provide Card Details: A pop-up window will appear. Enter your card information here as prompted and confirm the details.
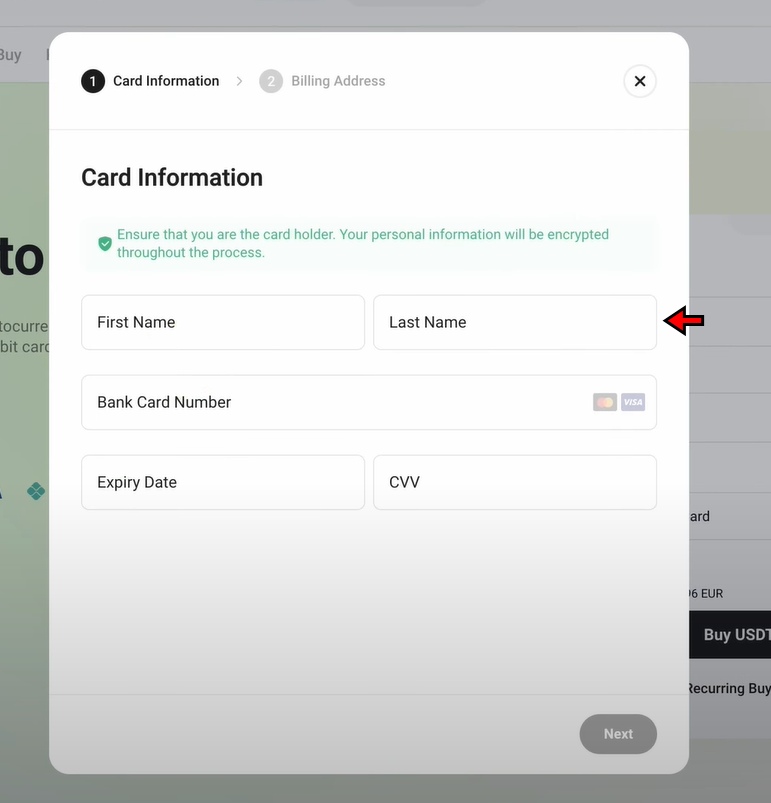
- Confirm Purchase: After verifying all values, click the “Buy” button to complete the transaction. The purchased crypto will appear in your KuCoin wallet once the payment is processed.
Understanding Order Types on KuCoin
Trading on KuCoin involves more than just hitting the “Buy” or “Sell” button. Each order type offers a different level of control, speed, and precision. Knowing how these orders work helps traders manage risk and implement better strategies.
Here’s a breakdown of the order types you’ll find on KuCoin, along with simple examples to show how each one works in practice.
Limit Order
A limit order lets you decide the exact price at which you want to buy or sell a cryptocurrency. The order sits in the order book and only executes if the market reaches your specified price or better. It gives you control over the price but doesn’t guarantee that the order will be filled.
Example: If Bitcoin is currently trading at $100,000 and you want to buy it only if the price drops to $95,000, you can place a limit buy order at $95,000. The trade won’t execute until the price falls to that level.
Market Order
A market order executes instantly at the best price currently available. It prioritizes speed over price accuracy. Traders use it when entering or exiting a position; getting a precise price quickly matters more than it does when entering or exiting a position.
Example: If Ethereum is trading at around $2,000 and you place a market buy order, KuCoin will fill your order at the best available price. This could be $2,001 or $2,002 depending on the depth of the order book.
Stop-Limit Order
A stop-limit order uses a trigger price to place a limit order once that price is reached. It gives traders more control over execution compared to a basic stop order.
Example: Suppose Bitcoin is trading at $100,000. You want to sell if the price drops to $97,000, but only if you can get at least $96,800. You set a stop at $97,000 and a limit at $96,800. If the price hits $97,000, KuCoin places a sell limit order at $96,800.
Stop-Market Order
This order type also relies on a trigger price, but it places a market order instead of a limit order once the stop is reached. This allows for faster execution, though the final price might vary depending on market conditions.
Example: If Ethereum is trading at $2,000 and you want to protect against a sudden drop, you can set a stop market sell order with a trigger at $1,950. Once the price hits $1,950, the platform places a market sell order to exit your position.
OCO Order (One Cancels the Other)
An OCO order combines a limit order with a stop-limit order. Only one of them can be executed. When one is triggered, the other is automatically canceled. This is useful for planning both a profit target and a stop-loss.
Example: Let’s say Bitcoin is at $100,000. You place an OCO order with a limit sell at $105,000 and a stop-limit sell with a stop at $97,000 and a limit at $96,800. If the price hits $105,000, the system sells at your target and cancels the stop-limit. If it drops to $97,000, the stop-limit takes over to reduce your losses.
Trailing Stop Order
A trailing stop order adjusts automatically as the market moves in your favor. You set a trailing amount or percentage away from the current market price. If the price moves in the right direction, the stop price adjusts with it. When the price reverses, the stop triggers a market order.
Example: You buy Ethereum at $2,000 and set a trailing stop of $100. If ETH rises to $2,100, your stop moves up to $2,000. If ETH continues climbing, the stop keeps following. But if the price falls back to $2,000, the order triggers and sells to lock in your gains.
KuCoin Spot Trading Tutorial
Spot trading refers to the immediate exchange of cryptocurrencies between buyers and sellers. Once a trade is executed, the asset transfers instantly to the trader’s account. This form of trading focuses on trading pairs, such as BTC/USDT, where users exchange one crypto asset for another.
KuCoin supports over 950 trading pairs, allowing traders to switch between various assets based on strategy or market conditions. Here’s how to begin spot trading step by step on KuCoin.
1. Access the Spot Trading Interface
Start by visiting KuCoin’s official homepage. If you’re not logged in, sign in using your account credentials.
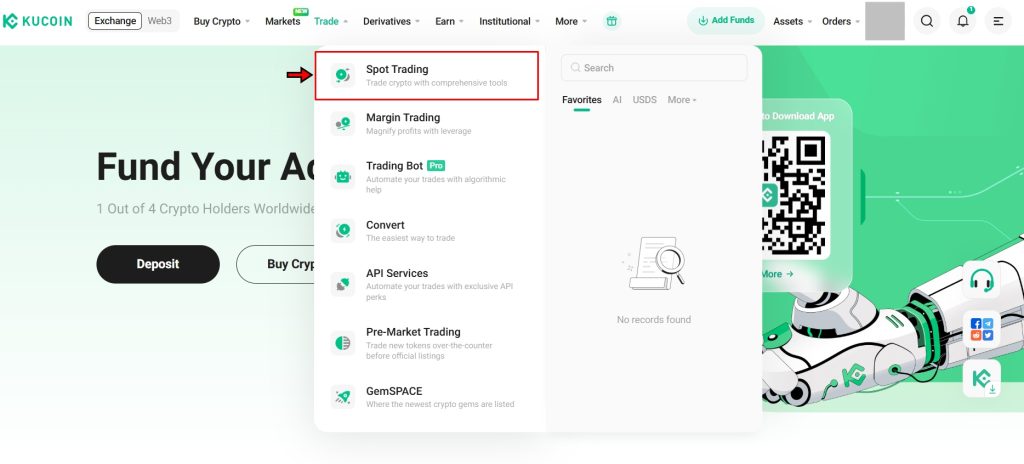
Once logged in, hover over the “Trade” tab located in the top navigation bar. A dropdown menu appears. Click on “Spot Trading” to open the trading interface. This is where you’ll carry out your crypto trades.
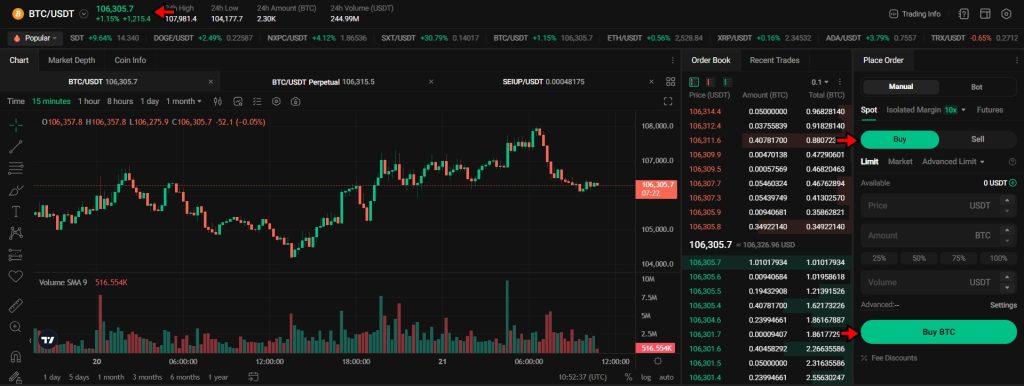
2. Get Familiar with the Trading Interface
Understanding the layout of the interface is essential before placing a trade. Each section provides specific information and tools. Let’s break down the interface section by section:
- Trading Pair Selection: Found in the top-left corner, this dropdown menu lets you search for and select a trading pair. Click on the current pair to open the list. For example, you can choose BTC/USDT or ETH/USDT.
- Price Chart: Located below the trading pair selection, the chart shows the live price movements of the selected asset. Traders can view different timeframes, apply technical indicators, and study trends before executing a trade.
- Order Book: Positioned to the right of the chart, this section displays real-time buy and sell orders from other users. It helps assess market depth and price levels.
- Order Panel: Found on the far right, next to the order book, this is where you place trades. You’ll input order types, define prices, and enter amounts. Every trade is initiated here.
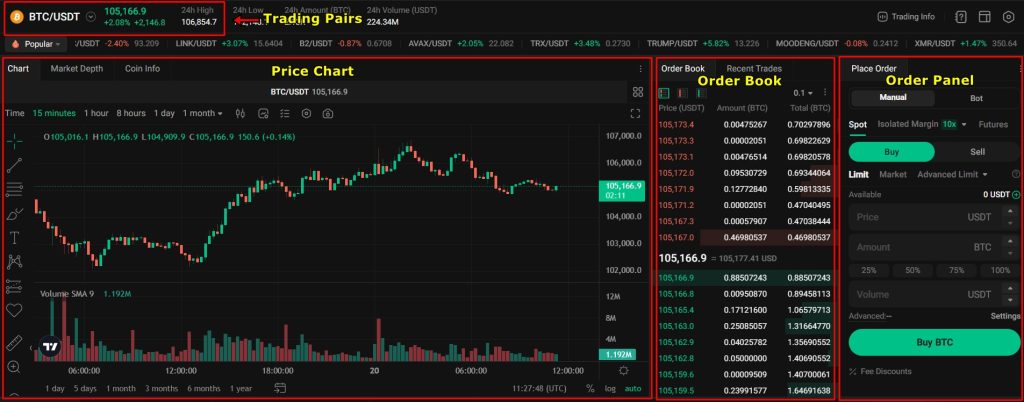
Take some time to explore the interface. A clear understanding of each component ensures faster and more accurate decision-making.
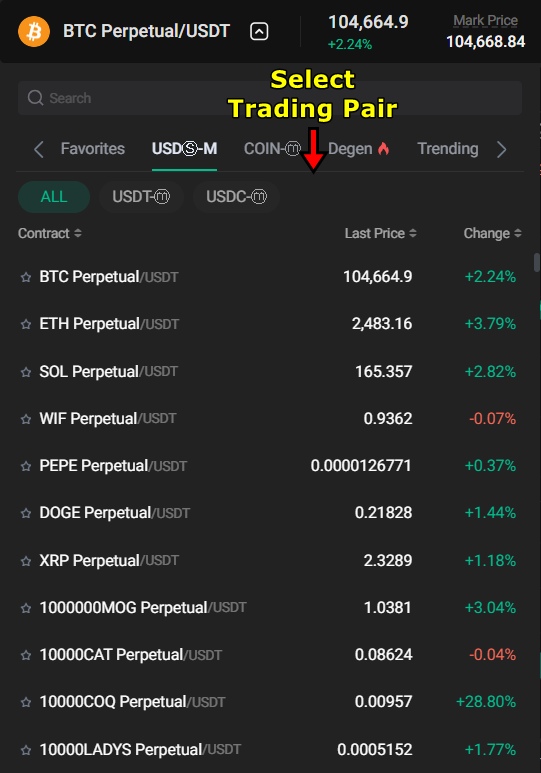
3. Select a Trading Pair
Trading pairs define the two assets involved in the transaction. In BTC/USDT, Bitcoin is bought or sold using Tether (USDT). To select a pair, click the Trading Pair Selection dropdown in the top-left corner. Search for or scroll through the list to find your preferred pair. For this example, we are selecting BTC/USDT.
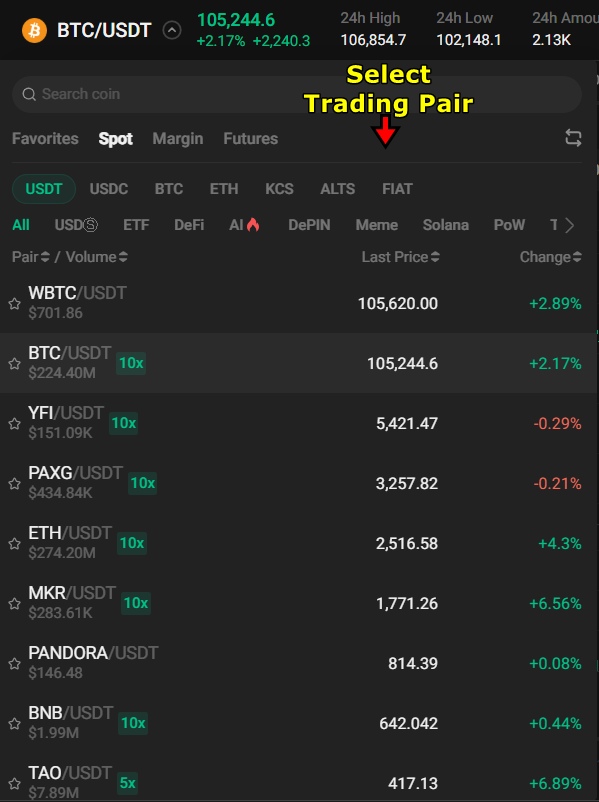
Once selected, the interface updates. You’ll see the chosen pair's real-time chart, price movements, and order book.
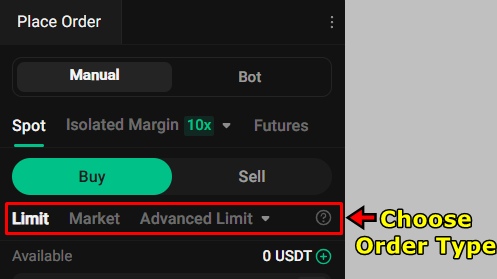
4. Choose the Order Type
Next, navigate to the Order Panel to choose your preferred order type. The two most commonly used order types in spot trading are Limit Order and Market Order.
For this tutorial, we are selecting Limit Order. This type lets you set the price at which you want to buy BTC. The order executes only when the market hits that price. It gives you more control over your trade entries.
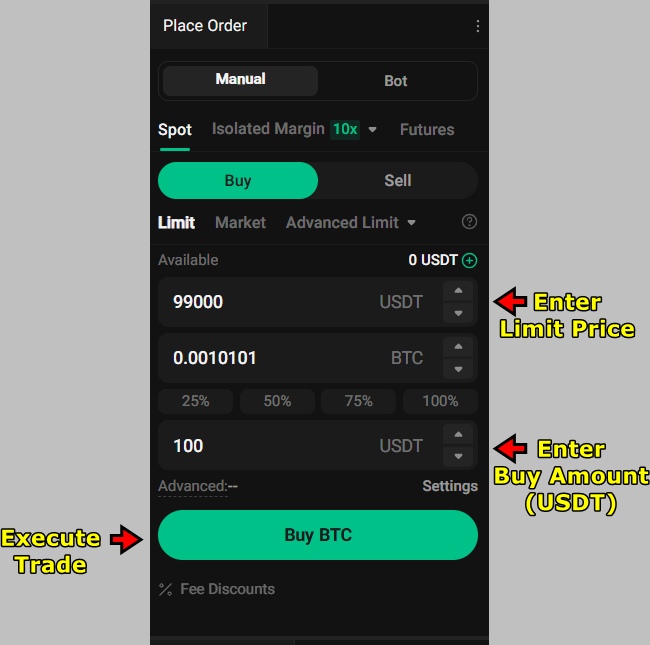
5. Enter Trade Details
After selecting Limit Order, fill in the trade details in the Order Panel:
- Limit Price: Enter the price at which you want to buy BTC. For example, set it at $99,000.
- Order Amount: Specify how much USDT you want to spend. For instance, enter 100 USDT.
Review your entries for accuracy. When ready, click “Buy BTC” to submit the order.
6. Monitor the Order Status
Since a limit order depends on market conditions, it won’t execute instantly unless the price reaches your set value. Until then, it remains active in the Open Orders section located below the Order Panel.

Once the market hits your limit price, the trade executes automatically. Your purchased BTC will appear in your Spot Wallet, and the completed order moves to the Order History tab for tracking.
KuCoin Futures/Margin Trading Tutorial
KuCoin’s Futures and Margin platforms give traders access to leveraged trading, allowing greater market exposure with a smaller upfront investment. In margin trading, users borrow assets directly from KuCoin to increase their position size. These trades are executed on the spot market, meaning the actual asset changes hands. Leverage in margin trading on KuCoin is capped at 10x, and users must repay the borrowed funds along with interest.
On the other hand, futures trading does not involve owning or borrowing the actual asset. Instead, traders enter into contracts that speculate on the asset’s future price. KuCoin offers leverage of up to 100x in futures trading, giving traders significantly higher exposure. While this opens up greater profit potential, it also increases the liquidation risk. The interface for futures trading is more polished compared to margin trading and generally comes with lower trading fees.
KuCoin also provides different futures products:
- USDT-Margined Contracts
- USDC-Margined Contracts
- Coin-Margined Contracts
For this tutorial, we will demonstrate how to place a trade using USDT-Margined Contracts, though the process remains similar for other contract types and for margin trades. Let’s take a look:
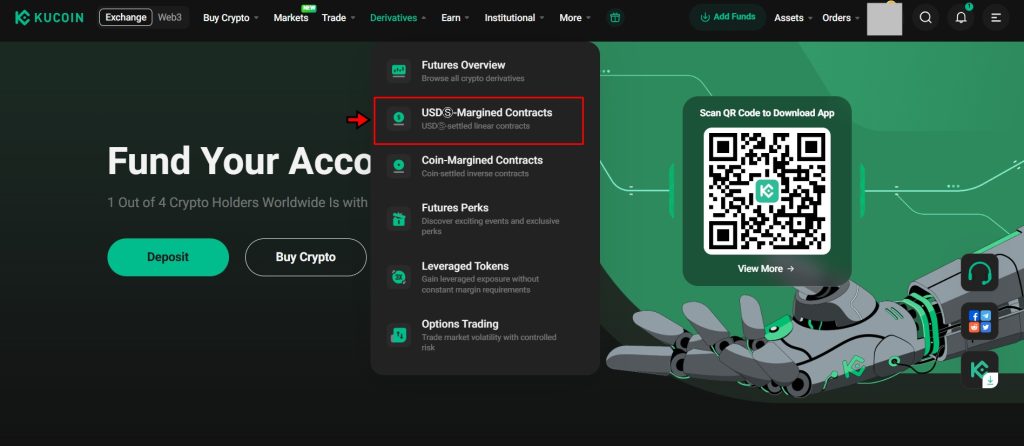
1. Access the KuCoin Futures Market
Start by logging in to your KuCoin account. On the homepage, hover over the “Derivatives” tab in the top navigation bar. From the dropdown menu, click “USD-Margined Contracts”. This will open the main KuCoin Futures interface where you can place leveraged trades.
2. Understand the Futures Interface
Before trading, explore the layout of the trading terminal and get familiar with it:
- Trading Pair Selector: Located at the top left, this dropdown lets you choose from various futures contracts. Click the pair name (e.g., BTC-P/USDT) to view and select other contracts.
- Price Chart: Below the trading pair selector, this section displays real-time charts. You can change timeframes, apply indicators, and analyze trends to make better trading decisions.
- Order Book: To the right of the chart, the order book shows live buy (green) and sell (red) orders. This helps you gauge market depth and understand current liquidity levels.
- Order Panel: Positioned on the far right, this is where trades are placed. You’ll choose order type, leverage, direction (long or short), and input trade details here.

Take a few minutes to explore each element. Understanding how they interact is important and can help you understand the entire process better.
3. Select a Trading Pair
Click the current trading pair in the upper left corner. Use the search bar to find the BTC Perpetual/USDT (BTC-P/USDT) contract and select it. This updates the interface to reflect BTC’s futures data. You can choose any contract based on your trading goals.
4. Choose an Order Type
In the Order Panel, you will need to select an order type. KuCoin supports several, including:
- Limit Order: Set a specific entry price. Trade only executes when the market hits this level.
- Market Order: Executes instantly at the current market price.
- Stop-Limit: Triggers a limit order when a defined price is reached.
For this tutorial, we are going with the Limit Order. It gives full control over the price you want to enter the trade.

5. Set Margin Mode and Adjust Leverage
Before submitting your order, choose a Margin Mode:
- Isolated Margin: Limits risk to only the margin allocated for that position. Recommended for beginners.
- Cross Margin: Uses your entire futures account balance to back the trade.
We are going with the Isolated Margin for this example.
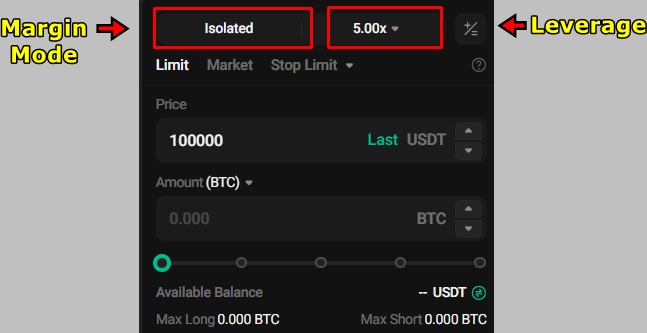
Next, set leverage. Click the leverage value next to the margin mode. Use the slider or enter a value manually. For this example, we are choosing 5x leverage, meaning a $100 margin controls a $500 position. Avoid high leverage if you're just starting out as liquidation risk increases sharply the higher you go.

6. Enter Trade Details and Open Position
Now it is time to place a trade. First you need to decide your trade direction:
- Long: You expect the price to rise.
- Short: You expect the price to fall.
We’ll go Long in this case to demonstrate
Next in the Order Panel:
- Enter your Limit Price (e.g., $97,000 for BTC).
- Input the USDT amount you want to commit to this position.
Review your inputs and click “Buy/Long”. Your order will now appear in the “Open Orders” section below. Once the market price reaches your limit, the trade executes and moves to the “Positions” tab.

For a Short position, follow the same process but choose Sell/Short instead of Buy/Long. In a short, you benefit when the asset price drops.
Note: If funds are unavailable in the Futures trading interface, transfer them from your main or trading wallet to futures wallet before placing the order.
7. Monitor Your Open Position
Once the trade is live, monitor it under the Positions tab. This section provides real-time updates on:
- Position Size
- Entry Price
- Unrealized PnL (floating profit/loss)
- Realized PnL (from partially closed positions)
- Liquidation Price (the price at which your position will auto-close)

Stay alert to these metrics to manage risk.
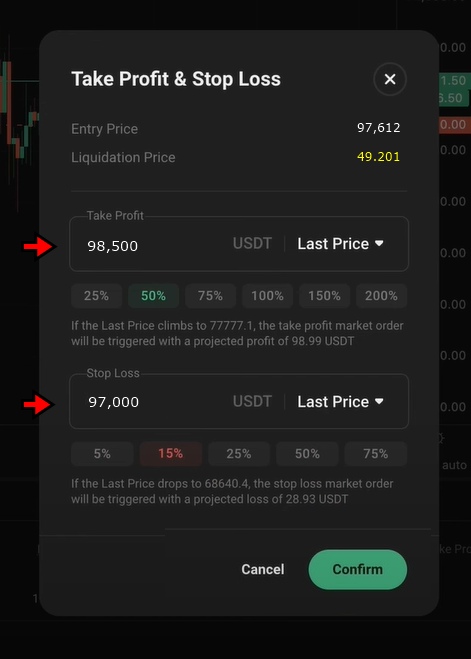
8. Add Stop-Loss and Take-Profit
Risk management is crucial in crypto trading. To manage exits, set Stop-Loss (SL) and Take-Profit (TP) levels:
- Under the TP/SL column in the Positions tab, click “TP/SL”.
- Enter your target price for locking in gains (TP) and your cutoff to limit losses (SL).
- Confirm the values.
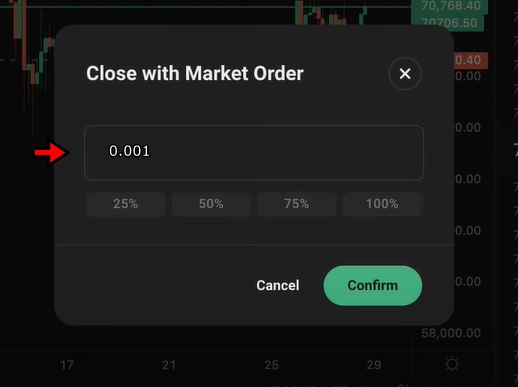
Alternatively, you can close your position manually:
- Click Limit or Market under the same row.
- For fast exits, click “Market” and select 100% to close the full position instantly at market price.
KuCoin Key Trading Features
KuCoin extends its capabilities beyond spot and leveraged trading by offering tools that support peer-to-peer transactions, asset conversions, options contracts, leveraged tokens, and trading automation. These features allow users to diversify strategies, simplify trades, and automate decisions where needed.
KuCoin P2P Trading
KuCoin’s peer-to-peer (P2P) platform allows users to trade directly with each other instead of through the exchange order book. Traders can buy and sell popular cryptocurrencies like BTC, ETH, and USDT using a wide range of fiat currencies, including USD, CAD, and CNY. Payment methods vary by region, but ACH transfers and PayPal remain the most common.
The P2P feature offers pricing flexibility as buyers and sellers agree on a rate that suits both parties. This setup benefits users in regions where crypto access through traditional exchanges is limited. It also enables better control over price negotiation and trade terms.
To trade on the P2P market, users must first access the platform through the “Buy Crypto” dropdown on the KuCoin homepage. Once there, they select the cryptocurrency and preferred fiat payment method. The interface displays available offers. Users can either buy from an existing offer or create a new one to sell their own assets.
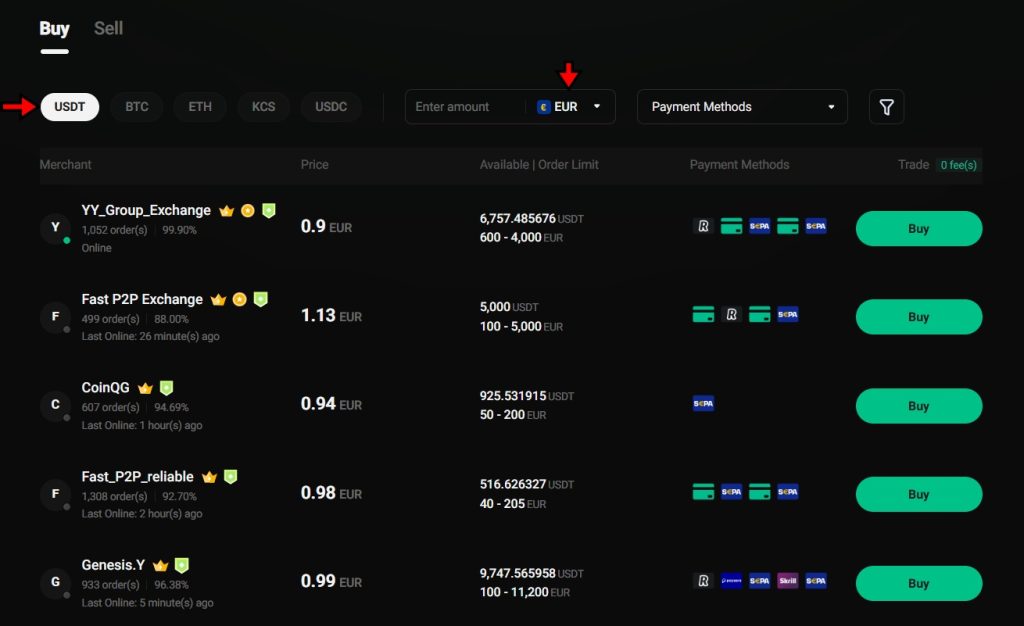
However, trading on KuCoin P2P requires identity verification (KYC). This condition removes the privacy often associated with true decentralized P2P platforms. As a result, the platform tends to have fewer active listings compared to fully open peer-to-peer marketplaces.
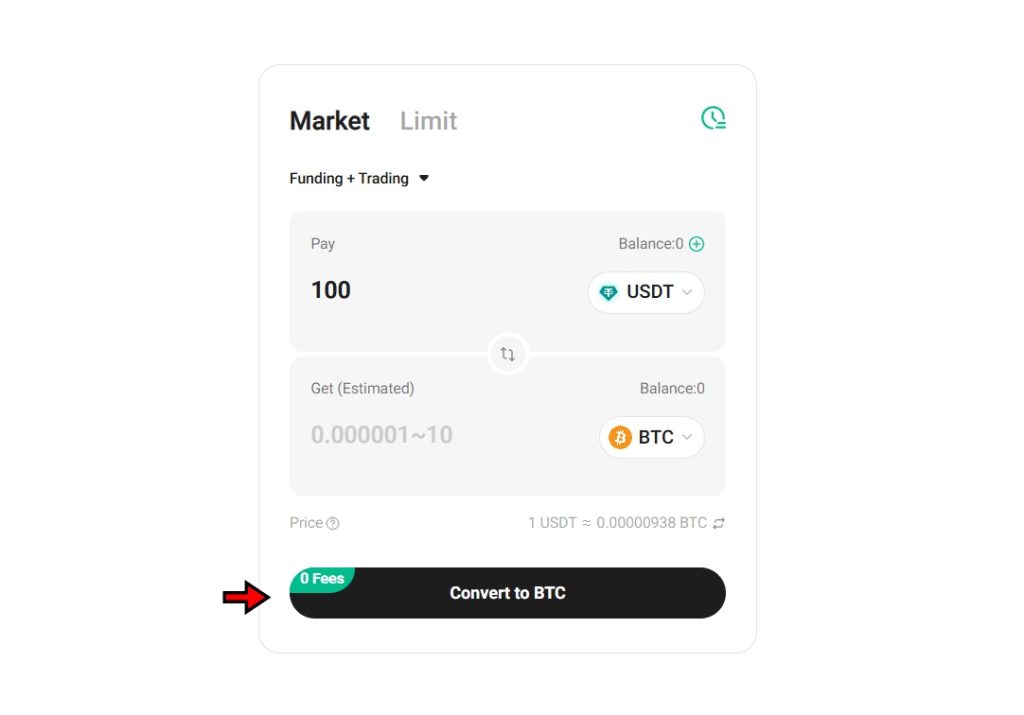
KuCoin Convert
KuCoin Convert provides a quick and fee-free way to swap between cryptocurrencies without using the spot market. This feature simplifies trading for beginners and avoids the need for charts, order books, or trading fees.
KuCoin convert supports over 100cryptocurrencies and users can convert assets almost instantly. KuCoin Convert offers both Market and Limit modes. Market conversions execute instantly at the best available rate, while limit orders allow users to set specific conversion rates.
To access this tool, users visit the “Convert” option under the “Trade” dropdown menu. After selecting the buy/sell pair and desired amount, a single click on “Convert” completes the transaction. This simplicity makes it excellent for users looking to swap tokens without having to look at complex interfaces with charts.
KuCoin Options Trading
KuCoin offers European-style options trading, which provides an alternative method for speculating on price movements. In this model, options can only be exercised at the expiration time, not before. This type of contract enables users to define risk upfront while gaining exposure to upward or downward price moves.
Options trading involves two choices: Call options (betting the asset’s price will rise) and Put options (betting it will fall). Each option requires users to pay a premium, which acts as the maximum potential loss. This makes it possible to manage risk better than with leveraged positions, where liquidation can exceed the initial investment.
To begin, users must activate their Options Trading account on the KuCoin app. This requires completing a brief knowledge quiz and accepting the trading terms. After funding the account with USDT, traders choose a contract like BTC/USDT, select a direction (Call or Put), define the expiration time, and confirm the order after reviewing key metrics like the breakeven chart.
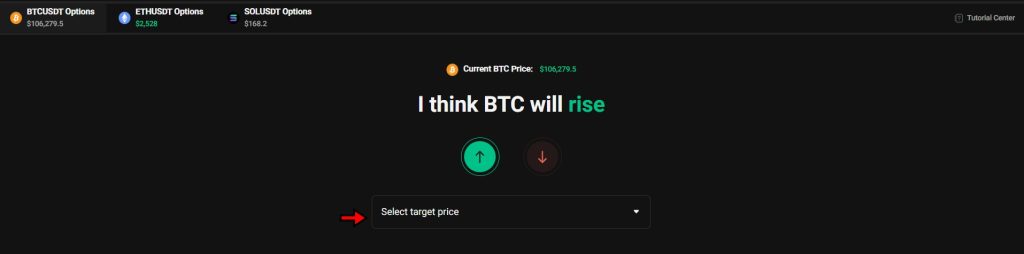
Open positions can be monitored in real-time. Users have the option to close trades early to secure profits or limit losses. At expiration, KuCoin settles all unexercised options automatically using the time-weighted average price (between 07:30–08:00 UTC). Settlement happens without user input, and results are directly reflected in the account balance.
KuCoin Leveraged Tokens
KuCoin’s Leveraged Tokens offer price exposure with built-in leverage, without requiring asset borrowing or margin management. These tokens are labeled based on their direction and leverage. For instance, BTC3L represents a 3xlong position on Bitcoin, while BTC3S represents a 3x short.
These tokens are listed in a dedicated marketplace under the “Derivatives” section. The trading experience is almost identical to spot trading as users can buy or sell these tokens just like regular coins. This means there is no need to transfer assets between wallets or manage liquidation risks manually.
Because of their simplicity and accessibility, leveraged tokens serve as a useful entry point for traders looking to take advantage of short-term price movements with leverage, without handling the complexity of futures or margin positions. However, the performance of these tokens can diverge from the expected multiple over longer timeframes due to rebalancing effects.
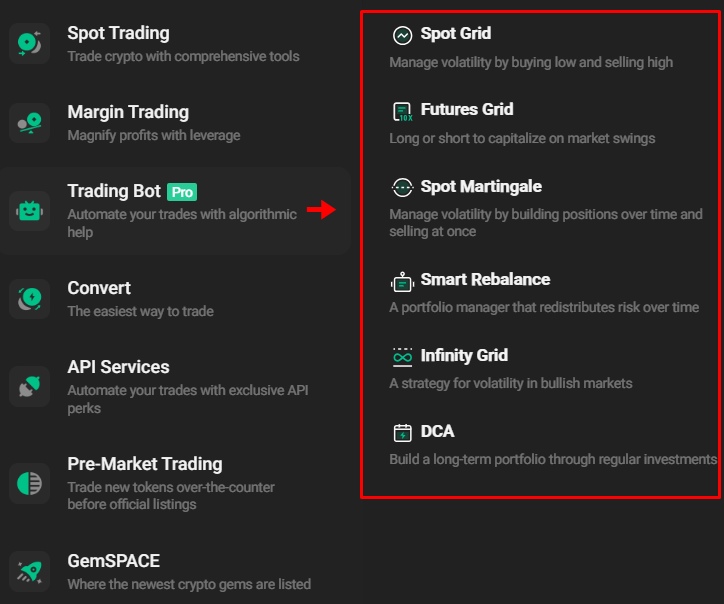
KuCoin Trading Bots
KuCoin provides several trading bots designed to automate strategies and reduce the need for manual execution. These bots operate continuously, handling repetitive tasks and executing trades based on predefined logic.
For beginners, KuCoin offers pre-configured strategies including:
- Dollar-Cost Averaging (DCA): Buys at regular intervals to average out entry prices.
- Futures Grid: Places buy and sell orders at set intervals for profit in volatile markets.
- Smart Rebalance: Maintains a portfolio’s target asset allocation through automatic rebalancing.
To use a bot, users can navigate to the “Trading Bots” section under the “Trade” tab, choose a strategy, configure key settings such as trading pair and investment amount, and launch the bot. Once active, the bot operates without requiring further user input, though users can pause or stop it at any time.
While bots can be effective in reducing emotional decision-making and increasing consistency, they carry risk. Poor configuration or unexpected market conditions can lead to losses. Users should assess their strategy before deploying a bot and monitor performance regularly.
How to Withdraw on KuCoin?
KuCoin only supports cryptocurrency withdrawals, as direct fiat withdrawals are not available at this time. Users can deposit fiat to buy crypto, but cannot move fiat funds out of KuCoin directly. To withdraw, users must first convert their assets into crypto and then follow a simple withdrawal process.
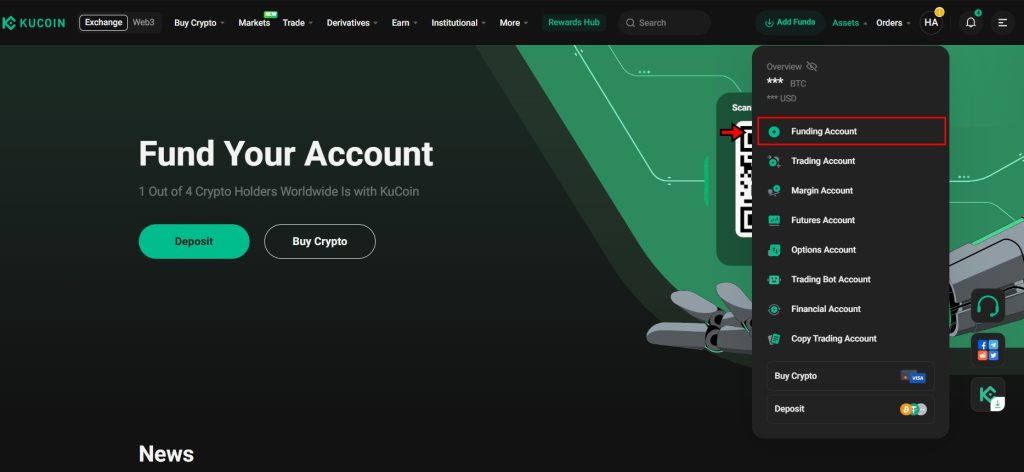
1. Go to the Funding Page
Begin by navigating to your Funding Account. From the homepage, open the “Assets” dropdown at the top right and select “Funding Account.” This section displays all available balances and allows access to the withdrawal interface.
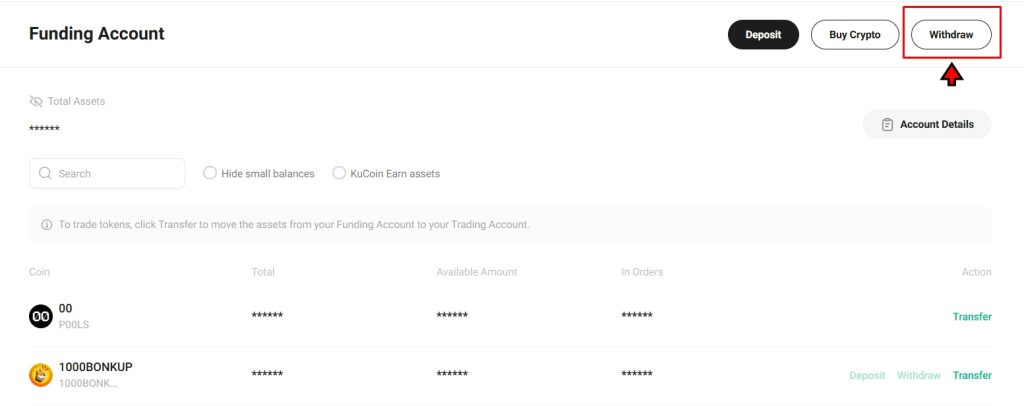
2. Open the Crypto Withdrawal Page
Inside the Funding Account, click the “Withdraw” button. This opens the crypto withdrawal page where users can initiate the transfer of digital assets to an external wallet.
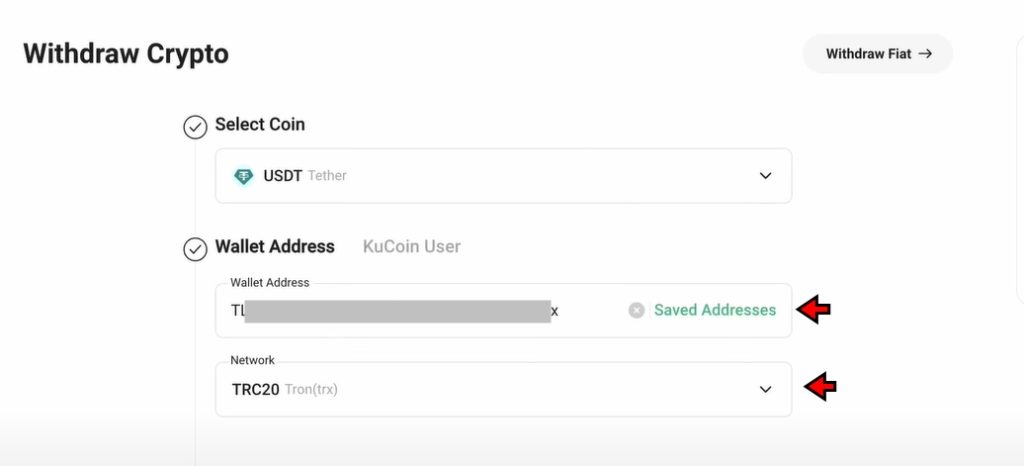
3. Select the Cryptocurrency
On the withdrawal page, choose the cryptocurrency you want to transfer. For instance, if you plan to move USDT, select it from the dropdown list. KuCoin supports a wide range of digital assets for withdrawals.
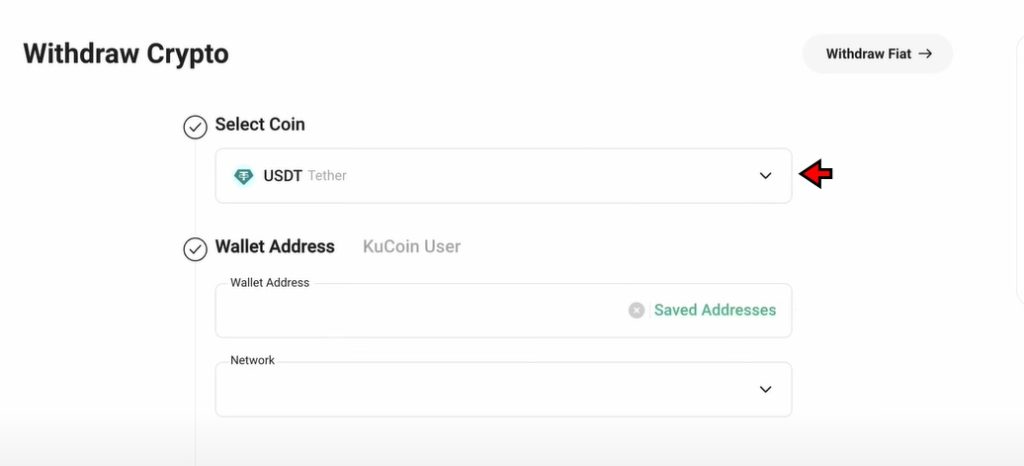
4. Enter Wallet Address and Select Network
After selecting the crypto, paste the deposit address of the external wallet where you want to send the funds. In most cases, KuCoin detects the network type automatically after pasting the address. If it does not, select the correct network manually. Always match the network on KuCoin with the one used by the receiving wallet. For USDT, supported networks include TRC20 and ERC20.
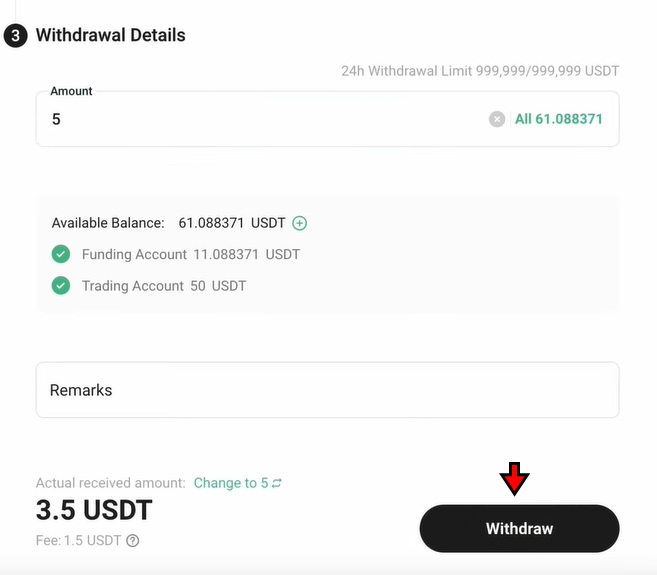
5. Enter the Amount and Confirm the Transaction
Once the wallet address and network are set, enter the amount you want to withdraw. Carefully review all information, including the wallet address, selected network, and the withdrawal amount. When ready, click the “Withdraw” button to confirm the transaction. The funds will be sent to the external wallet after KuCoin processes the request.
KuCoin Fees
KuCoin uses a tiered fee model based on users’ 30-day trading volume. Most users will pay a flat 0.1% fee for both Maker and Taker trades in the spot market. Paying fees with KuCoin’s native token, KCS, gives users a discount of up to 20%.
Futures trading fees depend on funding rates, which can fluctuate between positive and negative values. During stable conditions, the platform may reduce funding fees to 0%. These adjustments occur every eight hours and reflect ongoing market conditions.
Here is a breakdown of KuCoin’s fee structure for both spot and futures market.
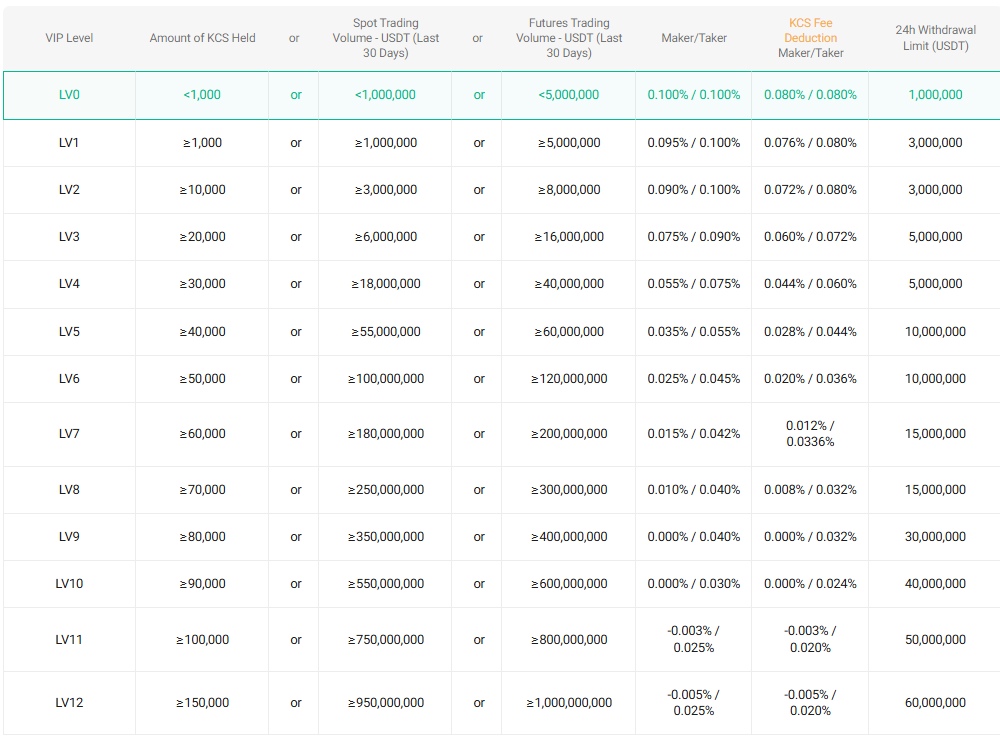
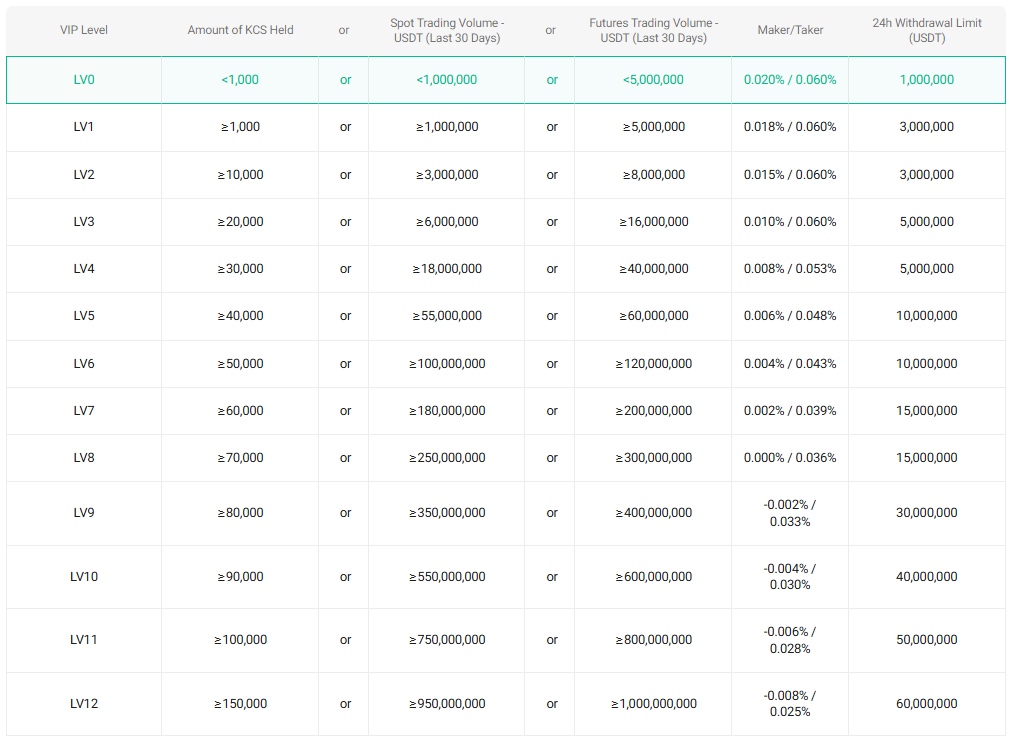
On the other hand, when it comes to crypto deposits, KuCoin charges no fee. Withdrawal fees vary based on the cryptocurrency and the blockchain network used. Users should check the official KuCoin Fees Page for the most accurate, real-time rates.
For fiat purchases, KuCoin applies a transaction fee when using the Fast Pay method, but the exact amount only appears at the final confirmation step. Since KuCoin doesn’t directly handle fiat deposits, it works with third-party providers. These providers may apply their own fees, which KuCoin doesn’t disclose on its platform.
Is KuCoin Secure?
KuCoin implements multiple layers of security to protect user assets and maintain platform integrity. Most user funds are kept in cold storage, minimizing exposure to online threats. For added protection, KuCoin collaborates with Onchain Custodian, a third-party provider specializing in the secure storage of digital assets.
Despite a major security breach in 2020, where hackers stole $275 million, KuCoin reimbursed all affected users. Since then, it has strengthened its infrastructure and introduced more advanced protections. No similar incident has occurred since.
The platform relies on strong encryption and continuous monitoring through internal control departments to identify and block suspicious activity. It also enforces two-factor authentication and provides features like anti-phishing codes, login and trading safety phrases, and IP address restrictions to safeguard user accounts.
To counter scams and phishing attempts, KuCoin offers an Anti-Fraud Suite that verifies wallet addresses and scans for malicious activity. This system ensures users interact only with verified business wallets and official communications.
KuCoin also maintains Proof of Reserves to verify that all user assets are fully backed. As of early 2025, it holds a 100% reserve ratio for major assets like BTC, ETH, USDT, and USDC. These figures are independently audited by Mazars, reinforcing transparency and user trust.
Final Takeaway
If you’ve gone through this tutorial, you’re now in a solid position to start using KuCoin without confusion. The steps to register, secure your account, deposit crypto, and start trading are all straightforward. KuCoin is a user-friendly exchange and nothing about these processes is overly complicated. The interface becomes familiar quickly once you’ve used it a few times.
Trading fees are simple to understand, and KuCoin gives you options like fee discounts with KCS. Withdrawals are easy to handle, as long as you double-check the wallet address and network. While fiat withdrawals aren’t supported, crypto transfers work smoothly.
With security features like two-factor authentication, anti-phishing tools, and proof of reserves, KuCoin covers the essentials. If you follow what’s laid out here, you should be able to use the platform confidently and handle your trades without needing to look things up every time.
Frequently Asked Questions – FAQs
KuCoin is a global cryptocurrency exchange that allows users to buy, sell, and trade a wide range of digital assets. It offers spot, margin, and futures trading along with staking, lending, and various DeFi features.
You can sign up using your email or phone number on the official KuCoin website or mobile app. After registration, it’s recommended to enable two-factor authentication and complete identity verification for added security.
Yes, KuCoin offers a clean interface and guided steps for deposits, trading, and withdrawals, making it accessible for new crypto users.
KuCoin allows fiat deposits only through third-party payment providers. It does not support direct bank transfers or fiat withdrawals.
Go to your Funding Account, choose the asset you want to deposit, copy the wallet address, and send the funds from your external wallet. Always make sure to select the correct network.
Deposited funds appear in the Funding Account. You can transfer them to your Trading Account from the same page to begin trading.
KuCoin charges a 0.1% maker and taker fee for spot trades. Users can reduce this fee by 20% when paying with KuCoin’s native KCS token. Futures trading fees vary based on funding rates.
Go to your Funding Account, click “Withdraw,” select the crypto you want to send, enter the destination wallet address, choose the correct network, and confirm the amount.
No, KuCoin doesn’t support fiat withdrawals. You can only withdraw cryptocurrency to an external wallet.
KuCoin uses multiple security measures including cold storage, two-factor authentication, IP whitelisting, and anti-phishing features. It also publishes Proof of Reserves verified by third-party audits.
Proof of Reserves is a verification system showing that KuCoin holds enough assets to match customer deposits. As of March 2024, KuCoin reported a 100% reserve ratio for major assets.
Yes, KuCoin provides a fully functional mobile app that allows trading, deposits, withdrawals, and account management on both Android and iOS.
Use the account recovery options on the login page. If those don’t work, contact KuCoin support and be ready to verify your identity.
Disclaimer: All content on The Moon Show is for informational and educational purposes only. The opinions expressed do not constitute financial advice or recommendations to buy, sell, or trade cryptocurrencies. Trading involves significant risk and may result in substantial losses. Always seek independent financial advice before making investment decisions. The Moon Show is not responsible for any financial losses or decisions made based on the information provided.
Please view the full disclaimer at: https://themoonshow.com/disclaimer

The Ultimate WEEX Exchange Tutorial: Step-by-Step Guide for Beginners
WEEX is not among the largest cryptocurrency exchanges. It does not match the trading volume of...

The Ultimate Bybit Exchange Tutorial - A Step-by-Step Guide for Beginners
Cryptocurrency trading continues to evolve with time. Today, crypto users can access several ex...

MEXC Exchange Tutorial: Step-by-Step Guide for Beginners
MEXC is a well-established cryptocurrency exchange that supports a wide range of trading featur...