The Ultimate WEEX Exchange Tutorial: Step-by-Step Guide for Beginners
WEEX is not among the largest cryptocurrency exchanges. It does not match the trading volume of platforms like Binance or Bybit, and it does not offer an extensive list of advanced features. Instead, it focuses on delivering a streamlined and practical trading experience. It offers an interface that is simple, a layout that is easy to follow, and it also avoids any unnecessary complications that can make things confusing for beginners.
WEEX serves traders who prefer a clean and functional environment. It includes unique features, regular promotional events, and a clear emphasis on accessibility. Users can navigate the platform without getting lost in complex menus or settings, which makes it suitable for both beginners and pro traders. Read our WEEX exchange review for more details.
In this in-depth tutorial, we will explain how to use WEEX from start to finish. It covers how to create an account, complete identity verification, make deposits, withdraw funds, and place trades. Each section provides a step-by-step breakdown to help users understand the platform and start trading right away. Let’s have a look:
Get more value from your first move on WEEX. Deposit 100 USDT to earn a 50% futures bonus, bind your phone and email for a 10–100 USDT coupon, and collect ongoing trading rewards.
What is WEEX?
WEEX is a centralized cryptocurrency exchange that has been active since 2018. It is registered in Singapore, with operational hubs in Taiwan and Dubai. Instead of rushing to release new features, WEEX focuses on building a legally sound and compliant platform. This approach allows it to operate in multiple regions under proper regulatory oversight.
The exchange holds Money Service Business (MSB) registrations with FINTRAC in Canada and FinCEN in the United States. These licenses give WEEX a legitimate foundation to serve users in countries such as the United States, Canada, the United Kingdom, and Japan.
On the trading side, WEEX offers a wide range of services. These include spot trading, futures trading with leverage up to 400x, over-the-counter (OTC) trading, and copy trading. With access to more than 600 cryptocurrencies, users can find both major and emerging assets on the platform.
Security is another core focus for WEEX. The exchange maintains a 1,000 BTC protection fund that users can verify publicly. It also provides Proof of Reserves and uses advanced security measures to protect user funds and data. These are the reasons why WEEX is rated quite highly in terms of security.
How to Create Your WEEX Account
Creating an account on WEEX is a quick process. The platform makes it easy to get started on any device. Follow the steps below to complete your account setup.
1. Visit the WEEX Website
Begin by opening your preferred browser and going to www.weex.com. If you’re using a smartphone, download the WEEX app from either the Google Play Store or the Apple App Store. Both the website and the app offer the same core functionality, so you can choose the platform that fits your preference (This guide will be solely focused on the web version of WEEX Exchange). Now on the website click on the “Sign Up” option at the top right corner to get started.

2. Fill in the Signup Details
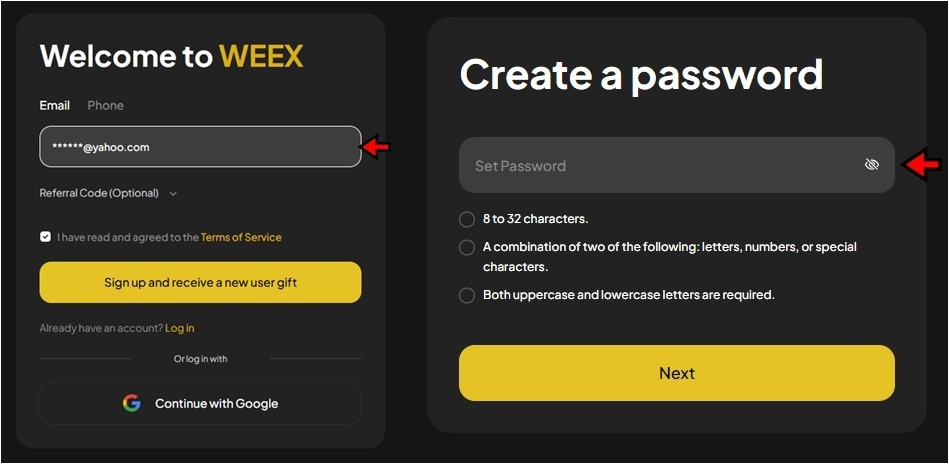
After clicking the “Sign Up” button, you will be prompted to enter your email address and create a password on the next page. Make sure the password is strong, combining letters, numbers, and symbols to enhance security. Once you've filled in the details, agree to the Terms of Service and Privacy Policy by checking the required boxes. Click “Sign Up” to move forward.
3. Verify Your Email
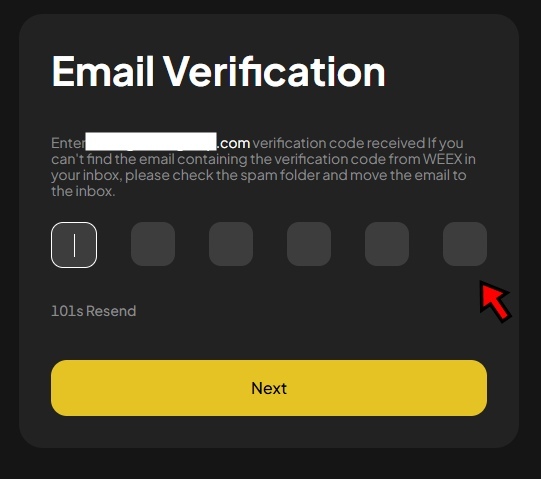
After submitting the signup form, WEEX sends a confirmation email to the address you provided. Open your inbox and find the email from WEEX. Click the verification link inside to activate your account. This step is mandatory. You won’t be able to log in or access trading features until your email is verified.
4. Set Up Two-Factor Authentication (2FA)
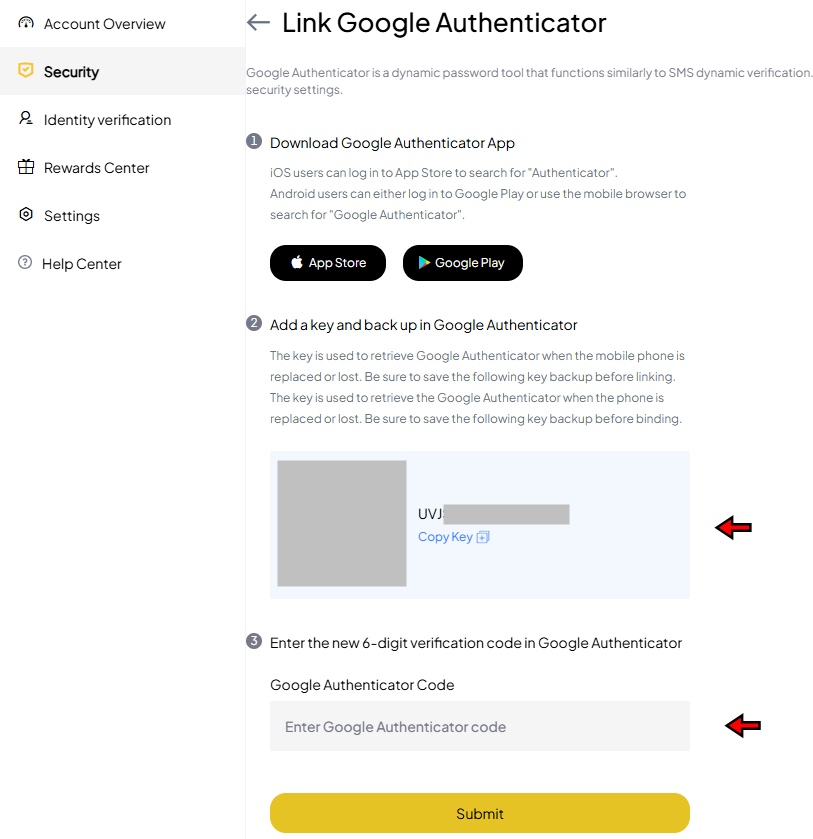
Once your account is active, go back to the homepage and log in. Before making any trades or deposits, it’s strongly recommended to enable Two-Factor Authentication (2FA) to secure your account. Start by downloading a 2FA app like Google Authenticator or Authy on your phone. Inside your WEEX account settings, scan the QR code using the app. Enter the six-digit code generated by the app to complete the setup. This adds an extra layer of security and helps prevent unauthorized access.
With your account created and secured, you’re ready to explore the platform and begin trading.
How to Complete KYC on WEEX?
Completing KYC (Know Your Customer) on WEEX is necessary if you want access to the platform’s full range of features. It helps protect user accounts, supports compliance with financial regulations, and enhances overall platform security. KYC verification allows higher withdrawal limits, access to WeLaunch events, and added account protections. The process is simple and takes only a few minutes to complete.
1. Go to the WEEX Homepage
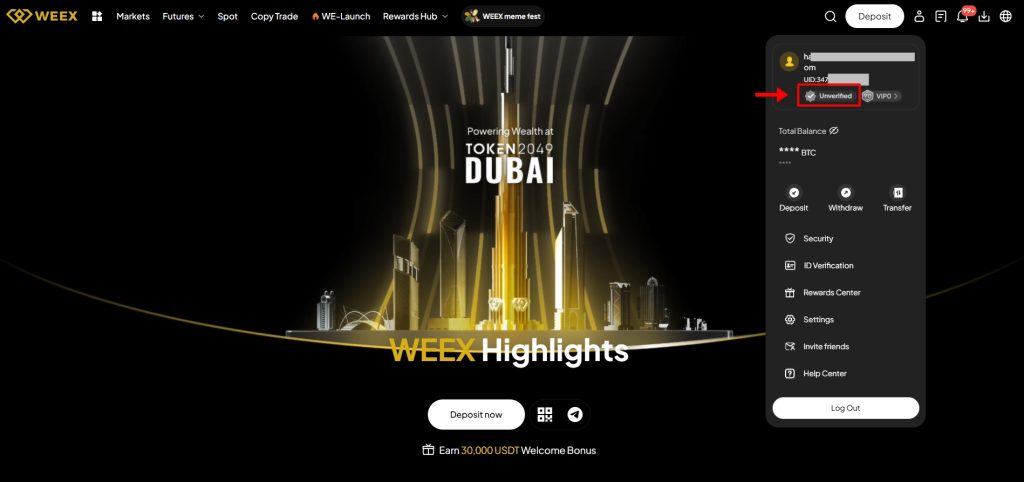
Start by visiting the official WEEX website. If you're not already logged in, enter your credentials to access your account. Once logged in, click on the user icon in the top right corner of the homepage. A dropdown menu will appear. Under your email and User ID, click on the “Unverified” label to begin the KYC process.
2. Click “Verify Now”
You’ll be redirected to the verification section. On this page, locate and click the “Verify Now” button displayed in the center. This will open the identity verification form where you can begin uploading your information.
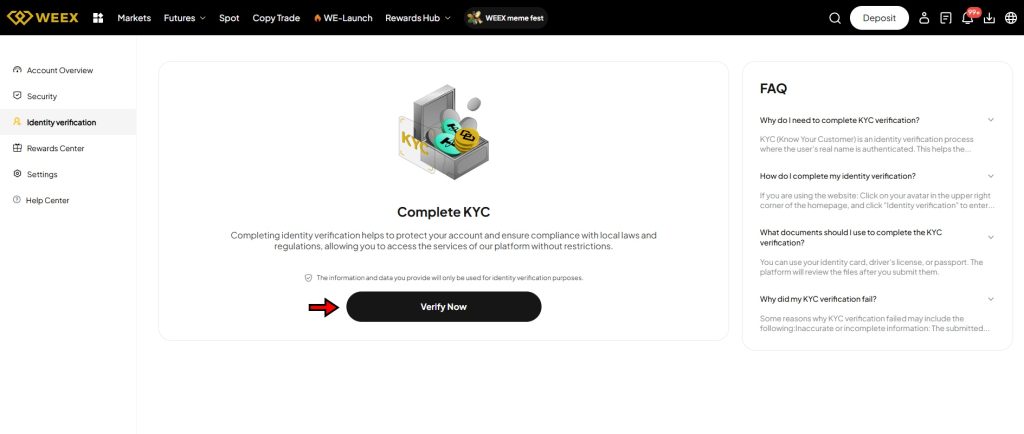
3. Choose Your Country and Document Type
Select your country of residence from the dropdown list. After that, choose the type of identification document you’ll be using for verification. This can be a passport, national ID, or driver’s license, depending on your region. On the next screen, upload clear images of the required document as prompted.
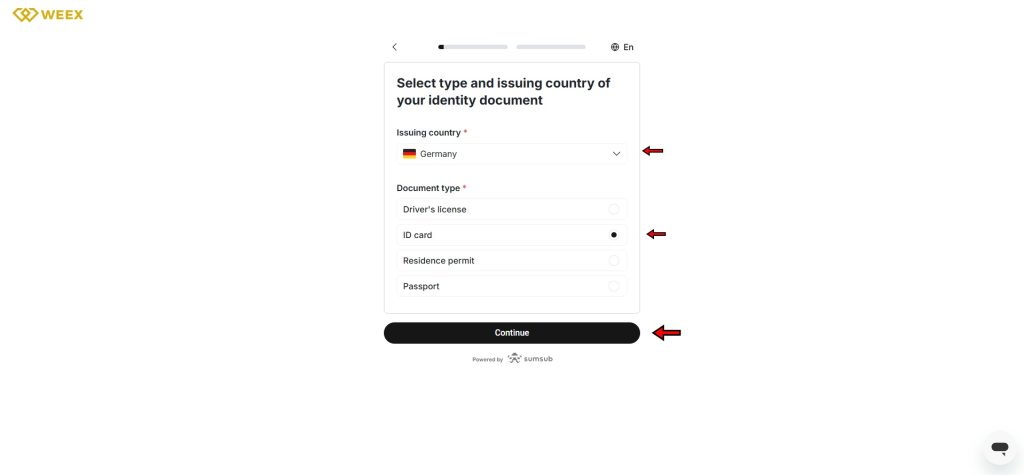
4. Take a Selfie
The final step is facial verification. Position yourself in a well-lit area and make sure the camera lens is clean. Follow the on-screen instructions to take a selfie. Once the image is captured and uploaded, submit your application for review.
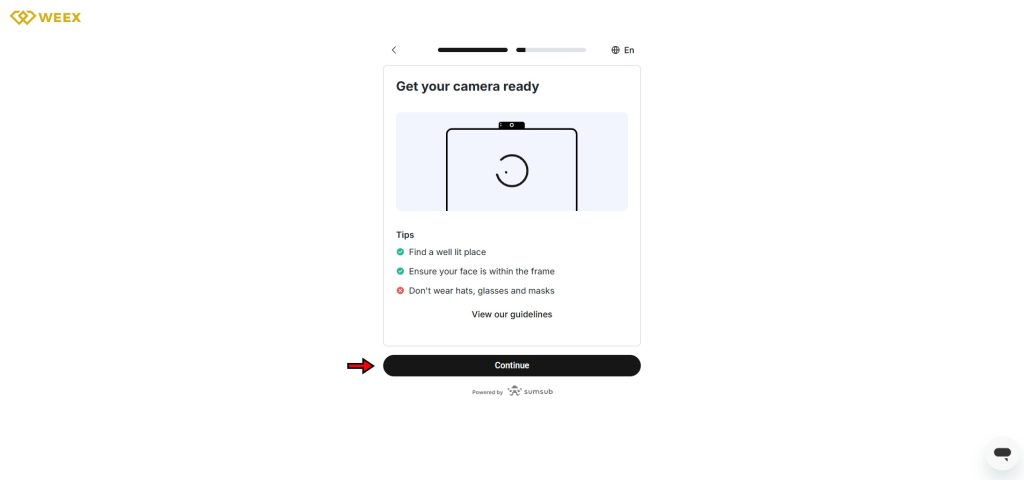
WEEX typically processes KYC applications within 24 to 48 hours. You’ll receive a notification once your verification is complete. After approval, your account will be fully verified and ready for unrestricted use.
Join WEEX now to claim double rewards for a limited time. Bind your phone and email to receive a 10–100 USDT coupon and start earning more through trading rewards.
How to Deposit on WEEX
Depositing crypto on WEEX is a straightforward process. The exchange does not currently support fiat deposits, but it allows users to transfer digital assets from external wallets or other exchanges with ease. The process is secure, and the platform provides clear steps to minimize the risk of errors during transfers. Follow the guide below to complete your deposit.
1. Go to the Deposit Page
Start by visiting the official WEEX website. Once logged into your account, click on the “Deposit” button in the top right corner of the homepage. You can also scroll down and select the “Deposit Now” option. Either button will redirect you to the deposit page where you can initiate your transfer.
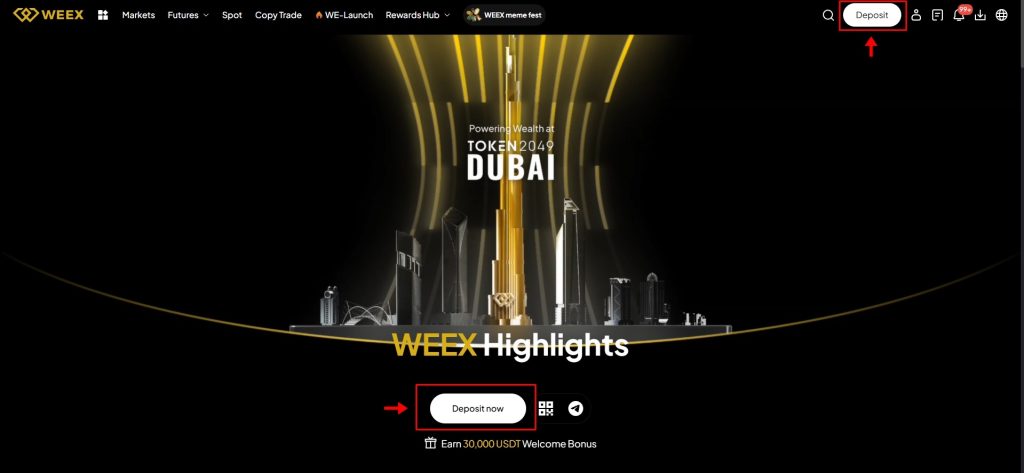
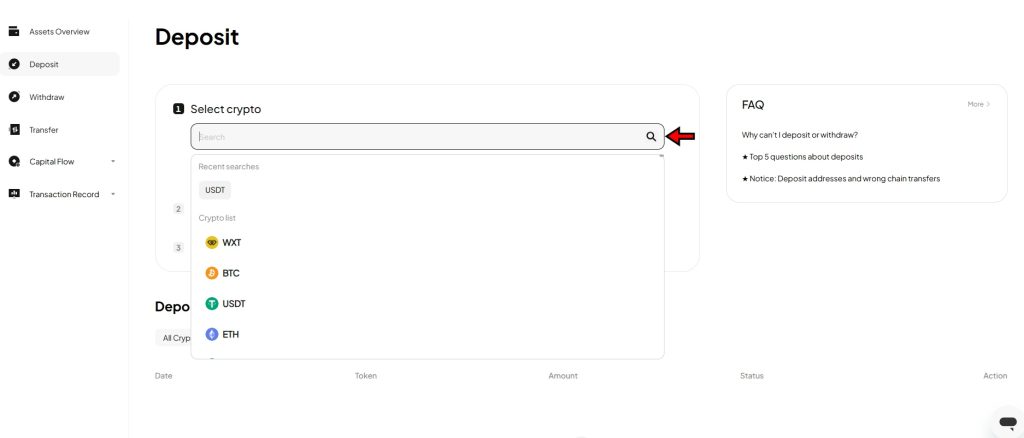
2. Select the Cryptocurrency
On the deposit page, begin by choosing the cryptocurrency you want to deposit. If you’re holding Bitcoin, select Bitcoin. If you're transferring stablecoins like USDT, select the appropriate version. WEEX supports a wide range of assets, so make sure you choose the correct one before proceeding.
3. Choose the Network
After selecting the coin, you’ll need to pick the corresponding network. This step is important. For example, if you are depositing USDT, you may have options like TRC20, ERC20, or BEP20. Choose the network that matches the one used by your external wallet or exchange. Using the wrong network can result in permanent loss of funds.

4. Copy the Wallet Address and Complete the Transfer
Once both the cryptocurrency and network are selected, WEEX will generate a deposit address. This address can be copied directly or scanned using a QR code scanner. Go to the wallet or exchange you’re transferring from, paste or scan the address, and confirm the transaction. The deposit time will vary depending on the selected network, but once confirmed, the funds will appear in your WEEX account.
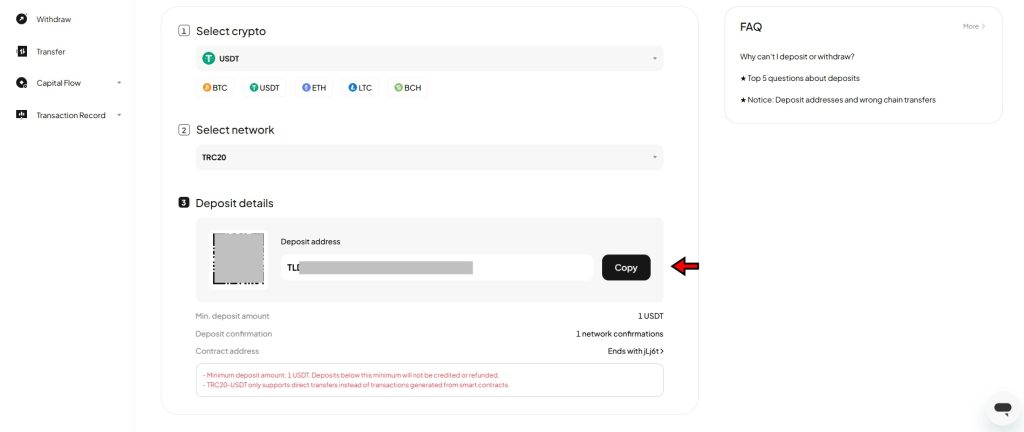
Always double-check the address and network before sending any funds to avoid mistakes.
Understanding Order Types on WEEX
Before placing any trade on WEEX (whether spot or futures), users should understand the different order types the platform supports. Each order type plays a role in how trades are executed and can help manage risk, define trading strategy, and improve execution under different market conditions.
Order types give traders control over entry and exit points. Knowing when and how to use them can help avoid unnecessary losses and support better decision-making, especially in markets like crypto.
Market Order
A market order executes immediately at the best price available in the order book. It prioritizes speed over precision, making it useful for situations where entering or exiting a position quickly matters more than the exact price.
Example: A trader sees Bitcoin rising fast and places a market buy order. The order fills instantly at the current market price.
Limit Order
A limit order allows the trader to specify the exact price they want to buy or sell at. The order only executes if the market reaches that price or better. This method provides more control but doesn't guarantee execution.
Example: A trader wants to buy ETH at $2,500. They place a limit order, and it stays open until the price drops to that level.
Stop-Loss Order
A stop-loss order helps minimize losses by automatically closing a position when the price hits a defined threshold. It’s a core risk management tool, especially useful in volatile markets.
Example: A trader buys BTC at $30,000 and sets a stop-loss at $28,000. If the price falls to $28,000, the system sells to cap the loss.
Take-Profit Order
A take-profit order lets traders secure gains by setting a price level at which their position is automatically closed. Once the market hits that target, the system executes the order and locks in the profit.
Example: A trader buys ETH at $2,000 and places a take-profit at $2,300. When the price reaches $2,300, the system sells the position automatically.
Stop-Limit Order
A stop-limit order combines a stop-loss trigger with a limit order. Once the stop price is reached, a limit order is placed instead of a market order. This setup allows for more precise control over the exit price.
Example: A trader sets a stop price at $1,900 and a limit price at $1,880 for ETH. If ETH drops to $1,900, a limit sell order is placed at $1,880.
Trigger Order
A trigger order allows the user to set a condition under which a buy or sell order is activated. It won’t appear in the order book until the trigger condition is met, giving traders flexibility to automate entries or exits without being online.
Example: A trader wants to buy BTC only if the price breaks above $31,000. They set a trigger buy order at that price. Once BTC hits $31,000, the order is placed automatically.
Post-Only Order
A post-only order ensures that it adds liquidity to the market. If the order would immediately match an existing order, it gets canceled.
Example: A trader places a post-only buy order for ETH at $3,000. If a matching sell order already exists at that price, the post-only order is canceled.
Understanding these order types and applying them correctly gives traders a better chance at controlling risk, maximizing profits, and reacting effectively to market changes.
WEEX Spot Trading Tutorial
Spot trading on WEEX offers a straightforward way to buy and sell cryptocurrencies at real-time market prices. Unlike margin or futures trading, it doesn’t involve borrowing funds or contracts—users trade actual crypto assets, and ownership transfers instantly. The following guide walks through the complete spot trading process on WEEX, with each step explained clearly.
1. Access the Spot Trading Interface
Go to the official WEEX homepage. If you haven’t logged in, sign into your account using your credentials. Once logged in, locate and click the “Spot” tab at the top left of the homepage. This action opens the spot trading interface where you can execute direct crypto-to-crypto trades.

2. Understand the Trading Interface
Before placing any trades, explore the spot trading interface. Knowing how to navigate each section is essential for accurate and timely trading.
- Trading Pair Selection: On the left side, this panel lets you search or scroll through available trading pairs such as BTC/USDT, ETH/USDT, etc.
- Chart Area: The central section displays live price charts. Users can adjust timeframes, apply indicators, and analyze market trends for the selected pair.
- Order Panel: Located beneath the chart, this panel allows users to input order types, prices, and amounts before submitting trades.
- Order Book: On the right, the order book shows active buy and sell orders, helping traders assess liquidity and price levels.
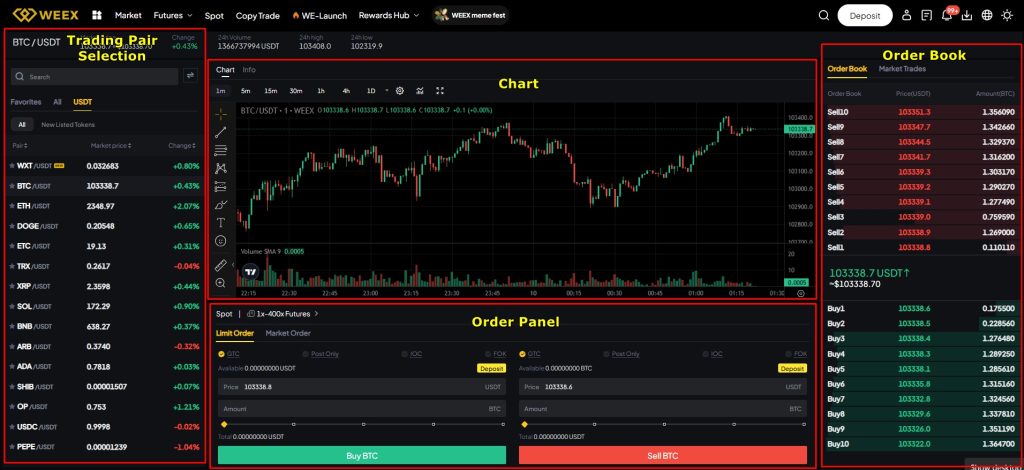
Take time to explore each section to ensure you understand how real-time data and user inputs function within the platform.
3. Select a Trading Pair
Trading pairs represent the assets you’re exchanging. For example, in the BTC/USDT pair, you use USDT to buy BTC. Use the Trading Pair Selection panel to find and click on the desired pair. In this tutorial, we’ll use BTC/USDT as the example.
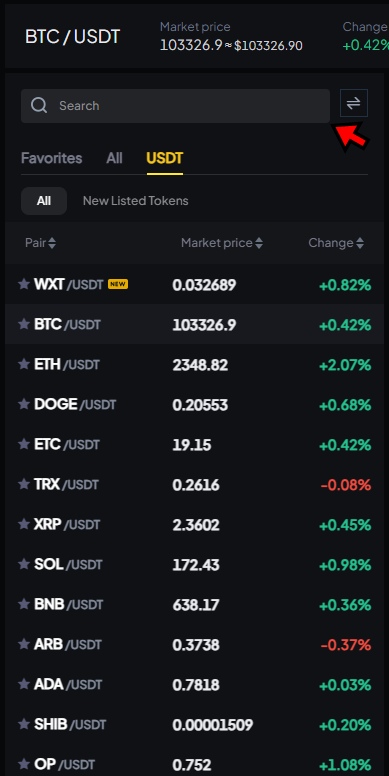
Once selected, the interface updates to reflect the current market data, order book, and chart for BTC/USDT.
4. Choose the Order Type
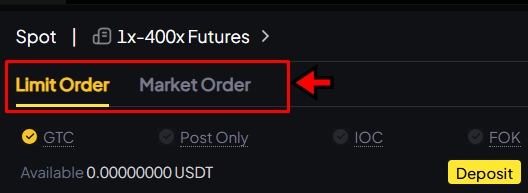
Within the Order Panel, you’ll see options for different order types. For spot trading, the primary choices are Limit Order and Market Order.
For this tutorial, we will be choosing Limit Order. A limit order lets you specify the exact price at which you want to buy BTC. The trade will execute only if the market reaches your defined price, offering control over entry points.
5. Enter Trade Details
Once the order type is selected, fill in the required fields:
- Limit Price: Set the price at which you want to buy BTC (e.g., $99,000).
- Order Amount: Enter how much USDT you want to spend (e.g., 100 USDT).
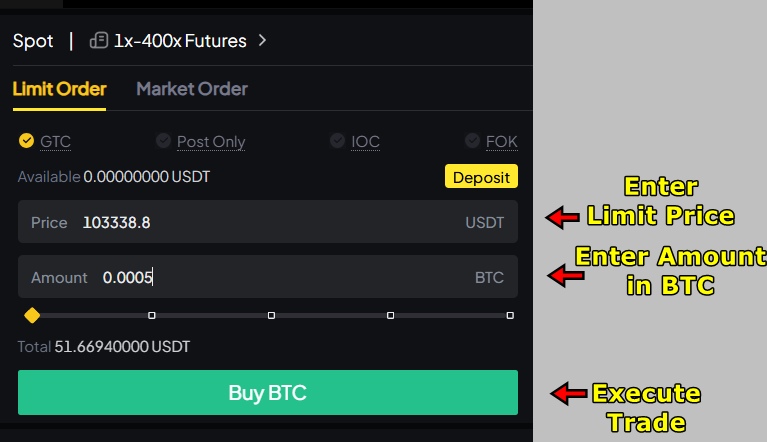
Double-check your entries to make sure everything is correct. When ready, click the “Buy BTC” button to submit the order.
6. Monitor the Order Status
Since you placed a limit order, it won’t execute immediately unless the market hits your specified price. Until then, the order remains open and visible in the Open Orders section below the order panel.
Once the BTC price reaches your chosen limit, WEEX will fill the order automatically. After execution, your newly purchased BTC will appear in your Spot Wallet, and the order will move to the Order History tab for future reference.

WEEX Futures Trading Tutorial
Futures trading allows crypto traders to speculate on price movements without owning the underlying asset. Unlike spot trading, which involves immediate settlement, futures contracts let users agree to buy or sell a cryptocurrency at a set price in the future. WEEX supports over 700 trading pairs in its USDT-M Futures market and offers leverage up to 400x. The following steps explain how to execute a futures trade on WEEX.
1. Go to WEEX Futures Market
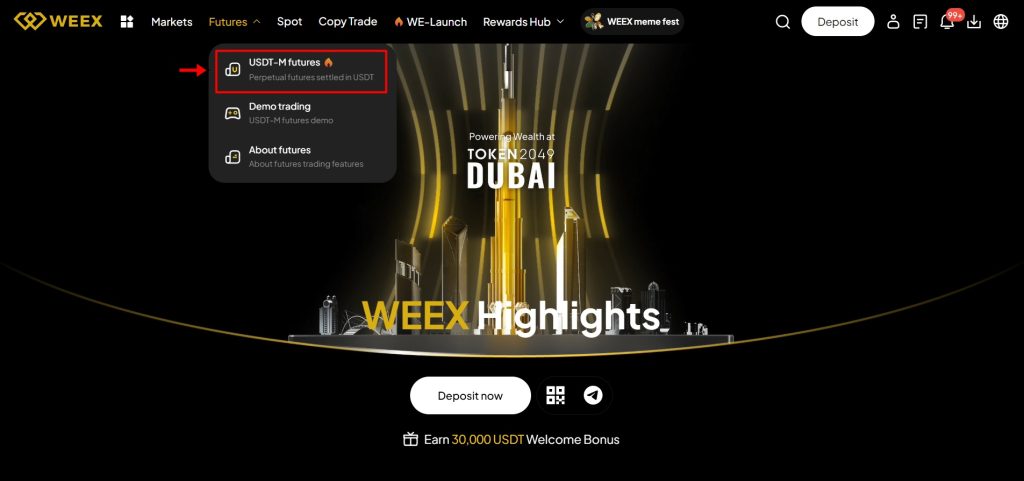
Log into your WEEX account. On the homepage, hover over "Futures" in the top navigation bar. Select "USDT-M Futures" from the dropdown. This opens the futures trading interface, where you can start configuring your trade.
2. Get Familiar with the Interface
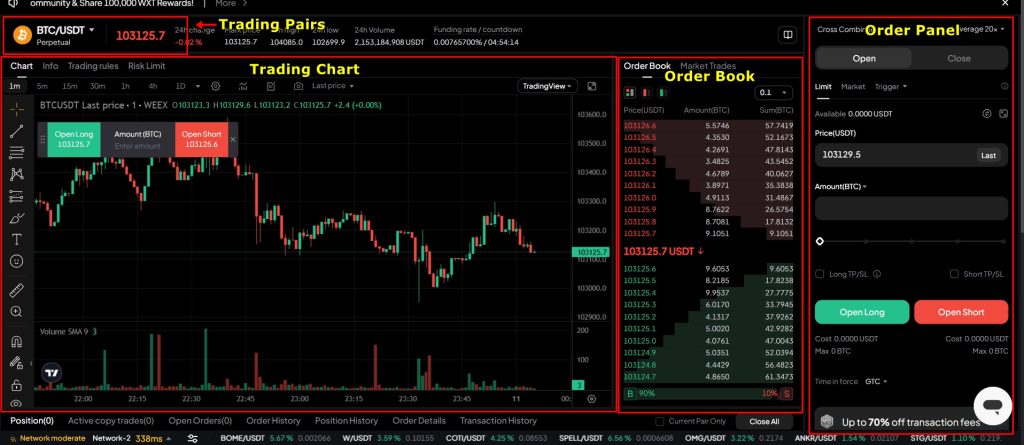
Before placing a trade, understand the key sections of the interface:
- Trading Pair Selection: Located at the top left. Click the current pair to open a dropdown list and select a different futures contract.
- Chart Area: Found below the pair selector. It displays real-time price movements and allows users to adjust timeframes and technical indicators.
- Order Book: Located to the right of the chart. It shows active buy and sell orders, helping users assess market depth and liquidity.
- Order Panel: Positioned on the far right. This is where users configure order type, leverage, margin mode, direction, and price before placing a trade.
Review each section to avoid mistakes during order placement.
3. Select a Trading Pair
Click the displayed trading pair in the top left corner. A dropdown menu will appear. Use the search bar or scroll to select a futures pair. For this tutorial, we are going with BTC/USDT. Once selected, the chart and order book will update accordingly.
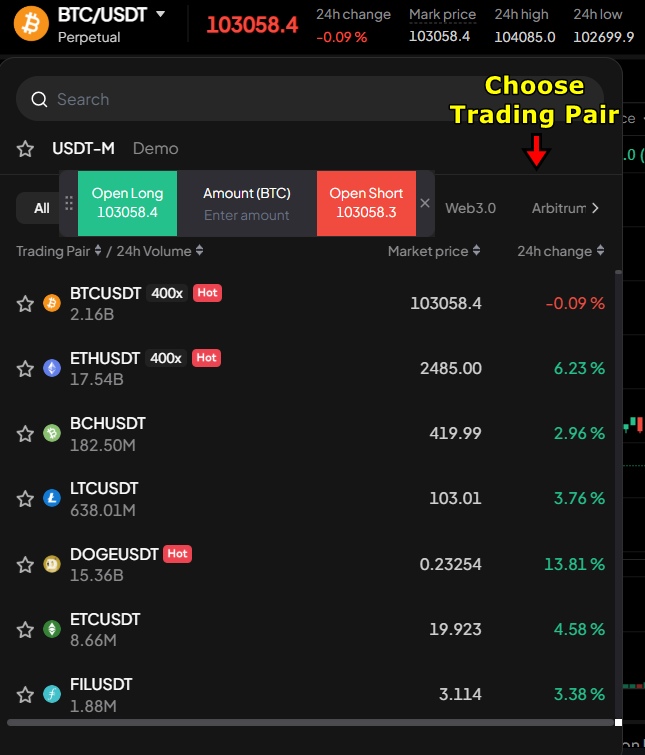
4. Choose an Order Type
In the Order Panel, select your preferred order type. WEEX supports Limit, Market, and Trigger orders.
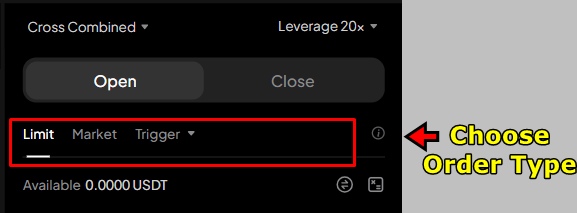
This tutorial uses a Limit Order, which allows you to define the price at which your trade opens. The order executes only when the market reaches your specified price.
5. Choose Margin Mode and Leverage
Next, select the Margin Mode. Choose Isolated Margin for this tutorial. It limits your risk to only the margin assigned to that specific trade, keeping your remaining balance unaffected.
Adjust the Leverage using the slider or input field. WEEX allows up to 400x leverage. For this example, use 10x leverage, meaning you can open a position ten times the size of your allocated margin.
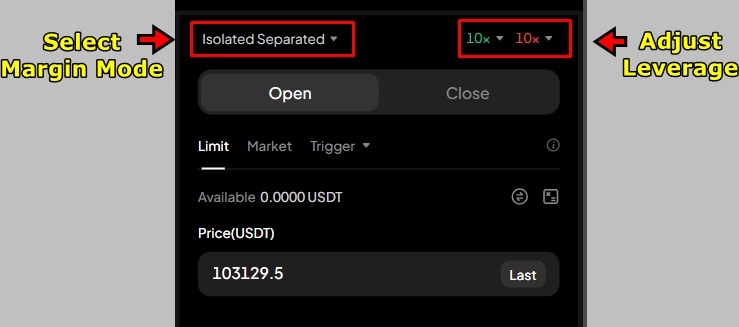
6. Enter Trade Details
Choose your trade direction:
- Long if you expect the asset's price to increase.
- Short if you expect the price to decrease.
This example demonstrates how to open a Long Position.
In the Order Panel:
- Set your Limit Price (e.g., $103,000).
- Enter the Amount of BTC you want to allocate.
After confirming the trade details, click “Open Long.” Your order appears in the Open Orders section and executes when the market reaches the limit price.
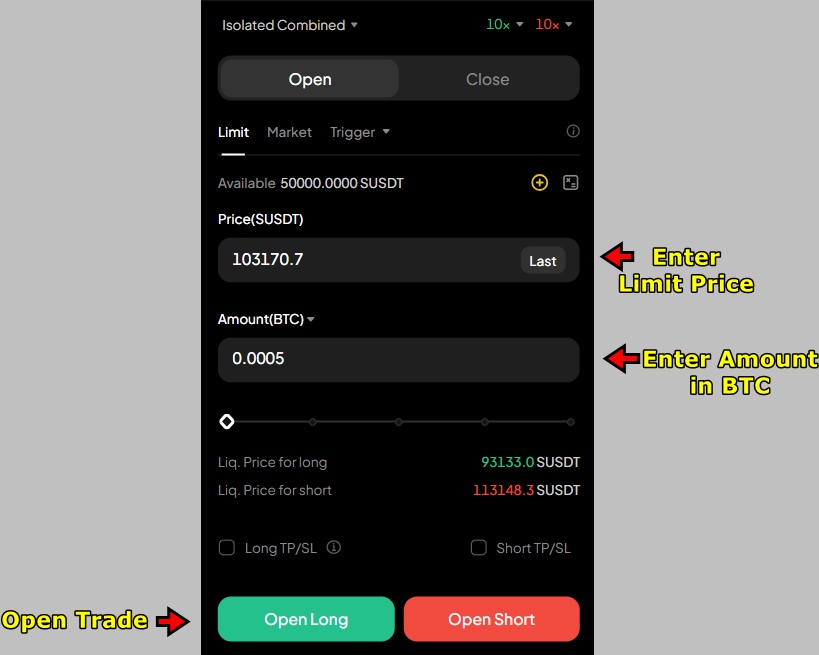
To open a Short Position, follow the same steps but click “Open Short.” A short trade profits when the asset's price drops, allowing you to sell high and buy back lower.
7. Monitor Your Position
After your order is filled, go to the Open Positions tab at the bottom of the interface. This section displays important data including:
- Position Size
- Unrealized PnL
- Realized PnL
- Market Price
- Liquidation Price
- ROI

Use this information to track your trade performance and respond quickly to market movements. Regular monitoring helps you make informed decisions and avoid unnecessary losses.
8. Add Stop-Loss/Take-Profit
Managing risk is critical in futures trading. In the Open Positions tab, locate the TP & SL option on the right. Set your Stop-Loss to cap potential losses and your Take-Profit to lock in gains when your target price is reached.

You can also manually close your position using the “Flash Close” button or by entering specific price and quantity values next to the “Close Position” option. These controls allow you to close trades partially or completely.
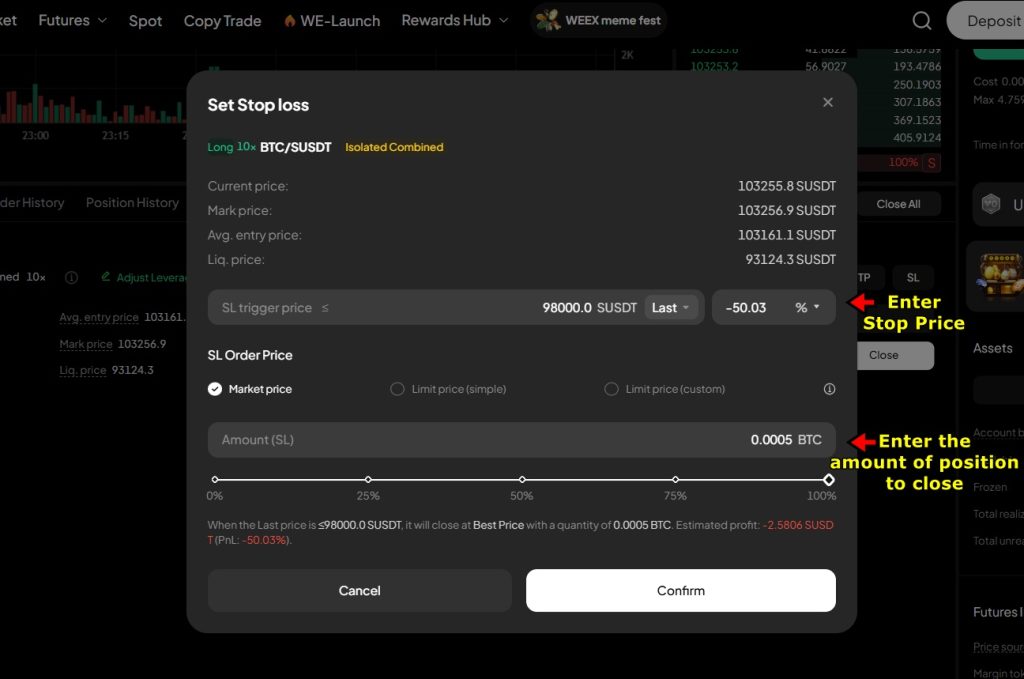
Another tool available is the “Reverse” option, which closes your current position at market price and immediately opens an opposite position. For example, if you had a Long trade open, using Reverse will initiate a Short trade at the same moment.
New users can claim double rewards on WEEX for a limited time. Bind your phone and email to get a 10–100 USDT coupon and unlock additional trading rewards.
WEEX Copy Trading Tutorial
WEEX’s Copy Trading feature allows users to automatically follow and mirror the trades of professional futures traders. It’s designed for users who want to participate in futures trading without developing their own trading strategies. Here’s how to set it up step by step:
1. Open WEEX Copy Trading Page
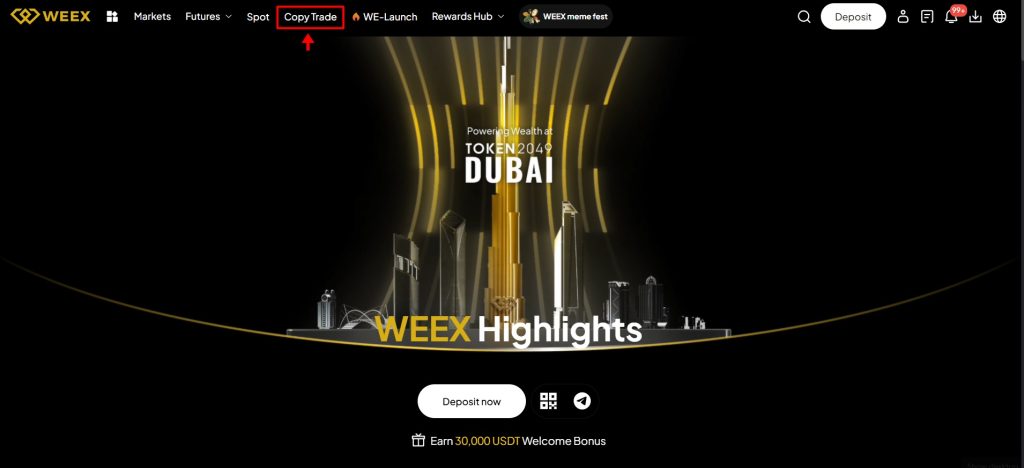
Start by visiting the official WEEX website and logging into your account. From the top navigation bar, click “Copy Trade.” This opens the Copy Trading dashboard, where you’ll see a list of trader profiles available for copying. Each profile includes key stats to help you assess performance.
2. Select a Trader to Copy
Browse through the list of traders. WEEX ranks traders based on metrics such as overall ROI, PnL, and trade history. You can filter the list or click “All Traders” to explore more profiles. Review each trader's performance, trading style, and follower count. Once you find someone whose results and strategy suit your preferences, click “Copy Trade” next to their name to begin setup.

3. Choose Futures Pairs to Copy
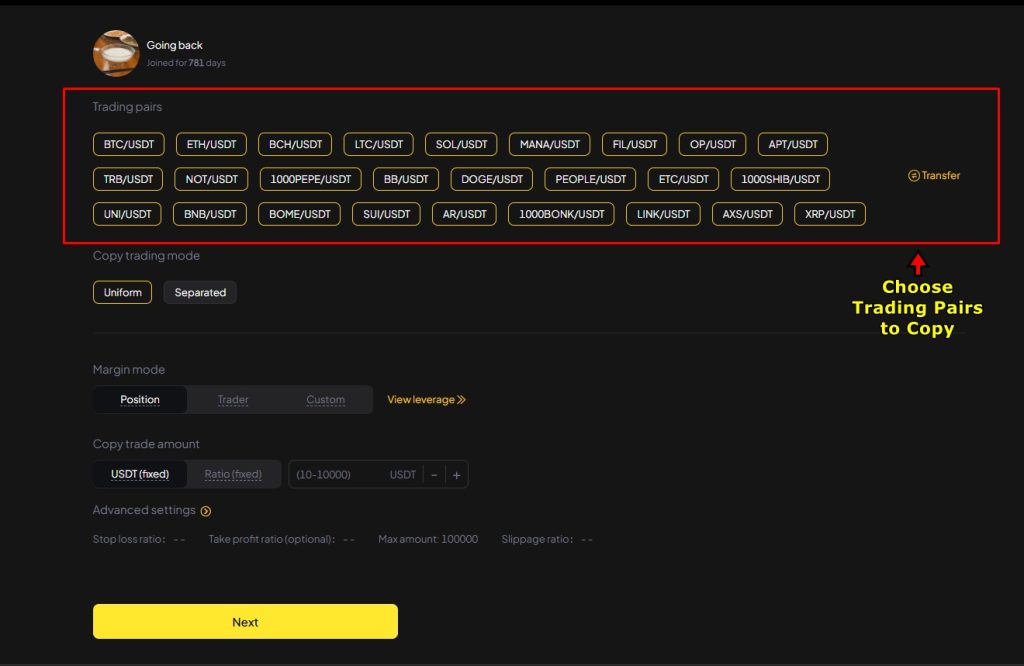
On the configuration screen, you’ll be asked to select which futures trading pairs to include. You can choose to copy all pairs supported by the trader, or select only the specific pairs you want exposure to. This allows you to limit your risk to assets you’re familiar with or prefer trading.
4. Select Preferred Copy Trading Mode and Margin Mode
Now choose how your trades will be copied. There are two Copy Trading modes:
- Uniform Mode: Applies one set of trade settings across all selected pairs.
- Separated Mode: Lets you configure each pair individually with different trade settings.
After setting the Copy Mode, choose a Margin Mode:
- Position Mode: Uses your personal leverage settings for every trade.
- Trader Position Mode: Matches the trader’s exact leverage per trade. If your account lacks enough balance, the copy will fail.
- Custom Mode: Lets you manually configure leverage for each position, offering more flexibility. Trades still require enough margin to open.

5. Enter Copy Trade Amount
Next, define how much you want to allocate per trade. WEEX offers two options:
- USDT Fixed: You set a fixed USDT amount. If you enter 50 USDT and the trader executes a 1000 USDT trade, your position will open with 50 USDT. If your balance is less than 50, the system will use the maximum available amount instead.
- Ratio Fixed: You mirror the trader’s position size based on a ratio. If you set it to 0.5 and the trader opens a 1.5 BTC position, your trade size will be 0.8 BTC (rounded up). This lets you scale your position based on the trader’s trades.
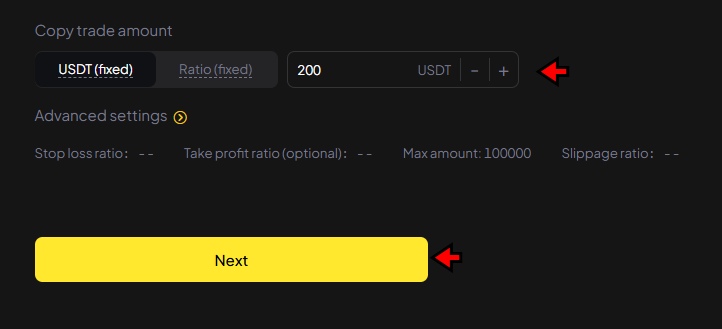
Choose the option that matches your risk tolerance and balance. Enter your trade amount, then proceed.
6. Review and Confirm Your Copy Trade
A confirmation window will display a summary of the copy trade setup. You’ll see the selected pairs, trade sizes, margin settings, and leverage. Carefully review this information to ensure it aligns with your intent. If everything looks correct, click “Confirm” to activate copy trading. Your trades will now open and close based on the trader’s activity, and you can track them from your account.
How to Withdraw on WEEX
WEEX supports smooth and secure crypto withdrawals. While it doesn’t allow fiat withdrawals, users can transfer digital assets to external wallets or exchanges with minimal effort. The steps below explain the process clearly to help you avoid mistakes.
1. Go to the Withdrawal Page
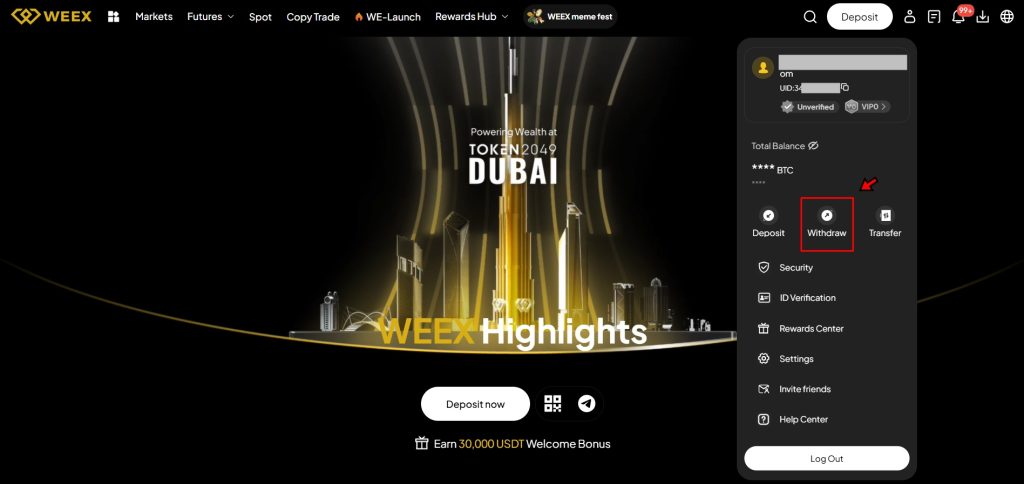
Visit the official WEEX website and log in to your account. Once logged in, click the User icon at the top right corner of the screen. A dropdown menu will appear. From this menu, select “Withdraw” to access the withdrawal interface.
2. Select the Cryptocurrency
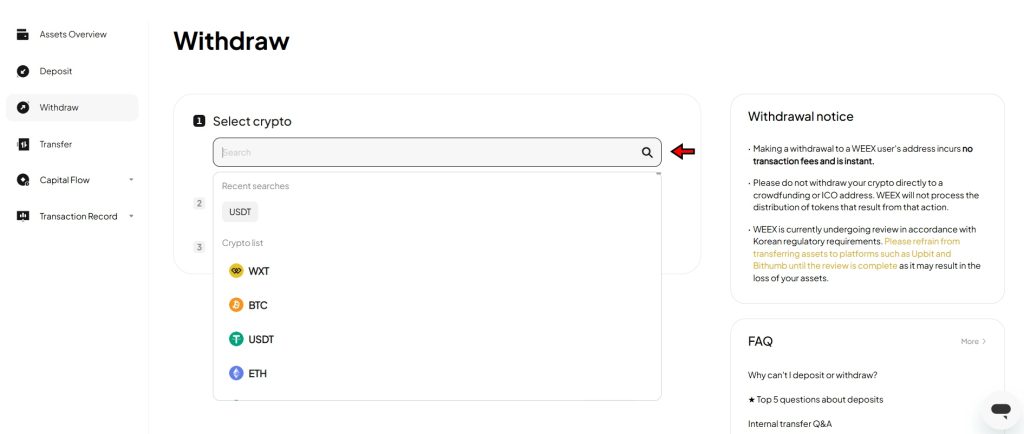
On the withdrawal page, begin by selecting the cryptocurrency you want to withdraw. For example, if you're holding Bitcoin, choose Bitcoin. If you're withdrawing USDT, make sure to select the correct version such as USDT-TRC20, USDT-ERC20, or USDT-BEP20. WEEX supports a wide list of tokens, so double-check that you’ve selected the correct one before continuing.
3. Choose the Network
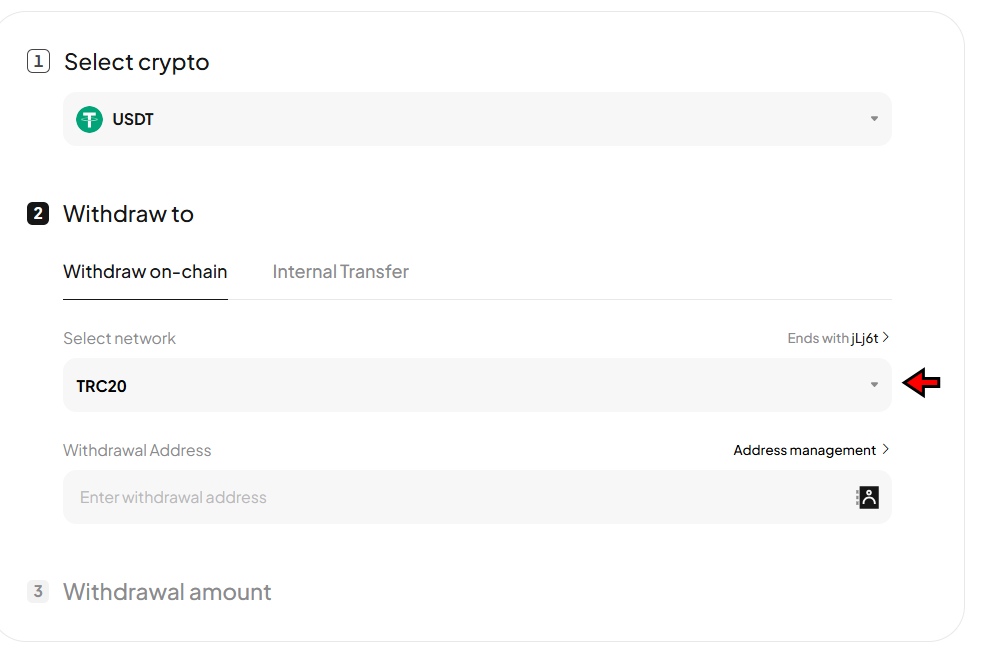
After selecting the cryptocurrency, you’ll need to choose the network for the withdrawal. This is a critical step. If you choose the wrong network—one that doesn’t match your receiving wallet—you risk losing your funds permanently. For instance, when withdrawing USDT, pick TRC20, ERC20, or BEP20 depending on which network your external wallet supports. Always confirm the network compatibility before proceeding.
4. Copy the Wallet Address and Complete the Transfer
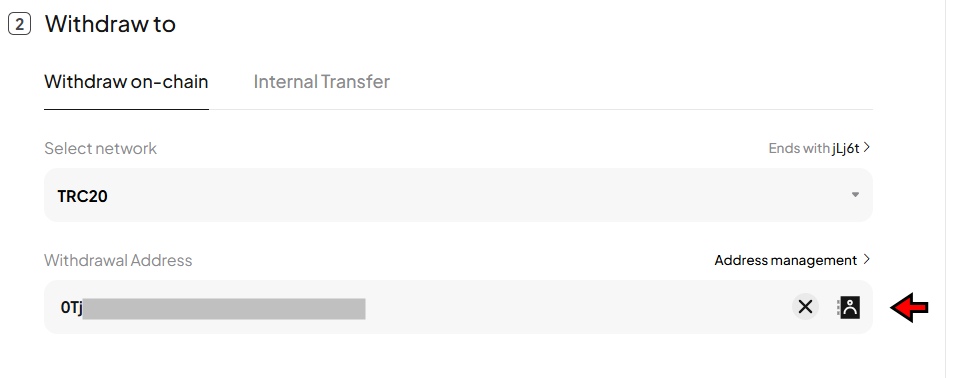
Now enter the destination wallet address where you want to receive the funds. Open your external wallet or exchange, copy the wallet address, and paste it into the address field on WEEX. Be sure to double-check the address, as crypto transactions are irreversible once submitted.
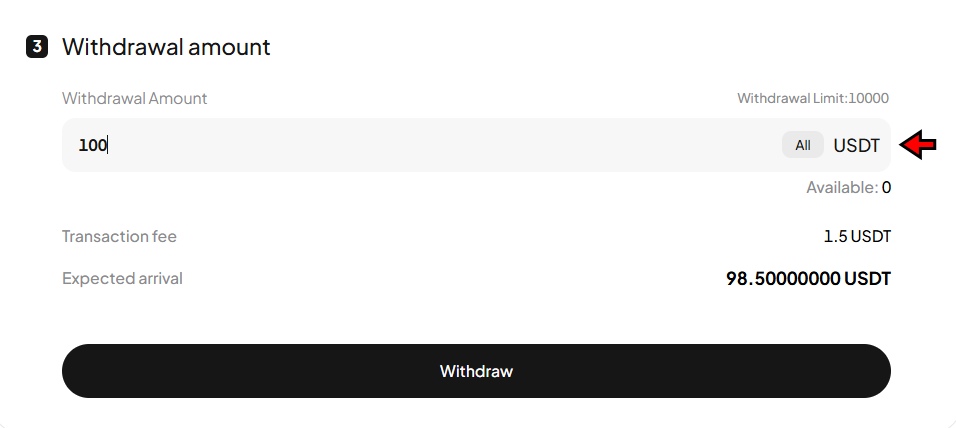
5. Enter the Amount You Want to Withdraw
Finally, input the amount of cryptocurrency you wish to withdraw. After entering the amount, click “Withdraw” to initiate the process. Depending on the network you chose, confirmation times may vary. Once the transaction is confirmed, the funds will be credited to your specified wallet.
WEEX Fees
WEEX follows a flat fee structure, keeping things simple without volume-based discounts. Spot traders pay 0.10% for both maker and taker orders. Futures trading offers lower fees, with maker trades at 0.02% and taker trades at 0.08%. Unlike exchanges that reward high-volume traders with lower costs, WEEX keeps its rates consistent for all users. This setup benefits those who prefer a predictable fee model but may not be ideal for traders looking for progressive discounts.

Deposits are free, meaning users can fund their accounts without extra charges. Withdrawal fees vary based on the asset but remain competitive with industry standards. While some exchanges impose hidden costs on transfers, WEEX maintains transparency, allowing traders to move funds without unexpected deductions.

Is WEEX Secure?
WEEX applies several protective measures to secure user assets, but its overall security standing remains moderate compared to top-tier exchanges. According to Certified’s rankings, WEEX holds a CC security rating and ranks 77th, suggesting room for improvement in certain areas.
One of the core protections WEEX offers is its Proof of Reserves (PoR) system. This allows users to verify that the exchange holds enough assets to cover all user balances. A significant portion of these assets is stored in cold wallets, which stay offline and out of reach from online threats. This limits exposure to large-scale hacks.
The exchange also maintains a 1,000 BTC protection fund, designed to act as a financial cushion in the event of a security breach or user fund loss. This reserve adds a layer of financial assurance, especially during unexpected incidents.
From a technical perspective, WEEX uses two-factor authentication (2FA) to secure user accounts. Users must confirm login attempts through a second verification step, typically using a mobile app like Google Authenticator. Additionally, WEEX secures all data transfers through SSL encryption, which prevents third parties from intercepting private information during online activity.
To detect threats in real-time, the platform runs an AI-powered risk control system. This tool scans transactions and behavior patterns to identify suspicious actions or unauthorized access attempts. Security audits from firms like Shencha Technology and Qingsong Cloud Security confirm that WEEX has taken measurable steps to enhance its platform’s defense layers. Despite these protections, self-custody remains the safest option for holding digital assets. Transferring crypto to a personal wallet instead of leaving it on an exchange gives users full control and eliminates reliance on third parties.
Final Takeaway
WEEX offers a straightforward way to get started with crypto trading, whether you're placing your first futures order or following a seasoned trader through copy trading. This tutorial covered everything you need, from creating an account to making withdrawals and understanding how secure the platform really is. After going through these steps, you’ll be able to use WEEX with confidence and start trading without any roadblocks. The platform offers solid features and tools, but like with any exchange, it’s smart to stay cautious and use personal wallets for long-term storage. Happy trading!
New to WEEX? Make your first 100 USDT deposit and get a 50% futures bonus. Bind your phone and email to claim a 10–100 USDT coupon and start earning trading rewards right away.
Frequently Asked Questions – FAQs
WEEX is a cryptocurrency exchange that supports spot, futures, and copy trading with up to 400x leverage.
WEEX uses Proof of Reserves, cold wallets, 2FA, SSL encryption, and a 1,000 BTC protection fund to secure user assets.
Visit the WEEX website, click “Sign Up,” and register using your email or phone number.
KYC is optional for most features, but some withdrawal limits and services may require identity verification.
WEEX offers spot trading, USDT-margined futures, and automated copy trading.
Users can trade with up to 400x leverage on certain futures pairs.
You choose a trader to follow, configure your trade settings, and your account mirrors their trades in real time.
You can either copy all pairs the trader supports or manually select specific ones.
WEEX offers both Isolated mode and Cross mode for its Futures pairs. In copy trading, WEEX offers Trader Mode, Position Mode, and Custom Mode for flexible leverage control.
Go to the “Withdraw” section, select your coin and network, enter your wallet address and amount, then confirm.
No, WEEX only supports cryptocurrency withdrawals at this time.
Yes, the platform is user-friendly, and features like copy trading make it accessible for newcomers.
Yes, trading fees apply and vary depending on the market type and trading pair.
Get more value from your first move on WEEX. Deposit 100 USDT to earn a 50% futures bonus, bind your phone and email for a 10–100 USDT coupon, and collect ongoing trading rewards.


