The Ultimate Coinflare Exchange Tutorial: Step-by-Step Guide for Beginners
Pros and Cons
Pros
- Requires a low minimum deposit
- No mandatory KYC verification for account creation.
- Offers up to 100x leverage on crypto trades.
- User-friendly platform with an intuitive trading interface.
- Low trading fees
- Collaborates with reputable firms to enhance security.
- Provides high-earning potential through affiliate and partnership programs.
Cons
- Restricted in certain regions, including the United States.
- Limited selection of cryptocurrency trading pairs.
- A relatively new exchange with a shorter track record.
Coinflare, formerly known as BITFLEX, is a Seychelles-based cryptocurrency exchange that offers both spot and derivatives trading. The exchange operates with the aim of simplifying crypto trading with a clean interface and easy access to essential tools. The platform supports a wide range of digital assets and is suitable for both new and experienced traders.
In this Coinflare tutorial, we will provide a complete walkthrough of how to use Coinflare. It covers the entire process from creating an account to placing spot and futures trades. You will also learn how to manage open positions and apply leverage safely. Screenshots are included at every step to make the process easier to follow. If you are just getting started, this guide will help you understand how Coinflare works and how to use it efficiently. Let’s begin!
What Is Coinflare?
Coinflare started out as BITFLEX and went live in December 2022. The exchange is based in Seychelles and supports both spot and derivatives trading. After the rebranding, the focus shifted toward delivering a cleaner, more practical trading experience: something that’s easy to pick up but still offers enough depth for active traders.
The interface is one of its stronger points. It's built to be approachable for beginners without removing the tools that more advanced users expect. Everything from market charts to order placement feels organized. You can quickly find what you need without clicking through layers of menus. For new users, that makes a big difference.
Coinflare supports a wide range of digital assets. The spot market covers most major cryptocurrencies, while the derivatives section includes perpetual contracts with adjustable leverage. Switching between the two is seamless, and there’s no major learning curve involved.
Security is also handled quite well. The exchange uses standard measures like two-factor authentication and cold storage for most user funds. Since launch, there haven’t been any reported security breaches, which adds to its credibility, especially for a platform that’s still building its reputation.
Despite being relatively new, Coinflare is growing steadily. Traders who want a mix of simplicity and control seem to find a good balance here. The Coinflare exchange also runs an affiliate program, which has helped bring in more users over time. While it doesn’t try to compete on hype, it does a good job of delivering the basics in a way that feels reliable and easy to use.
Sign up on Coinflare to claim up to $5,050 in welcome rewards and start trading crypto today!
How to Create Your Coinflare Account?
Setting up a Coinflare account doesn’t take long. The process is straightforward and beginner-friendly, with only a few steps before you’re ready to start trading. Below is a breakdown of each step, explained clearly so you can follow along without confusion.
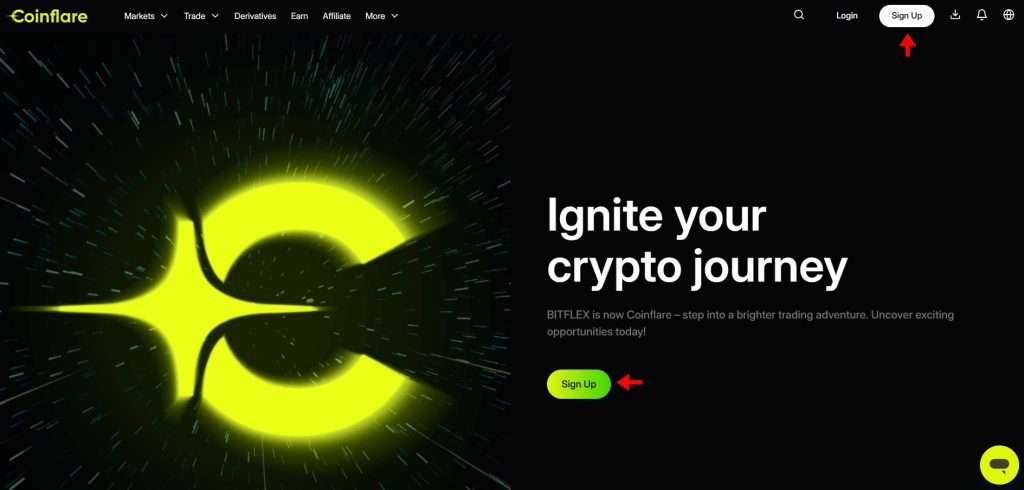
1. Go to the Official Website
Open your browser and head to Coinflare.com. This is the official site where all trading activity takes place. On the homepage, you’ll see a “Sign Up” button in the top right corner. There’s also a “Sign Up” option displayed in the center of the page. Click either one to begin the registration process.
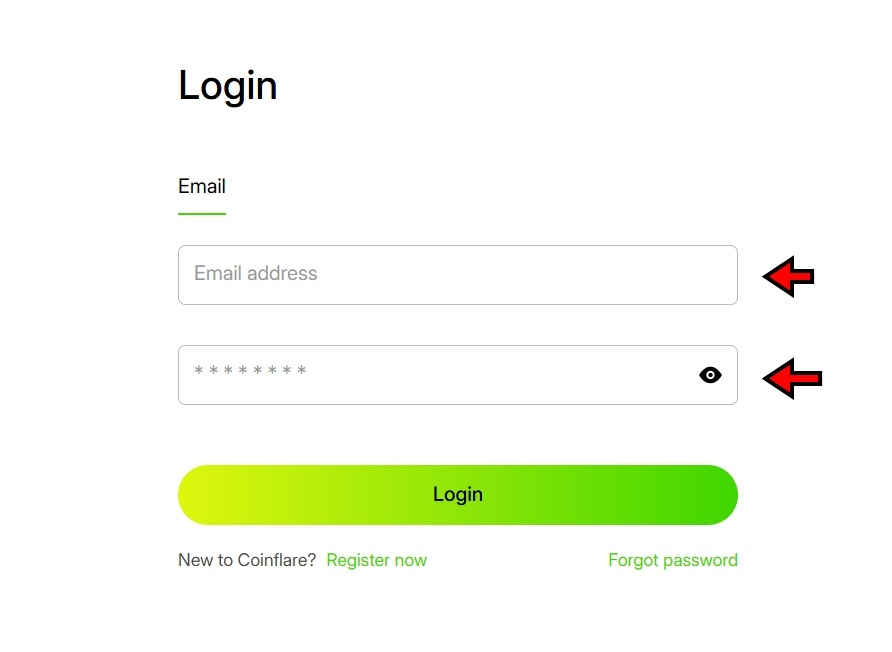
2. Enter Your Details
You’ll be taken to the registration page. Here, choose whether to sign up using your email address or phone number. Once you’ve entered your preferred contact method, create a secure password. Make sure it’s strong and use a mix of letters, numbers, and special characters to protect your account from unauthorized access.
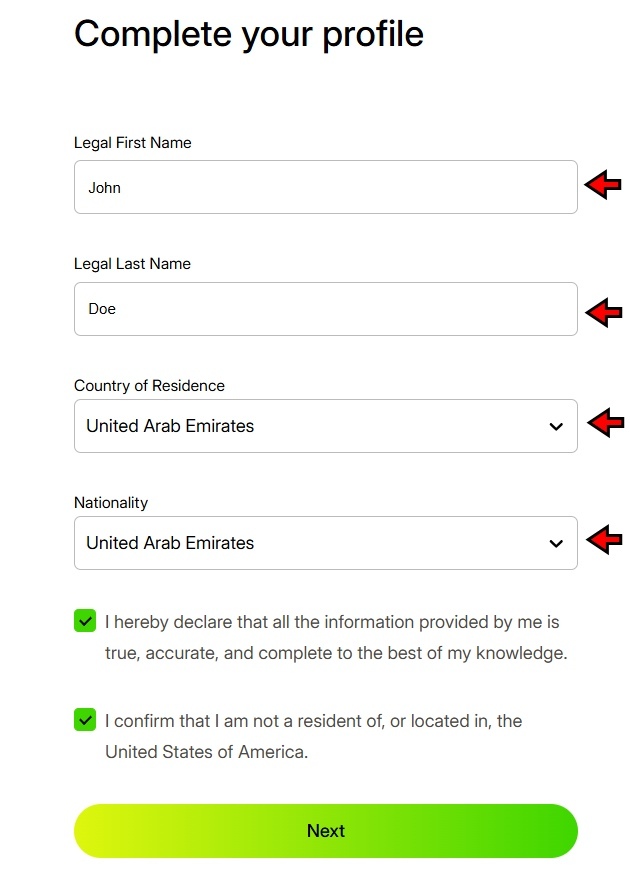
3. Provide Personal Details
Next, fill in your personal details. This includes your first and last name, country of residence, and nationality. Double-check that all the information is accurate. After that, agree to the platform’s terms and conditions by checking the required boxes. Once everything looks correct, click “Continue.”
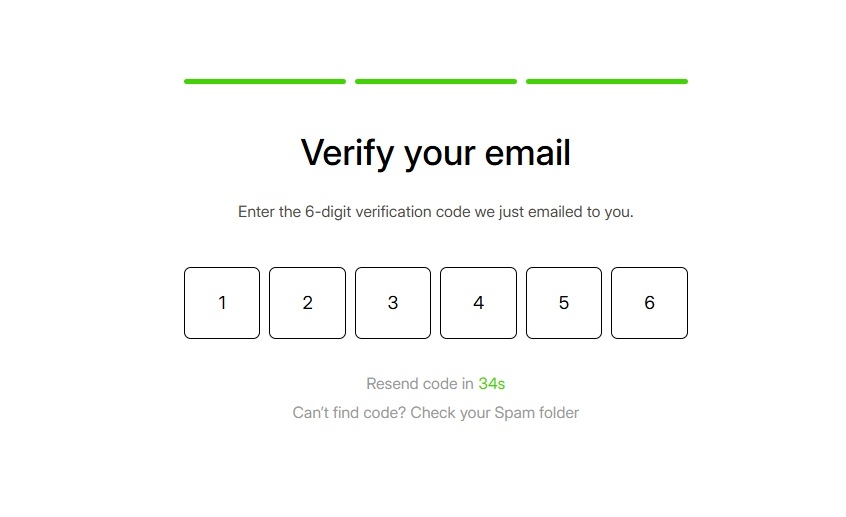
4. Verify Your Account
After you click continue, Coinflare will send a six-digit verification code to the email or phone number you used to register. Open the message and enter the code on the platform to complete the verification step. This is required to activate your account.
5. Start Trading
Once your account is verified, you’re ready to use the exchange. Coinflare does not require mandatory KYC for basic trading. This means you can deposit funds and start trading immediately after completing the initial sign-up and verification steps.
The whole process usually takes just a few minutes. Once you’re signed in, you can explore the dashboard, view market pairs, and prepare your account for deposits and trades.
How to Complete KYC on Coinflare?
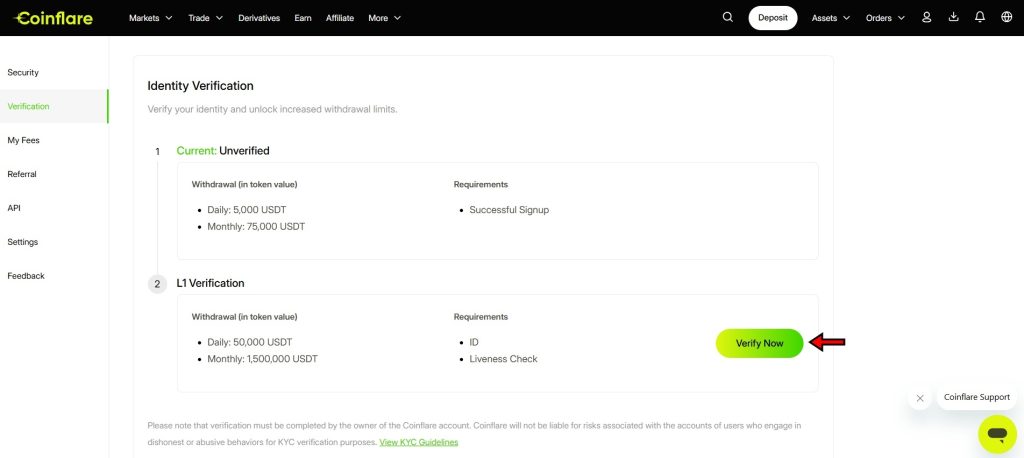
Coinflare doesn’t make identity verification mandatory, which means you can trade and withdraw up to 5,000 USDT daily without submitting any personal documents. But if you want higher limits or added account protection, the exchange offers optional KYC with multiple levels. Completing Level 1verification increases your withdrawal limit to 50,000 USDT per day, which can be useful for more active traders.
Here’s how to complete the KYC process step by step:
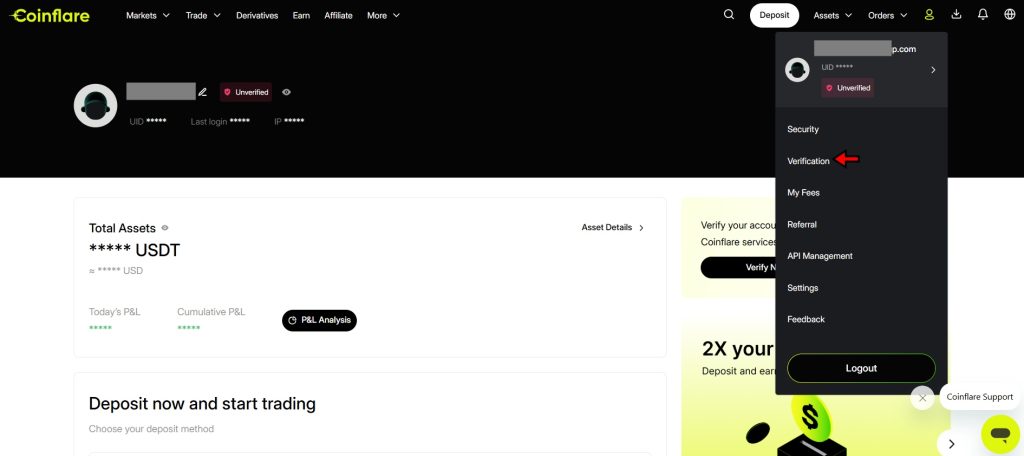
1. Open the ID Verification Page
Log in to your Coinflare account and go to the main dashboard. Move your cursor to the user icon in the top right corner of the screen. A dropdown menu will appear. Click on “Verification.” This will take you directly to the ID verification page where the process begins.
2. Click on “Verify Now”
On the verification page, you’ll see your current verification status listed as “Unverified.” In the Level 1 section, click the “Verify Now” button to start the application. This opens a new window where you can begin entering your KYC details.
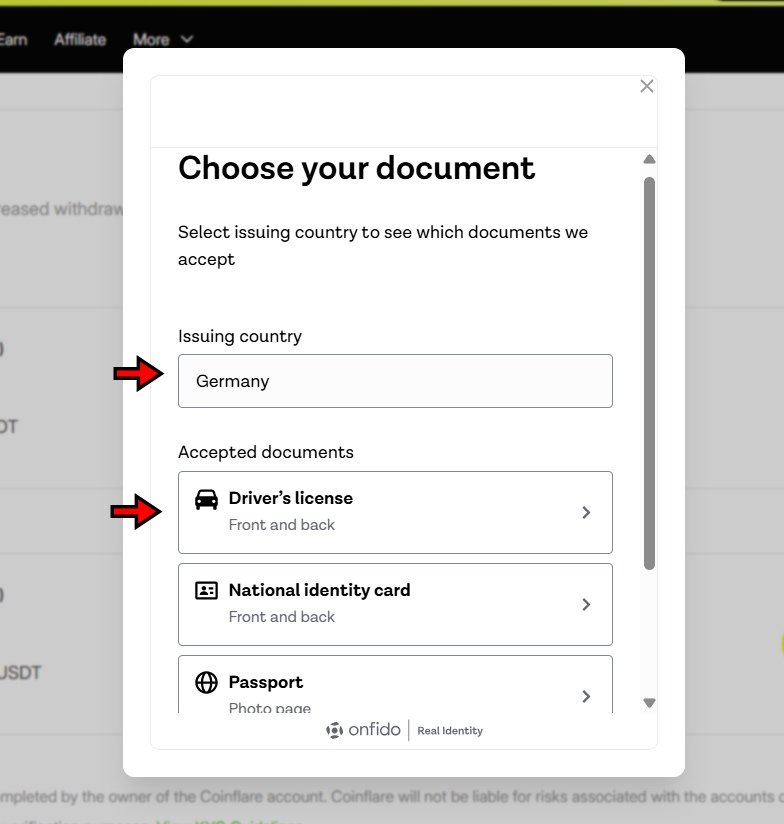
3. Choose Country and Document Type
A pop-up will guide you through the verification steps. Start by selecting your country of residence. Once that’s done, choose the type of identity document you want to submit. The options may vary depending on the country you’ve selected. After choosing the document type, proceed to the next step.
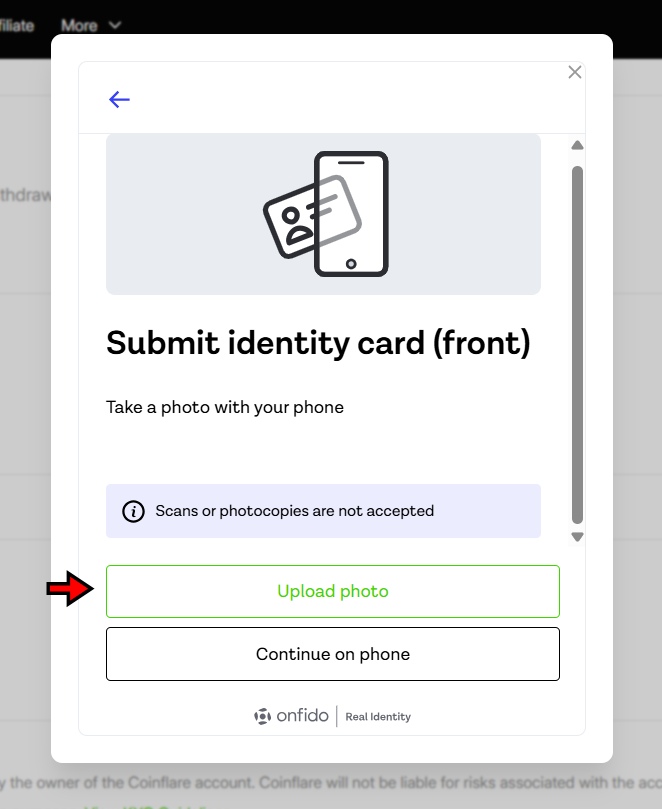
4. Upload Documents
You’ll now be prompted to upload a copy of your selected ID document. Make sure the image is clear and that all text is readable. If you have selected a National ID card, you must upload clear copies of both the front and back of the card. Avoid using scanned copies that are blurry or cropped. You can either upload from your desktop or switch to the Coinflare mobile app to continue the process there.
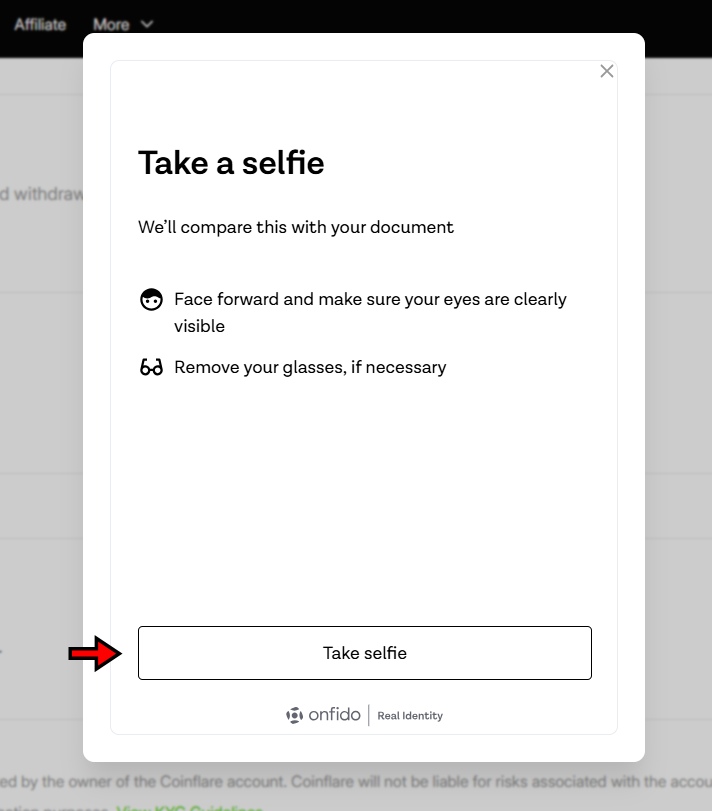
5. Complete Facial Verification
After uploading your document, you’ll be asked to complete a quick facial verification. Use your webcam or mobile camera to take a clear selfie. Don’t wear glasses or anything that could block your face. Follow the on-screen instructions carefully to ensure the system captures the image properly.
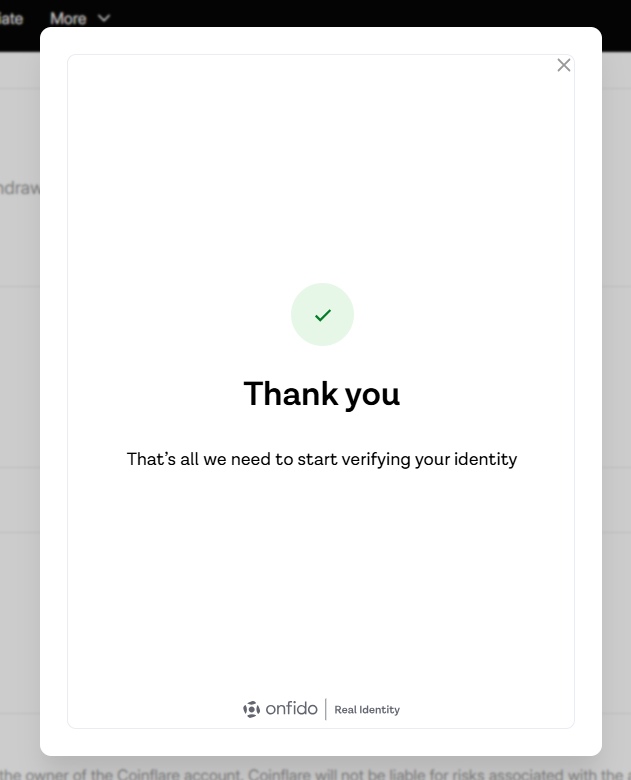
6. Submit Application
Once both the document and selfie are submitted, click on “Confirm” to complete the process. Your application will be sent for review. In most cases, verification is completed within 24 hours, but this may vary slightly depending on your location and the document you provided.
If you don’t need the higher withdrawal limits, you can continue trading without KYC. But if you're planning to move larger amounts or want extra account security, completing the verification is a simple process that doesn’t take much time.
How to Deposit on Coinflare
Depositing funds into your Coinflare account is straightforward. The exchange supports only crypto deposits at the moment, and fiat deposits aren’t available. If you're holding assets like USDT, BTC, ETH, or any supported coin, you can fund your account in just a few steps. Here's how to do it from start to finish.
1. Go to the Deposit Page
Once you're logged into your Coinflare account, look toward the top right corner of the screen. You’ll see the “Deposit” button in the header section. Click it, and you’ll be taken straight to the deposit interface.
2. Select the Cryptocurrency to Deposit
On the deposit page, you’ll see a list of supported cryptocurrencies. Select the coin or token you want to deposit. If you're sending stablecoins like USDT, go ahead and pick it. For this tutorial, we’ll use USDT as an example, but the steps remain the same for other assets like Bitcoin or Ethereum.
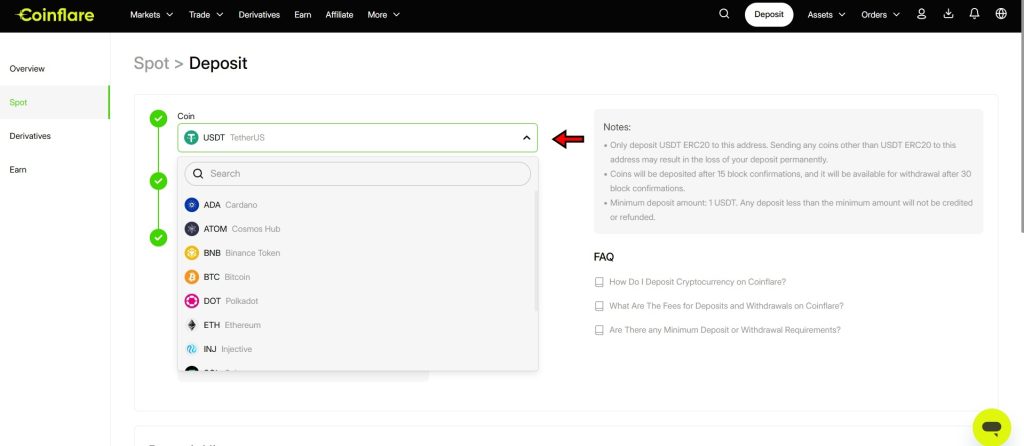
3. Select a Network and Copy the Wallet Address
After choosing your currency, Coinflare will ask you to pick a network. For USDT, options usually include ERC20andTRC20. Pick the one that matches the network you're using in your sending wallet. Choosing the wrong network can lead to lost funds, so double-check this step.
Once selected, the platform will generate a unique deposit address. Copy this address and paste it into the withdrawal section of the wallet you're sending funds from. Again, confirm that both networks (sending and receiving) are the same.

4. Wait for Blockchain Confirmation
After initiating the transfer, give the blockchain a few minutes to process it. You can monitor the transaction through your wallet or a block explorer. As soon as the confirmation is complete, the funds will land in your Spot Wallet by default.
Note: If you're planning to use those funds for derivatives trading, you’ll need to move them manually. Just hit the “Transfer” button next to your funds, choose Derivatives Wallet as the destination, and confirm. The transfer is instant, and you’re ready to start placing trades.
Understanding Order Types on Coinflare
Before placing trades on Coinflare—whether in spot or derivatives markets—it’s essential to understand how different order types work. Each order behaves differently depending on price conditions, execution priorities, and trading goals. Here's a breakdown of the supported order types and how they work in practice.
Market Order
A market order executes immediately at the best available price. It prioritizes speed over price control, making it ideal for users who want fast execution without waiting for specific price conditions.
Example: If BTC is trading at $100,000 and you place a market buy order for 0.5 BTC, the exchange will match your order with the best available sell offers. You may end up paying slightly more or less depending on order book liquidity, but the trade executes instantly.
Limit Order
A limit order lets you set a specific price at which you want to buy or sell. The order stays open until the market reaches your defined price. This type offers control but may remain unfilled if the market doesn’t move in your favor.
Example: Say ETH is trading at $2,000. You place a limit buy order at $1,950. The order will only execute if ETH’s price drops to $1,950 or lower. If the price never reaches that level, the order remains pending.
Stop Order
A stop order helps manage risk by turning into a market order when a trigger price is hit. It’s mainly used for stop-loss strategies. A sell stop order activates when the price falls below your set level, while a buy stop triggers when the price rises above it.
Example: BTC is trading at $100,000. You want to limit losses, so you set a sell stop order at $95,000. If BTC drops to $95,000, your order turns into a market order and sells at the next available price.
Stop Limit Order
A stop limit order adds price control to a standard stop order. It activates at a stop price but executes only if the market can fill it at your set limit price or better.
Example: ETH is at $2,000. You expect a breakdown, so you place a stop limit sell order with a stop price at $1,950 and a limit at $1,940. If the price drops to $1,950, the order activates. It will only sell if ETH can be sold at $1,940 or higher.
Conditional Order
Conditional orders execute only when certain conditions are met. You can customize both the trigger and the execution type (limit or market). These are useful for advanced trading strategies where timing and precision matter.
Example: BTC is trading at $100,000. You believe a breakout will occur if it crosses $105,000. You set a conditional buy order: trigger price at $105,000 and execution as a market order. Once BTC hits $105,000, the system places a market buy order automatically.
Coinflare gives traders flexibility with these order types, helping them manage both entry and exit points based on price, volatility, and risk tolerance. Understanding how each order behaves allows for better planning.
Sign up on Coinflare to claim up to $5,050 in welcome rewards and start trading crypto today!
Coinflare Spot Trading Tutorial
Spot trading on Coinflare lets users buy or sell crypto assets instantly at current market prices. Buyers receive assets right away, and sellers get paid without delay. Coinflare supports ten major trading pairs, including BTC, ETH, XRP,and MATIC. The platform keeps the process simple and intuitive, making it accessible for both beginners and experienced traders. Here's how to start trading on Coinflare’s spot market step by step.
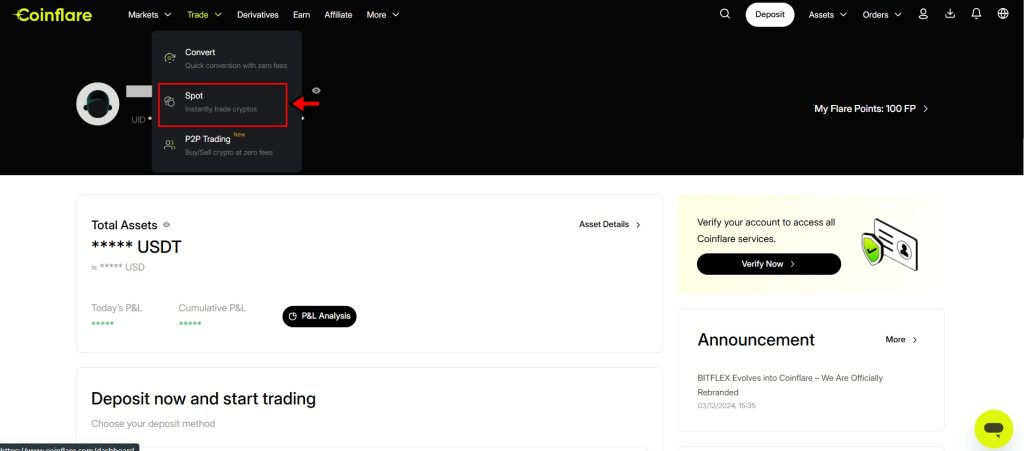
1. Go to the Spot Market
Log in to your Coinflare account. From the top navigation bar, hover over the “Trade” menu and click on “Spot” from the dropdown. This will take you directly to the spot trading interface.
2. Get Comfortable With the Layout
Take a moment to get familiar with what’s on your screen. The layout is divided into sections:
- Trading Pair Selector sits in the top-left corner. You can scroll through the list or search for the pair you want.
- Price Chart, powered by TradingView, sits right below it. You can switch timeframes and track price action in real time.
- Order Book is on the right side of the chart. It shows live buy and sell orders and helps you gauge liquidity.
- Order Panel, placed to the far right, is where you’ll enter trade details like price and quantity.
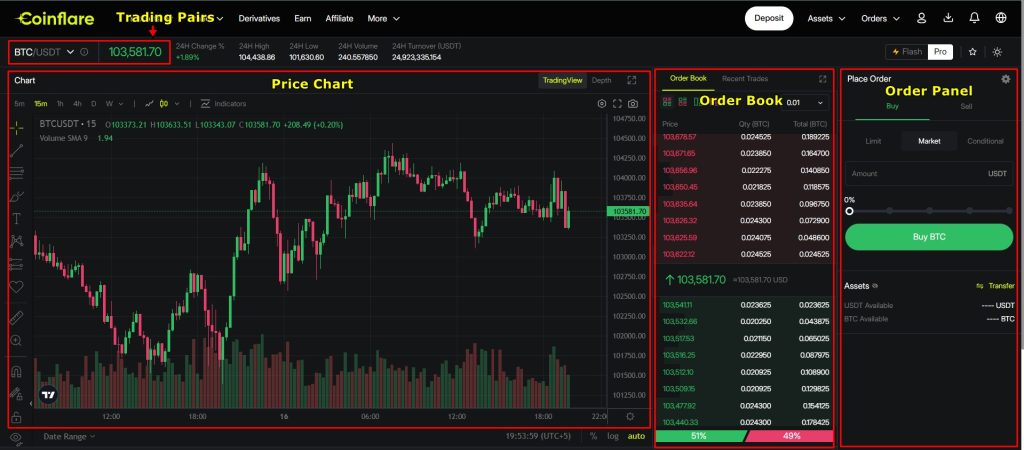
Everything you need to trade is on one screen, which makes the process easier.
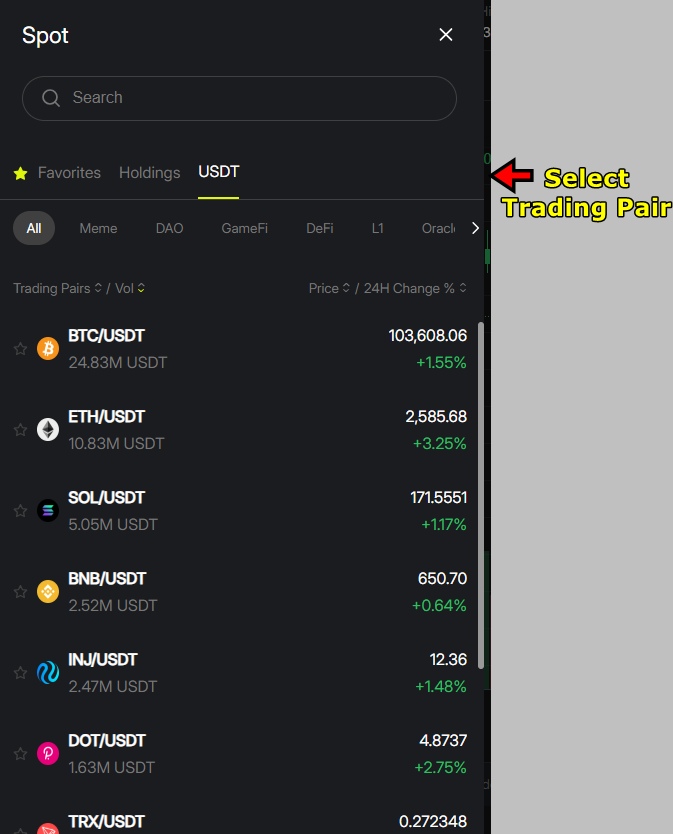
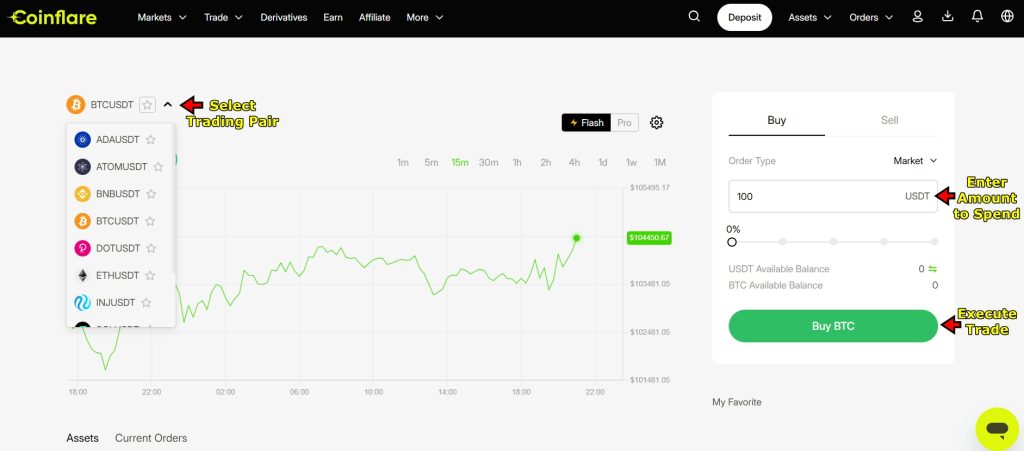
3. Select a Trading Pair
Click on the current pair (usually defaulted to BTC/USDT) to open the trading pair list. Use the search bar or scroll manually to find the one you want. For the purpose of this tutorial, we are sticking with the BTC/USDT pair.
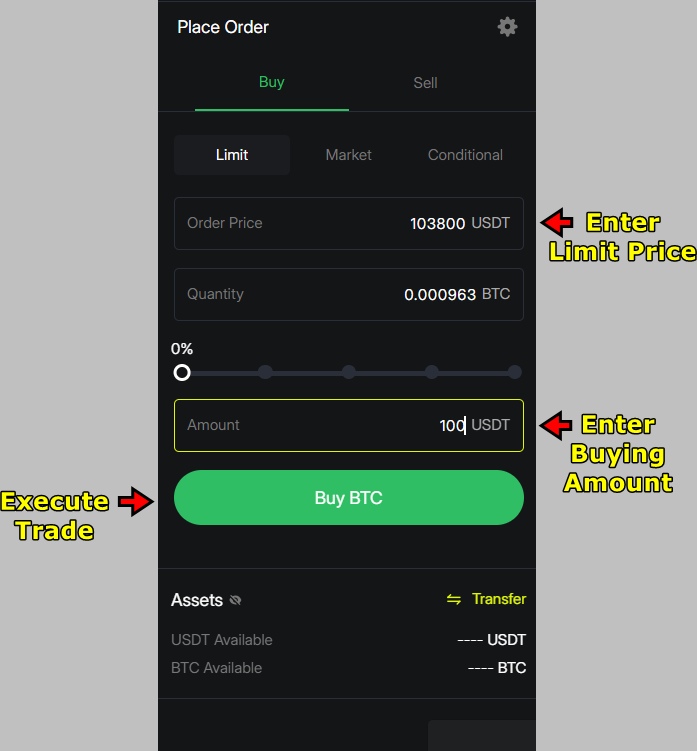
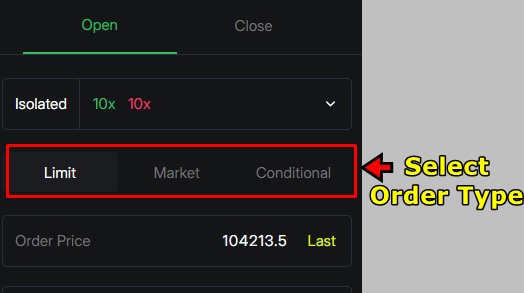
4. Pick an Order Type
In the Order Panel, choose how you want to place your trade. You can pick from Market, Limit, or Conditional orders. To keep it simple, let’s go with a Limit Order as this lets you set the price at which you want to buy BTC rather than accepting the current market rate.

5. Enter Your Order Details
After selecting Limit Order:
- Enter the price you want to pay for 1 BTC (e.g., $98,000).
- Enter the amount of BTC you want to buy, or just type in the amount of USDT you want to spend.
- Once everything looks good, click “Buy BTC” to execute the trade.
6. Let the Order Fill
If the market price reaches your limit, your order will be filled. Until then, you’ll see it listed in the Orders section below. Once executed, the BTC will be available in your Spot Wallet.
Flash Spot Trading
For traders who prefer speed and simplicity, Coinflare offers a stripped-down version of its spot market called Flash Trading. This interface is built for users who don’t want to deal with charts, order books, or advanced settings. It’s ideal for beginners or anyone looking to make quick trades without distractions.
Once you’re on the Flash page, the layout is minimal. On the left, select the trading pair you want, such as BTC/USDT or ETH/USDT. Then, just enter the amount of USDT you want to spend. Click “Buy”, and the trade executes instantly at the best available market price.
There’s no need to set order types, track price charts, or manage trade size with precision. Flash Trading handles everything in the background and gets your order through with one click. It’s as simple as it gets and useful when time matters or when you just want to buy without overthinking it.
Join Coinflare now to unlock a $5,050 bonus and start trading your favorite digital assets.
Coinflare Derivatives Trading Tutorial
Derivatives trading on Coinflare lets users trade contracts based on the price of cryptocurrencies without owning the actual coins. Instead of buying Bitcoin or Ethereum directly, you can trade USDT perpetual contracts and profit from price movements in either direction.
Coinflare offers USDT-margined contracts for top assets like BTC, ETH, and LTC. These contracts don’t expire, and you can hold them as long as your margin supports the position. Derivatives trading also gives you access to leverage. This means you can open a larger position than your actual balance allows. Coinflare supports up to 100x leverage on Bitcoin and Ethereum pairs, while the cap for other pairs can vary.
Leverage can boost profits, but it also increases risk. A small move in the market can either lead to high returns or a quick liquidation. That’s why it’s essential to understand the interface and set up your trades carefully.
Here’s how to start derivatives trading on Coinflare:
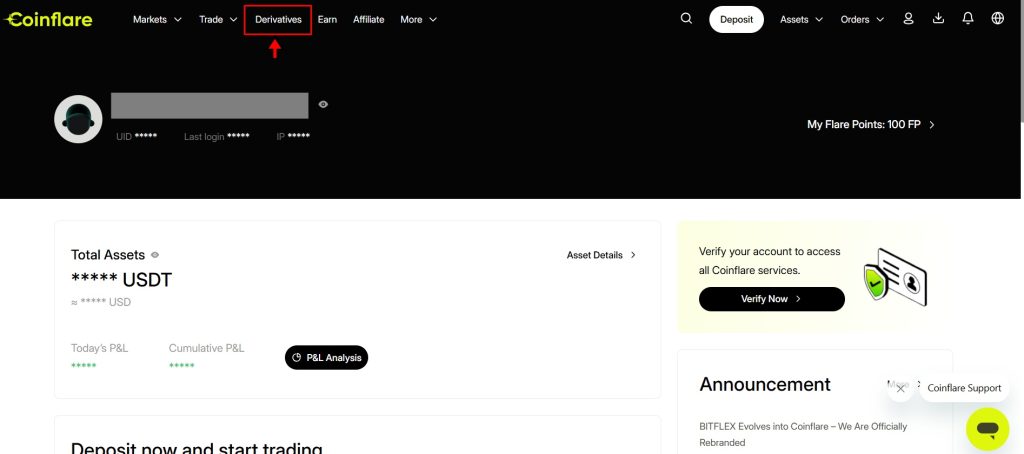
1. Go to the Derivatives Trading Page
Log into your Coinflare account. From the top menu, click on “Derivatives”. This opens the dedicated derivatives interface, where you’ll place and manage all futures trades.
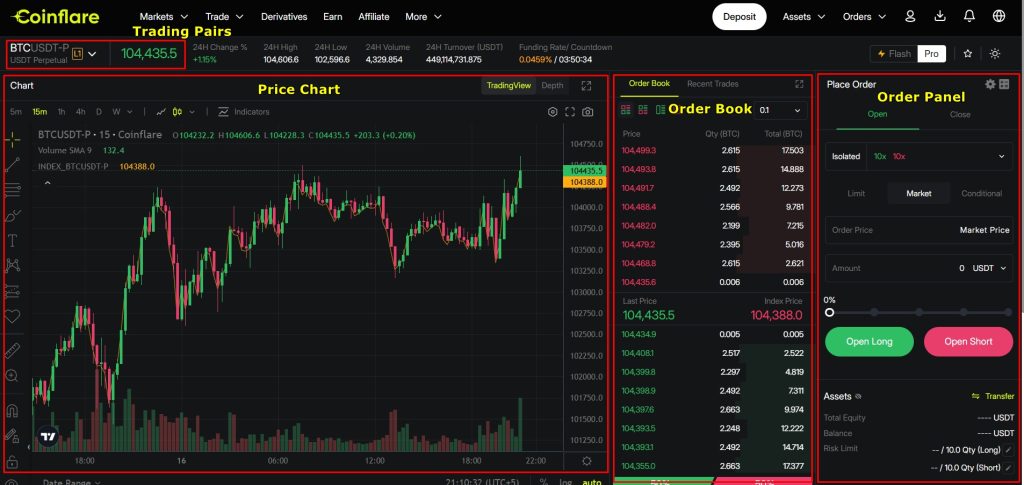
2. Understand the Trading Interface
Before opening a position, explore the interface and take a few minutes to understand how the interface works.
- Trading Pair Selector: Located on the upper-left side, you can use this to browse or search available perpetual contracts like BTC/USDT.
- Price Chart: Directly below the pair selector. Displays real-time market data using TradingView. You can adjust timeframes and add indicators as needed.
- Order Book: On the right side of the chart. This section shows active buy and sell orders with price levels.
- Order Panel: Found on the far right. This is where you configure trade details, including margin mode, leverage, order type, direction, and amount. This is the section that lets you place a trade.
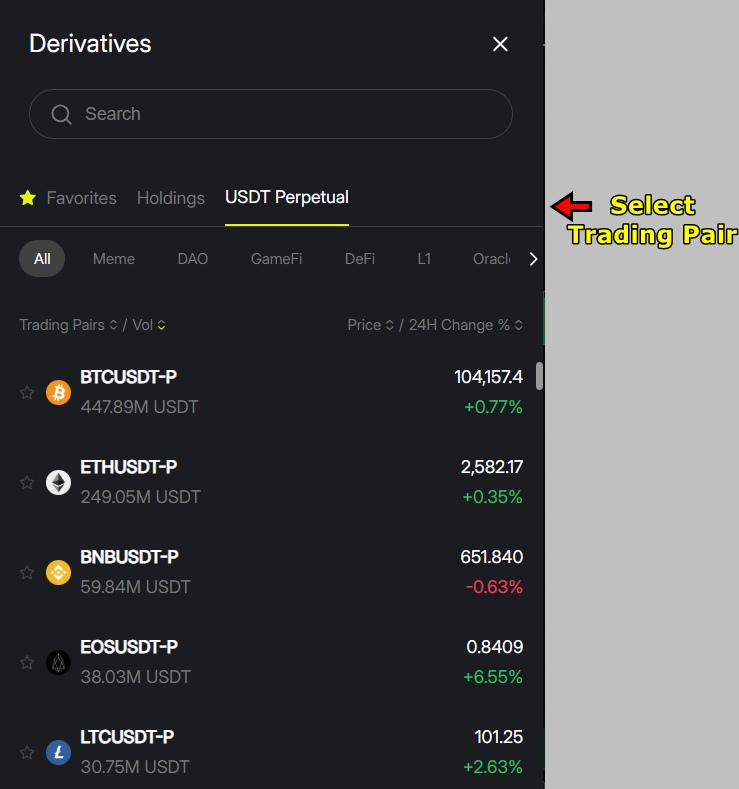
3. Select a Trading Pair
Click the trading pair in the top left corner. A dropdown will appear where you can scroll or use the search bar. For this tutorial, we are going with the BTC/USDT pair.
4. Choose an Order Type
Now, once you have picked a trading pair, you’ll see three order types in the Order Panel: Limit, Market, and Conditional. All three order types serve different purpose as mentioned earlier.
For this demonstration, we’ll use a Limit Order, which lets you set the price at which you want to enter. If you prefer instant execution, you can select a Market Order, but the price may fluctuate slightly due to market activity.
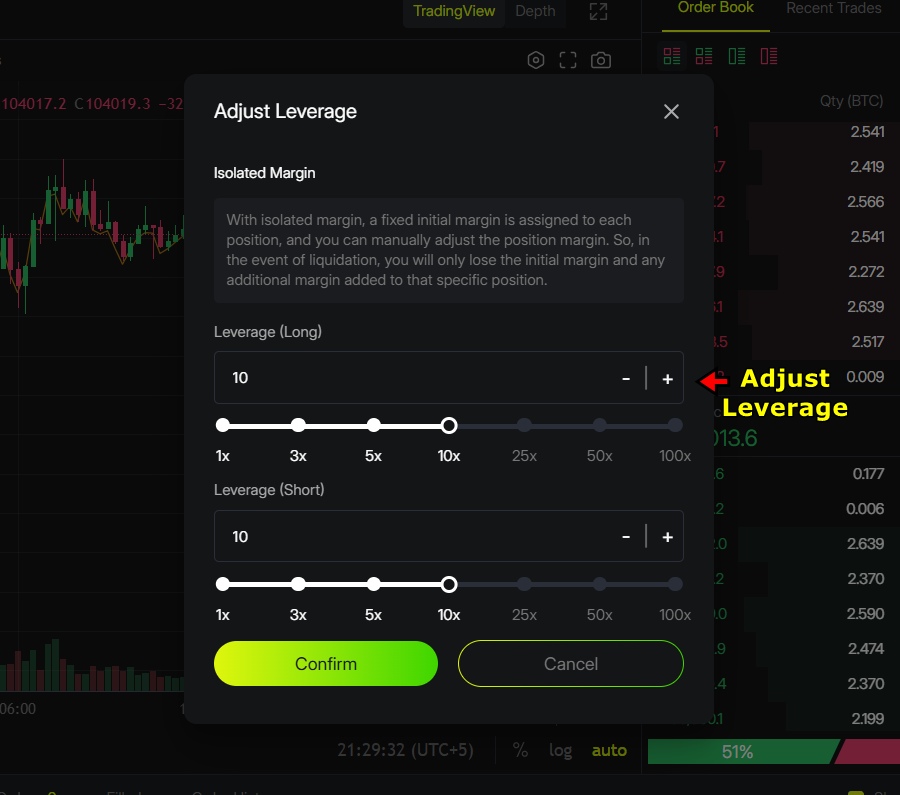
5. Set Margin Mode and Leverage
Unlike spot trading, derivatives trading requires you to choose a margin mode. There are two types of margin modes available on most derivatives market:
- Isolated Margin limits risk to the margin you use for this trade.
- Cross Margin uses your full futures account balance to support the position.
For this tutorial, we are choosing Isolated Margin as it limits the exposure and is good for beginners.
You will also need to select the leverage after picking a margin mode. Coinflare lets you choose different leverage for Long and Short trades. Use the slider to adjust leverage. We’ll go with 10x, which means your position size will be ten times your input margin.
6. Enter Trade Details
Now it’s time to configure your position.
We’ll demonstrate how to open a Long Position, which means you’re betting the price of BTC will rise.
In the Order Panel:
- Enter your Limit Price (the price where you want to buy BTC).
- Enter the USDT amount you want to use for this trade.
Once everything looks correct, click “Open Long”. Your order will appear in the Orders tab. It will only execute when the market reaches your set price.
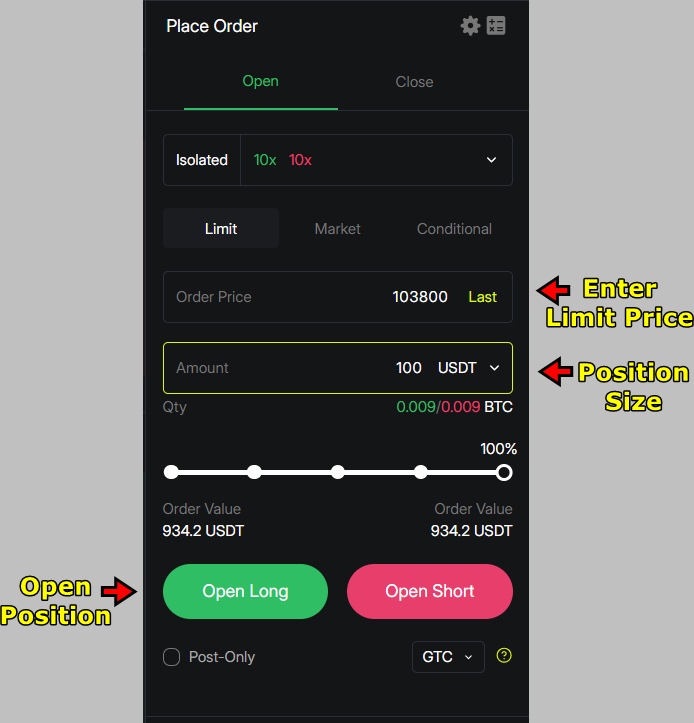
To open a Short Position, follow the same steps, but click “Open Short” instead. A short trade profits when the asset’s price drops so you will be opening the trade at higher amount and close when the price drops to your target.
7. Monitor Your Position
Once your trade is live, scroll down to the Open Positions tab.
Here you can track several important metrics including:
- Position Margin
- Entry Price
- Unrealized and Realized PnL
- Liquidation Price
Keep an eye on these metrics, especially if the market becomes volatile. They help you understand your position status and make decisions based on real-time data.

8. Set Stop-Loss and Take-Profit
Risk management is essential in derivatives trading. To control risk and lock in profits, set TP/SL (Take-Profit and Stop-Loss) for your active position.
- In the Open Positions tab, look for the TP/SL button on the right.
- Use Take-Profit to close the trade automatically once your profit target hits.
- Use Stop-Loss to prevent bigger losses if the price moves against your trade.
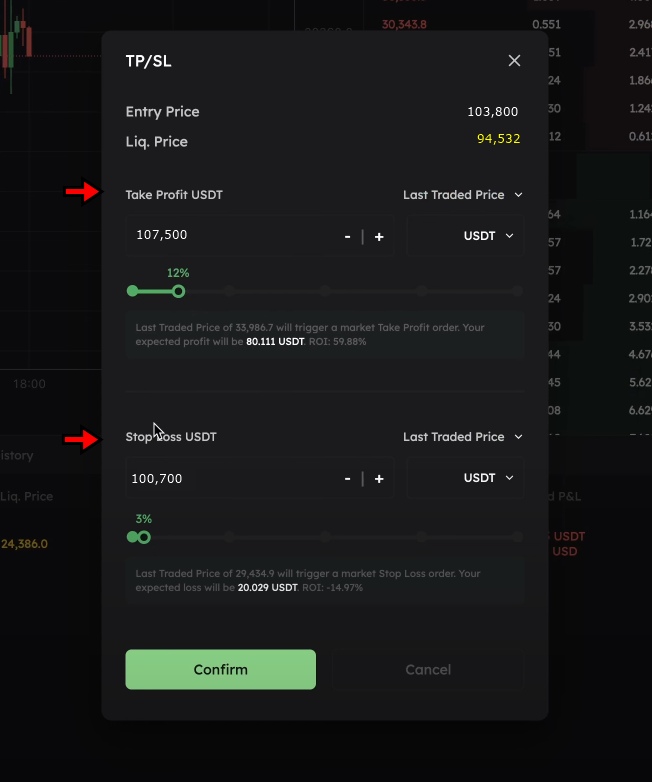
You can also close the position manually using the “Close By” button. Choose whether you want to exit the entire position or just a portion. For instance, if your position size is $100, you can close $50 worth and keep the remaining $50 open.
Flash Derivatives Interface
Flash Trading on Coinflare offers a simplified approach to derivatives trading for users who prioritize speed and ease of use. Unlike the standard derivatives interface filled with charts, order books, and advanced configuration panels, Flash Trading strips everything down to the essentials. It’s built for traders who want to place quick Long or Short positions without getting caught up in technical analysis or detailed trade setups. This makes it particularly useful for beginners or anyone looking to execute quick trades.
You can access the flash trading interface by clicking on the “Flash” option on the top right of derivatives trading page. On the left side, users can select their desired perpetual contract pair, such as BTC/USDT-P or ETH/USDT-P. After choosing a pair, simply select whether to open a long or short position. Below that, enter the amount of USDT you wish to allocate to the trade and adjust the leverage using a straightforward slider. Clicking “Long” or “Short” immediately places the trade at the best available market price.
By default, Flash Trading uses market orders for instant execution, but users also have the option to switch to limit orders if they prefer to specify the entry price.
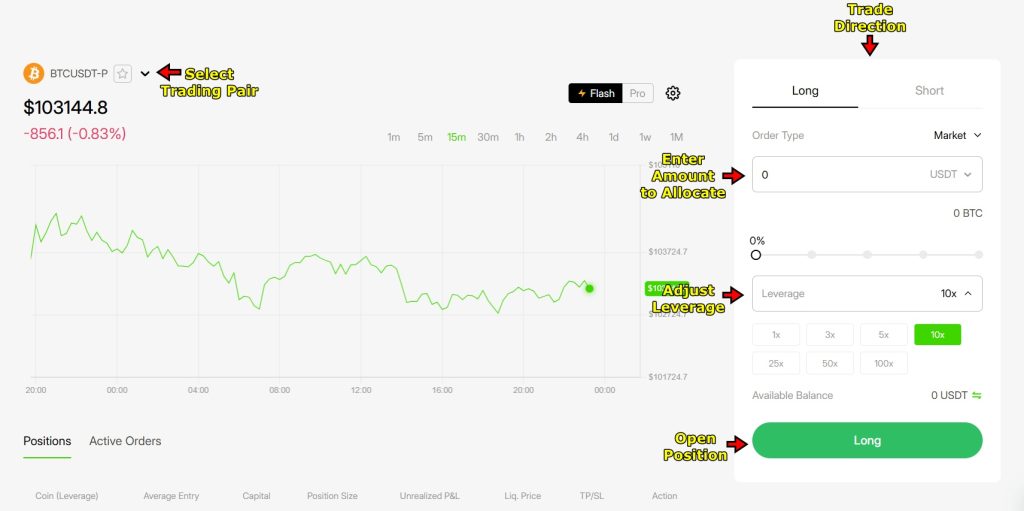
Flash Trading is ideal for scenarios where reaction time is critical or when a user simply doesn’t want to overthink a trade. It streamlines the process without compromising access to leverage or trading functionality. Once a trade is placed, it appears in the Open Positions tab just like in the standard derivatives platform, where users can monitor or close their positions as needed
Coinflare Key Trading Features
Coinflare includes a range of trading tools that make it easy to navigate the platform, whether you're just getting started or already trading regularly these features can provide plenty of value. Some features focus on simplifying transactions, while others offer rewards and community-driven incentives. Here's a breakdown of what traders can actually use and how these features work in practice.
Coinflare Convert
Coinflare Convert removes the complexity from crypto-to-crypto exchanges. Instead of going through the spot market or choosing from a list of trading pairs, users can directly swap one token for another. It’s a quick process as all you need to do is, select the crypto you want to convert, enter the amount, and choose what you want in return. A real-time quote shows how much you'll receive, and if you're satisfied, tapping the “Convert” button completes the swap.
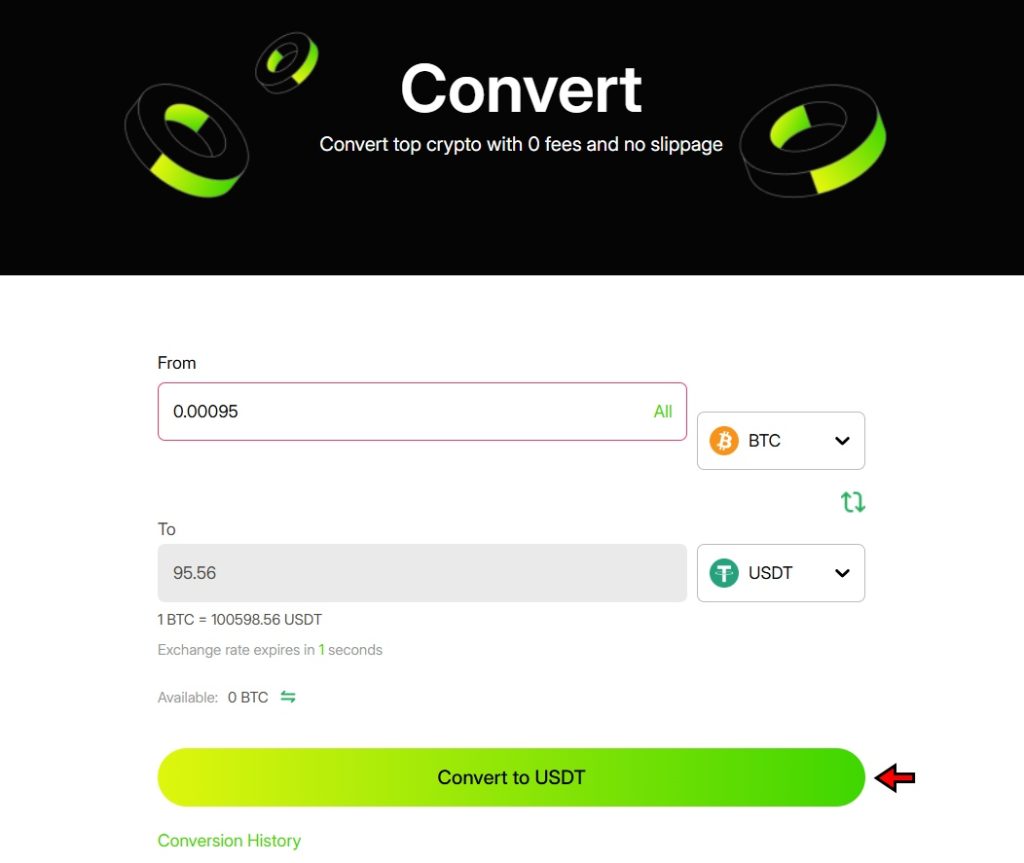
There are no hidden steps, no fees, no charts, and no order book mechanics to understand. The converted funds are deposited straight into your wallet. This feature works great for users who prefer direct conversions over traditional trading and is available under the “Trade” dropdown on the homepage.
Register on Coinflare to secure your share of $5,050 in rewards and start your trading journey today.
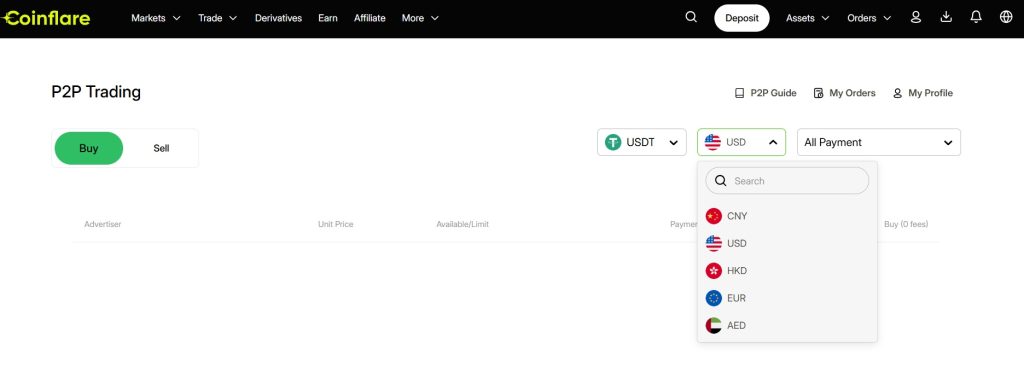
P2P Trading
Coinflare’s P2P market gives users a way to buy and sell crypto using fiat, without relying on a central payment processor. This is especially helpful in countries where direct crypto purchases are restricted. You can post your own offer or respond to someone else’s, set your preferred payment methods, and agree on the rate.
The platform acts as an escrow to hold the crypto during the transaction, adding a layer of protection for both parties. While Coinflare’s P2P section isn’t as active as some of the larger platforms, it’s functional and useful for users who value direct control over their trades. If you’re looking to use cash or a local transfer method to fund your Coinflare account, this is where to start. You’ll find it under the “Trade” dropdown on the homepage.
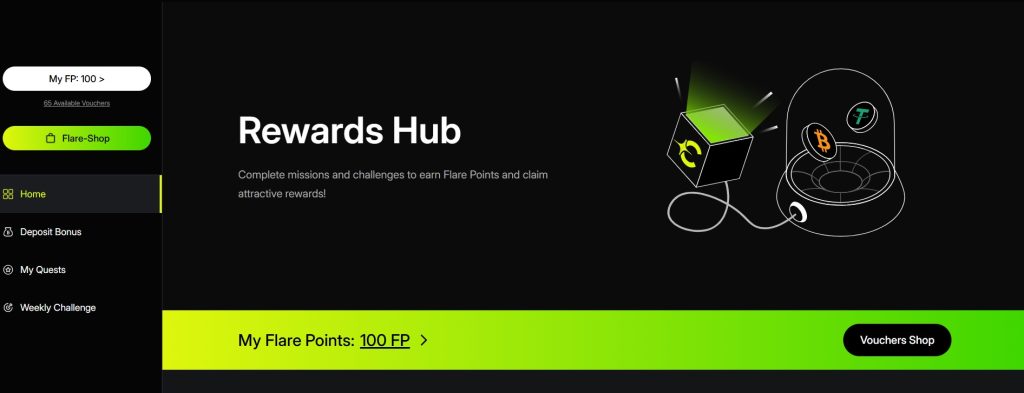
Coinflare Campaigns and Rewards Hub
Coinflare runs several ongoing campaigns that reward activity beyond just trading. These events rotate often, usually with two or more active at once, and are announced through their website or social media. Unlike passive reward programs, Coinflare’s approach centers around participation, trading, inviting users, or completing tasks.
The Futures Tournament is one of the more competitive events, with prize pools reaching up to 10,000 USDT. There’s also the Top Inviter Rewards, where users can earn up to 2,000 USDT by referring others to the platform. For users who prefer a luck-based system, the Monthly Trading Sweepstakes offers physical prizes like Apple devices.
At the center of these programs is the Rewards Hub, which uses Flare Points (FP) as its main incentive system. Users earn points by completing tasks, some of which are as simple as signing up and verifying identity, others requiring deposits or trades. Most tasks expire after a limited time, so the system encourages ongoing activity. These points can later be redeemed for various rewards, giving active users something tangible for their engagement.
How to Withdraw on Coinflare
Coinflare currently supports only crypto withdrawals. Users won’t find a fiat withdrawal option on the platform for now. That said, the crypto withdrawal process remains straightforward and closely follows the same steps used during deposits. Here’s how to steer the process from start to finish.
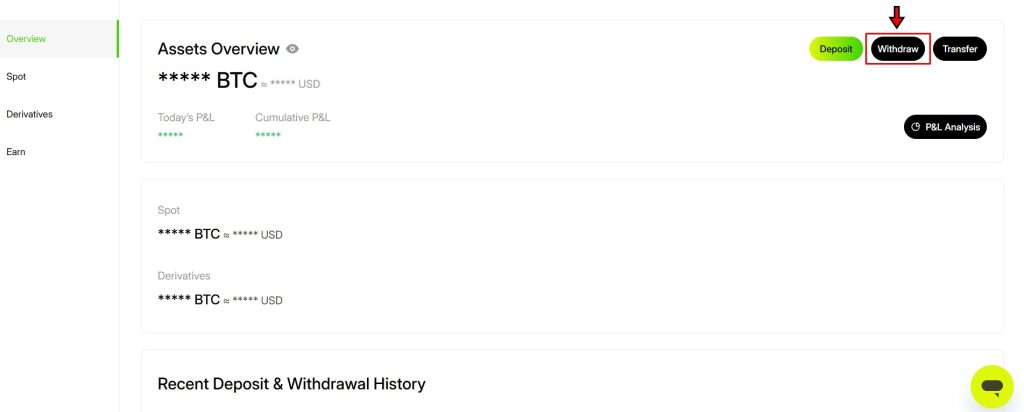
1. Access the Withdrawal Page
Begin by heading to the “Assets” tab on the top navigation bar of the homepage. From there, click on “Withdraw” to open the withdrawal interface. If two-factor authentication (2FA) isn’t enabled on your account, the platform will prompt you to activate it first. This extra step is mandatory for accessing the withdrawal section and helps secure your funds.
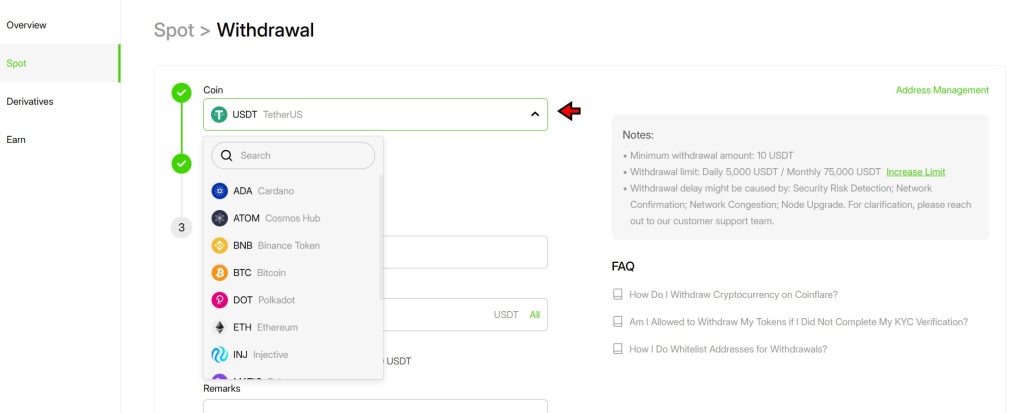
2. Select the Cryptocurrency
Once you’re on the withdrawal page, you’ll see a list of available tokens. Choose the cryptocurrency you want to withdraw. Coinflare supports a wide range of assets, so take a moment to confirm you’ve selected the correct token before proceeding.
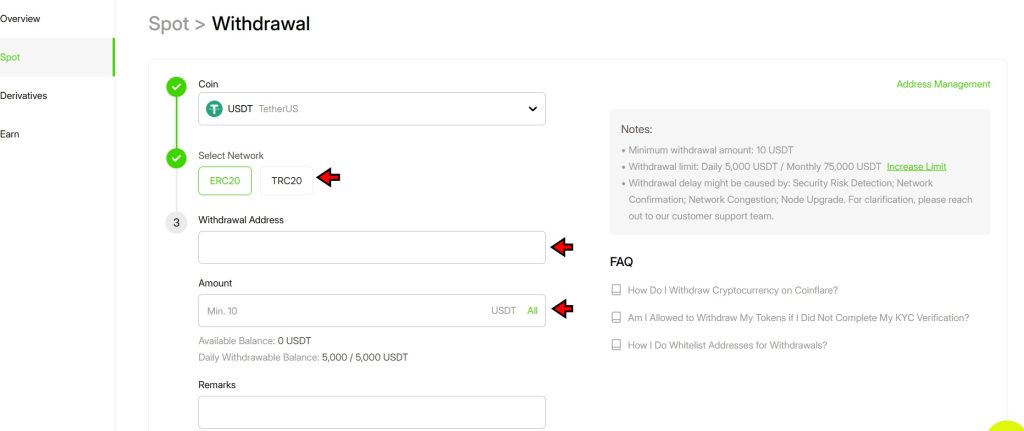
3. Enter Withdrawal Information
After selecting the token, choose the appropriate blockchain network. This step is critical. The network must match the one used by your receiving wallet. For example, when withdrawing USDT, you might see options like ERC20 or TRC20. If the network selection doesn’t match on both ends, your funds could be lost permanently.
Next, enter the destination wallet address carefully. Mistyping an address or selecting the wrong network are two of the most common errors that lead to failed or lost transactions. Then specify the amount you want to withdraw. You can also add a remark for your reference, though this step is optional.
4. Review and Confirm
Before finalizing the transaction, take a moment to double-check all details. Confirm the wallet address, selected network, and withdrawal amount. Once everything looks correct, click the “Withdraw” button to process the request.
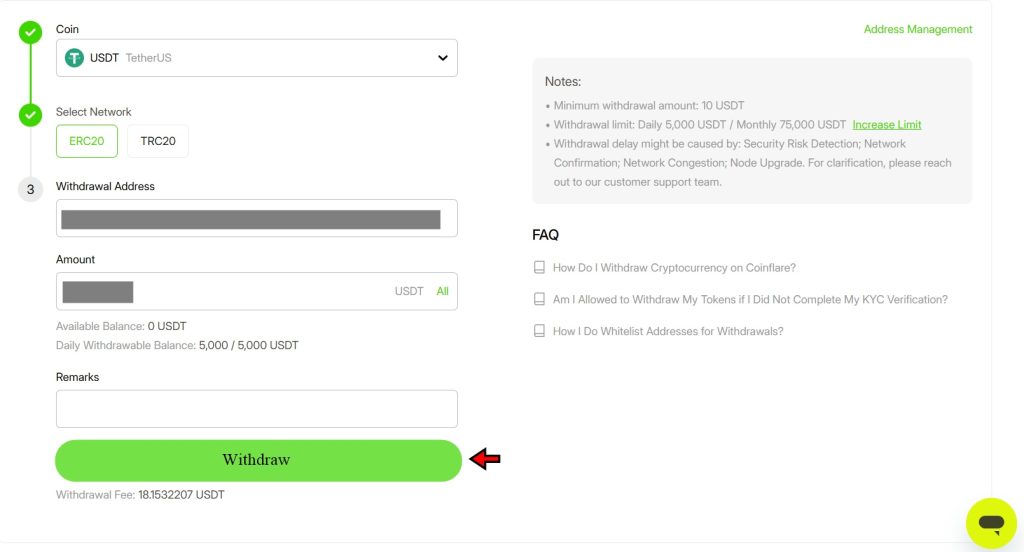
Withdrawals on Coinflare are usually quick, but always allow some time depending on the network congestion. More importantly, avoid rushing through this step as crypto transactions are irreversible.
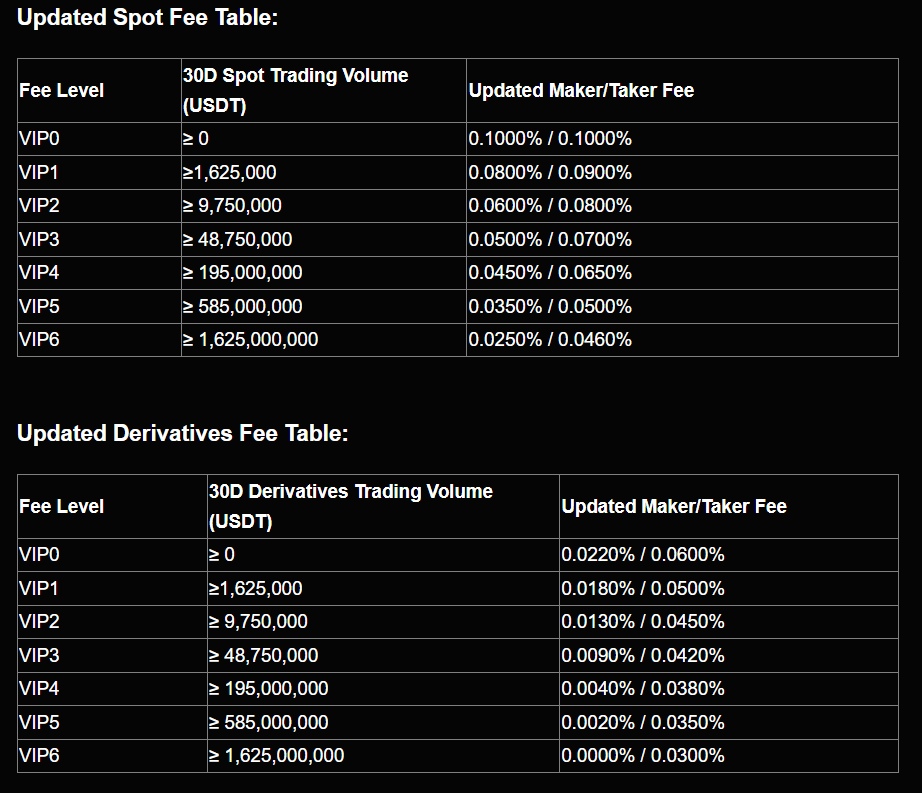
Coinflare Fees
Coinflare uses a tiered fee structure that adjusts based on user activity. For spot trading, both makers and takers pay a standard 0.1% fee at the base level. As users increase their trading volume and progress through the VIP levels (from VIP 0 up to VIP 6), these fees are reduced significantly. At the highest tier, maker fees can drop to 0.0250%, while taker fees go as low as 0.0460%.
The derivatives market follows a similar model, though with different base rates. At entry level, makers pay 0.0220% and takers are charged 0.0600%. With higher trading activity and VIP progression, the fees decrease to 0.0100% for makers and 0.0300% for takers at VIP 6. This structure encourages long-term use and benefits frequent traders.
Coinflare does not support fiat deposits or withdrawals. All transactions on the platform must be done in cryptocurrency. While crypto deposits and withdrawals are free of platform charges, users are still responsible for blockchain network fees. These vary depending on the token and current network conditions and are not controlled by Coinflare.
Is Coinflare Secure?
Coinflare takes user security seriously and applies several layers of protection to reduce the risk of account breaches or unauthorized fund access. The first line of defense is mandatory two-factor authentication (2FA), which users can set up either through their mobile number or with Google Authenticator. Due to this, even if login credentials are compromised, access to the account still requires a time-sensitive code from a separate device.
For added security during withdrawals or internal transfers, Coinflare offers an “Asset password” feature. This is a separate password users must enter before moving any funds. It acts as a final barrier so even if someone gets into an account, they can’t withdraw assets without this second layer of verification.
On the infrastructure side, Coinflare has partnered with Fireblocks, who are a well-known security provider in the digital security space. Fireblocks helps safeguard digital assets by using secure multi-party computation (MPC) technology and advanced wallet management systems. This partnership reduces the risk of internal mismanagement or external breaches and adds credibility to Coinflare’s security setup.
Final Takeaway
If you’ve made it this far, you should be more than ready to start using Coinflare. The platform doesn’t overcomplicate things. Setting up your account, making deposits, placing trades, and withdrawing funds all follow a clear and straightforward process. Whether you’re using the full trading interface or sticking with Flash Trading for quicker moves, everything is laid out in a way that’s easy to follow.
Also, once you get the hang of where things are, like the derivatives trading interface or the Asset management page, the flow becomes familiar. You won’t need to keep referencing guides every time. Just keep your security settings in place, double-check withdrawal details, and you’re good to go.
Frequently Asked Questions – FAQs
Yes, Coinflare offers a simple interface and features like Flash Trading that are ideal for beginners.
Flash Trading is a simplified interface that lets you place quick long or short positions without charts or order books.
Coinflare supports both spot and perpetual pairs like BTC/USDT and ETH/USDT-P.
Yes, Coinflare offers a P2P market where users can buy or sell crypto using fiat with other users directly.
Go to the “Trade” dropdown on the homepage and select “Convert” to swap one crypto for another instantly.
Yes, fees start at 0.1% for spot trading and 0.06% for derivatives takers. Fees decrease with higher trading volume.
Go to the Asset Overview page, click “Deposit,” select your token and network, and copy the deposit address to send funds.
Click “Assets,” then “Withdraw,” select your token, enter the destination address, network, and amount, and confirm.
Yes, users must cover blockchain network fees when withdrawing crypto.
No, Coinflare only supports crypto deposits. Fiat deposits are not available.
Yes, identity verification is required for full access to trading and withdrawal features.
Yes, 2FA is mandatory for accessing the withdrawal page and securing your account.
It’s an extra password required for withdrawals or transfers to add another layer of protection.
Coinflare uses 2FA, asset passwords, and external security infrastructure from Fireblocks to protect user assets.
Disclaimer: All content on The Moon Show is for informational and educational purposes only. The opinions expressed do not constitute financial advice or recommendations to buy, sell, or trade cryptocurrencies. Trading involves significant risk and may result in substantial losses. Always seek independent financial advice before making investment decisions. The Moon Show is not responsible for any financial losses or decisions made based on the information provided.
Please view the full disclaimer at: https://themoonshow.com/disclaimer

The Ultimate WEEX Exchange Tutorial: Step-by-Step Guide for Beginners
WEEX is not among the largest cryptocurrency exchanges. It does not match the trading volume of...

The Ultimate Bybit Exchange Tutorial - A Step-by-Step Guide for Beginners
Cryptocurrency trading continues to evolve with time. Today, crypto users can access several ex...

MEXC Exchange Tutorial: Step-by-Step Guide for Beginners
MEXC is a well-established cryptocurrency exchange that supports a wide range of trading featur...