The Ultimate Gate.io Exchange Tutorial: Step-by-Step Guide for Beginners
Gate.io is one of the oldest active cryptocurrency exchanges. It launched in 2013 and has remained operational through several market cycles, regulatory changes, and waves of new user activity. While it doesn’t always rank among the most talked-about platforms, its long history and global reach make it a relevant option for all kinds of traders.
The platform has not been without issues. In its early years, users reported frustrations with the interface, system performance, and overall reliability. However, since then, the team behind Gate.io has released several updates that aim to fix these problems. The interface has improved, features have been added, and the platform now supports a wide range of tools and markets.
Today, Gate.io offers spot trading, futures, margin trading, copy trading, and a variety of other features. For someone unfamiliar with the exchange, the number of options can feel overwhelming at first. This tutorial simplifies the experience. It breaks down the process of using the platform from account creation to executing trades. By the end of this guide, you should be able to use Gate.io with confidence. The goal is to make the process as straightforward as possible, whether you're trading for the first time or switching over from another exchange. Let’s get started:
What is Gate.io?
Gate.io began its operations in 2013 under the name Bter. At the time, it was based in China and primarily served local users. That changed in 2017 when Chinese authorities issued a ban on crypto exchanges and initial coin offerings. In response, the company rebranded to Gate.io and shifted its operations abroad, allowing it to serve a global audience.
Today, Gate.io supports users across 197 countries and claims over 22 million active accounts. The platform offers access to more than 3,800 digital assets, making it one of the most extensive exchanges in terms of token availability. This variety appeals to traders looking for lesser-known coins alongside mainstream options. Despite its global reach, Gate.io remains restricted in several major regions. Users in the United States, Canada, China, Malaysia, Singapore, and a few other countries cannot access the platform. In parts of Europe, such as Germany, France, and the Netherlands, trading is limited to spot markets due to local regulations.
The platform is structured around two interface modes: Lite and Pro. Lite mode is built for users who prefer a clean, simplified layout with fewer features upfront. Pro mode unlocks advanced charting tools, in-depth market data, and more complex trading options. Beyond trading, Gate.io includes features for lending, staking, and decentralized finance tools.
Security is a core component of Gate.io’s operations. The platform enforces identity verification through KYC policies and follows anti-money laundering protocols. Two-factor authentication, SSL encryption, and Yubikey support add further layers of protection. Users must complete KYC to withdraw more than $1,000, keeping Gate.io in line with international compliance standards.
Gate.io has come a long way from its beginnings as a regional exchange. It now operates as a full-featured global trading platform, offering a wide range of services while continuing to adapt to regional compliance demands and user expectations.
How to Create Your Gate.io Account?
Setting up a Gate.io account takes only a few minutes. The process is straightforward, whether you're new to crypto or switching from another exchange. Follow the steps below to get started.
1. Visit the Gate.io Website
Start by going to the official Gate.io homepage. You’ll see the sign-up option right away. You can enter your email or phone number to begin. If you prefer a quicker setup, the platform also supports sign-up through Gmail, Apple ID, or MetaMask. These options let you skip some of the usual form fields and connect instantly.

2. Choose Your Region and Set a Password
After entering your contact information, select your country or region from the dropdown list on the next page. This is important because it determines what services will be available to you. Some regions are restricted or have limited features. Next, set a strong password. Use a mix of letters, numbers, and symbols to secure your account. Confirm that you accept the terms of service, then click the sign-up button. In some cases, a welcome bonus might be offered after account creation, depending on promotions running at the time.

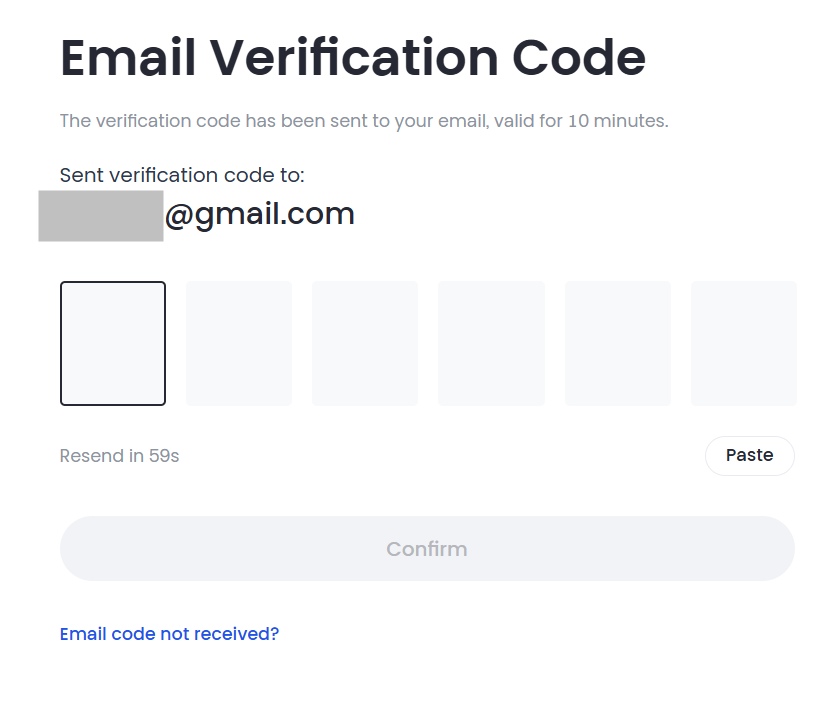
3. Verify Your Email or Phone Number
Once you’ve submitted your details, Gate.io will send a verification code to your email or phone. Enter the code in the field provided and confirm to complete this step. This verification ensures your contact information is valid.
4. Deposit and Start Trading
After verification, you’ll land on the main dashboard. From here, you can explore the interface, but if you’re ready to begin trading, click on the “Deposit” button. Choose a preferred method, add funds to your account, and you’re good to go. A detailed walkthrough of the deposit process will be covered in a later section, so you don’t need to figure everything out immediately.
With your account active, you now have access to the full range of features Gate.io offers. The next steps involve securing your account and completing identity verification, which we’ll cover next.
How to Complete KYC on Gate.io?
Gate.io requires users to complete identity verification before accessing certain features, especially withdrawals. While deposits may go through without verification in some regions, it’s better to complete KYC right after setting up your account. This prevents any access issues later, especially when you’re ready to trade or withdraw funds.
The KYC process is straightforward and can usually be completed within a few hours. You’ll need a valid government-issued ID and a clear selfie. Here's how to do it step by step.
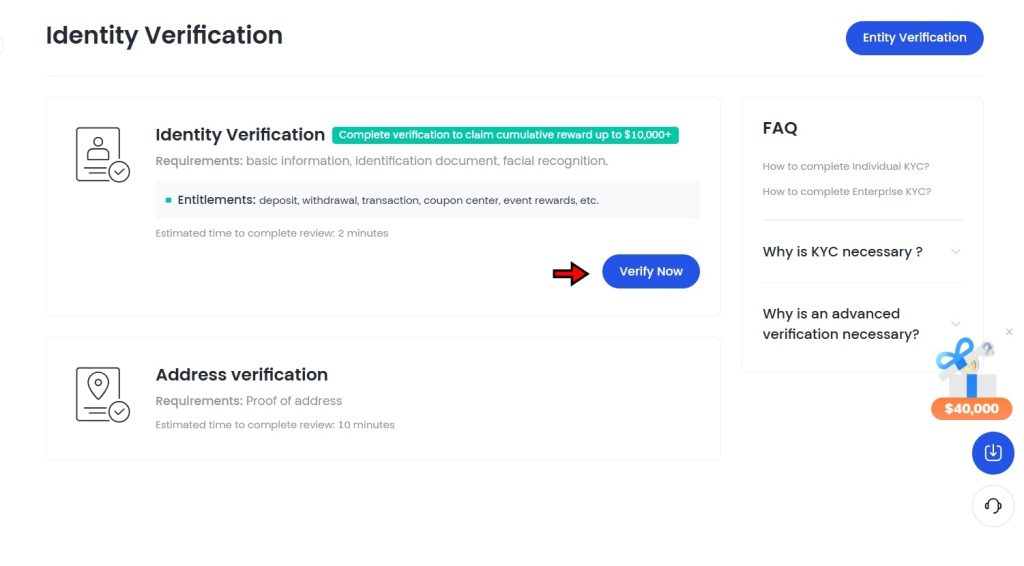
1. Go to the Identity Verification Page
Log in to your Gate.io account. On the homepage, hover your cursor over the user icon at the top right corner. From the dropdown menu, click on “Identification.” This takes you to the identity verification section, where the KYC process begins.

2. Start the Verification Process
On the verification page, click the “Verify Now” button in the center of the screen. This launches the guided verification process and opens the form where you’ll submit your information and documents.
3. Provide Basic Information
Begin by filling out your basic details. This includes your country of residence, nationality, full name, and the identification number from your chosen ID document. Make sure the details match exactly with what appears on your ID. Mistakes or typos can lead to delays or rejection. After checking the form, click “Next Step.”

4. Upload Your Documents
In the next step, you’ll upload images of your ID. Gate.io accepts a passport, national ID card, or a driver’s license. Follow the instructions on screen to ensure the images are clear and meet the required format. After uploading, confirm that everything looks correct, then click “Next Step” to continue.

5. Facial Verification
You’ll now be redirected to the face recognition page. This part confirms that the ID you uploaded actually belongs to you. Click “Verify Now” and choose how you’d like to proceed. You can either use the Gate.io mobile app or scan the QR code on the screen to complete the process from your phone.
You will need to upload four photos of yourself, each showing a specific hand gesture along with the last four digits of your Gate.io UID. These poses must follow the platform’s guidelines exactly. Once you upload all four photos, click “Confirm and Submit.”

Gate.io states that most KYC applications are reviewed within 12 hours. In many cases, it can take less than an hour. However, delays are possible depending on demand or if any issues are found in the documents submitted. Completing your KYC early ensures you won’t face any interruptions once you begin trading or need to withdraw funds.
How to Deposit Funds on Gate.io?
Before you can place any trades, you need to add funds to your Gate.io account. The platform supports both cryptocurrency deposits and fiat purchases. You can choose the method that suits you best based on your region and preferences. Here’s how to complete both types of deposits step by step.
Depositing Crypto on Gate.io
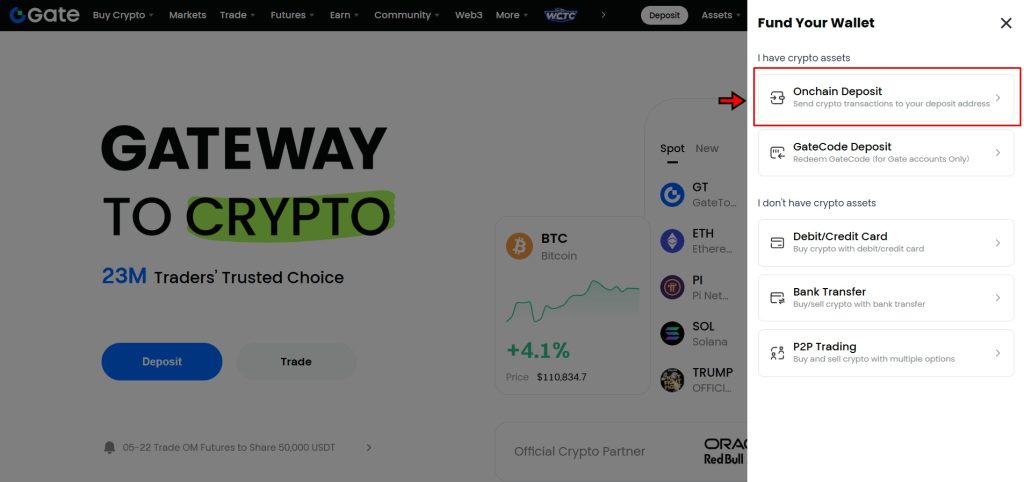
Depositing crypto on Gate.io is quick and works just like it does on most exchanges. You send your tokens from another wallet to your Gate.io wallet using an on-chain transaction.
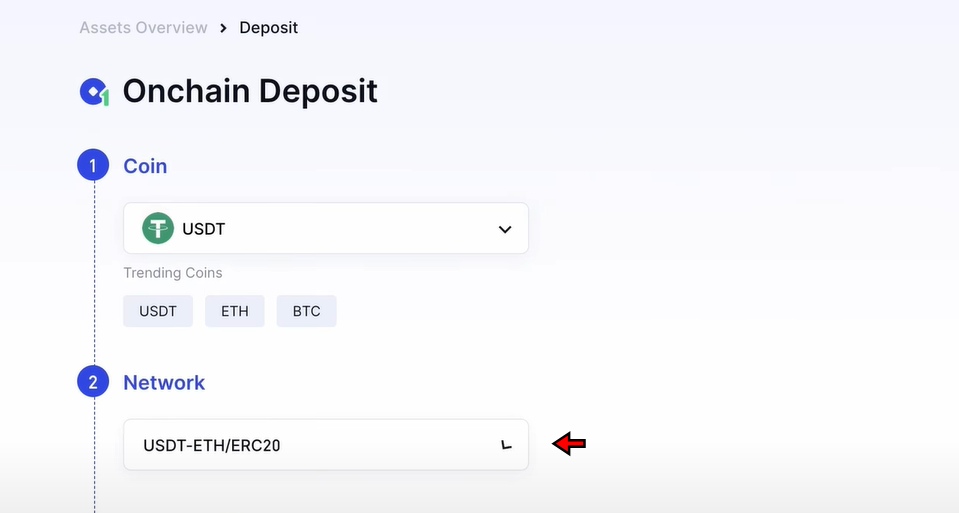
- Go to the Crypto Deposit Page: Start by logging in and clicking on “Deposit” in the top navigation bar. This opens a dropdown on the right side of your screen. From there, select “On-chain Deposit.” It will take you to the deposit page where you can begin the process.
- Choose the Currency to Deposit: On the deposit page, select the cryptocurrency you want to send. Gate.io supports a wide range of assets including Bitcoin (BTC), Ethereum (ETH), and Tether (USDT), along with many others. Use the search bar if you don’t see your token listed right away.
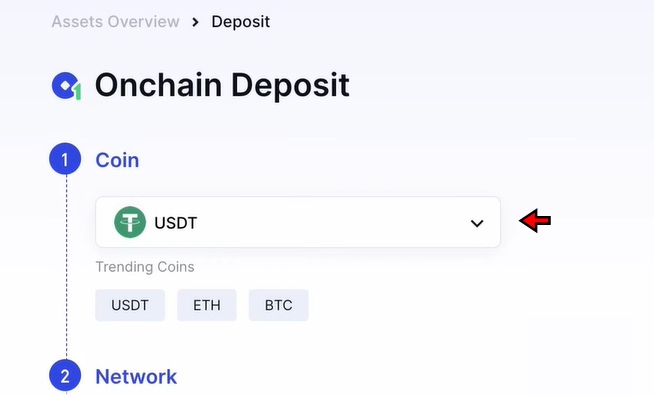
- Select the Network Type: After choosing the crypto, select the correct network for the transfer. This is important. For example, if you’re sending USDT, you can choose between TRC20, ERC20, or other supported networks. Match the network to the one selected in your sending wallet to avoid failed or delayed transfers.
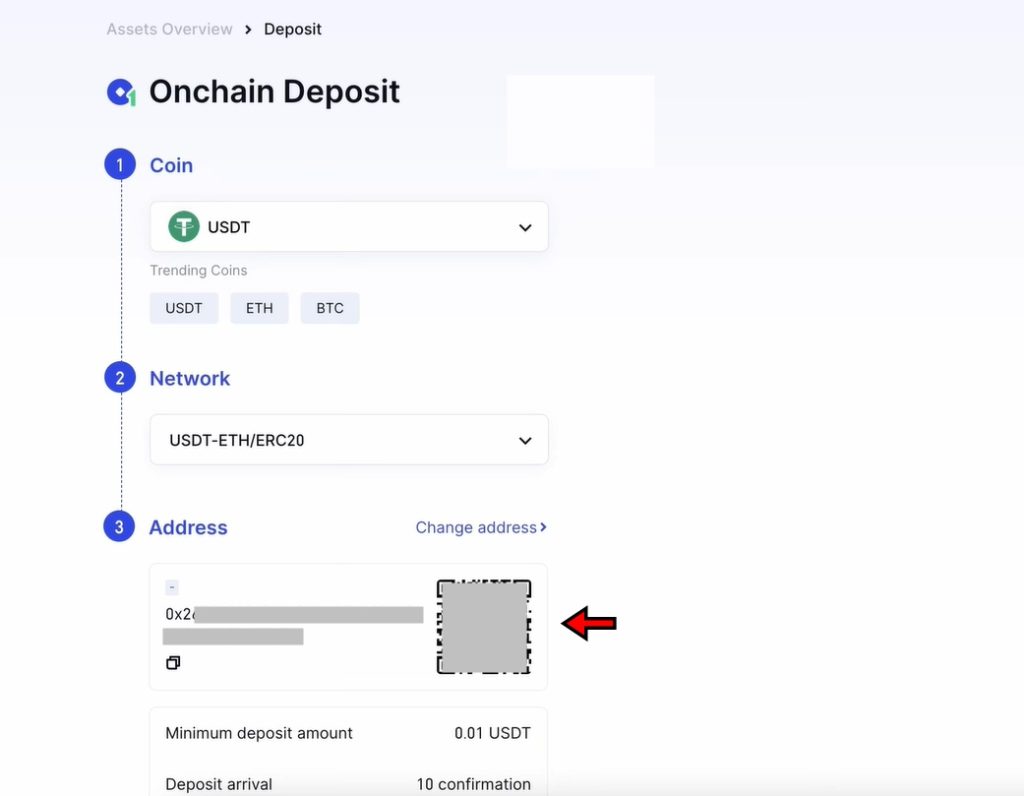
- Copy the Deposit Address and Complete the Transfer: Gate.io will now generate a wallet address for the selected crypto and network. Copy this address or scan the QR code. Paste it into the withdrawal field in the external wallet you're using to send the funds. After submitting the transaction, the blockchain will confirm it, and your funds will appear in your Gate.io wallet shortly after.
Buying Crypto with a Debit or Credit Card
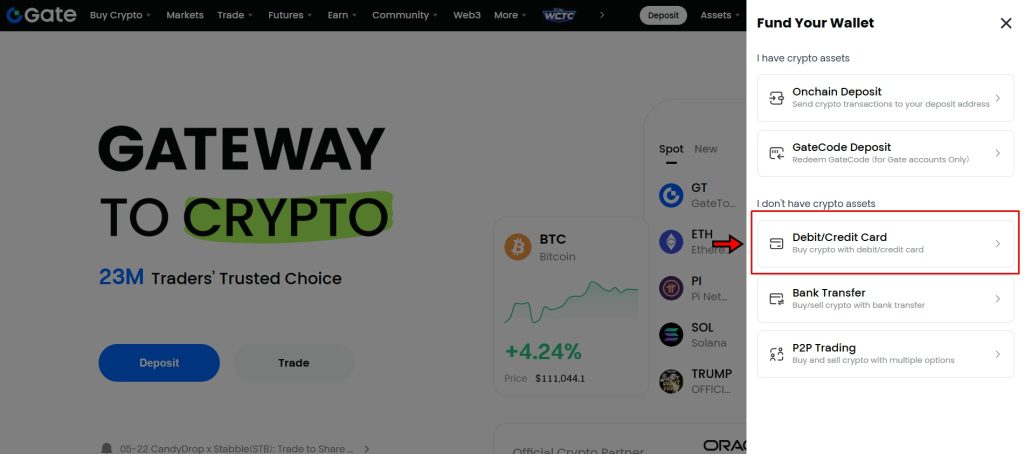
Gate.io doesn’t allow direct fiat deposits, but you can still buy crypto using a debit or credit card. This option is available in many regions, depending on local regulations and card provider support.
- Go to the Debit/Credit Card Page: From the homepage, click on “Deposit” in the navigation bar. In the dropdown, select “Debit/Credit Card.” This will redirect you to the crypto purchase page where you can begin your fiat-to-crypto transaction.
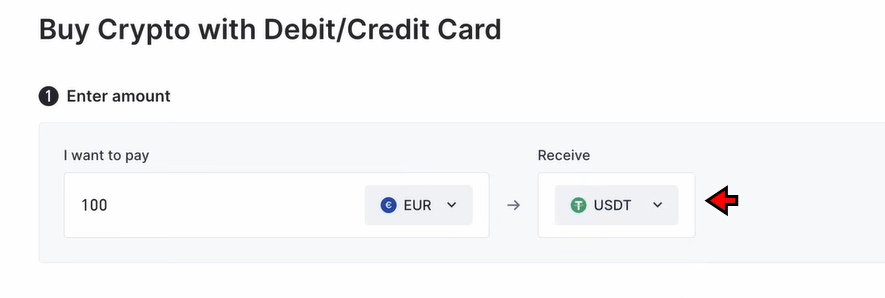
- Enter the Amount: Choose the fiat currency you’re using and the crypto you want to buy. USDT is a common choice because it's a stablecoin and can easily be swapped into other cryptocurrencies later.
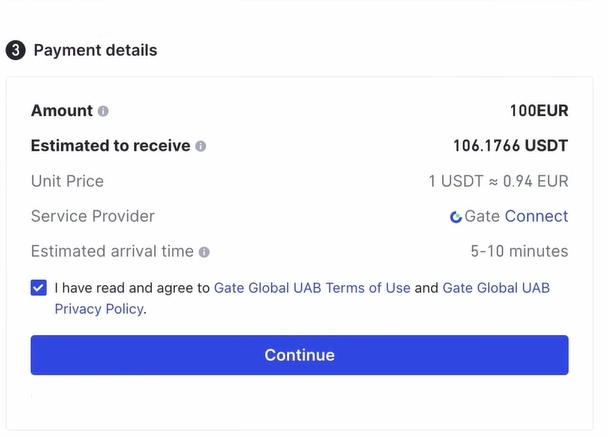
- Select a Payment Channel: The available payment service providers will appear based on your region. Choose the one you prefer or the one you’ve used before. The system will guide you to the next step.
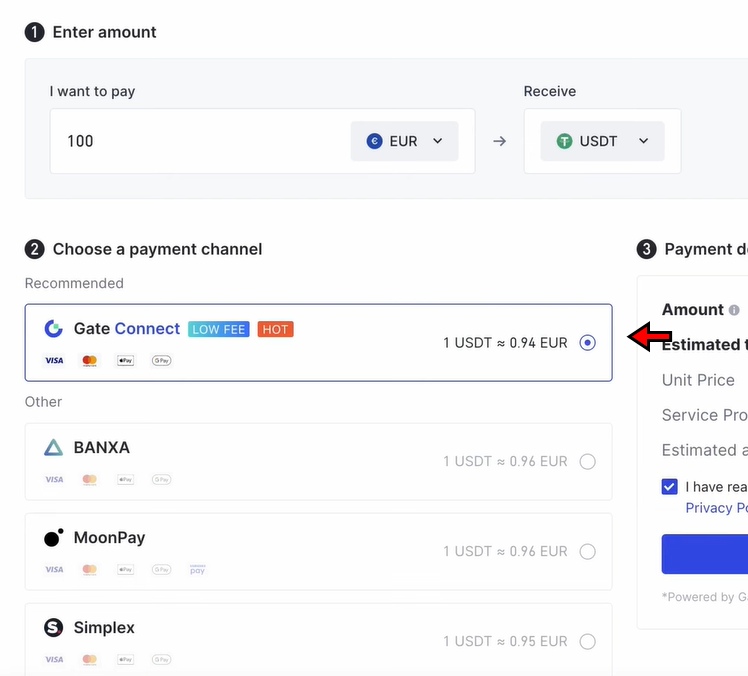
- Enter Payment Details and Confirm: Review the transaction summary, including the amount, exchange rate, and fees. Click “Continue” and enter your debit or credit card information. Confirm the transaction. Your purchased crypto will be credited to your Gate.io wallet shortly after payment is completed.
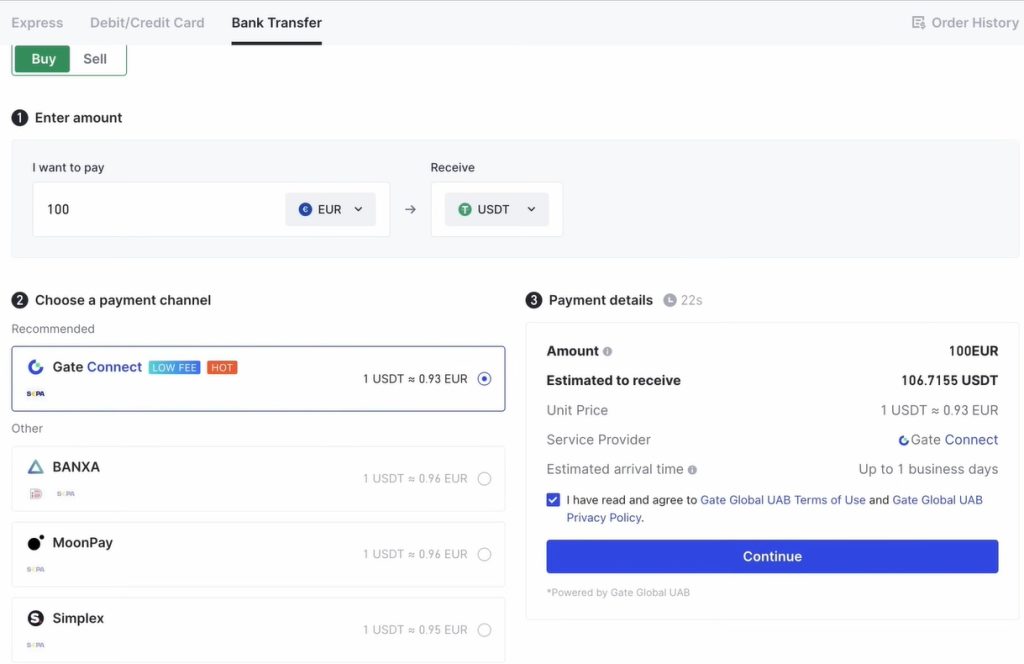
Buying Crypto with Bank Transfer
Gate.io also offers bank transfer options in select countries. The steps are almost identical to buying with a debit or credit card.
- Choose Bank Transfer as Your Payment Method: Once you're on the fiat purchase page, choose bank transfer instead of card. Depending on your location, you might see SEPA for Europe or local banking options for other regions.
- Enter Bank Account Details and Confirm: Enter the required banking details as prompted. Complete the transfer using your banking app or interface. Keep in mind that bank transfers are not instant. It can take up to one full business day for the funds to reflect in your Gate.io wallet.
Once the funds are in, you’re ready to move on to trading. Whether you choose to deposit crypto directly or buy using fiat, the process is designed to be beginner-friendly and efficient.
Understanding Order Types on Gate.io
Choosing the right order type on Gate.io depends on your trading goals, risk management preferences, and market timing strategy. Each order type executes differently and offers varying levels of control over price and timing. Below is a breakdown of the key order types available on Gate.io, along with a clear example to illustrate how each one works.
Limit Order
A limit order allows traders to set the exact price at which they want to buy or sell a cryptocurrency. The trade only executes when the market price reaches the specified limit. This order type provides precision and avoids slippage but does not guarantee execution if the price doesn’t reach the limit.
Example: BTC is trading at $100,000. A user places a limit buy order at $99,000. The system waits for the market to drop to $99,000 before executing the order. If the price doesn’t reach that level, the order stays open.
Market Order
A market order executes instantly at the best available price. It prioritizes speed over price, making it suitable when immediate execution is more important than the exact rate.
Example: ETH is trading at $2,000. A user places a market sell order for 1 ETH. The system fills the order at the best current bid price, which may be slightly above or below $2,000, depending on liquidity.
Smart Market Order
A smart market order enhances the standard market order by incorporating real-time market data such as depth and volatility. It aims to reduce slippage and improve fill quality during execution.
Example: BTC is trading around $100,000 with high volatility. A user enables a smart market buy order. The system factors in order book depth and avoids large price jumps by executing the trade in smaller batches or at optimized entry points.
Conditional Order
A conditional order activates only when a specific condition is met. It can be configured as either a limit or market order and uses a trigger based on the mark price, index price, or last traded price.
Example: ETH is trading at $2,000. A user sets a conditional sell order that triggers when the price drops to $1,950. Once the condition is met, the system submits a market sell order automatically.
TP/SL (Take-Profit / Stop-Loss)
Take-profit and stop-loss orders allow traders to automate their exit strategy. A TP order secures profits once a target price is reached, while an SL order minimizes losses if the market moves unfavorably. Gate.io supports three variations: Order TP/SL, Position TP/SL, and Trigger TP/SL.
Example: BTC is at $100,000. A user who bought BTC at $95,000 sets a take-profit order at $105,000 and a stop-loss at $97,000. If either level is reached, the position is closed automatically.
Trailing Stop Order
A trailing stop follows the market price as it moves in a favorable direction but locks in profits when the price reverses by a set percentage or amount. It’s a dynamic way to ride trends while limiting downside.
Example: ETH is trading at $2,000. A trader sets a trailing stop with a $50offset. If ETH rises to $2,100, the stop price trails at $2,050. If ETH then drops to $2,050, the system triggers a market sell.
TWAP (Time-Weighted Average Price)
TWAP breaks a large order into smaller pieces and executes them over a time interval to minimize market impact. It aims to match or beat the average price over the time range.
Example: A user wants to buy 10 BTC while BTC is at $100,000. Using TWAP, the system divides the order into smaller trades and spreads them over 30 minutes, reducing slippage and avoiding sudden price movements.
Advanced Limit Orders
These are specialized limit orders offering more control over execution behavior:
- Post-Only
This order only adds liquidity by entering the order book without immediate execution. If it matches an existing order, it is canceled.
Example: BTC is at $100,000. A user places a post-only limit buy at $99,900. If a matching sell order exists, it cancels to avoid taker fees.
- Fill or Kill (FOK)
The order must be filled entirely and immediately. If not, it is canceled in full.
Example: A user submits a FOK buy order for 5 BTC at $100,000. The system cancels the entire order if only 3 BTC is available at that price.
- Immediate or Cancel (IOC)
The system executes as much of the order as possible right away. Any unfilled portion is canceled.
Example: A user submits an IOC sell order for 3 ETH at $2,000. If buyers are available for 2 ETH, the order executes that portion and cancels the remaining 1 ETH.
Understanding these order types gives traders more control over how and when their trades are executed. Each serves a specific use case, and selecting the right one improves execution quality while managing risks.
Gate.io Spot Trading Tutorial
Gate.io offers a feature-rich spot trading platform with support for over a thousand trading pairs. Some pairs even allow up to 10x leverage. The trading interface integrates TradingView, offering advanced tools for technical analysis. While the layout may appear complex at first, understanding each section will make trading easier. Follow these steps to navigate Gate.io's spot trading interface.
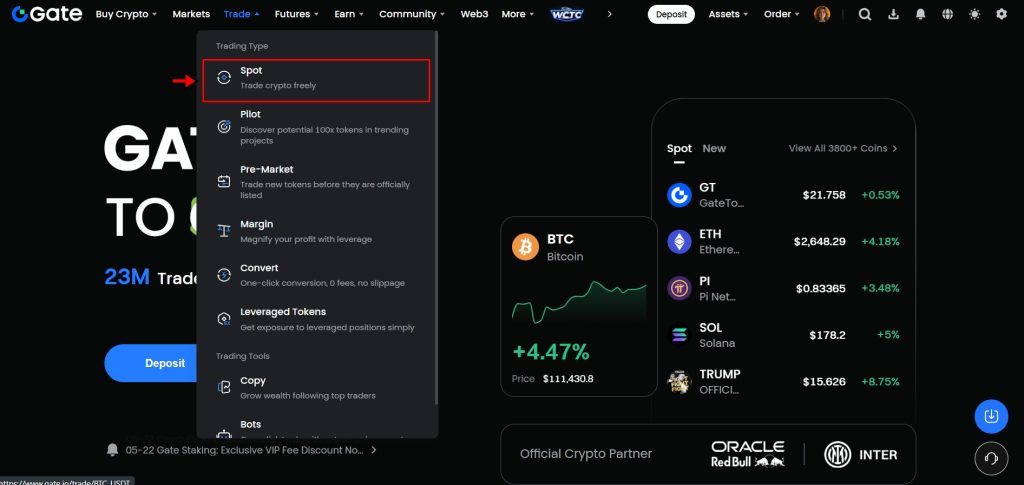
1. Open the Gate.io Spot Market
Start by logging into your Gate.io account. On the top navigation bar, hover over the “Trade” tab. From the dropdown menu, click on “Spot.” This opens the main interface for spot trading where users buy and sell crypto directly.
2. Get Familiar with the Trading Interface
Before placing a trade, take time to understand the layout. The interface includes several important components:
- Trading Pair Selector: Located at the top left, this section lets users search and select trading pairs. Typing in symbols like BTC or ETH filters the available options.
- Price Chart: Displayed below the pair selector, this chart shows live price data using TradingView. You can adjust the timeframe and apply technical indicators for deeper analysis.
- Order Book: Found beside the chart, this section shows active buy (green) and sell (red) orders. It helps traders assess liquidity and gauge short-term market direction.
- Order Panel: Positioned on the far right, this panel is where users enter trade details. It includes order types, price fields, and amount options. This is where trades are placed.
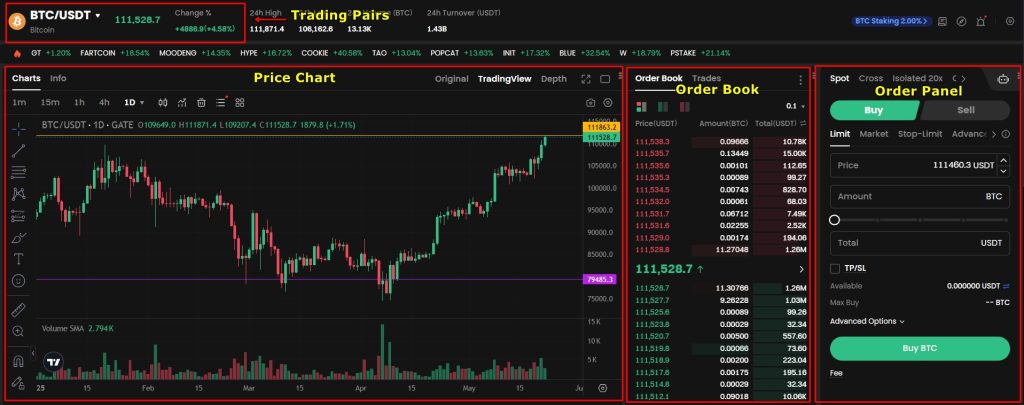
Explore each part of the interface before moving forward. Knowing where everything is will help reduce mistakes.
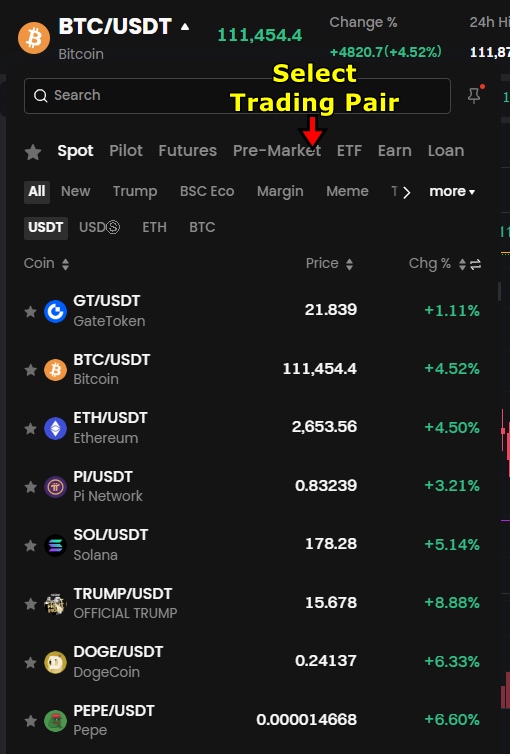
3. Choose a Trading Pair
Click on the trading pair selector in the top-left section. Use the search bar or scroll through the list to find your desired pair. For this walkthrough, we are selecting BTC/USDT. This pair allows you to buy Bitcoin using Tether. Once selected, the interface updates to show the relevant chart, order book, and trading panel.
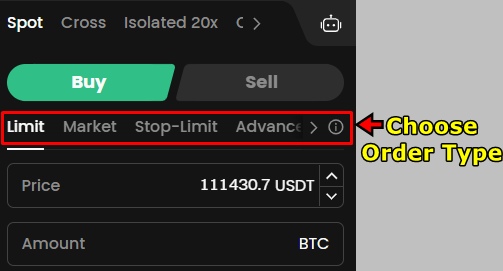
4. Select an Order Type
Head over to the Order Panel and pick an order type. Gate.io offers several order types inclduing:
- Limit Order: Set your own price for buying or selling. The order executes only when the market reaches that price.
- Market Order: Instantly executes at the current market price.
- Stop-Limit Order: Executes a limit order once the price hits a trigger level.
For this tutorial, we are using the Limit Order. It gives more control over the entry price, which helps reduce slippage.
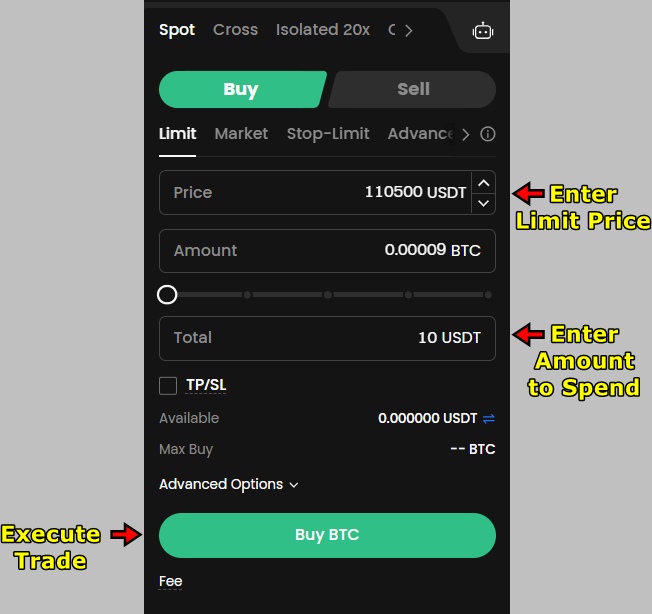
5. Enter Trade Details and Place the Order
Fill out the order form based on your trade plan:
- Limit Price: Enter the price you want to pay. For instance, if BTC is trading at $111,000, you can set a limit buy at $110,500 to try securing a lower entry.
- Purchase Amount: Decide how much BTC you want to buy or how much USDT to spend. The platform auto-calculates the other field based on your input.
Double-check all values. When everything looks correct, click Buy BTC to place the order. A pop-up might also appear for double confirmation.
6. Wait for the Order to Fill
Limit orders won’t fill instantly unless the market price matches your limit. The order stays active in the “Open Orders” section. You can cancel it at any time if the market doesn’t move in your favor.

If the price drops and reaches your limit, Gate.io matches your order with a seller. Once filled, your purchased BTC appears in your spot wallet.
Gate.io Futures Trading Tutorial
Gate.io supports both USDT-Margined and Coin-Margined futures contracts, including perpetuals and delivery-based products. With over 450 pairs and up to 125x leverage, the platform offers flexibility for different trading strategies. In this tutorial we will use USDT-Marginedperpetualcontracts, as they are the most traded future contracts, to walk through the trading process step by step. Let’s get into it:
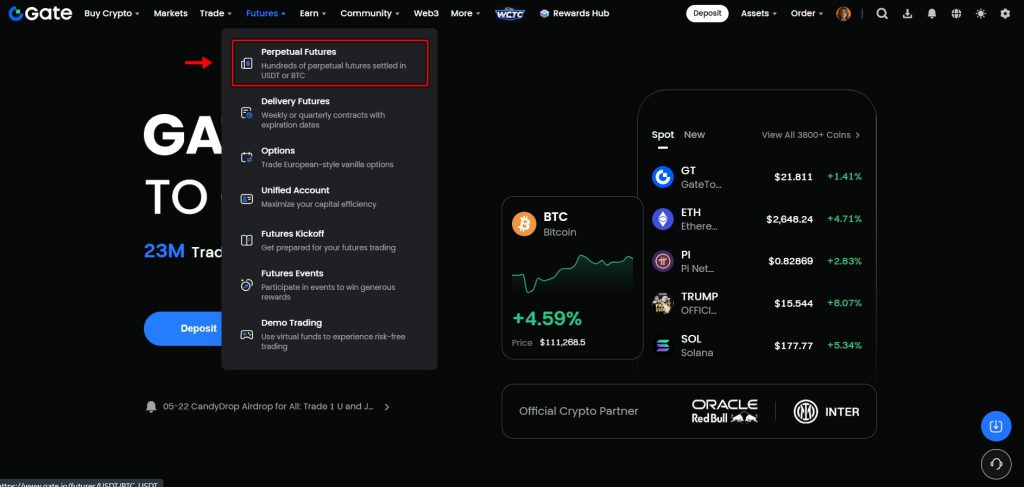
1. Access the Gate.io Futures Market
Log in to your Gate.io account. From the top navigation bar, hover over the "Futures" tab and select "Perpetual Futures" form the dropdown. This opens the dedicated interface for USDT-Margined perpetual contracts. This terminal is where futures orders are placed and managed.
2. Understand the Futures Interface
Before opening a trade, get familiar with the layout and tools:
- Trading Pair Selector: Located in the top left, click this option to choose from various perpetual contracts. For this tutorial we are selecting BTC/USDT.
- Price Chart: Powered by TradingView and located under the trading pairs, this chart displays real-time price movements of the selected asset. Use it to apply indicators and analyze patterns.
- Order Book: To the right of the chart, the order book displays live buy and sell orders. It helps gauge market activity and depth.
- Order Panel: The order panel is located on the far right. This is where trades are configured. Users select order types, margin mode, leverage, position size, and direction here.
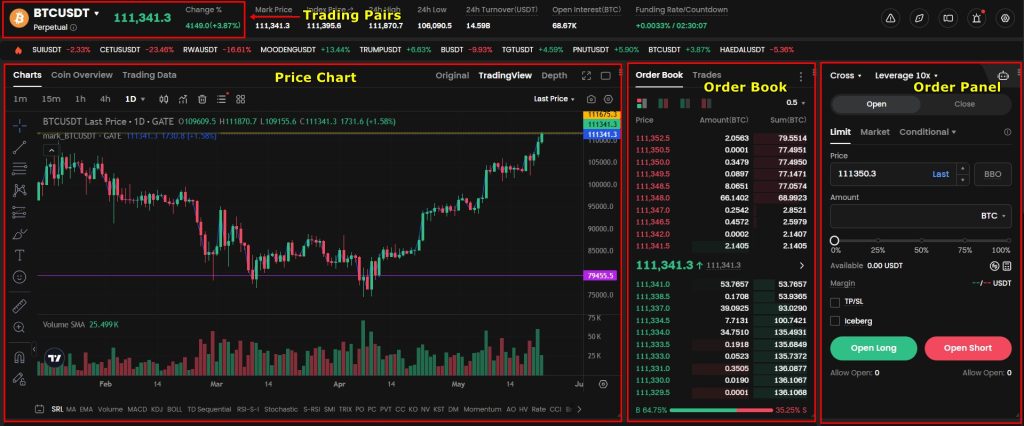
Spend time exploring each section. Understanding the interface improves accuracy and helps avoid placing incorrect trades.
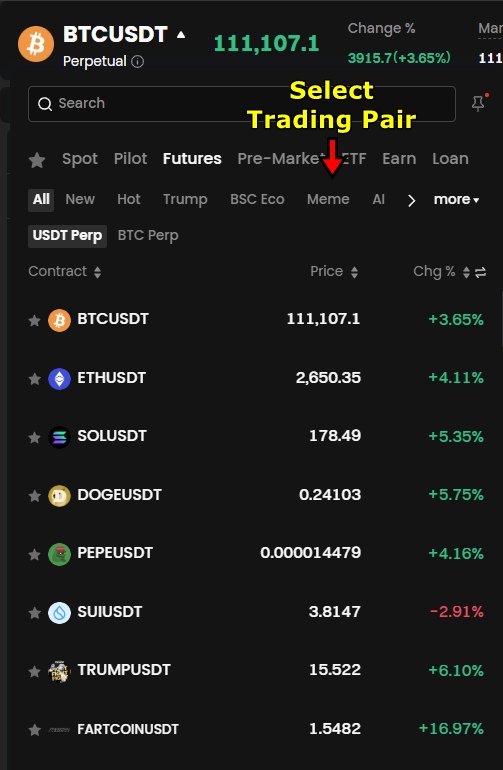
3. Select a Trading Pair
Click on the current trading pair (default may be BTC/USDT) in the top left. A searchable window appears. Type BTC/USDT (or any other pair you want to trade) and select it. This loads the Bitcoin-USDT perpetual contract, allowing you to trade using USDT as both margin and settlement currency.
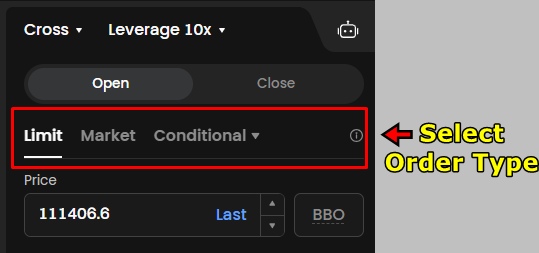
4. Choose an Order Type
In the Order Panel, pick an order type. Gate.io supports several order types including:
- Limit Order: Lets you specify the exact price to enter the market.
- Market Order: Executes immediately at the current best price.
- Stop-Limit: Triggers a limit order when a specific condition is met.
For this tutorial, we are choosing Limit Order as it lets us define the entry point precisely. For instance, If BTC is trading at $100,000 and you want to enter at $99,500, set your limit order at $99,500.
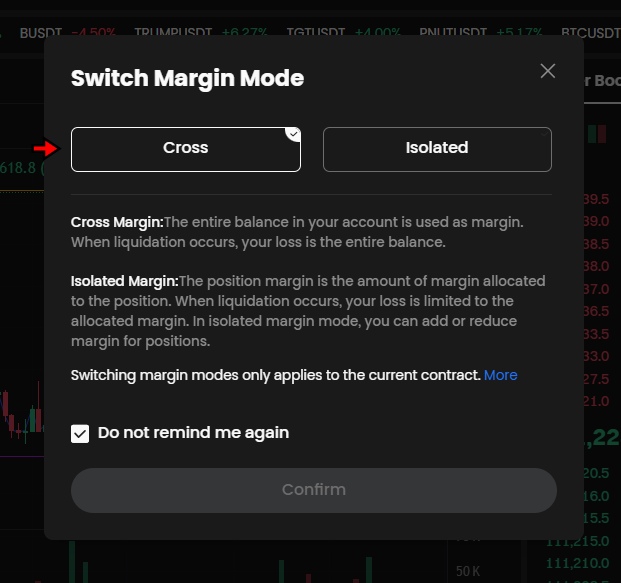
5. Select Margin Mode and Set Leverage
Right above the order type selection, we have “Margin Mode”. Gate.io offers two types of margin modes:
- Isolated Margin: Limits risk to the selected position only.
- Cross Margin: Uses your entire futures wallet balance to prevent or decrease liquidation.
For this demonstration, we are choosing “Cross Margin”. It provides flexibility by using the total balance as collateral. Beginners can opt for Isolated to cap risk per position. Cross margin may seem scary at first, but you can always add stop loss and take profit to manage the risk.
After choosing the margin mode, you will need to adjust the leverage which is available right next to margin mode. Use the slider to adjust the leverage. For this tutorial, we are setting it to 2x. This means a $100 USDT margin controls a $200 position.
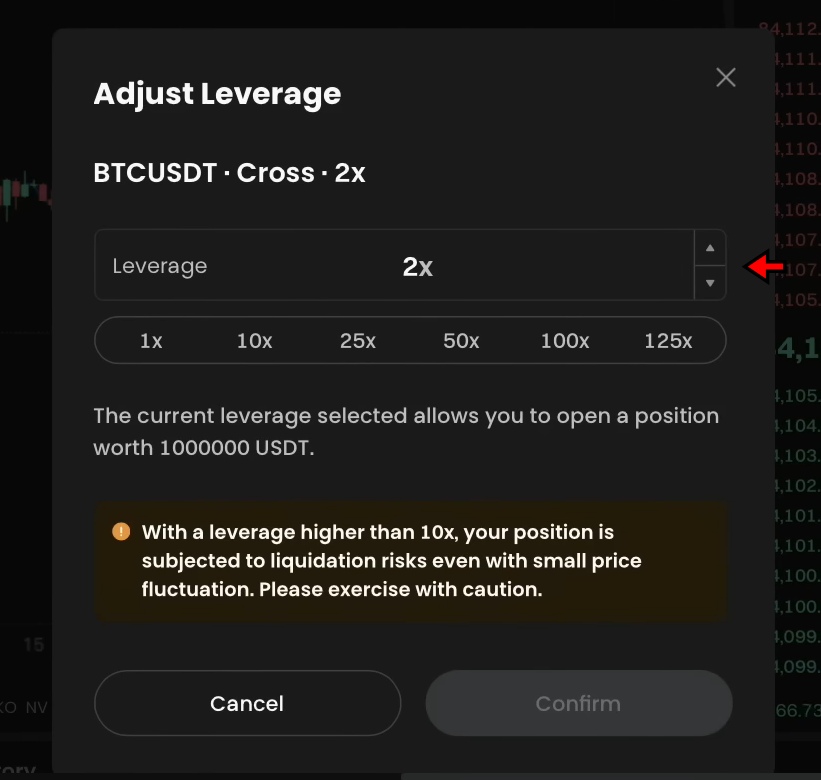
Note: If the platform doesn’t allow setting margin mode or leverage, go to “Assets”, then Transfer, and move funds from your Spot Wallet to the Futures Wallet.
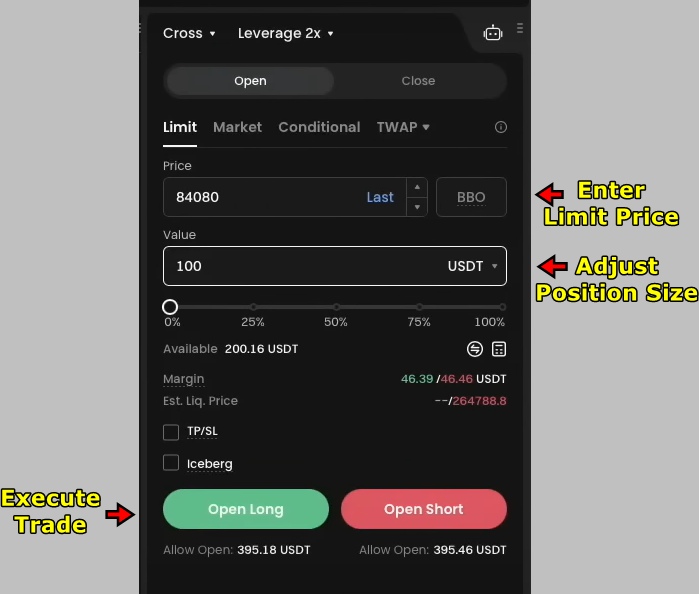
6. Enter Trade Details and Open Position
Now decide the trade direction, which means you need to decide whether you are betting in favor of the price or against it. In other words:
- Long: You expect the price to increase.
- Short: You expect the price to decrease.
In this tutorial we show you how to place a “Long” trade. A “Short” trade can be placed following the same steps. The only difference will be that you will be opening the position at a higher price and closing at a lower price for profits.
Now to place a long trade in the Order Panel:
- Set your Limit Price (e.g., $99,500).
- Define the order size in USDT.
- Click Buy/Long.
Your order can be seen in the “Positions” section once the market price reaches your limit.
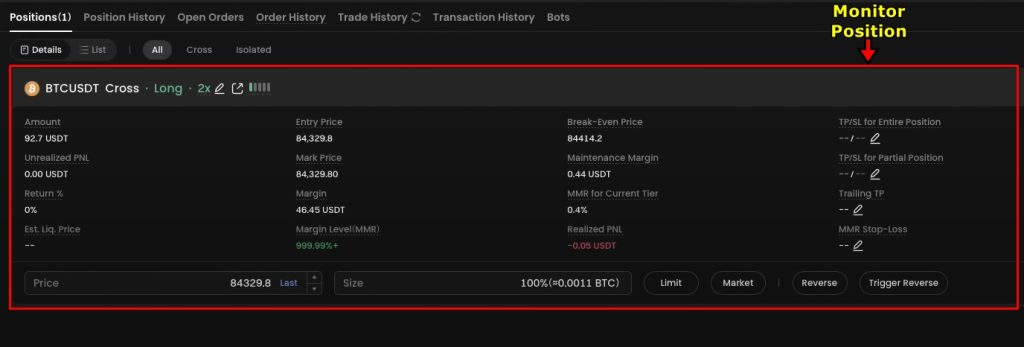
7. Monitor Your Open Position
After execution, track your trade in the Open Positions section. Key data points include:
- Position Size
- Entry Price
- Unrealized PnL (Profit or loss if closed at the current price)
- Realized PnL (Final profit or loss from closed parts)
- Liquidation Price (The level at which your position is forcibly closed to prevent further loss)
Monitoring these values helps in timely decision-making, especially in volatile markets.
8. Add Stop-Loss and Take-Profit
Risk management is crucial in leveraged trading. Use the TP/SL option in the position row to minimize your risks:
- Click TP/SL.
- Set your Take-Profit price. For instance, if you entered at $99,500, set TP at $101,000.
- Set your Stop-Loss to limit downside risk, e.g., $98,000.
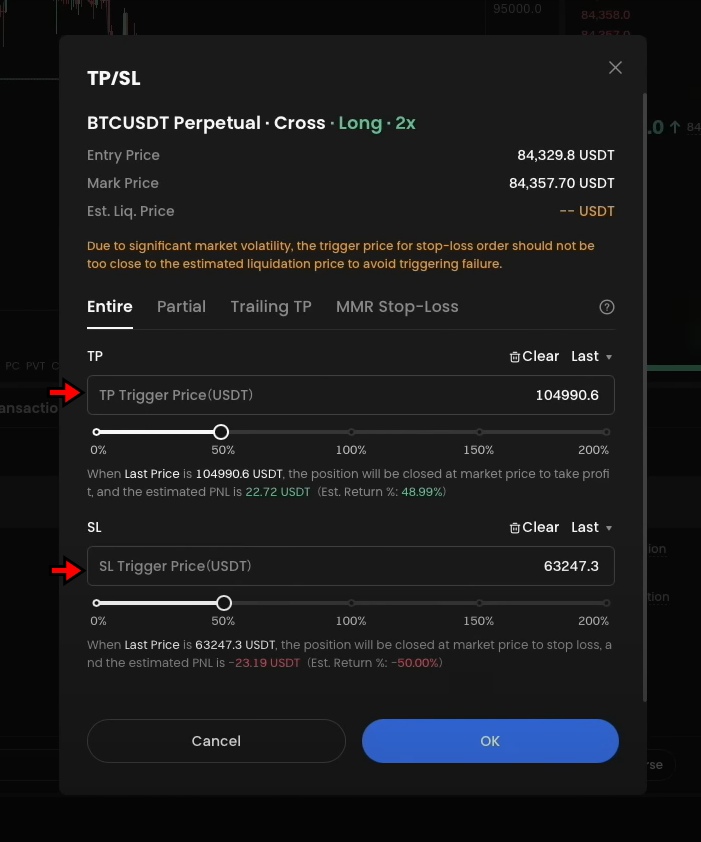
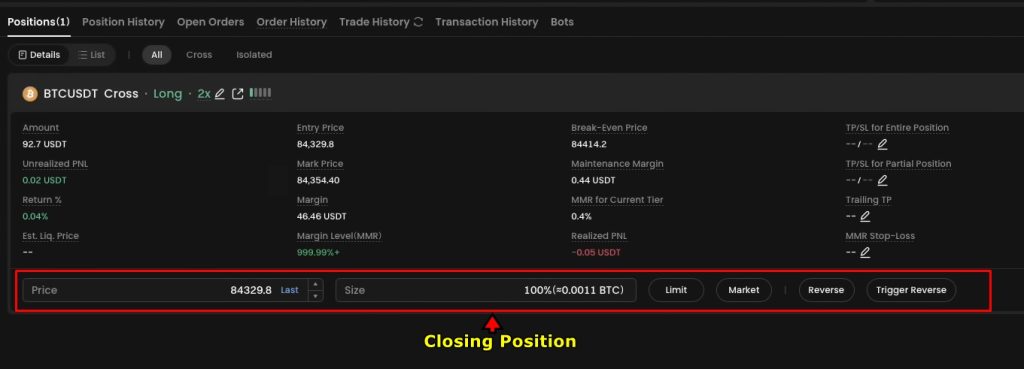
These values depend on how much risk you are willing to take. Alternatively, you can also close the position manually:
- Go to your position.
- Enter the Size to close (e.g., 50% or 100%).
- Select Market for immediate closure or Limit to define an exit price.
Proper use of take-profit and stop-loss helps reduce losses and secure gains even if the market moves quickly.
Gate.io Copy Trading Tutorial
Gate.io offers a copy trading feature for users who want to follow the strategies of more experienced traders. It allows both beginners and passive investors to participate in the market without building strategies from scratch. The platform supports copy trading for both Spot and Futures markets.
Users can view trader profiles, check performance data, and choose who to follow. Once selected, the platform automatically opens and closes positions in line with the trader’s actions. While the interface is more functional than polished, it covers all the basics for hands-off trading.
Here’s a step-by-step guide on how to use Gate.io’s Copy Trading feature.
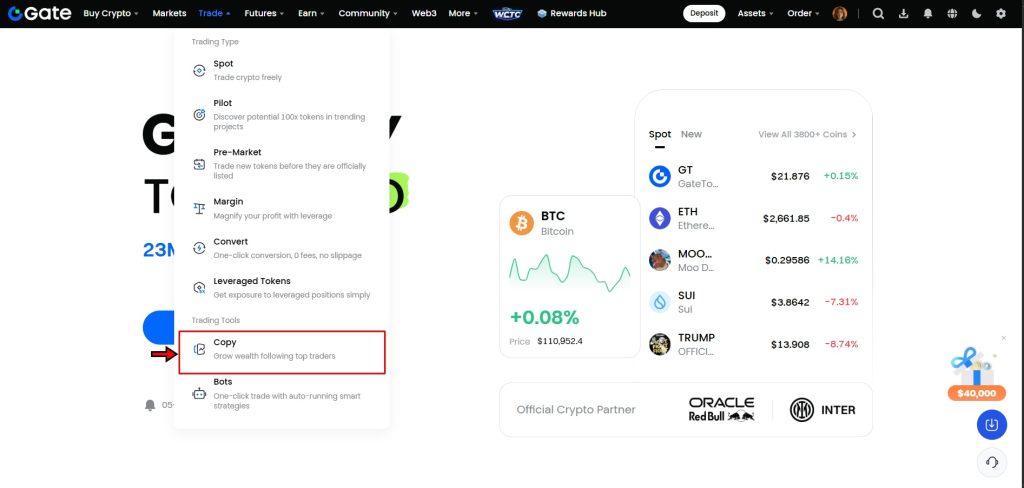
1. Go to the Copy Trading Page
Log in to your Gate.io account. From the homepage, hover over the “Trade” tab in the top menu. Click on “Copy” from the dropdown. This opens the Copy Trading interface.
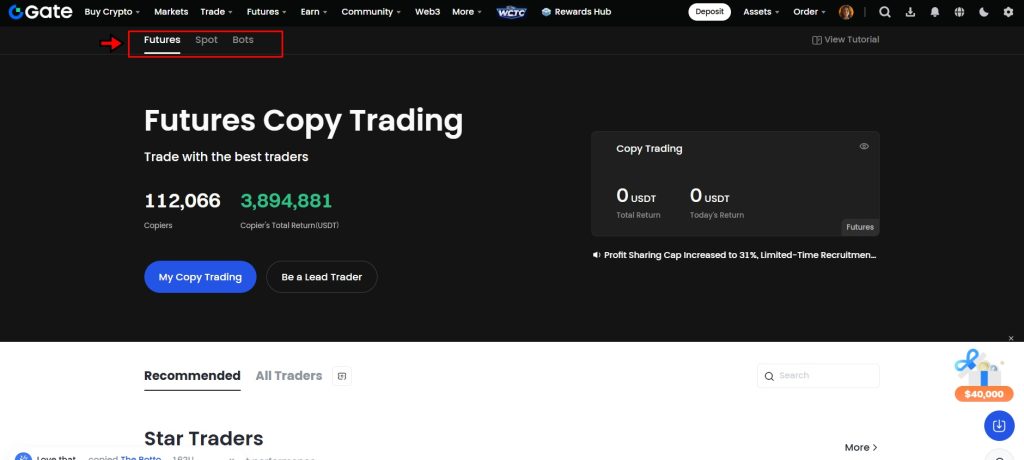
2. Select the Market Type
Inside the Copy Trading page, you’ll find two tabs: “Spot” and “Futures.” Choose the market you prefer. Both options follow similar steps. For this tutorial, we’ll use Futures Copy Trading as an example.
3. Pick a Trader to Follow
This step requires a bit of research. Scroll through the list of available traders. Click on any profile to view detailed stats, like win rate, number of followers, trading history, and performance metrics.
Look for traders with a consistent track record and low drawdowns. Once you’ve found someone to follow, click “Copy” on their profile to proceed. For this example, we are using a random trader for demonstration.

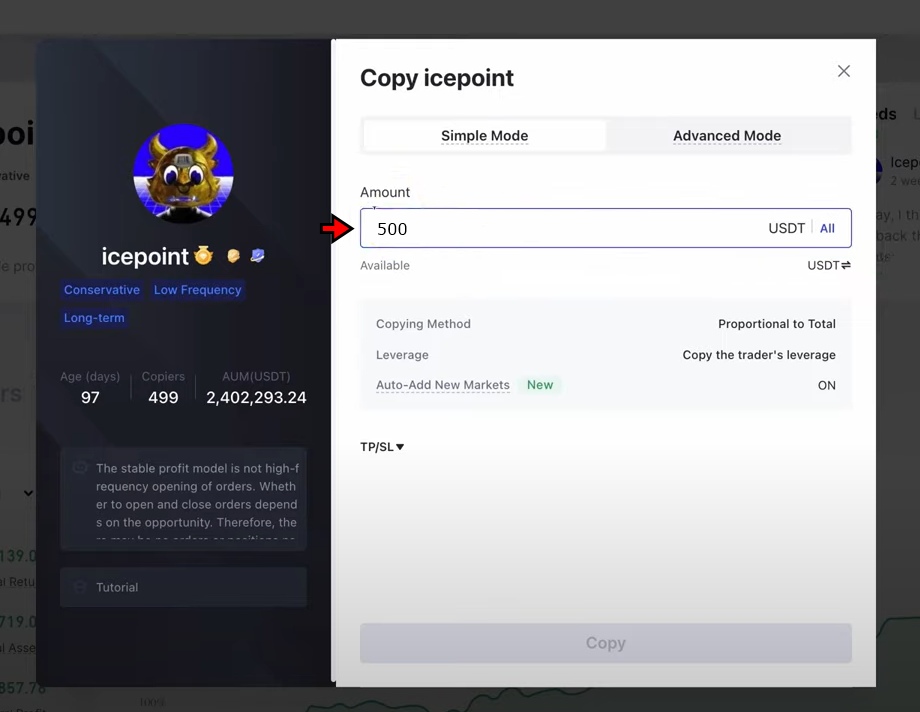
4. Enter the Investment Amount
After clicking “Copy,” enter the amount you want to allocate to copy trading. This is the capital Gate.io will use to mirror the trader’s positions. If you want more control, switch to “Advanced Mode.” This lets you fine-tune risk settings, assign different margins per trade, or set limits on how much exposure you’re willing to take on.
Once everything looks good, confirm the copy setup. From this point forward, Gate.io will automatically mirror the trader’s activity in your account.
Gate.io Key Trading Features
Gate.io offers several tools that go beyond basic spot or futures trading. These features help users manage risk, explore short-term strategies, and simplify asset conversion. Each tool is designed to support different trading styles and caters to different kinds of traders. Below is a breakdown of some of the key features available on the platform.
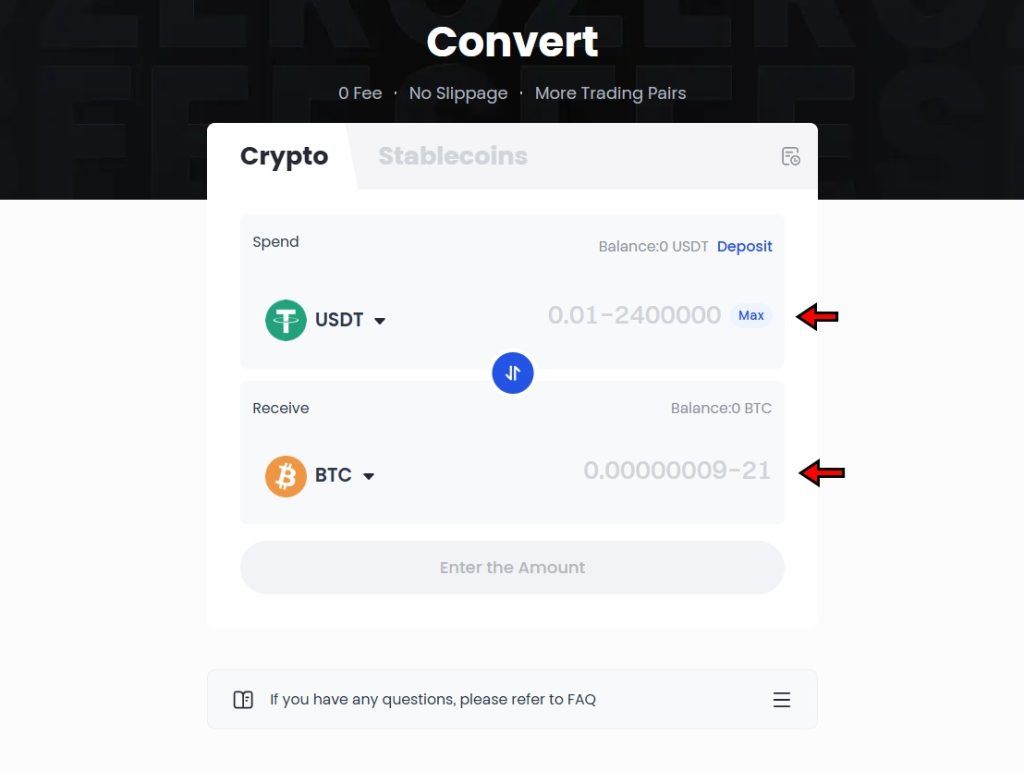
Gate.io Convert
Convert is Gate.io’s one-click swap tool. It lets users exchange one cryptocurrency for another instantly, without using the standard trading interface. There are no fees for using Convert, and the process is handled directly in the spot account.
To use it, visit the Convert page from the main menu. Select the token you want to swap from and the token you want to receive. Enter the amount, and the system will display the conversion rate. After reviewing the details, confirm the swap. The funds will be credited to your wallet automatically.
This feature is useful for users who want to move between assets quickly without managing order books or market conditions.
Gate.io ETF Leveraged Tokens
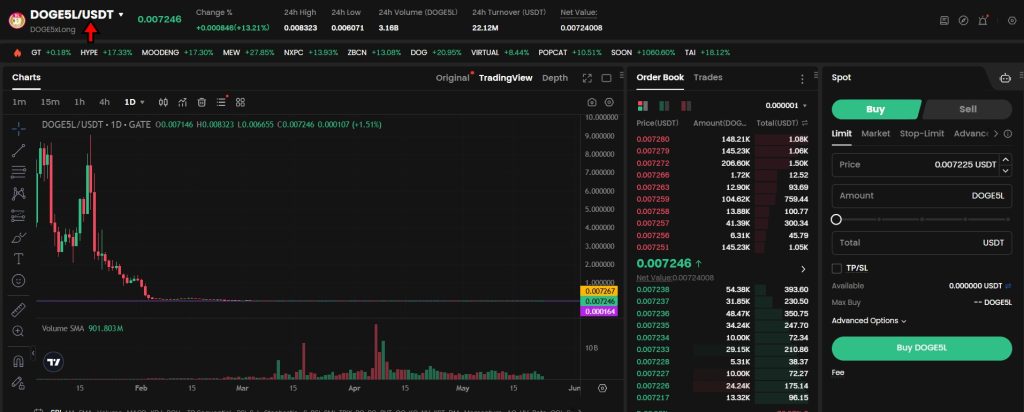
ETF Leveraged Tokens provide amplified exposure to market movements without the complexity of margin trading. These tokens track the price of an underlying asset using a fixed leverage ratio such as 3x long or 3x short.
For example, a 3x long Bitcoin token rises approximately 3% if Bitcoin’s price increases by 1%. Losses are also magnified the same way. What sets leveraged tokens apart from margin trading is that there’s no need to borrow funds or manage collateral. There’s also no risk of forced liquidation.
Trading them works just like spot trading. Navigate to the Leveraged Tokens section from the “Trade” dropdown. From there, choose your token and execute trades as you would in the spot market.
Gate.io supports leverage up to 5x on select tokens. While this makes them attractive for short-term trades, these products automatically rebalance to maintain their leverage target. This rebalancing can lead to value decay over time, especially in sideways or volatile markets. Because of that, leveraged tokens are best used for short-term strategies and not for holding long-term.
Gate.io Options Trading
Options trading allows users to buy or sell the right—but not the obligation—to trade an asset at a specific price. Gate.io supports both call and put options across different expiration dates.
Call options give the buyer the right to purchase an asset at a set price. Put options give the buyer the right to sell an asset at a set price. Users can choose between American-style options, which can be exercised anytime before expiration, and European-style options, which are only exercised at expiration.
To start trading options, go to the “Futures” tab and select “Options.” You’ll see the options chain, which lists contracts by expiration date and strike price. Choose your contract and direction, then click on the option to open the trade window. From there, complete your order.
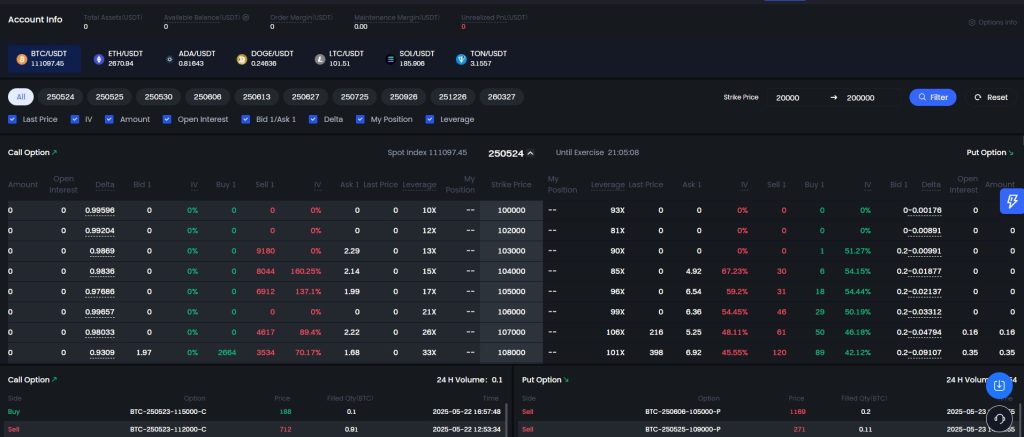
The interface is direct and functions well for traders who already understand how options work.
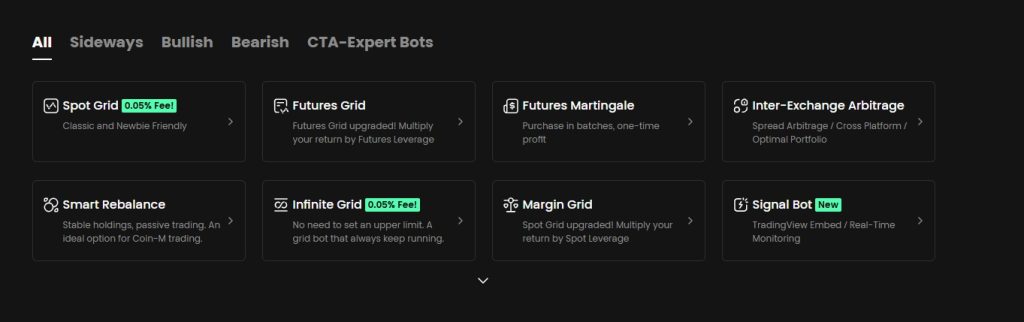
Gate.io Trading Bots
Trading bots on Gate.io automate trades based on predefined strategies. Users can set rules around entry points, position sizes, and execution frequency. Once configured, the bot operates automatically and executes trades even when the user is offline.
Gate.io supports various strategies, including Dollar-Cost Averaging (DCA) and Grid Trading. Bots can run continuously or within specific time frames. Many are simple to set up, and most include a demo mode for backtesting. More advanced bots are also available, allowing deeper customization for experienced users.
To use a trading bot, select “Trading Bots” from the platform menu. Each bot comes with step-by-step guidance to help with setup. While bots reduce manual effort, they still require proper configuration to align with your trading goals.
How to Withdraw Funds on Gate.io?
Gate.io allows users to withdraw cryptocurrencies directly to external wallets or other exchanges. However, the platform does not support fiat withdrawals. If you need to convert your crypto to fiat, you’ll have to transfer your assets to another exchange that supports fiat off-ramping. The process to withdraw crypto from Gate.io is simple. Follow these steps to complete a withdrawal.
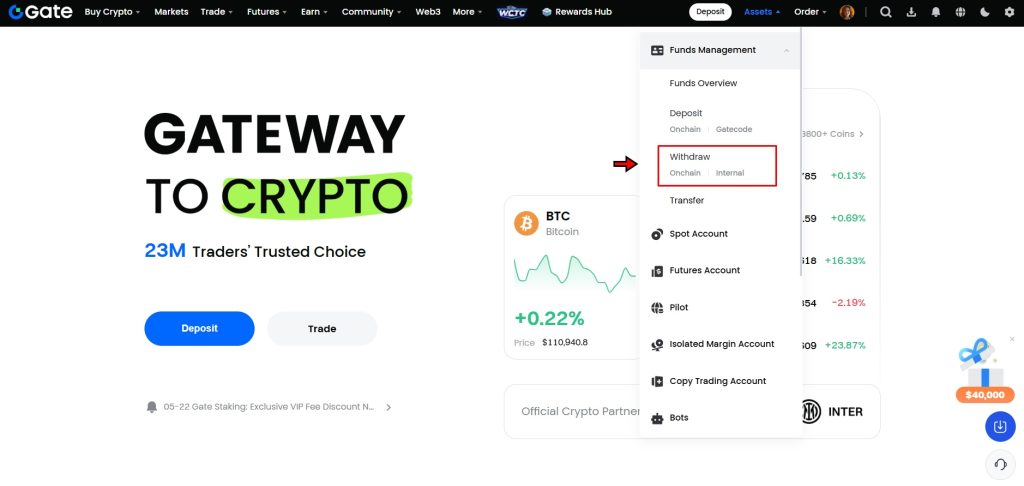
1. Go to the Crypto Withdrawal Page
Start by logging in to your Gate.io account. Hover over the “Assets” tab in the top navigation bar. From the dropdown, click on “Funds Management.” Then select “Withdraw” under the available options. This will take you to the crypto withdrawal page.
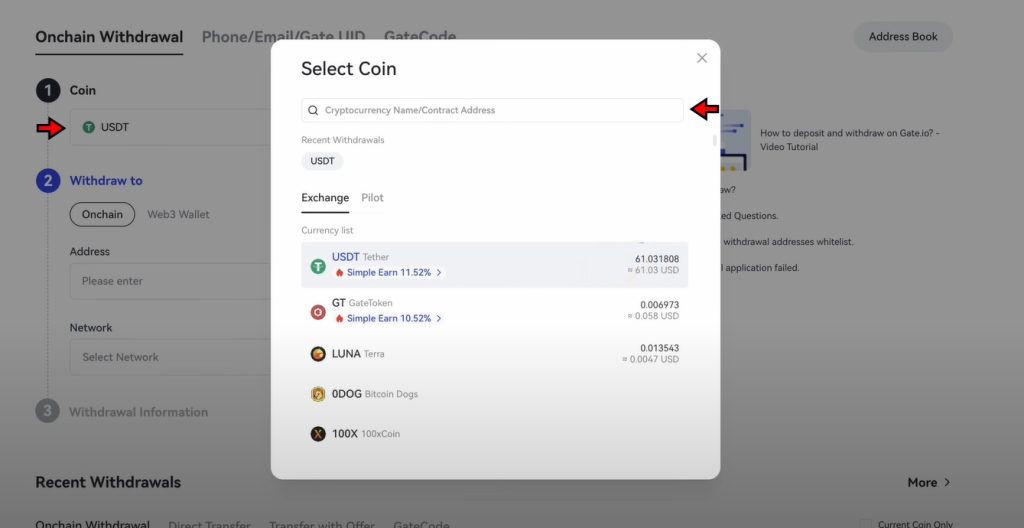
2. Choose the Currency to Withdraw
On the withdrawal page, you’ll see a list of supported cryptocurrencies. Use the search bar if you don’t see your token immediately. Select the coin you want to withdraw, whether it's Bitcoin, Ethereum, USDT, or any other supported asset.
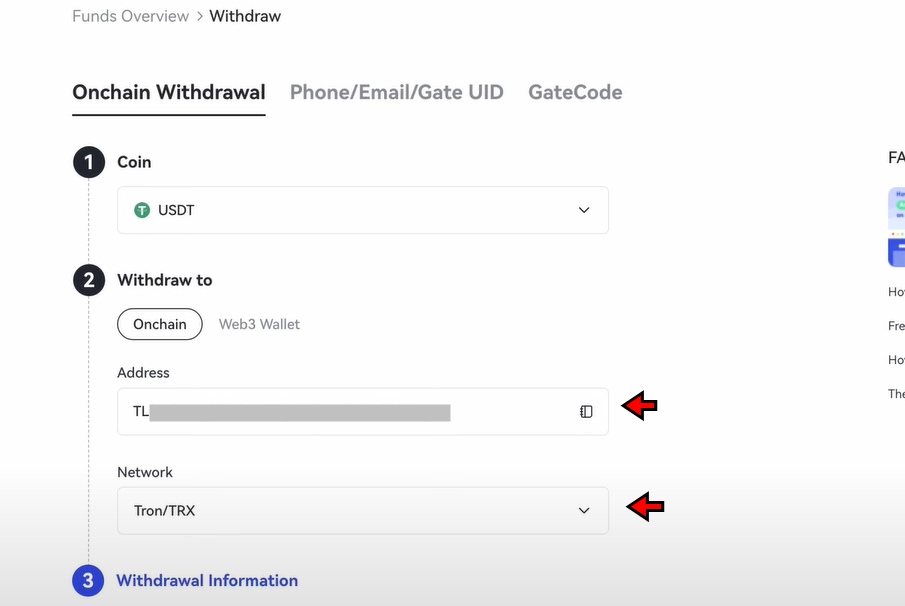
3. Enter Address and Select Network
Once you’ve selected your token, choose the “On-chain” withdrawal option. Paste the wallet address where you want to receive the funds. Make sure to double-check the address to avoid sending funds to the wrong destination.
Next, select the network. This is important as the network must match the one supported by the receiving wallet and be compatible with the token you're withdrawing. Mismatched networks can result in lost funds.
4. Enter the Amount and Complete the Transaction
After entering the wallet address and selecting the correct network, type in the amount you want to withdraw. Review all details carefully, especially the address and network, then click “Withdraw” to complete the process.
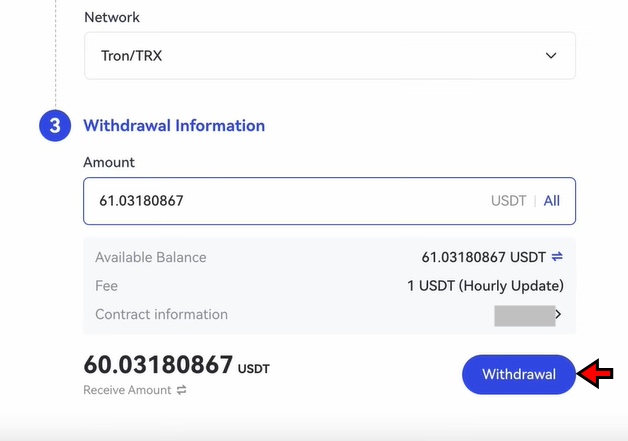
Gate.io will process the transaction, and your funds will be sent once the blockchain confirms it. The time it takes depends on network congestion and the token you're withdrawing.
Gate.io Fees
Gate.io doesn’t charge any fees for crypto deposits, so adding funds to your account is straightforward. However, withdrawal fees vary depending on the cryptocurrency, the selected blockchain network, and overall network traffic. For instance, withdrawing assets via the Ethereum network typically costs more compared to using alternatives like Tron or Arbitrum due to congestion and gas fees.
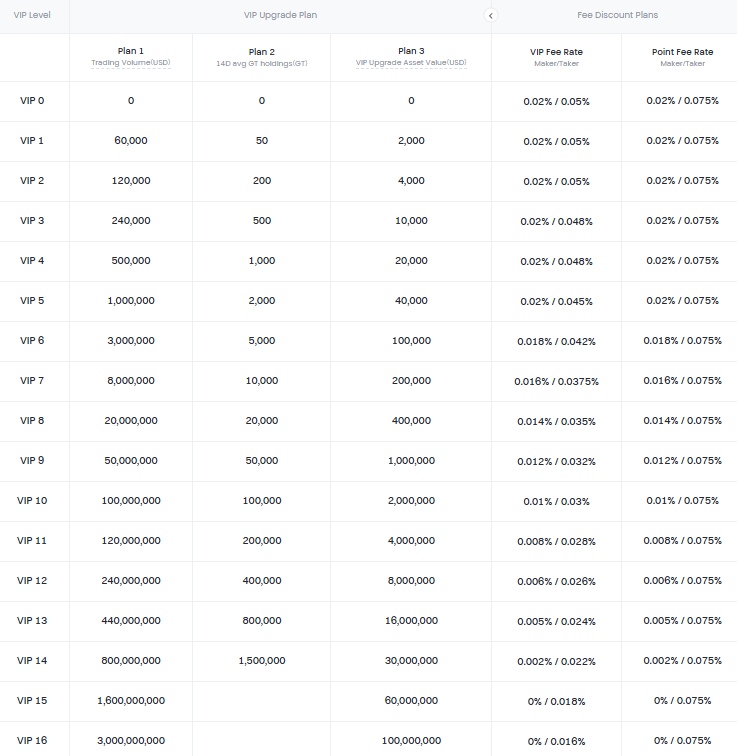
When it comes to trading, Gate.io uses a tiered fee model that rewards higher-volume traders with reduced fees. For spot trading, both maker and taker fees start at 0.2%. These rates decrease as your 30-day trading volume increases or if you reach higher VIP levels on the platform. This system benefits active traders by lowering costs over time. Here is a complete breakdown of Gate.io spot trading fees.

Futures trading has a different fee structure. The maker fee starts at 0.015%, and the taker fee is 0.05%. Just like with spot trading, futures traders can unlock lower fees through the same VIP-tier system, which is based on total trading volume. This approach encourages consistent trading activity by offering progressively better rates the more you trade. Below is a breakdown of the futures fees for Gate.io.
Is Gate.io Secure?
Gate.io employs several security measures to protect user accounts and funds. Two-factor authentication (2FA) through Google Authenticator is the default method, offering better protection than SMS-based 2FA. Users can also activate features like login verifications, withdrawal passwords, address whitelisting, anti-phishing codes, and blind IP logins. These tools aim to reduce unauthorized access and give users more control over account security.
The platform keeps most user funds in cold wallets, with only a small portion held in hot wallets for operational needs. However, Gate.io doesn’t disclose the exact percentage of assets stored offline, which is a notable omission. Many exchanges provide this detail to promote transparency. The platform also maintains an insurance fund designed to absorb some trading-related losses, though this coverage is limited and does not guarantee full protection in volatile conditions.
Gate.io publishes Proof of Reserves reports audited by third-party firms. These audits are intended to confirm that the platform holds enough assets to match user deposits. The findings are made public so users can evaluate whether their funds are backed by actual reserves.
Gate.io is based in the Cayman Islands, a jurisdiction with lighter regulatory oversight compared to regions like the U.S. or EU. As a result, it does not benefit from protections like federal deposit insurance or government-backed custody guarantees. This introduces an additional risk for users seeking strong regulatory safeguards.
Final Takeaway
If you’ve followed this tutorial, you should be well-equipped to start trading on Gate.io with confidence. The platform covers a wide range of trading options, including spot, futures, leveraged tokens, copy trading, and even options. User can access all these features without getting overwhelmed. Setting up your account, securing it, funding it with crypto, and placing your first trade all follow a clear step-by-step flow.
The layout is consistent across features, so once you’ve used one, navigating others becomes easier. Tools like Convert, trading bots, and ETF tokens give you flexibility without requiring deep technical skills. Withdrawals are also simple, as long as you double-check your wallet addresses and network choices.
With the basics covered, you won’t need to rely on tutorials every time. Just keep your security settings tight and focus on your strategy. Gate.io doesn’t get in your way once you know how to move around.
Frequently Asked Questions - FAQs
Gate.io is a centralized crypto exchange that offers spot, futures, options, ETF leveraged tokens, copy trading, and automated trading tools.
Yes, the platform provides a clean interface and step-by-step instructions for most features, making it accessible to new traders.
Yes, users must complete identity verification to unlock full trading and withdrawal features.
Yes, Gate.io supports fiat purchases through third-party providers, though it does not support direct fiat withdrawals.
Copy Trading lets users automatically mirror the trades of experienced traders based on selected strategies.
These are structured tokens that offer amplified exposure to crypto price movements without requiring margin management.
Yes, Gate.io offers both American and European options with a simple interface to choose call or put positions.
Withdrawals are done through the “Funds Management” section. You need to select the crypto, input the wallet address, choose the correct network, and confirm the amount.
Deposits are free. Spot trading fees start at 0.2% and futures trading fees begin at 0.015% for makers and 0.05% for takers. Withdrawal fees vary by asset and network.
Gate.io uses 2FA, cold wallet storage, and withdrawal whitelists. However, it lacks full regulatory oversight and insurance.
Proof of Reserves are third-party audits that confirm Gate.io holds assets equal to its liabilities, aiming to provide transparency.
Yes, Gate.io offers a mobile app with full access to trading features, account settings, and security tools.
Gate.io is registered in the Cayman Islands, a jurisdiction with looser regulatory requirements compared to the US or EU.
Disclaimer: All content on The Moon Show is for informational and educational purposes only. The opinions expressed do not constitute financial advice or recommendations to buy, sell, or trade cryptocurrencies. Trading involves significant risk and may result in substantial losses. Always seek independent financial advice before making investment decisions. The Moon Show is not responsible for any financial losses or decisions made based on the information provided.
Please view the full disclaimer at: https://themoonshow.com/disclaimer

The Ultimate WEEX Exchange Tutorial: Step-by-Step Guide for Beginners
WEEX is not among the largest cryptocurrency exchanges. It does not match the trading volume of...

The Ultimate Bybit Exchange Tutorial - A Step-by-Step Guide for Beginners
Cryptocurrency trading continues to evolve with time. Today, crypto users can access several ex...

MEXC Exchange Tutorial: Step-by-Step Guide for Beginners
MEXC is a well-established cryptocurrency exchange that supports a wide range of trading featur...