WEEX App Tutorial – How to Trade Crypto on WEEX App?
WEEX is a crypto trading platform built with a focus on usability. It doesn’t attempt to match the scale or feature set of larger exchanges like Binance or Bybit, but that’s intentional. The app avoids clutter and prioritizes a trading environment that’s direct, efficient, and accessible.
The interface is minimal without feeling limited. Menus are clearly labeled, key functions are placed where users expect them to be, and unnecessary steps are removed from common actions. This approach benefits both beginners and experienced traders who prefer a more focused setup.
WEEX supports both spot and futures trading, with essential features available through both its mobile app and web platform. The structure stays consistent across devices, which helps reduce the learning curve and makes account management more straightforward.
This tutorial walks through the core functions of the WEEX app, starting with account creation and verification. It then moves on to deposits, withdrawals, and trade execution. Each section includes a clear breakdown of the process, supported by screenshots for visual reference. The goal is to provide a complete walkthrough that allows users to get started without needing outside help or extra research. Let’s get started:
What is WEEX?
WEEX is a centralized cryptocurrency exchange that has been active since 2018. It is registered in Singapore and operates regional offices in Taiwan and Dubai. The platform takes a conservative approach to growth, focusing on regulatory compliance rather than rapid feature expansion. This strategy has allowed it to enter and operate in several regulated markets.
WEEX holds Money Services Business (MSB) licenses from both FINTRAC in Canada and FinCEN in the United States. These registrations give it the legal standing to serve users in countries like the United States, Canada, the United Kingdom, and Japan. Its licensing foundation makes it a viable option for users in jurisdictions with tighter regulatory requirements.
The platform supports spot and futures trading, with futures contracts offering leverage up to 400x. It also includes over-the-counter (OTC) trading and copy trading features. Users have access to over 600 cryptocurrencies, including major tokens and newer assets.
Join WEEX and unlock 40 USDT back with your first deposit-and-trade step. Deposit 100 USDT and start trading.
Security is also taken very seriously at WEEX. The exchange maintains a 1,000 BTC protection fund, which is publicly verifiable. It also publishes Proof of Reserves and uses multiple layers of protection to secure user assets and account data. These measures have contributed to the platform’s strong reputation for safety and transparency.
| Read Our WEEX Exchange Review | Read Our WEEX Exchange Tutorial |
How to Sign Up on the WEEX App?
Getting started with the WEEX app takes only a few minutes. The process is straightforward, whether you're opening your first crypto account or switching from another app. Below is a step-by-step guide that walks you through each stage of registration. Let’s take a look:
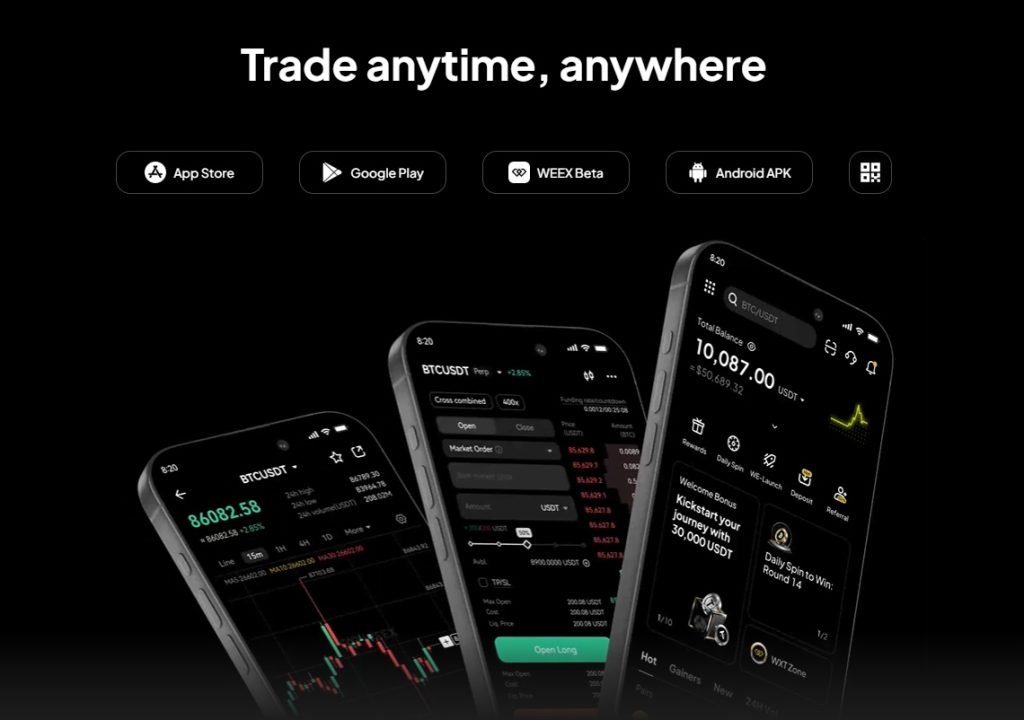
1. Download the WEEX App
Begin by installing the app on your device. For Android users, open the Google Play Store. If you're using an iPhone, head to the App Store. Type “WEEX” into the search bar, locate the official app, and tap Install. The file size is small, so the download and installation should complete quickly.
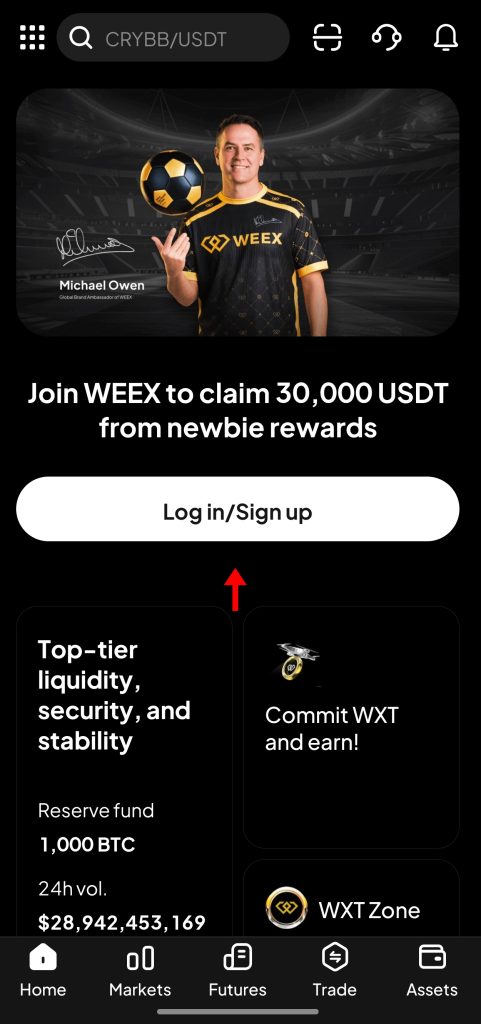
2. Launch the App and Start Registration
Once installed, open the app. On the welcome screen, you’ll see a “Sign-up” button prominently displayed. Tap it to begin the registration process. This will take you to a page where you can choose how to create your account.
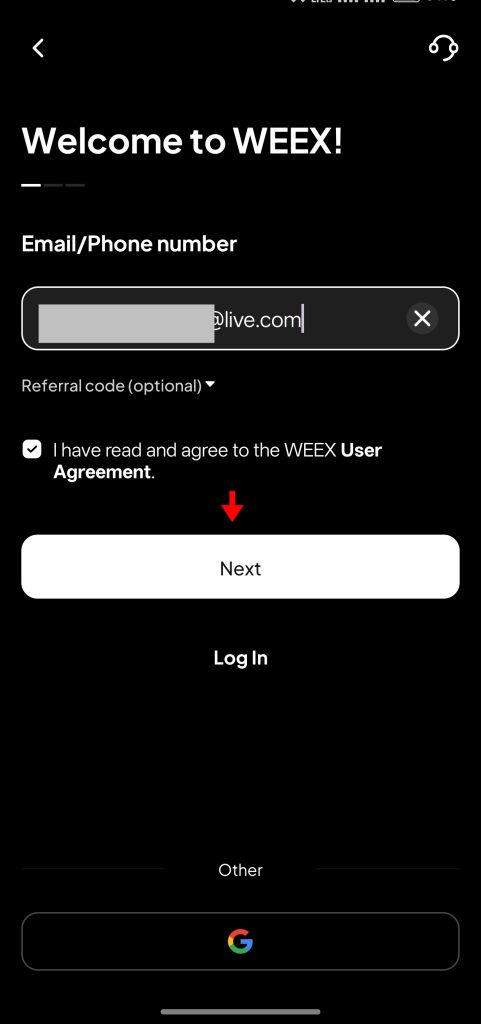
3. Enter Your Email or Phone Number
WEEX gives you two sign-up options: by email or phone number. Choose whichever method you prefer. Enter your details into the form, then tap “Next” to move forward. You can also register directly using a Gmailaccount if that’s more convenient.
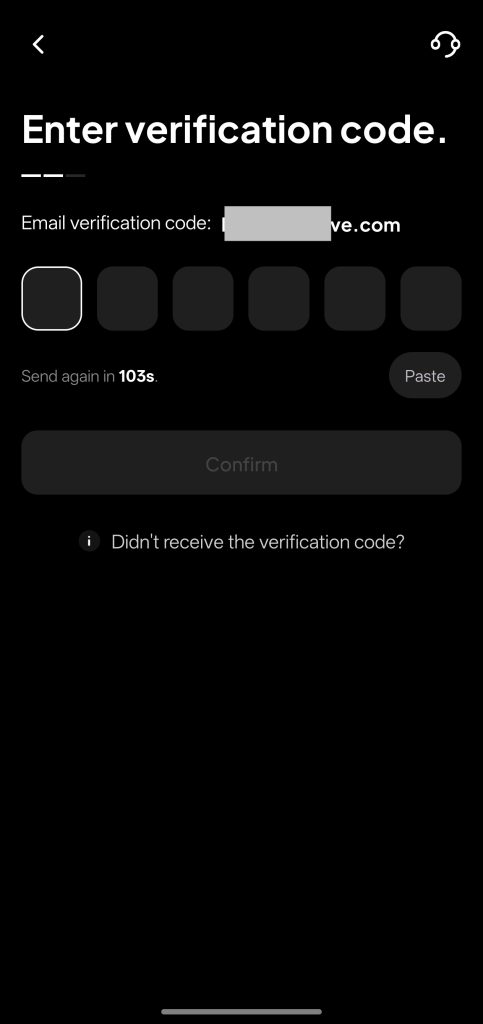
4. Verify Your Email or Phone
After entering your details, you’ll receive a verification code. If you used email, check your inbox. If you signed up with a phone number, look for an SMS message. Enter the code exactly as it appears. Tap “Confirm” to confirm your identity and proceed.
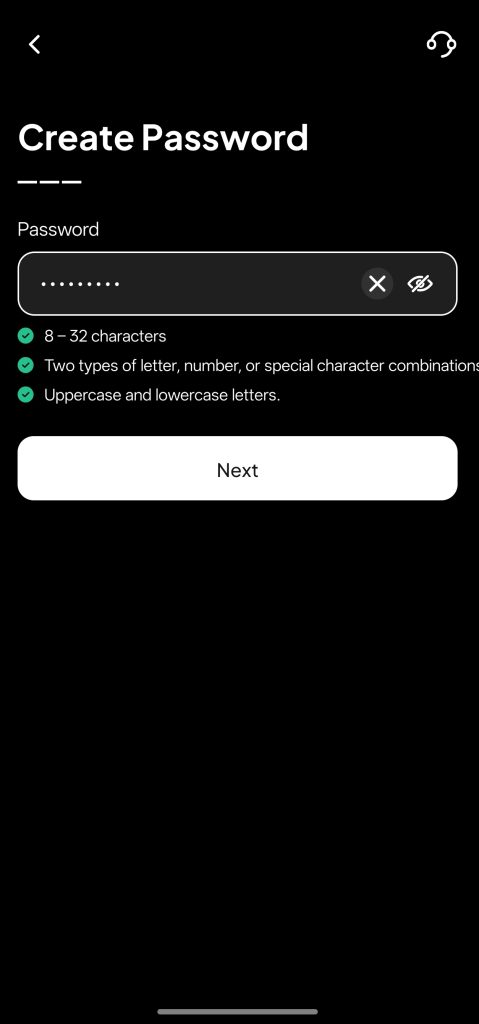
5. Set Up a Secure Password
Next, you’ll be asked to create a password. Use a combination of uppercase and lowercase letters, numbers, and symbols. Avoid common or simple passwords. After entering and confirming your password, tap “Confirm” to complete the sign-up.
Once these steps are done, your WEEX account is active. You’ll land on the main dashboard, where you can view trading pairs, check live prices, and explore different sections of the app. The layout is clean, and the core features are easy to access.
You can start trading right away or continue to the next step: verifying your identity. Verification unlocks the full range of platform features, which we’ll cover in the following section.
Start trading on WEEX with a 100 USDT deposit and unlock 40 USDT back after completing your first trading step.
How to Complete KYC on the WEEX App
KYC, or Know Your Customer, is a basic requirement for unlocking the full range of features on the WEEX app. Completing it allows higher withdrawal limits, access to platform events like WeLaunch, and tighter security controls on your account. The process takes only a few minutes and requires just a valid ID and a selfie. Here’s how to complete it step by step.
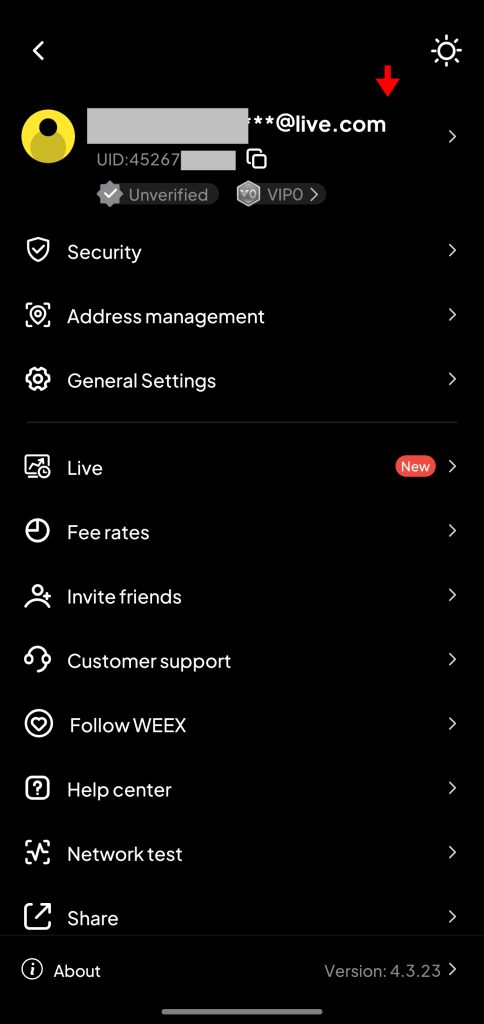
1. Go to Account Info
Open the WEEX app and log into your account. On the main screen, tap the dotted box icon at the top left corner. This opens the side panel. From here, tap your email address to open your Account Info page.
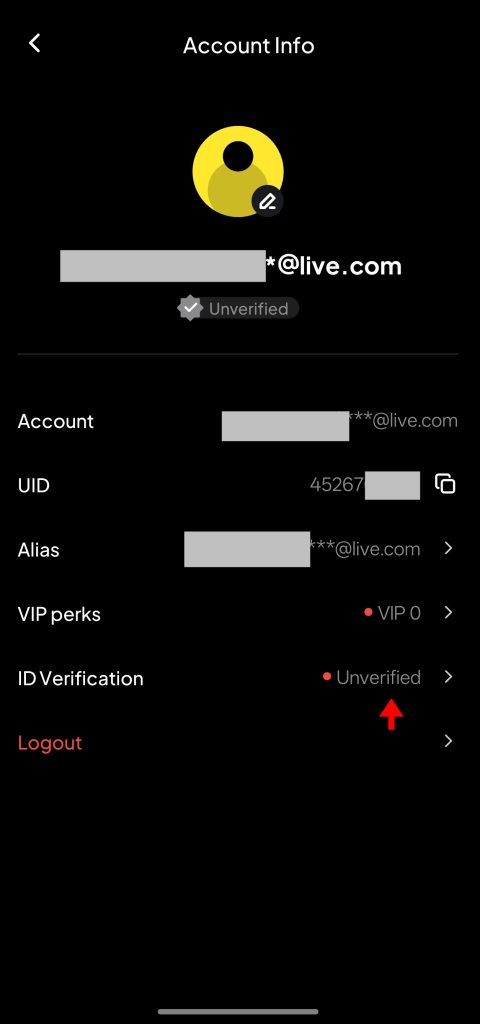
2. Open the Identity Verification Page
Inside the Account Info section, you’ll see your basic profile details like email, UID, alias, and VIP status. Look for the “ID Verification” option and tap it. This will take you to the KYC page where the process begins.
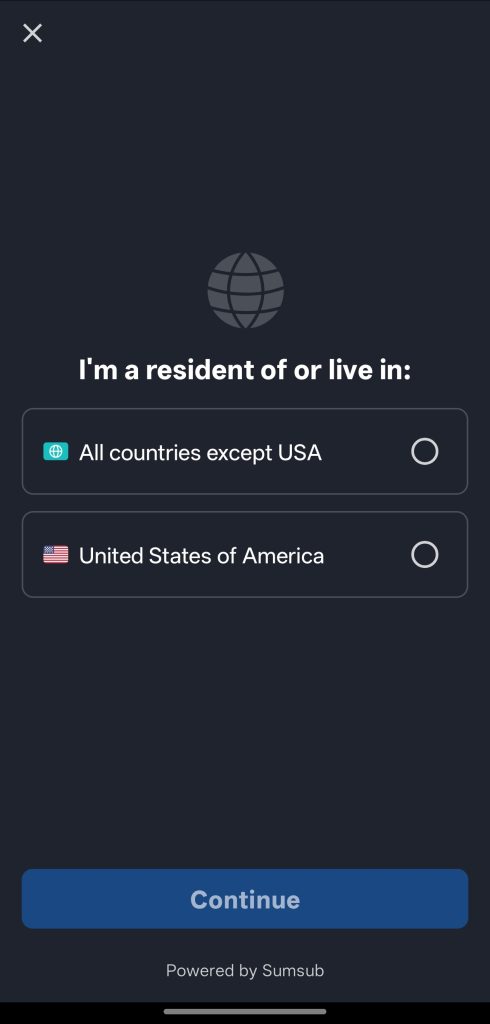
3. Select Your Country
The first step in the KYC process is selecting your country. You’ll be prompted to choose between “United States of America” and “Other Countries.” If you select “Other Countries,” a list will appear. Choose your country of origin and tap Continue.
4. Choose ID Type
Next, you’ll be asked to select the type of ID you want to use. The options will vary depending on your country but typically include passports, national ID cards, and driver’s licenses. Pick the one that you have on hand and tap to proceed.

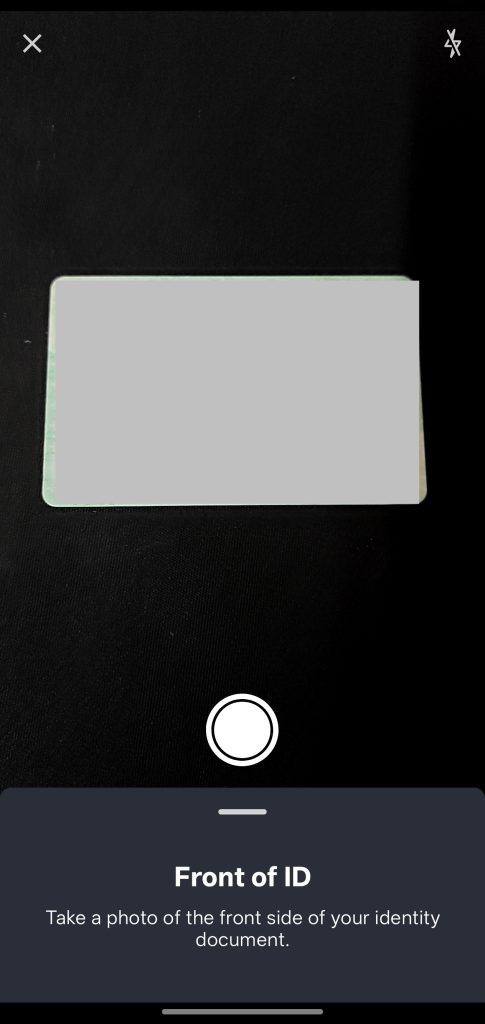
5. Take a Picture of the ID Document
Once you’ve selected an ID type, the app will open your camera. Position your ID clearly within the frame and take a photo. Make sure all text is visible and in focus. If the document has a back side, you’ll be prompted to capture that as well.
6. Facial Verification
After uploading your ID, the app will automatically begin facial verification. Hold the phone at eye level, stay still, and wait for the app to take a selfie using the front camera. No need to press anything. Once it captures the image, your submission will be sent for review.

WEEX usually processes KYC applications within 24 to 48 hours. In many cases, approvals happen within minutes. You’ll receive a notification once your verification is complete. After that, your account is fully verified and ready for unrestricted use across the platform.
New users can claim double rewards on WEEX for a limited time. Bind your phone and email to get a 10–100 USDT coupon and unlock additional trading rewards.
How to Deposit Funds on WEEX App
The WEEX app makes it easy to transfer digital assets from another wallet or exchange. While fiat deposits aren’t supported, the platform does a good job of keeping the crypto deposit process clean and simple. Users get access to a wide range of supported tokens and networks, with helpful safeguards to avoid mistakes. Here's a step-by-step breakdown of how to deposit funds into your WEEX account.
1. Open the Deposit Page
Start by logging into your WEEX account. From the home screen, tap the “Deposit” button. This opens the deposit dashboard where you’ll see a list of supported cryptocurrencies.

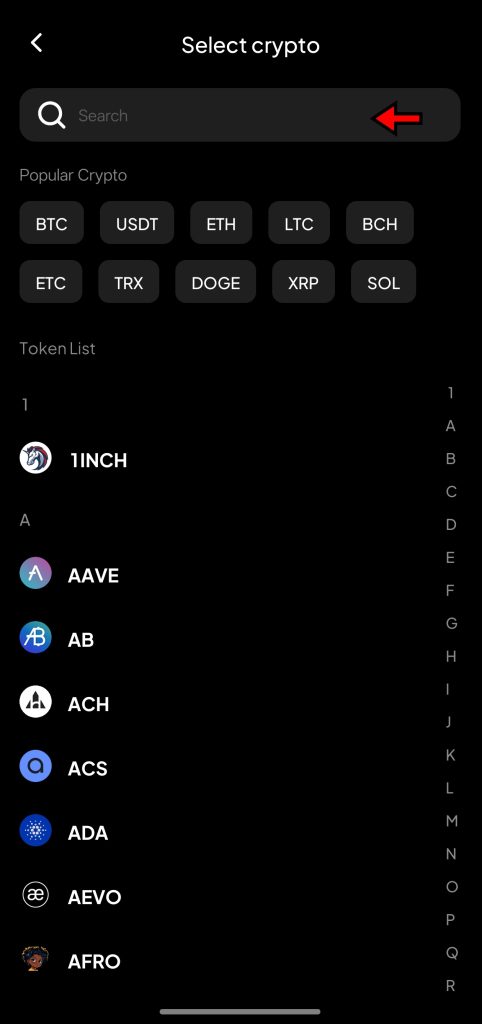
2. Choose the Cryptocurrency
Scroll through the list or use the search bar to find the coin you want to deposit. Tap the token name to proceed. This will bring up the deposit interface for that specific asset. Most users begin by depositing BTC or stablecoins like USDT.
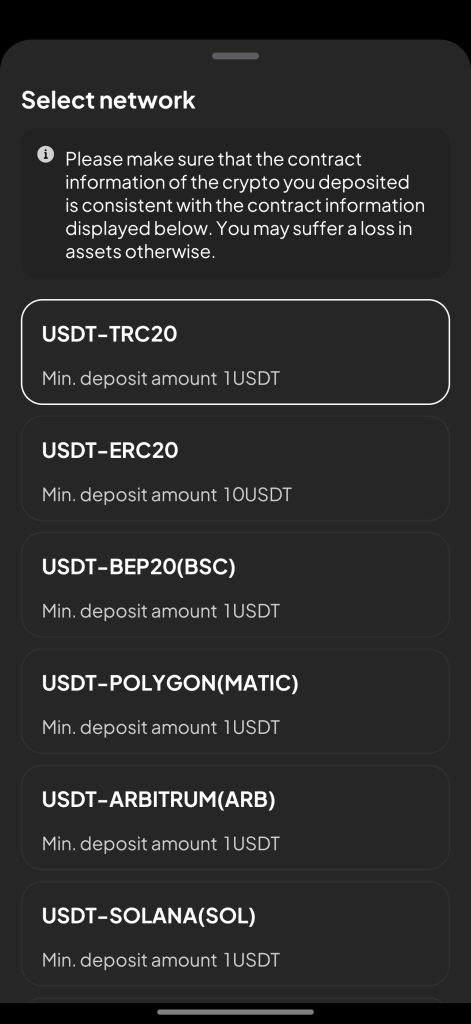
3. Select the Network
After selecting the coin, the app will ask you to choose a blockchain network. This step is critical. The network you choose here must match the network used by the sending wallet. For example, if you're sending USDT from a wallet using the TRC20 network, you must also select TRC20 on WEEX. Using the wrong network can result in a permanent loss of funds, so double-check before proceeding.
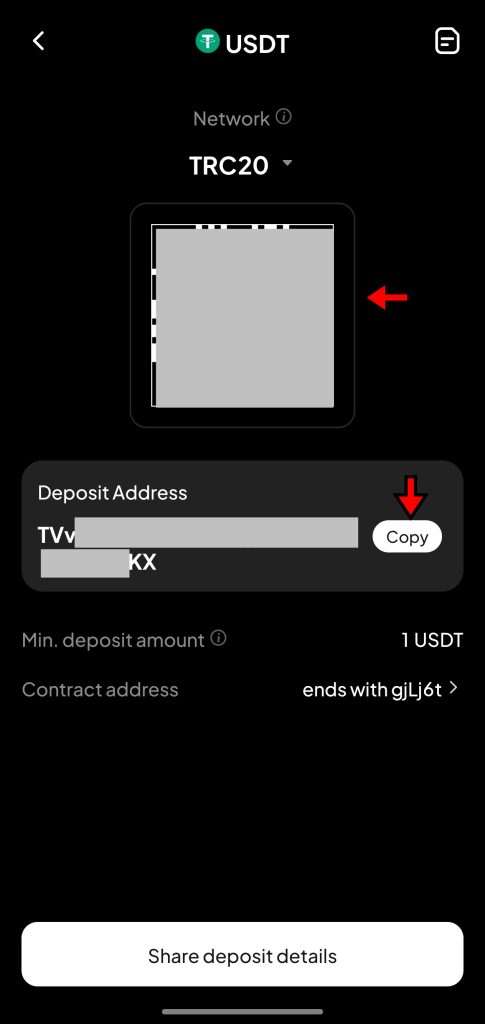
4. Copy or Scan the Wallet Address
Once the network is selected, WEEX will generate a deposit address along with a QR code. You can tap “Share Address” to copy the address or use the QR code to scan it directly from the sending wallet. Paste the copied address into your external wallet or exchange, complete the transfer, and wait for the blockchain confirmation. Your crypto should appear in your WEEX balance shortly after the network processes the transaction.
That’s all it takes to deposit funds on WEEX. The app doesn’t add unnecessary steps or delays, and confirmations usually happen within minutes depending on the network traffic. Once the funds land in your account, you’ll be ready to trade, transfer, or use other platform features without restriction.
Order Types on WEEX App
Before placing trades on WEEX (whether in spot or futures markets) it’s important to understand the available order types. These options help users control how and when their trades get executed. Each one serves a specific purpose, allowing traders to manage risk, secure profits, or automate entries and exits based on market behavior.
Let’s go through the order types you’ll find on the WEEX app.
Market Order
A market order is the fastest way to enter or exit a trade. It executes instantly at the best available price. This type suits traders who want speed and are less concerned about the exact execution price.
Example: A user sees BTC rising quickly and places a market buy order. The app fills the order immediately using current prices from the order book.
Limit Order
A limit order lets you define the price you want to pay or receive. The order stays open until the market hits your target. It gives you price control, but there's no guarantee it will execute.
Example: A user wants to buy ETH at $2,500. They place a limit order at that price. It stays pending until ETH hits or drops below $2,500.
Stop-Loss Order
A stop-loss order protects against heavy losses. It closes a position automatically when the price falls to a specific level. It’s a go-to risk management tool.
Example: Someone buys BTC at $30,000 and sets a stop-loss at $28,000. If BTC drops, the position closes to prevent further loss.
Take-Profit Order
A take-profit order helps secure gains. It closes a position once a certain profit level is reached.
Example: A trader buys ETH at $2,000 and sets a take-profit at $2,300. When ETH hits $2,300, the position sells automatically to lock in profit.
Stop-Limit Order
This combines a stop trigger with a limit condition. Once the stop price hits, a limit order is placed instead of a market order. It gives more precision in volatile conditions.
Example: A user sets a stop at $1,900 and a limit at $1,880 for ETH. When ETH drops to $1,900, a limit sell order goes live at $1,880.
Trigger Order
A trigger order waits for a condition before activating. It doesn't appear in the order book until the condition is met, which helps with planning trades ahead of time.
Example: A trader sets a trigger buy order for BTC at $31,000. When BTC crosses that level, the app places the buy order automatically.
Post-Only Order
A post-only order adds liquidity. If it matches an existing order immediately, it gets canceled. This type is ideal for users who want to avoid taker fees.
Example: A trader places a post-only buy order for ETH at $3,000. If a matching sell order is already on the book at that price, the system cancels the post-only order.
New users can claim double rewards on WEEX for a limited time. Bind your phone and email to get a 10–100 USDT coupon and unlock additional trading rewards.
WEEX App Spot Trading Tutorial
Spot trading on WEEX gives users direct access to buy and sell crypto at real-time prices. This mode doesn’t involve leverage or contracts. Users exchange actual tokens, and once a trade completes, the asset lands straight into the user's wallet. The process is clean, fast, and designed to be beginner-friendly without sacrificing the features that active traders rely on.
1. Go to the Spot Market
Launch the WEEX app and tap “Trade” from the bottom navigation bar. This opens the spot trading interface. Here, you can view live price action, place buy and sell orders, and switch between different token pairs. The layout focuses on simplicity but keeps key trading tools within reach.

2. Get Comfortable with the Interface
The spot market screen is organized into a few key components:
- Order Book (right side): A live feed of buy (green) and sell (red) orders. This helps you track how other traders are pricing the asset and understand market depth.
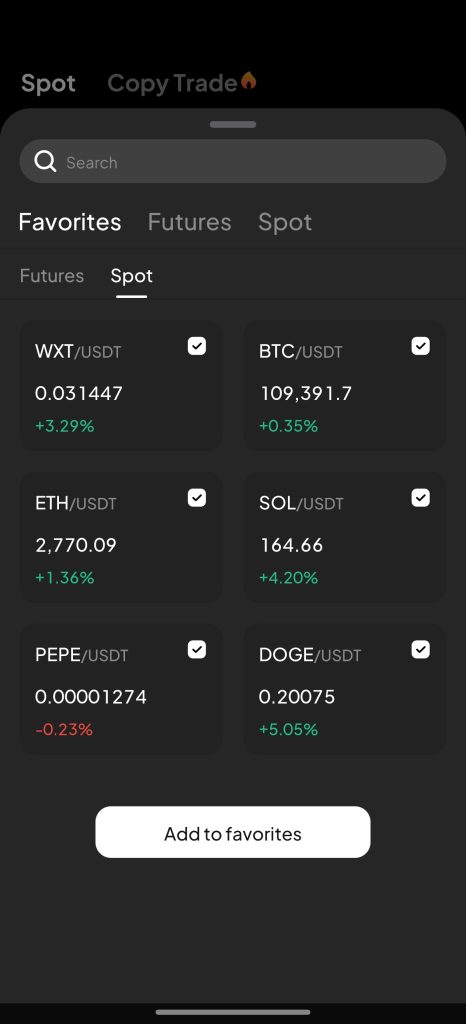
- Trading Pair Selector (top left): Shows the current token pair. Tap it to browse or search for others like ETH/USDT or SOL/USDT.
- Order Panel (left side): This is where you set up your trade. Choose an order type, enter a price, and define the amount you want to trade.
- Open Orders (bottom): Displays your active trades and recent transaction history.
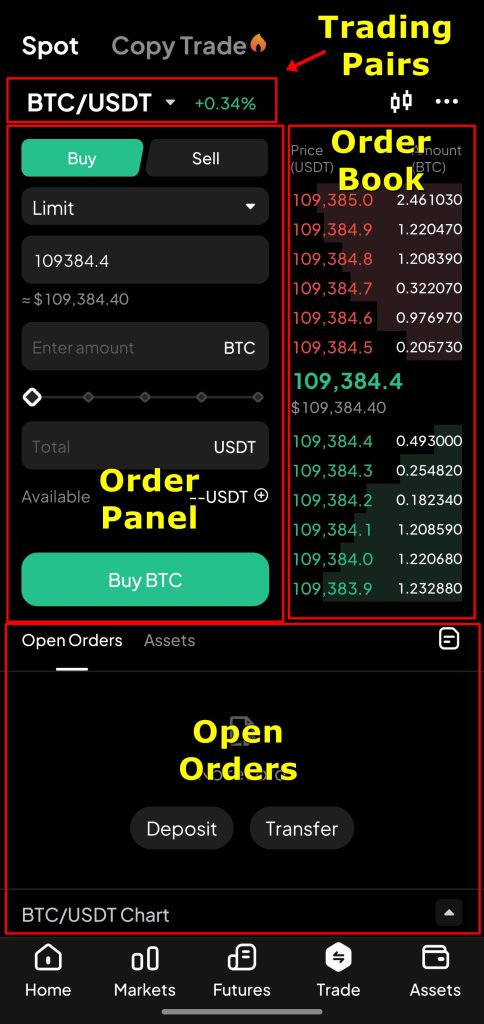
Knowing how to navigate each section helps avoid common mistakes like selecting the wrong pair or submitting an order with the wrong size.
3. Select a Trading Pair
Tap the trading pair at the top-left corner. A searchable list of all available pairs appears. Pick the one you want to trade, for example, BTC/USDT. The screen refreshes with live data for your selected market. You’ll see updated price, order book changes, and recent trade activity. This gives you a complete view before placing your trade.
4. Set Up Your Trade
In the Order Panel, choose your Order Type. WEEX supports multiple options, but the Limit Order is ideal for more control. It lets you define the price at which you want to execute the trade.
Set your desired price, then input the amount you wish to buy or sell. You can enter the number manually or use the percentage buttons like 25%, 50%, or 100% to select from your available balance.
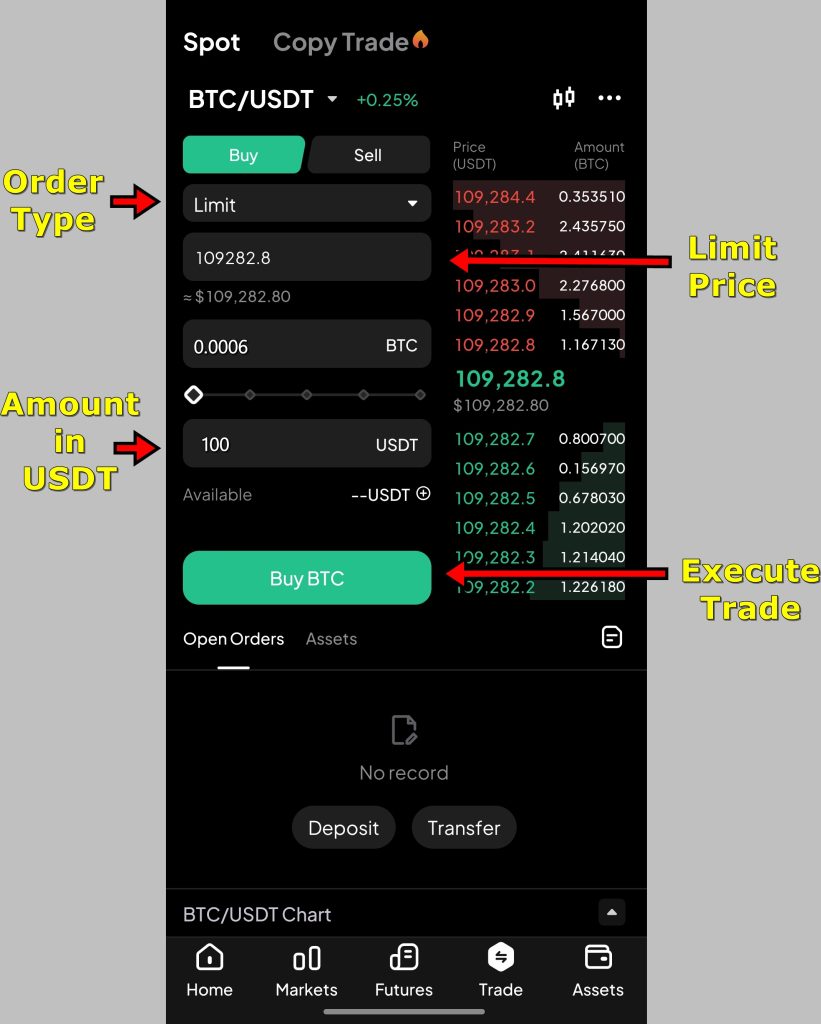
Review your trade summary carefully. Confirm the pair, price, and amount are correct. Small errors at this stage can be costly.
5. Execute the Trade
Once submitted, the order appears under Open Orders section below. If the market reaches your price, the trade fills automatically. If not, it stays pending until conditions are met. You can cancel or adjust it anytime before execution.
To buy or sell instantly, switch to a Market Order instead. It fills the trade immediately at the best available price, which is helpful in fast-moving markets. Once filled out, the crypto will appear in your Spot Wallet.
WEEX App Futures Trading Tutorial
Futures trading on WEEX gives traders the tools to speculate on price movements without needing to own the actual cryptocurrency. It works through contracts that lock in a buy or sell price for a later time. WEEX offers a wide selection of futures pairs, high leverage of up to 400x, and a clean interface that balances accessibility with advanced features. Here’s how to place a futures trade on the app from start to finish.
1. Access the Futures Market
Start by launching the WEEX app. From the bottom navigation bar, tap “Futures.” This brings you to the dedicated futures trading screen. The interface shows live price charts, market data, and gives access to both long and short positions. Everything is built around speed and visibility while keeping tools close at hand.
2. Understand the Interface
The futures screen is laid out clearly. Here’s how each section works:
- Order Book (right side): Shows real-time buy and sell orders. This lets you gauge how deep the market is and where major orders are sitting.
- Trading Pair Selector (top left): Tap this to choose a different futures contract like ETH/USDT or SOL/USDT.
- Margin Mode and Leverage (below the trading pair): Switch between Isolated and Cross margin. Set your leverage here as well.
- Order Panel (left side): This is where you input your trade details, including price, amount, and any advanced settings.
- Positions and Orders (bottom tab): Lets you monitor active trades, open orders, and past executions.
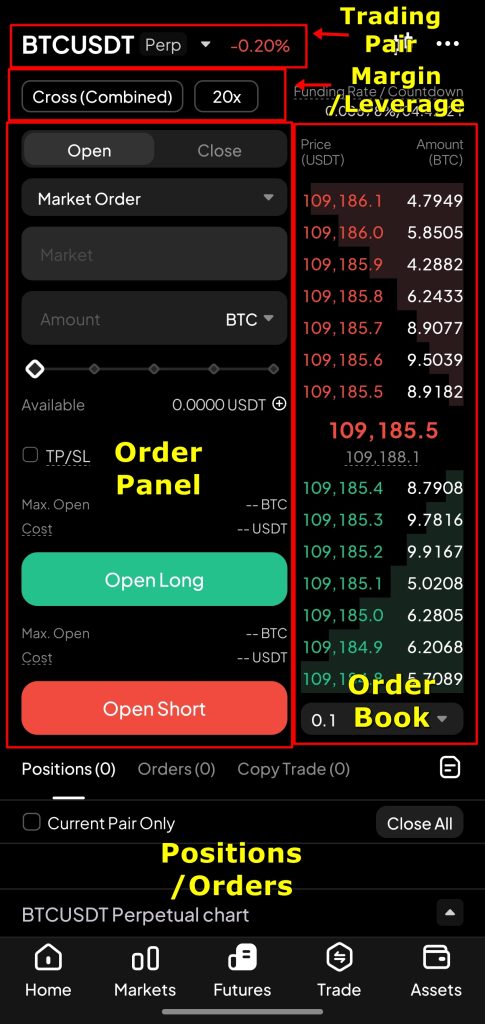
Take time to explore this layout. Knowing where each feature sits helps speed up trade execution and keeps you in control.
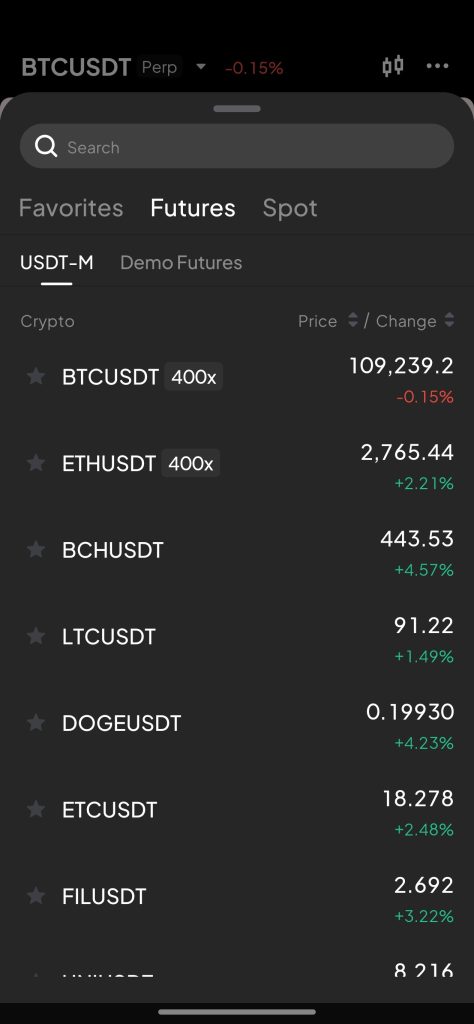
3. Select a Trading Pair
Tap the trading pair at the top left. A sidebar will open with all available contracts, organized by type. You can scroll through the list or search directly. For this guide, we are sticking with the BTC/USDT perpetual pair. Once selected, the app updates the screen with live charts, order book activity, and contract-specific data.
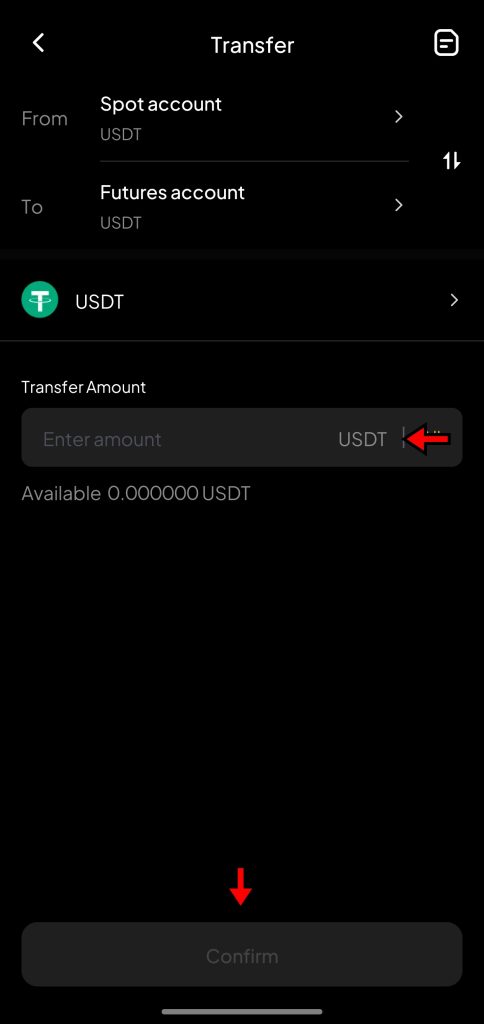
4. Move Funds to Your Futures Wallet
To start trading, you need funds in your Futures Wallet. In the Order Panel, locate the “Available” balance line and tap the “+” icon next to it. A transfer window opens. From here, you can move assets from your Spot Wallet to your Futures Wallet. Enter the amount and confirm the transfer. Your updated balance will appear instantly and is now ready for trading.
5. Set Margin Mode and Leverage
WEEX supports two margin modes:
- Isolated Margin uses only the funds allocated to a specific position. If the trade goes wrong, losses are limited to that amount.
- Cross Margin pools your entire futures balance across all positions. It gives more flexibility but carries more risk.
For this walkthrough, we are going with Isolated Margin. It keeps risk contained and is easier for newer traders to manage.
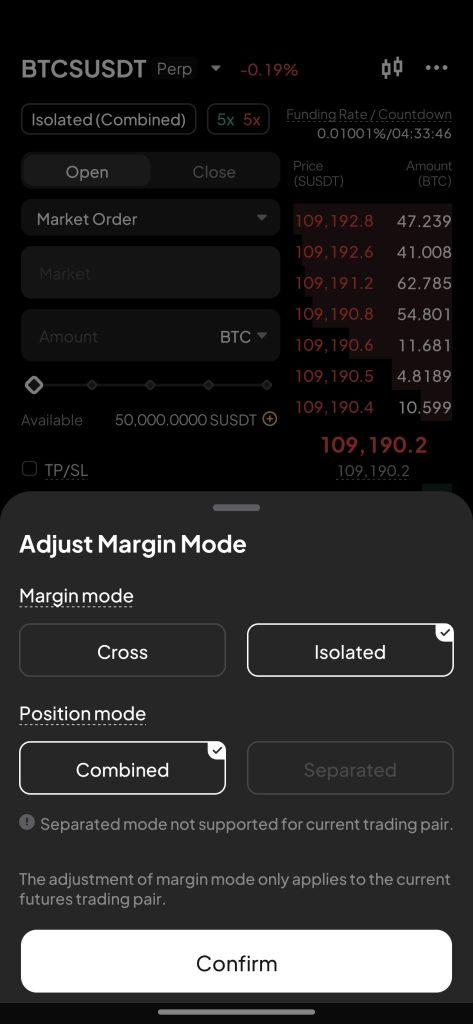
Next, adjust your leverage. Tap the leverage number beside the margin mode and use the slider or input box to set a level. For instance, setting leverage to 5x turns $100 into a $500 position. The green slider adjusts long position leverage, and the red one controls short position leverage.
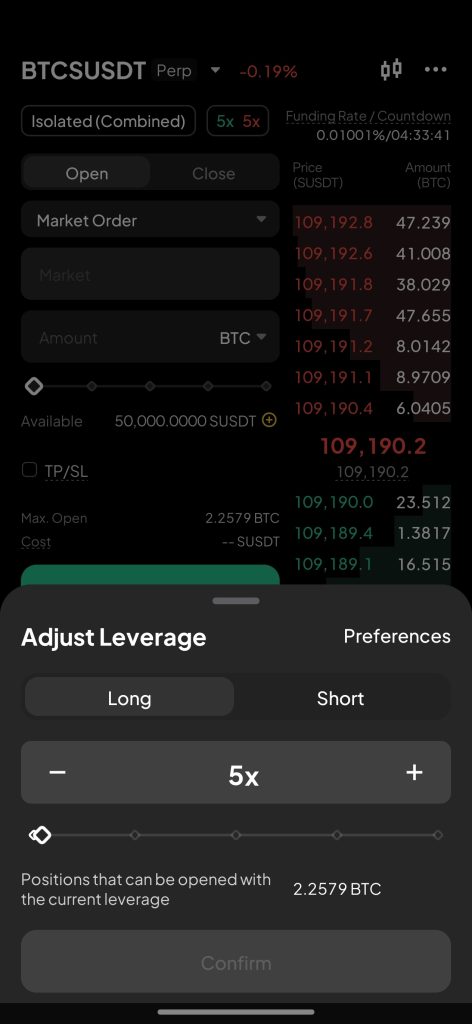
Avoid high leverage unless you fully understand the risks. The higher the multiple, the narrower your liquidation range becomes.
6. Set Up the Trade
With leverage and margin configured, it’s time to plan your entry.
- Choose between Long and Short. Go long if you expect the price to rise, short if you expect it to fall.
- Select your Order Type. For this example, we are using the Limit Order, which lets you specify your entry price.
- Input the entry price manually for the position you want to open.
- Set the Quantity you want to trade. You can enter this in BTC or switch to USDT using the toggle next to the quantity field. For example, inputting 100 USDT with 5x leverage gives you a $500 position.
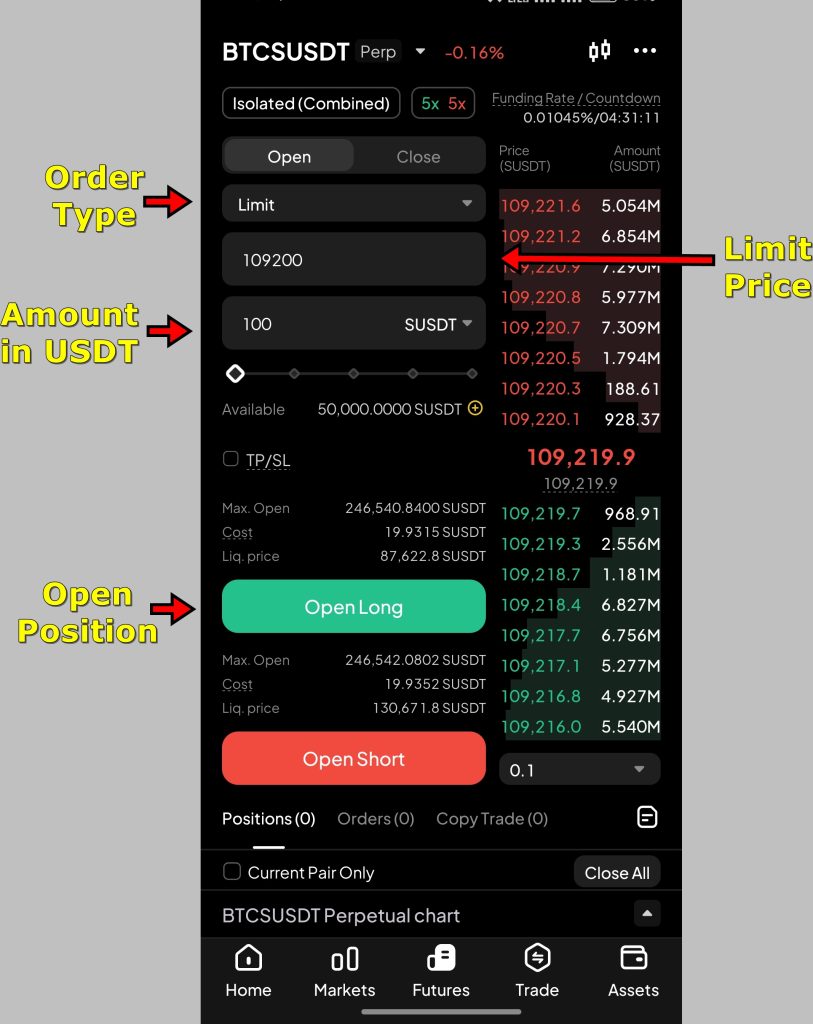
Before submitting, it’s best to set up risk controls to manage your exposure.
7. Add Take Profit and Stop Loss
WEEX lets you define automatic exit points to lock in profits and limit losses.
Check the “TP/SL” box in the Order Panel. Two new fields appear:
- Take Profit (TP): The price at which your position will automatically close with profit.
- Stop Loss (SL): The price that triggers an automatic exit if the market moves against you.
For example, if you open a Long position at $109,230, you might set TP at $112,000 and SL at $108,000. These can be modified later from the Positions tab.
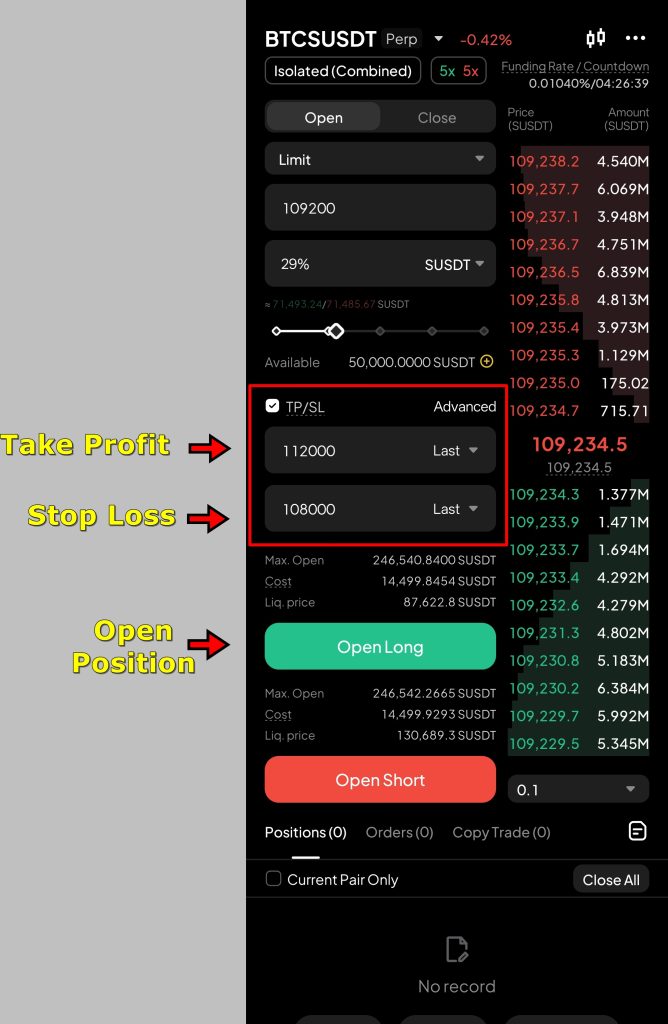
After confirming everything, tap “Open Long” or “Open Short” depending on your trade direction. The order will now be placed. If it’s a Limit Order, it remains pending until the market reaches your entry price.
8. Monitor Your Position
Once the market matches your entry price, the order becomes active and moves to the Positions tab.
From here, you can:
- Track real-time profit or loss
- Modify or remove your TP and SL levels
- Add or reduce margin to manage your liquidation risk
- Close the position manually if needed
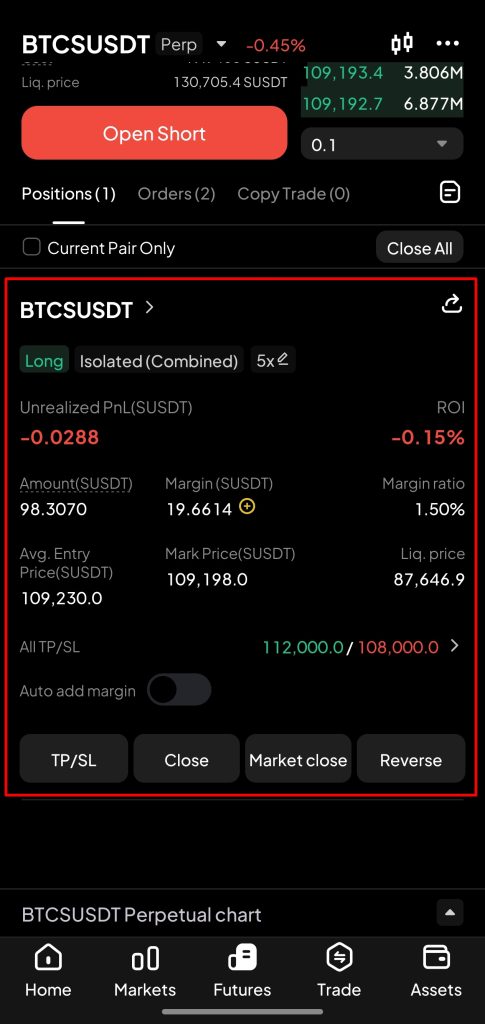
You can tap “Close” to exit at a specific price or “Market Close” for an instant exit at the best available price.
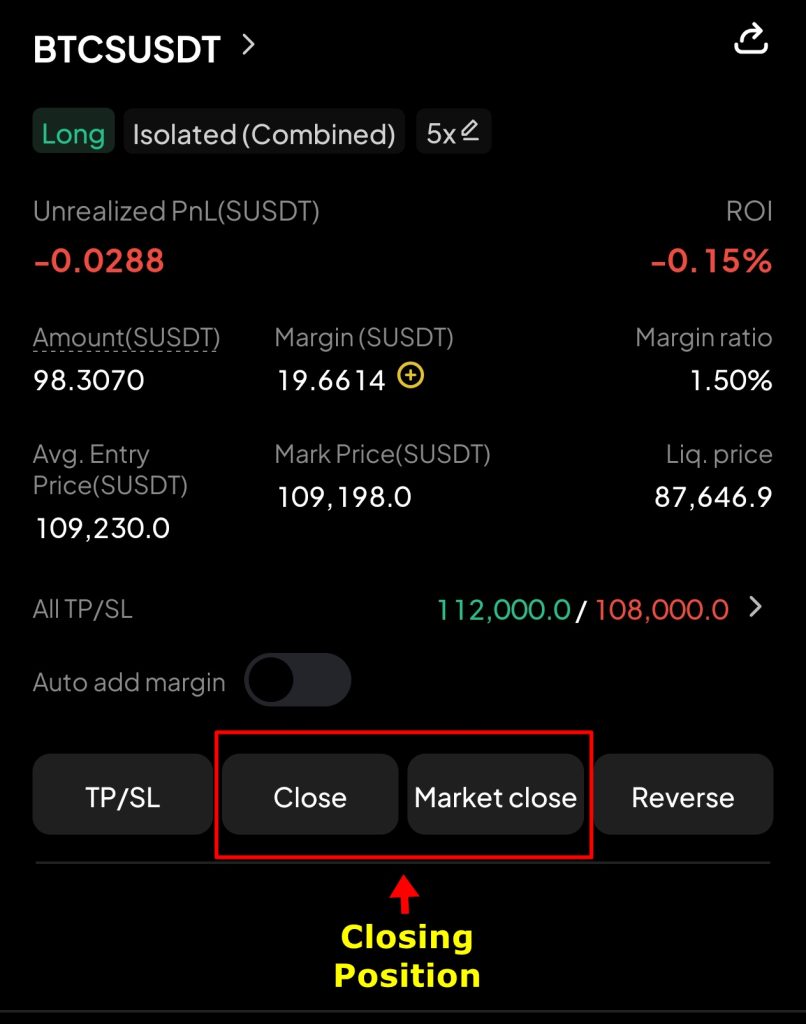
If your order hasn’t been triggered yet, you’ll find it under Open Orders. You can cancel or edit it there before execution.
WEEX App Copy Trading Tutorial
WEEX's Copy Trading feature streamlines the futures trading experience by letting users mirror the trades of experienced professionals. It's ideal for users who prefer passive strategies or are still learning the ropes of futures markets. This step-by-step guide explains how to use it effectively.
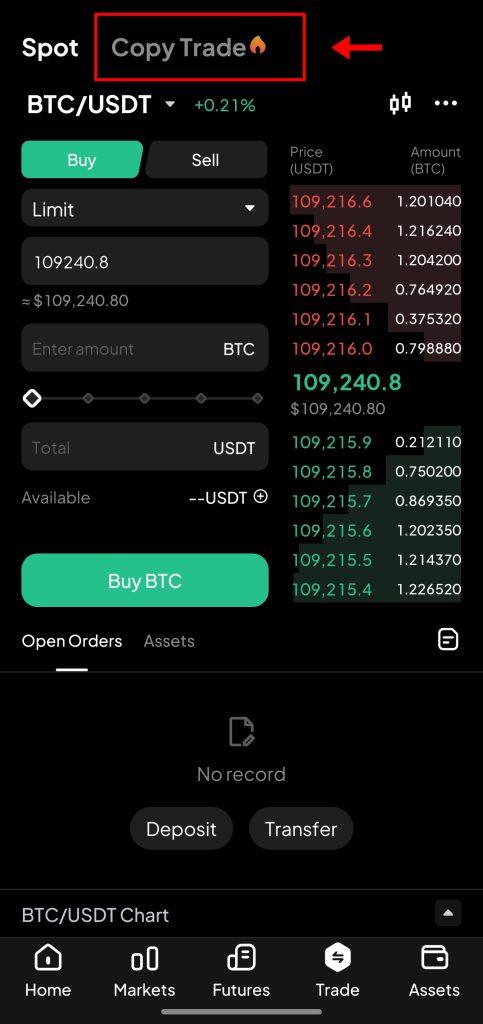
1. Navigate to the Copy Trading Page
Open the WEEX app and log in to your account. On the home screen, tap the “Trade” icon to access the markets. The app loads the Spot Market by default, but you can switch to the Copy Trading section by tapping the “Copy Trade” tab located at the top of the screen. This takes you to a dedicated page for discovering and following professional traders.
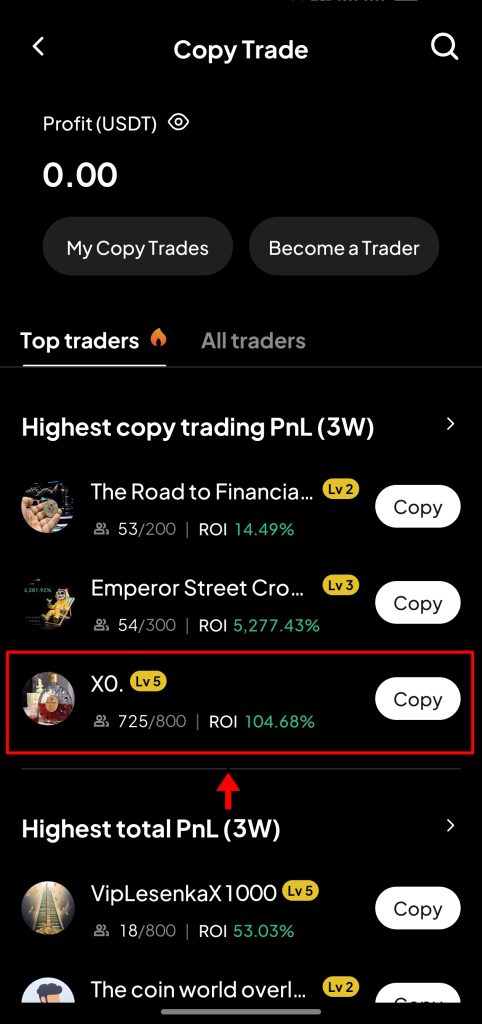
2. Choose a Copy Trader
Scroll through the list of available traders. Each trader’s profile shows their historical performance, copy trading success rate, and other important metrics. Tap on a trader’s name to access their detailed statistics, including win rate, drawdown, and follower count.
WEEX ranks traders by levels based on the capital in their futures account. For reference: Level 1 means the trader has equal to or less than 500 USDT in their futures account and Level 5 has greater than in their futures trading account 30,000 USDT.
This gives you insight into the scale and experience of the trader. Once you've identified someone who matches your risk tolerance and trading style, tap “Copy” to begin the setup.
3. Configure Copy Trading Settings
After selecting a trader, you’ll configure how the copy trading behaves. Start with Copy Mode:
- Uniform Mode: Uses one setting across all trading pairs. Suitable for a simple, consistent strategy.
- Separated Mode: Allows separate configurations for each trading pair. Ideal for users who want more control.
Next, select your Margin Mode:
- Position Mode: Applies your own leverage settings to all copied trades.
- Trader Position Mode: Mirrors the trader’s leverage settings exactly. If your balance is too low to match, the trade will not execute.
- Custom Mode: Lets you define custom leverage per trade. Offers flexibility but still requires a sufficient margin.
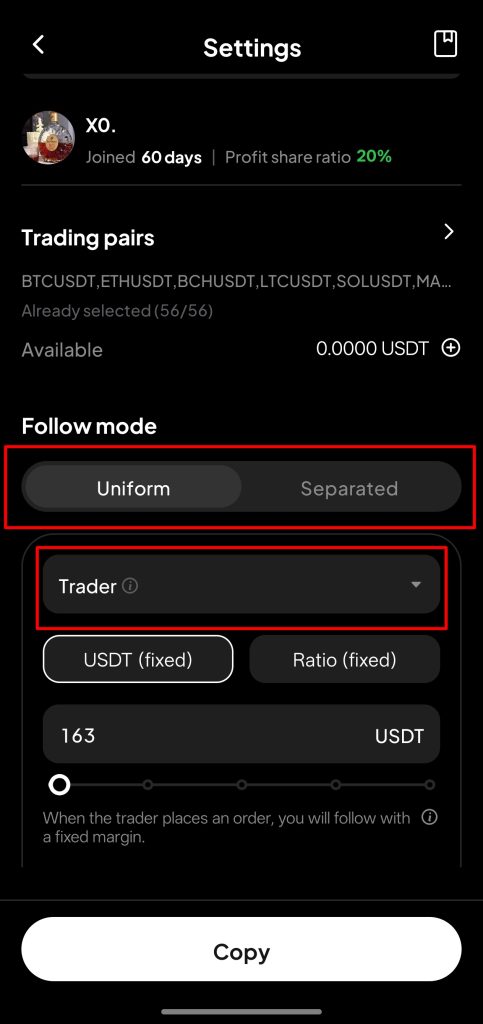
Choose the combination that matches your risk preference and trading capital.
4. Set Trade Allocation
Now decide how much capital to allocate per copied trade. WEEX offers two options:
- USDT Fixed: You specify a fixed amount per trade (e.g., 50 USDT). Regardless of the trader’s position size, your trade uses the set amount. If your balance is lower than the entered amount, the app automatically uses the maximum available.
- Ratio Fixed: You follow the trader’s trade size proportionally. For instance, a ratio of 0.5 means your position will be half the size of theirs. This option helps maintain proportional exposure as the trader adjusts position sizes.
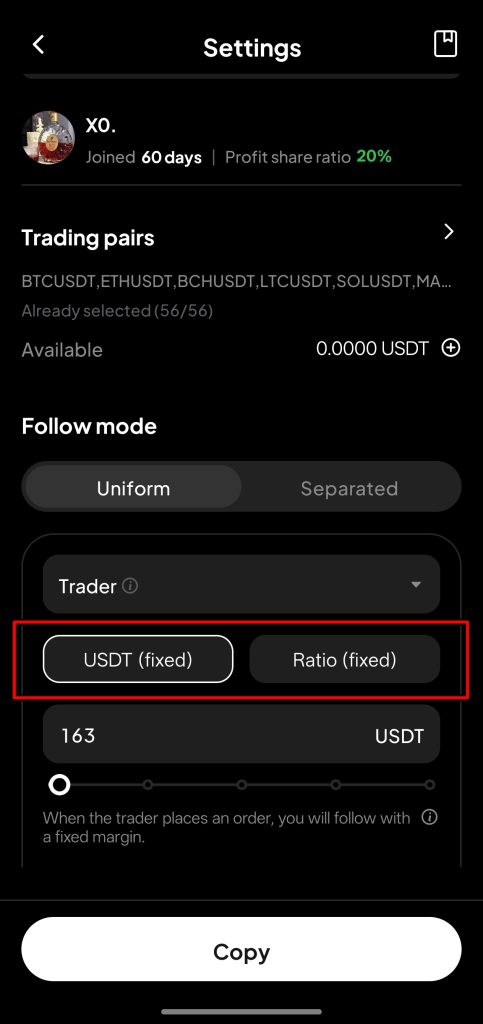
Make sure the setting reflects your capital and risk appetite.
5. Review and Confirm
Before going live, a confirmation window displays a summary of your copy trading setup. It includes:
- Chosen trading pairs
- Copy and margin modes
- Position size settings
- Leverage configuration
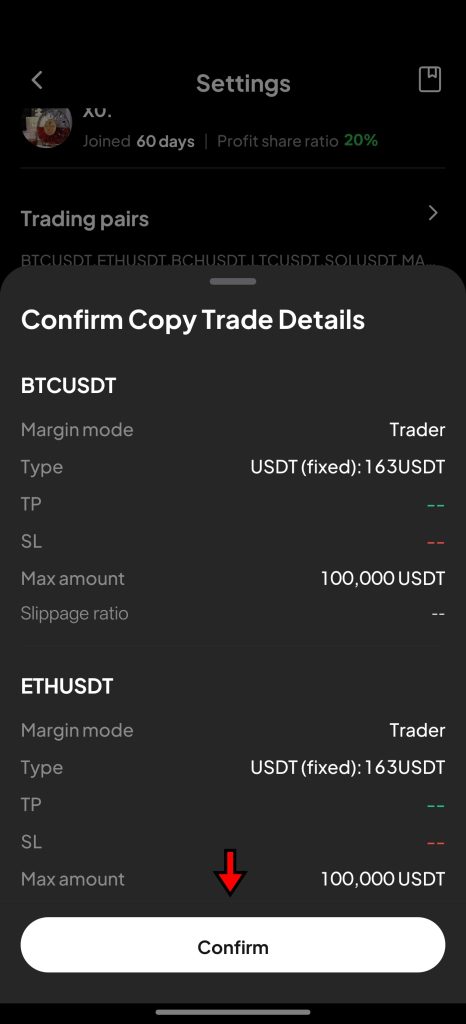
Review all information carefully. Once satisfied, tap “Confirm” to activate copy trading. The system will now mirror the selected trader’s activity automatically. You can monitor open positions, performance metrics, and trade history directly from your WEEX account dashboard.
How to Withdraw Funds on WEEX App?
WEEX makes it easy to transfer your crypto to an external wallet or another exchange. While it doesn't support fiat withdrawals, the crypto withdrawal process is straightforward and secure. Here's a step-by-step breakdown to help users avoid common errors and ensure smooth transfers.
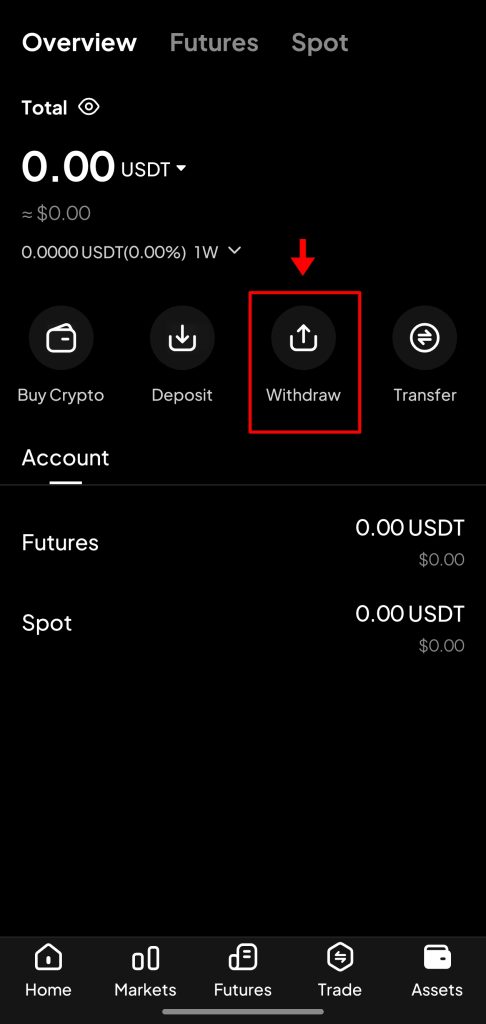
1. Open the Withdrawal Page
Start by launching the WEEX app and logging into your account. On the home screen, tap “Assets” located in the bottom-right corner. This opens your wallet overview, displaying your crypto balances and transaction history. Tap the “Withdraw” button to move to the withdrawal interface.
2. Select the Cryptocurrency
By default, WEEX sets the withdrawal currency to USDT. If you’re withdrawing a different asset, tap on “USDT” to open the list of supported tokens. Select the one you want to withdraw. The selected token determines which networks and addresses will be valid for the next steps, so choose carefully.
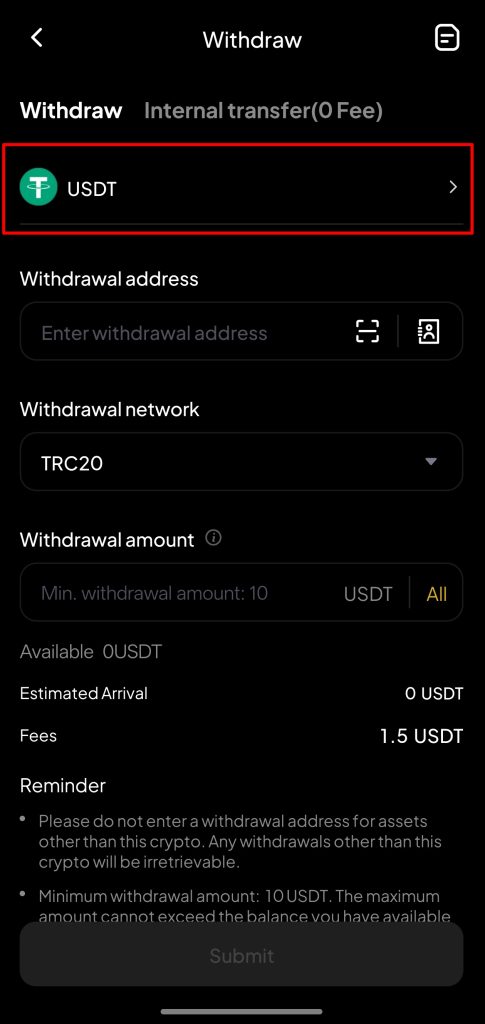
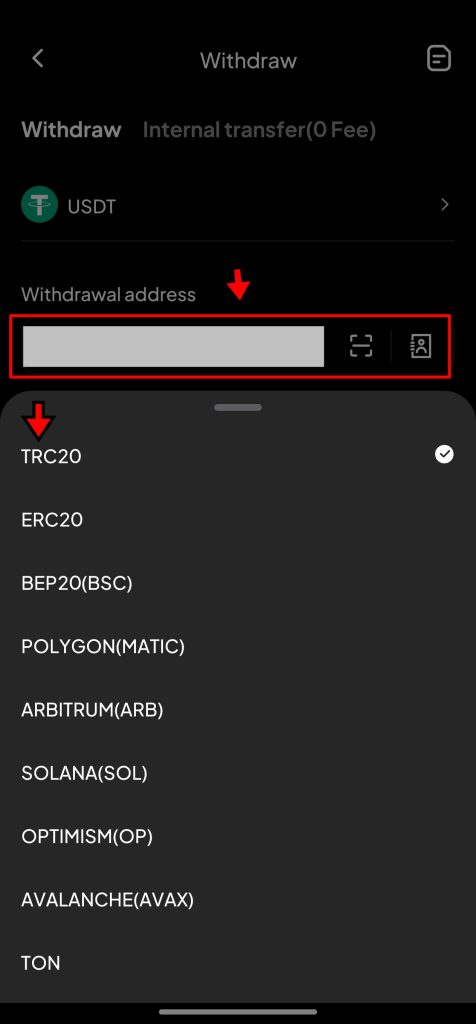
3. Paste Withdrawal Address and Choose Network
Copy the receiving address from the external wallet or exchange you’re withdrawing to. Then, paste this address into the Withdrawal Address field on the WEEX app.
Directly below this field, you’ll need to choose the appropriate network type for the transfer. This is crucial. For example, if the destination wallet uses TRC20, your WEEX withdrawal must also be on TRC20. A mismatch here can result in lost funds, so double-check the network on both ends before proceeding.
4. Enter Withdrawal Amount and Submit
Once the address and network are confirmed, enter the amount of cryptocurrency you want to withdraw. Ensure you leave enough to cover any withdrawal fees if applicable. After entering the amount, tap “Submit.”
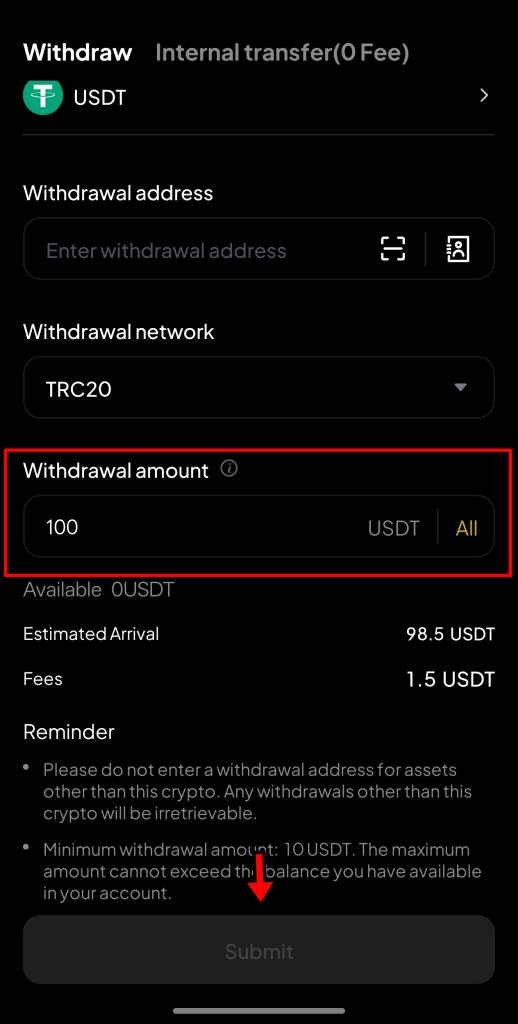
WEEX will begin processing the transaction. The crypto will be sent to your external wallet once the transfer is confirmed on the blockchain. Timing may vary depending on network congestion, but you can track the transaction status directly within the app.
WEEX App Fees
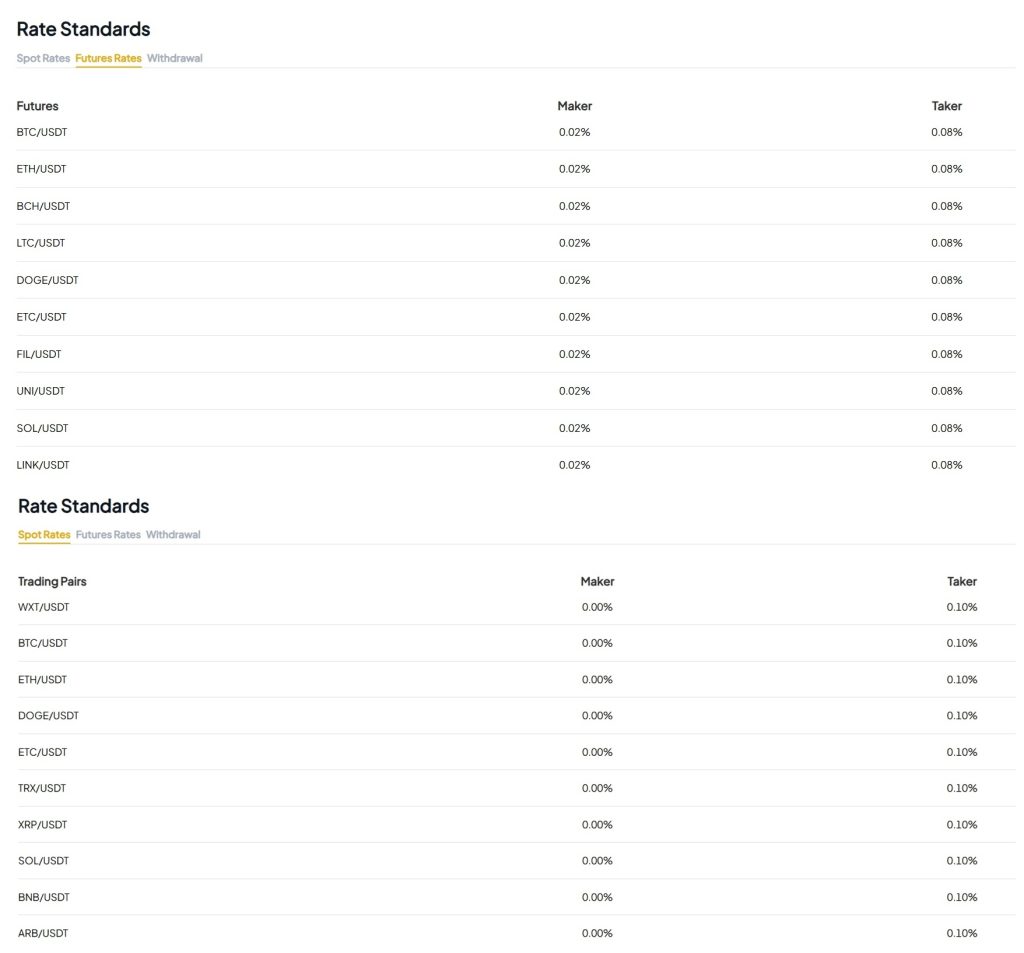
WEEX keeps its fee structure straightforward, opting for fixed rates over complicated, tier-based systems. Spot trading on the platform comes with a flat 0.10% fee for both maker and taker orders. For futures traders, the fees are slightly more favorable, 0.02% for maker orders and 0.08% for taker orders. This approach levels the playing field, offering the same rates to all users regardless of trading volume. While this consistency benefits those who value predictability, it might not appeal to high-frequency traders who expect tiered discounts.
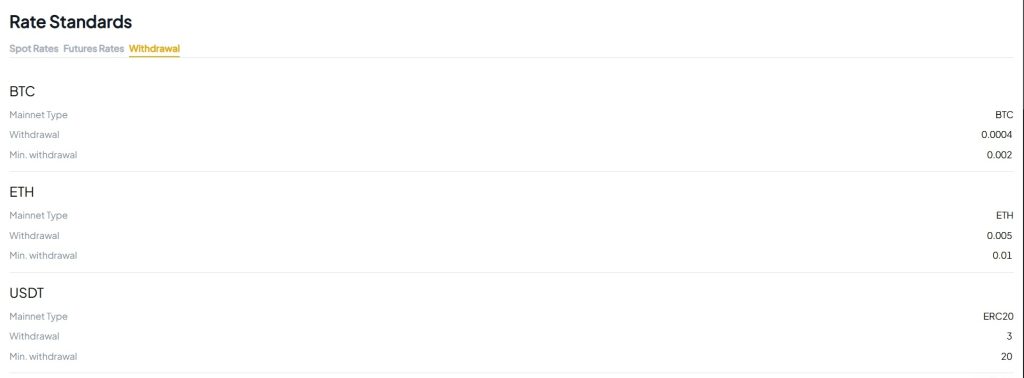
Depositing funds into your WEEX account is free, which removes one layer of cost for new users and frequent depositors. Withdrawal fees, on the other hand, depend on the specific asset being transferred. However, WEEX keeps these charges in line with industry norms. There are no surprise deductions or hidden fees when moving funds out of the platform. The result is a fee model that supports transparency and helps traders keep better control over their costs.
Is the WEEX App Secure?
WEEX integrates several standard security practices to safeguard user assets, but its overall security posture remains average when compared to more established exchanges. Certified gives the platform a CC security rating and ranks it 77th, indicating that while basic protections are in place, there’s still space for growth in strengthening its infrastructure.
One of WEEX’s notable safeguards is its Proof of Reserves (PoR) mechanism. This feature lets users confirm that the exchange holds sufficient assets to back user balances, promoting transparency. Most of these assets are stored in cold wallets, keeping them offline and isolated from potential online threats. This method significantly reduces the risk of large-scale hacks.
To further strengthen financial resilience, WEEX maintains a 1,000 BTC protection fund. This emergency reserve acts as insurance against losses from system failures or breaches, offering an added layer of reassurance for users.
On the technical side, the app uses two-factor authentication (2FA) to secure logins. Every access attempt requires a second confirmation, usually through apps like Google Authenticator. All data transmissions are protected using SSL encryption, which prevents unauthorized parties from intercepting sensitive user data.
To monitor threats in real-time, WEEX relies on an AI-powered risk control system. This tool continuously scans for suspicious behavior, flagging any irregularities before they can escalate. Independent security audits conducted by Shencha Technology and Qingsong Cloud Security have verified that the platform has implemented core defenses. While WEEX does not lead the industry in security, it covers the key essentials and shows ongoing efforts to improve user protection.
Final Takeaway
The WEEX app doesn’t try to overwhelm its users; in fact, it makes things quite simple. Whether it’s trading spot pairs, opening leveraged futures positions, or setting up copy trading, the app keeps the process clean and approachable. Features are laid out in a way that makes sense, even if you’re new to trading. Everything from adjusting leverage to managing risk settings is easy to find and quick to set up.
Copy trading, in particular, stood out. Browsing trader profiles, checking stats, and customizing how positions are mirrored felt intuitive. The platform clearly caters to users who want flexibility without digging through complicated settings.
Withdrawals are also straightforward, and fees are easy to track with no hidden catches. While the security setup isn’t the most advanced in the industry, the basics are covered well, including two-factor authentication, proof of reserves, and a sizable protection fund, all of which are in place.
After going through each part of the app hands-on, it’s safe to say you can pick up WEEX, set it up in a few minutes, and start trading with confidence. The tools are all there. You just need to start using them.
Get started on WEEX with a simple 40 USDT reward. Deposit 100 USDT, make your trade, and claim the bonus.
Disclaimer: All content on The Moon Show is for informational and educational purposes only. The opinions expressed do not constitute financial advice or recommendations to buy, sell, or trade cryptocurrencies. Trading involves significant risk and may result in substantial losses. Always seek independent financial advice before making investment decisions. The Moon Show is not responsible for any financial losses or decisions made based on the information provided.
Please view the full disclaimer at: https://themoonshow.com/disclaimer

Binance App Tutorial – Everything You Need to Know
Cryptocurrency exchanges are platforms for trading digital currencies, such as Bitcoin (BTC), E...

MEXC App Tutorial – How to Trade Crypto on MEXC App?
MEXC is a full-featured cryptocurrency trading app that supports a wide range of tools, includi...

Bitget App Tutorial – How to Trade Crypto on Bitget App?
Bitget is a multi-functional crypto trading app that combines spot, futures, and margin trading...