Bitget App Tutorial – How to Trade Crypto on Bitget App?
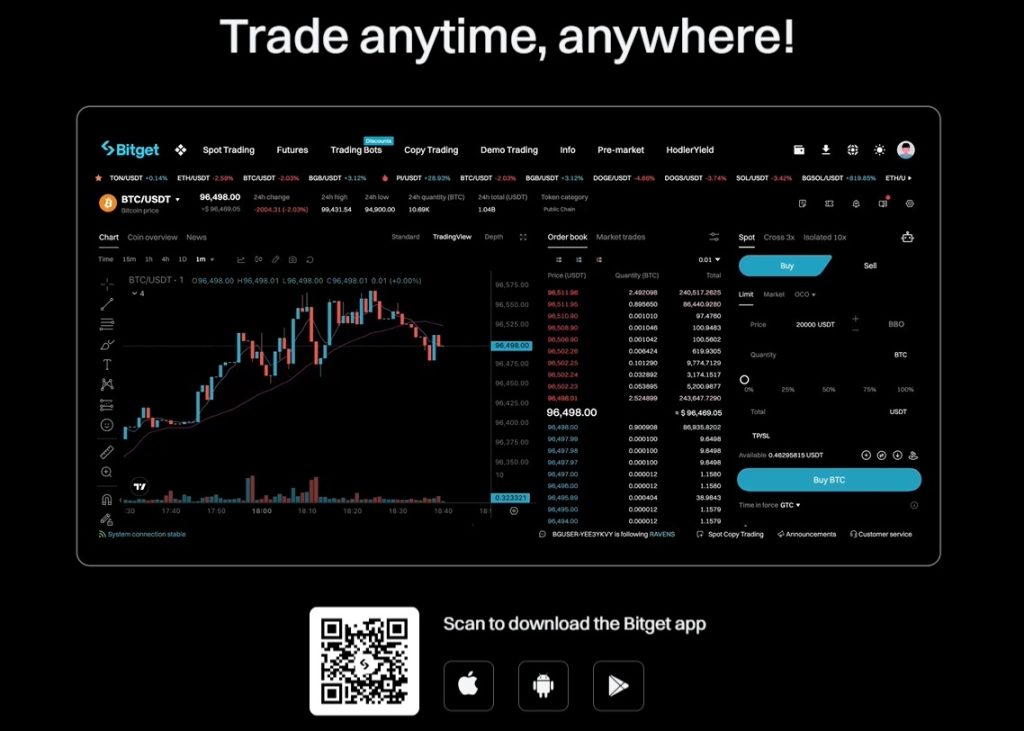
Bitget is a multi-functional crypto trading app that combines spot, futures, and margin trading in a single interface. It supports a wide range of cryptocurrencies and offers competitive fees. The layout is clean, responsive, and easy to get used to, even for users who are new to trading. Most features are accessible from the home screen without the need to dig through menus.
One of Bitget’s most useful tools is copy trading. This feature allows users to follow professional traders and automatically mirror their trades. It’s a great option for beginners who want to participate in the market without actively managing every position. The app also includes trading bots that automate strategies based on pre-set conditions. These bots silently do their work in the background and don’t interfere with manual trades.
This tutorial provides a step-by-step walkthrough of how to use the Bitget app. It explains how to create an account, secure it, make deposits, place trades, use copy trading, and withdraw funds. Screenshots are included throughout to help illustrate each step clearly. Whether you’re just getting started or want to explore more advanced features, this guide will help you get comfortable using the Bitget app. Let’s get started:
What is Bitget?
Bitget launched in 2018, during a period when most crypto projects were either collapsing or clinging on. It didn’t chase headlines early on. Instead, it kept its head down and built through the downturn. The team behind it came from both traditional finance and blockchain development, and that mix is easy to spot in how the platform operates. It’s structured, but still responsive to the fast pace of crypto.
Now in 2025, Bitget is no longer a small name. It serves users in over 150 countries and has more than 100 million registered accounts. In the first quarter of this year alone, trading volume crossed two trillion dollars. That level of activity points to a platform that has kept up with user needs and product improvements.
The app supports over 800 cryptocurrencies and lists more than 900 spot pairs. It covers the basics like Bitcoin, Ethereum, and XRP, but also includes a long list of altcoins that many traders actively seek. Despite the size of its offering, the interface remains clean and usable. Everything is where you expect it to be, and there’s no unnecessary clutter.
What stands out more is its approach to copy trading. Bitget didn’t invent the feature, but it has made it one of the platform’s main attractions. Users can browse top-performing traders, review their trading history, and copy their positions automatically. It’s a popular entry point for beginners, but many experienced traders use it to scale their activity while keeping manual trades on the side.
Bitget has added more tools to round out the experience. Bitget Earn lets users generate passive income from idle funds. Bitget Wallet offers a self-custody option for those who want direct control over their assets. There’s also an education section that breaks down trading concepts and platform features in a way that’s easy to follow.
On the security front, Bitget has made its very position clear. The exchange operates a 300 million dollar protection fund and maintains a reserve ratio above 200%. These aren’t just figures for show. They serve as practical safeguards that can help users during periods of high volatility or platform stress.
| Read Our Bitget Exchange Review | Read Our Bitget Exchange Tutorial |
How to Sign Up on Bitget App?
Creating a Bitget account using the mobile app is a fast and simple process. The app is designed to get new users onboard without unnecessary delays. The registration flow is straightforward and takes only a few minutes. Below is a step-by-step breakdown based on daily use and testing.
Start trading on Bitget and claim your welcome bonus of up to 6,200 USDT. Sign up now and explore one of the leading crypto trading platforms.
1. Download the Bitget App
First, head to your phone’s app store. Android users should open Google Play Store, while iPhone users need to visit the App Store. Search for “Bitget” and look for the official app. It’s clearly labeled and easy to spot. Tap “Install” and let the download finish. The app doesn’t take up much space and installs quickly. If you prefer shortcuts, Bitget also provides a QR code on its website that takes you directly to the download page.
2. Launch the App and Start Registration
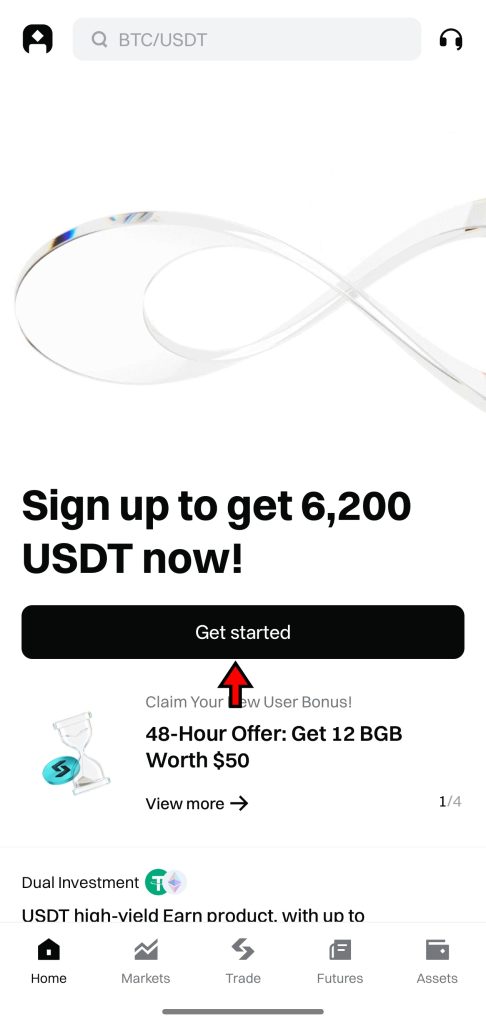
Once the app is installed, open it. You’ll land on a clean welcome screen. Tap “Get Started” to move into the registration process. From there, the app takes you to a sign-up page where you’ll choose how you want to register.
3. Enter Email and Create Password
You can sign up using your email address or your mobile number. Both options work the same way. Enter your email or number and then create a password. Bitget recommends using a password that’s at least eight characters long and includes a mix of uppercase and lowercase letters, numbers, and symbols. Once your details are in, check the boxes to agree to the User Agreement and Privacy Policy, then tap “Create Account.”
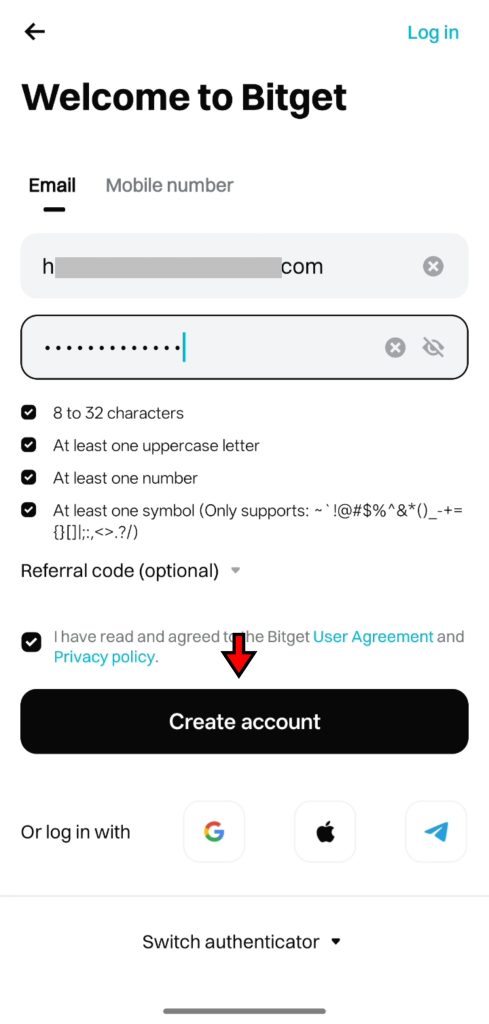
There are also third-party options like Gmail, Apple ID, or Telegram. These work just as well, and may save you a few seconds if you’re already logged in elsewhere.
4. Verify Your Email
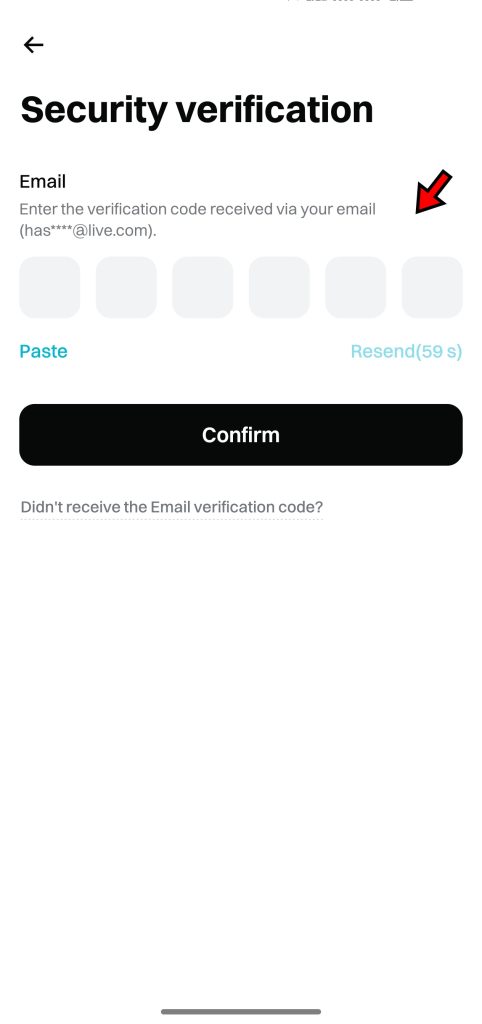
After submitting your details, Bitget sends a six-digit verification code to the email or number you provided. Go to your inbox or messages, copy the code, and return to the app. Enter the code into the field provided and tap “Confirm.” This step completes the basic registration.
5. Your Account is Created
Once your code is verified, your Bitget account becomes active. You can now access the app and explore its features. At this stage, you can view markets, browse trading tools, and start learning the layout. However, to start trading or deposit funds, you’ll need to verify your identity. The process of verifying your identity is covered in the next section.
The sign-up flow on Bitget is fast and clean. All the steps are clearly labeled, and each action leads directly to the next. It’s a good example of how registration should work on a modern trading app.
How to Complete KYC on Bitget App?
Since September 2023, Bitget requires all users to complete identity verification. It does not matter if you are trading small amounts or handling larger volumes, KYC is no longer optional. The process meets global compliance standards and is fully automated. You won’t need to speak to support or wait for manual reviews. Just follow a few steps inside the app and let the system take care of the rest.
1. Go to the Identity Verification Page
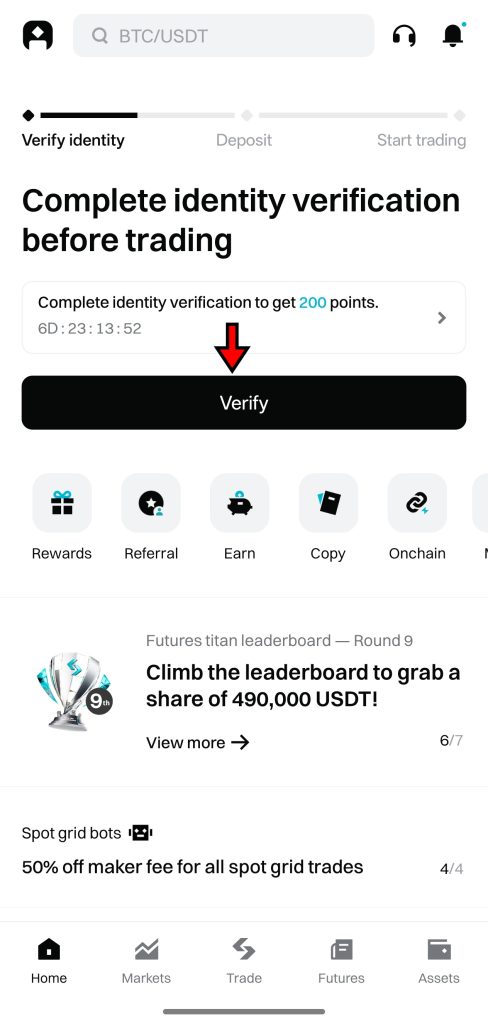
Start by opening the Bitget app. On the home screen, you’ll find a “Verify” button in the middle. Tap it to go directly to the identity verification section. It’s easy to spot and doesn't require you to dig through multiple menus.
2. Choose Country and ID Type
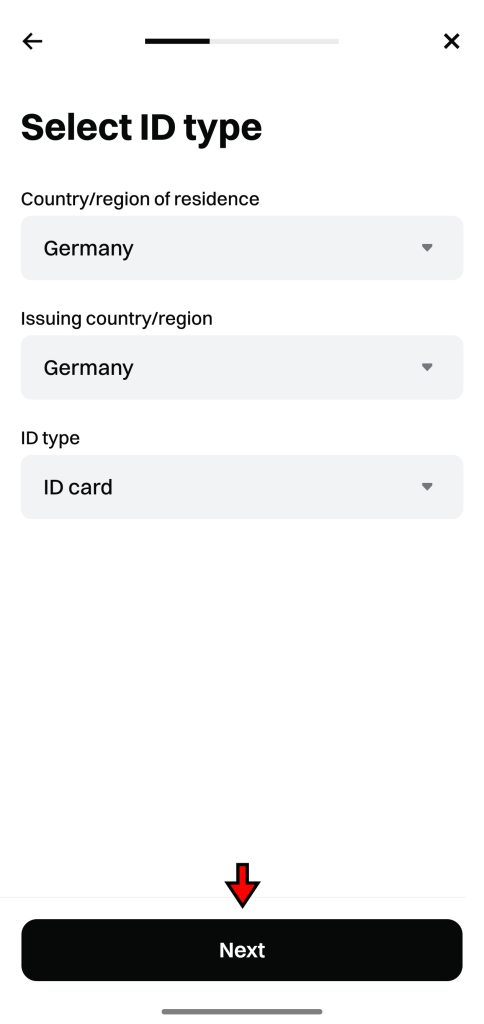
Next, select your country of residence and the country where your identification was issued. Based on your selection, Bitget will show you the accepted document types. These usually include a passport, national ID, or driver’s license. Choose the one that works best for you and tap “Next.”
3. Verify ID Document
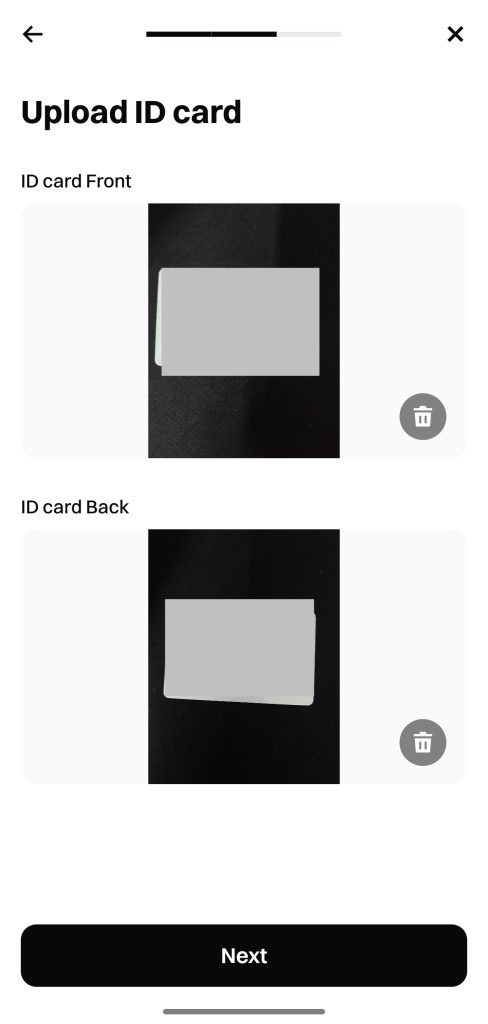
Now you’ll need to upload photos of the ID you selected. If you picked a national ID card, the app will ask for both front and back images. Make sure the photos are clear, well-lit, and readable. Avoid glare or shadows. Once you’ve taken the required images, tap “Next” to move on.
4. Facial Verification
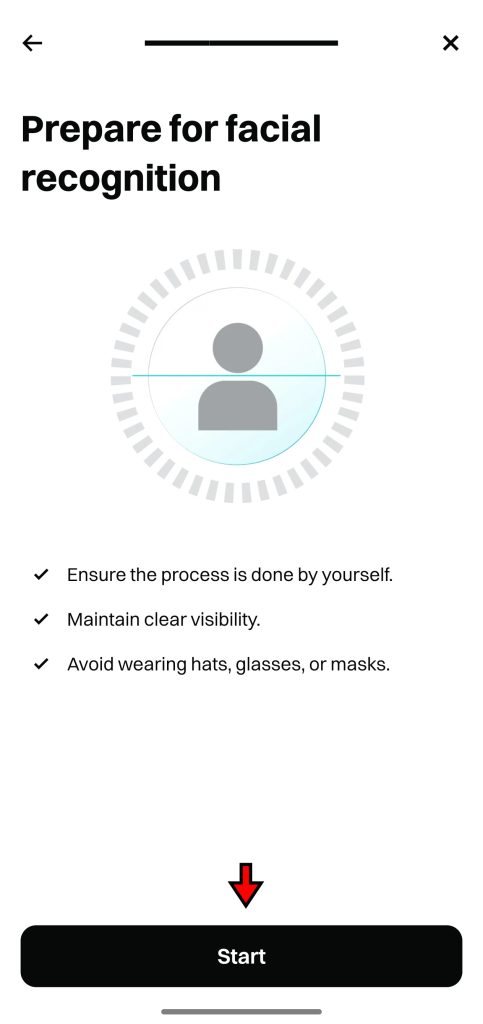
The final step is facial recognition. Tap “Start” to launch your phone’s front camera. Make sure you're in a well-lit space and hold your face steady in the center of the screen. The app will guide you through the scan and automatically capture your photo once it's clear enough. This step takes less than a minute.
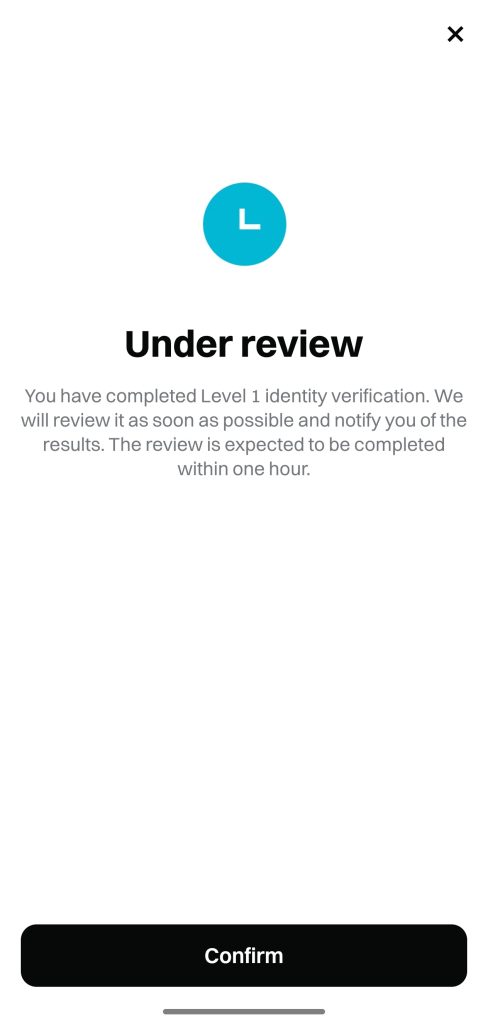
5. Submit for Review
After completing all the steps, the app will show a message confirming your application has been submitted. Your account status will now display as “Reviewing.” Bitget usually completes this process within an hour. In most cases, it takes less than four hours.
Once approved, your withdrawal limit will increase significantly. You’ll also unlock full access to all trading features. If you plan to use Bitget seriously, completing KYC is the first step toward that.
Start trading on Bitget and claim your welcome bonus of up to 6,200 USDT. Sign up now and explore one of the leading crypto trading platforms.
How to Deposit Funds on Bitget App?
Before you place a trade on Bitget, you need to fund your account. The app offers two main methods i.e., deposit cryptocurrency directly or use fiat to buy crypto. Both options are easy to follow, and the app guides you through each step clearly. Which one you choose depends on your region and how you prefer to move funds.
Depositing Crypto on Bitget
If you already hold crypto in another wallet or exchange, transferring it to Bitget is the fastest way to get started. The deposit flow is simple and doesn’t take more than a few steps.
- Go to the Crypto Deposit Page
Open the Bitget app. On the home screen, tap the “Deposit” button at the center. This brings up a screen with funding options. Choose “Deposit Crypto” to proceed.
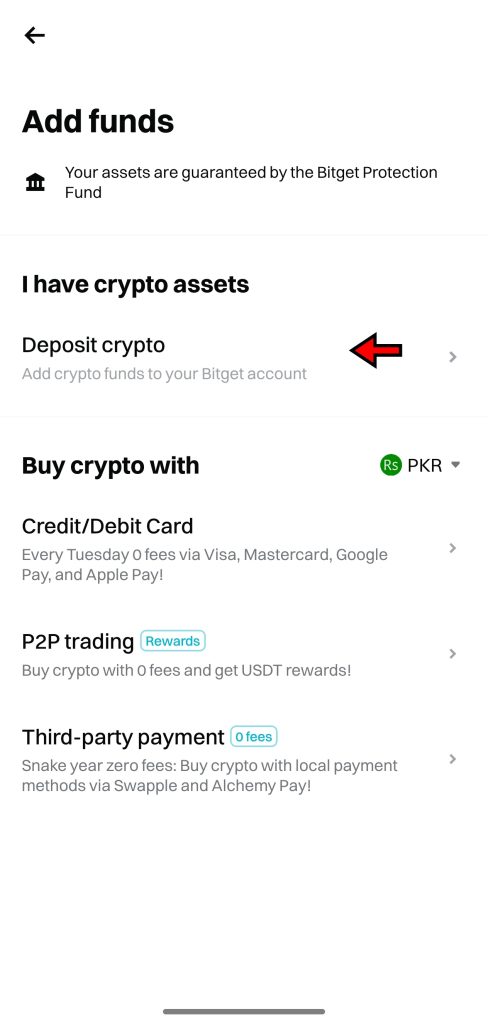
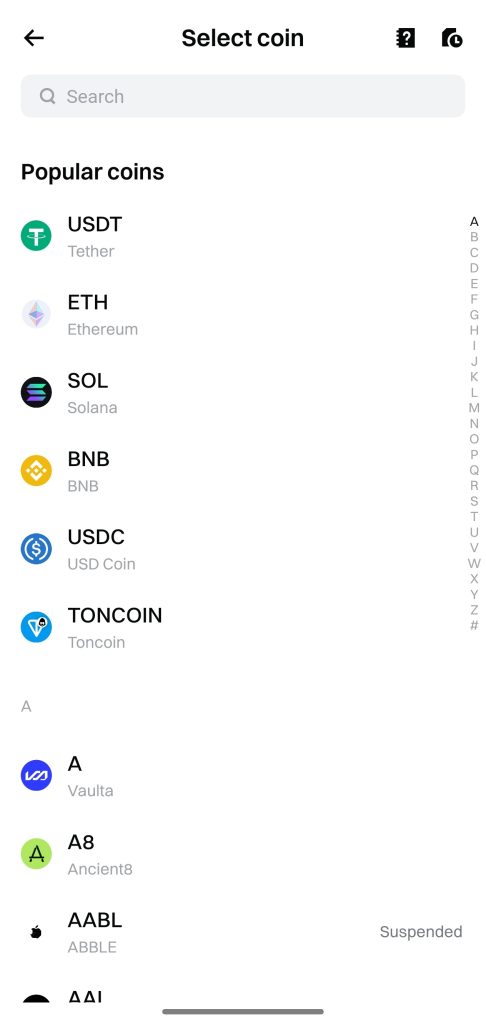
- Select the Cryptocurrency to Deposit
You’ll now see a list of supported assets. Bitget offers a wide range, including Bitcoin (BTC), Ethereum (ETH), Tether (USDT), and dozens of altcoins. Tap the token you want to deposit to move to the next step.
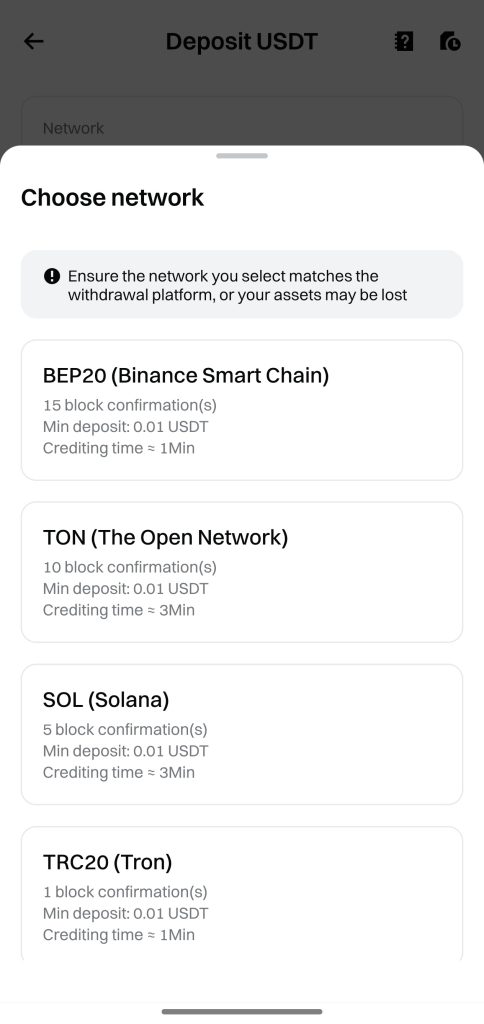
- Select Network
After selecting your token, you’ll be asked to choose the blockchain network. This part is crucial. The network selected on Bitget must match the one you’ll use from your external wallet. For example, if you’re sending USDT via TRC20, select TRC20 inside Bitget. A mismatch here can cause funds to be lost permanently.
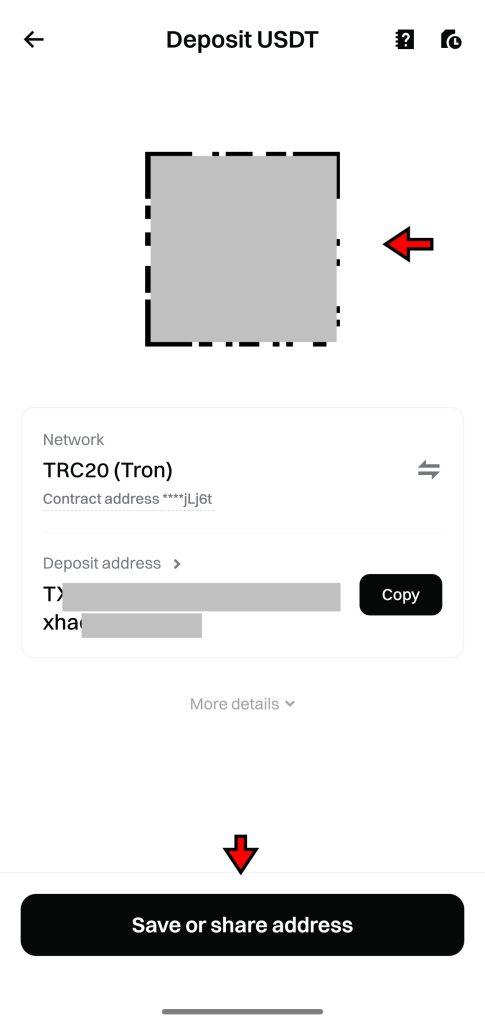
- Copy or Scan Wallet Address
Once the network is selected, Bitget generates a deposit address for that specific token and chain. You can either copy this address or scan the QR code from your external wallet. Paste the address into your sending wallet, initiate the transfer, and wait for blockchain confirmation. After the transaction clears, your funds will appear in your Bitget wallet automatically.
Buying Crypto with Fiat on Bitget
If you don’t already hold crypto, Bitget also lets you purchase it directly using fiat. The process is flexible, and the available payment options depend on your region and currency.
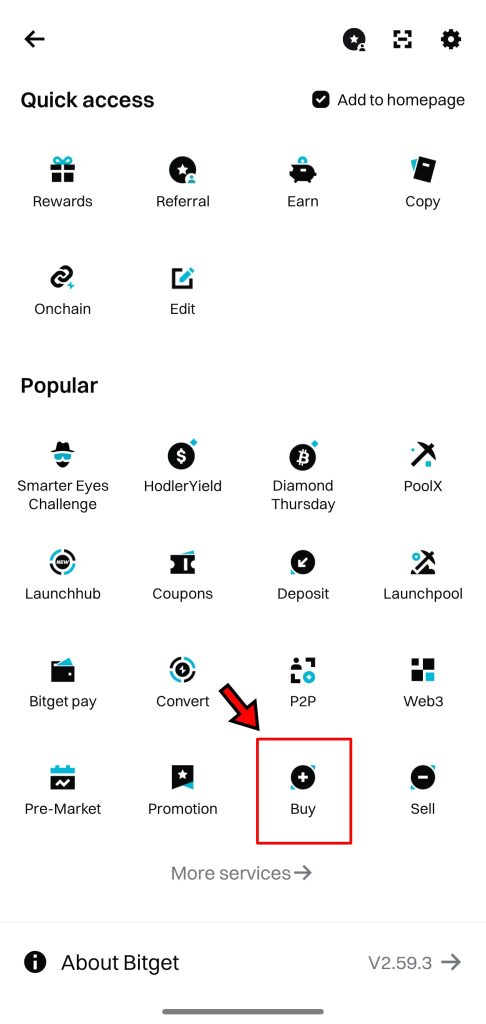
- Go to the Quick Buy Page
From the home screen, tap the user icon in the top-left corner. A menu will appear. Tap the “Buy” option to enter the Quick Buy section. This is where you can start purchasing crypto using local currency.
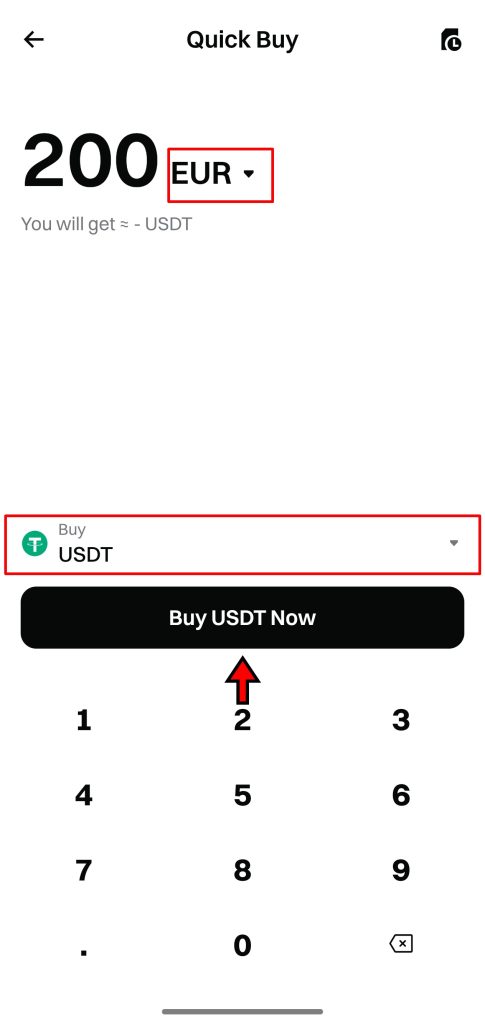
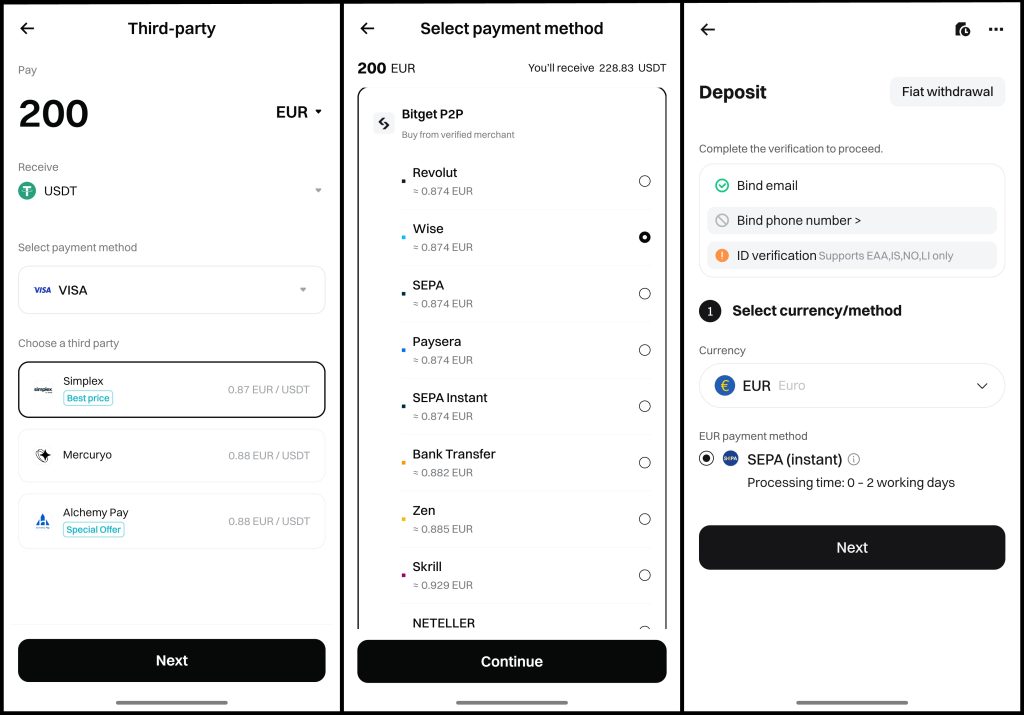
- Choose Currency and Enter Amount
On the next screen, pick the fiat currency you’ll be using and the crypto asset you want to buy. Then enter the amount. Once filled in, tap “Buy Crypto Now” to move to the payment selection screen.
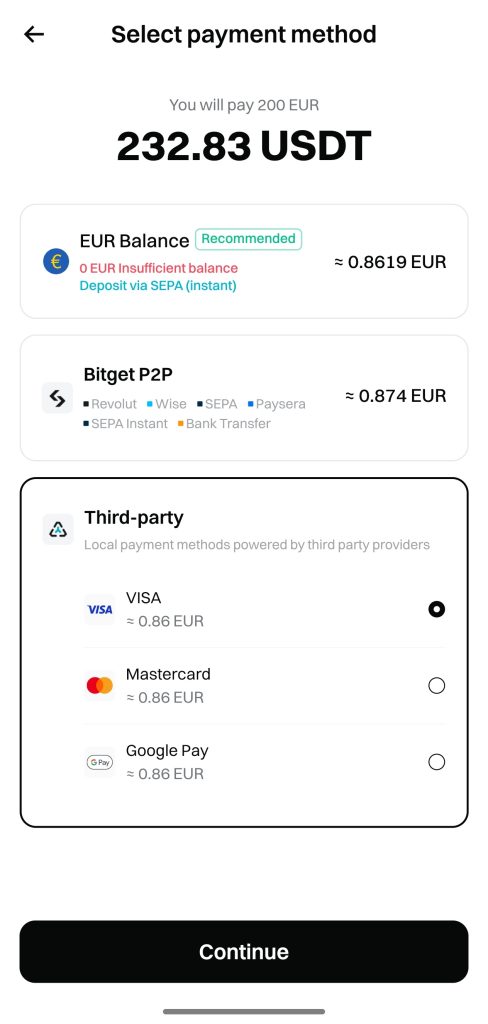
- Choose Payment Method
The available payment options vary depending on your selected currency. For example, if you’re using EUR, you might see SEPA bank transfers, P2P options, or credit and debit card support. Some regions may also have Google Pay or third-party providers. Choose the method that fits your preference and tap “Continue.”
- Confirm Transaction
Once you select a payment method, you’ll be taken to a confirmation page. Here’s how the process works depending on the method:
- Credit or Debit Card: You’ll be redirected to a third-party provider like Simplex. Enter your card details and complete the payment through their secure checkout.
- P2P: Choose an offer from the Bitget P2P marketplace and follow the steps shown to complete the payment using your selected method.
- Bank Transfer: Enter your bank details, follow the payment instructions (for example, SEPA for European users), and complete the transfer.
After confirming the transaction, Bitget processes the payment and deposits the purchased crypto into your account.
Bitget handles both deposit methods cleanly. The interface stays consistent throughout, and every step leads logically into the next. Regardless of experience, the process gets you trading-ready in minutes.
Order Types on Bitget App
Trading on Bitget goes beyond simply buying or selling at the current price. The platform offers a full set of order types, each designed for a specific strategy or market condition. Below is a breakdown of each order type available on Bitget, along with how they work and when to use them.
Market Order
A market order executes instantly at the best available price in the order book. This is the most direct way to enter or exit a position. However, because market conditions can shift quickly, the final execution price might not match what you saw when placing the order.
Example: If Bitcoin is trading at $100,000 and you submit a market buy for 1 BTC, the system fills your order using available sell orders. You might end up paying $100,050 or $99,980, depending on liquidity and slippage. This type of order works best when execution speed is more important than exact pricing.
Limit Order
A limit order gives you more control. You set the exact price at which you want to buy or sell, and the order only executes if the market reaches that price or better. If the market doesn't move in your favor, the order stays open until filled or cancelled.
Example: Ethereum is trading at $2,000. You want to buy it at $1,950. You place a limit buy order at $1,950. If the market drops to that level, your order is triggered and filled. If it doesn't, the order remains pending. This method suits traders who prioritize entry price over execution speed.
Trigger Order
A trigger order acts like a watchlist for the market. You set a trigger price, and once the market hits that level, Bitget places a regular market or limit order automatically. Until the trigger is activated, no funds are reserved.
Example: You expect Bitcoin to break higher if it crosses $101,000. You set a trigger buy order with the trigger at $101,000 and choose market execution. When BTC hits $101,000, Bitget sends a market order on your behalf. This tool works well when planning entries based on specific price moves.
Take-Profit / Stop-Loss Order
These are essential for risk management. A take-profit order closes a trade once a target profit is reached. A stop-loss order closes it if losses reach a certain level. Bitget lets you set both at the time of placing an order or manage them afterward.
Example: You buy ETH at $2,000. To protect your trade, you set a take-profit at $2,100 and a stop-loss at $1,950. If the price reaches either target, Bitget triggers a market order to exit the position. These orders help reduce risk and remove the need for constant monitoring.
Post-Only Order
Post-only orders ensure you act as a maker in the order book, not a taker. If your order would match immediately with an existing one, Bitget cancels it. This is useful for traders aiming to reduce fees, since maker orders usually cost less.
Example: BTC is trading at $100,600. You place a post-only sell limit at $100,500. Since the price is already above your limit, Bitget cancels the order. To successfully post a maker order, your price needs to sit outside the active market to avoid instant execution.
Trailing Stop Order
A trailing stop is dynamic. Instead of setting a fixed stop level, you set a trailing amount that follows the market. If the price moves in your favor, the stop level adjusts. When the market reverses by the set distance, the stop is triggered.
Example: BTC is at $100,000. You place a trailing stop sell with a 2% distance. As the price rises to $104,000, your stop level trails behind at $101,920. If the price then drops back to $101,920, Bitget executes a market sell. This type of order helps lock in profits during trending markets.
Bitget's order types cover a wide range of trading needs. Each one serves a specific purpose, whether it's fast execution, price precision, or risk control. Learning how and when to use them can improve your trades and give you better control over your strategy.
Bitget App Spot Trading Tutorial
Spot trading on Bitget is fast, simple, and beginner-friendly. The layout follows a familiar pattern seen on most apps, but Bitget keeps things clean and efficient. You’re not digging through tabs or jumping between screens just to place a trade. Everything sits where it should, and execution is smooth enough to keep up with quick price moves. Here’s how to place your first spot trade using the mobile app.
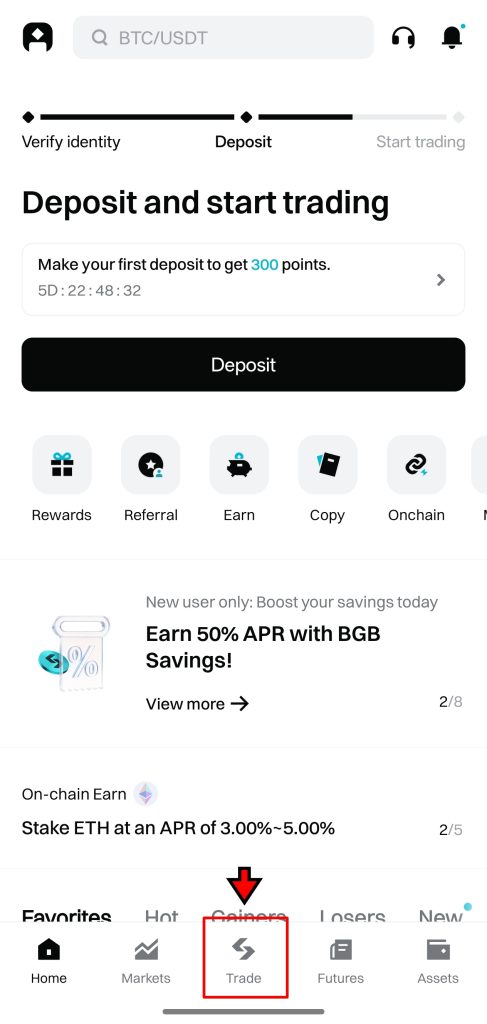
1. Go to the Spot Trading Interface
From the bottom navigation bar, tap the “Trade” button. This brings up the spot trading screen. You’ll land directly on the interface where you can view price charts, place buy or sell orders, and monitor the market in real time. It’s all built into one screen, so there’s no hunting around for key features.
2. Get Familiar with the Interface
Before placing a trade, take a moment to understand the layout. Bitget splits the screen into logical sections:
- Order Book (right side): Shows current buy and sell orders. Buy orders are listed in green, and sell orders in red. This gives a live view of market depth.
- Trading Pair Selector (top left): Displays the crypto pair currently being traded. Tap it to switch to another market like ETH/USDT or LTC/USDT.
- Order Panel (left side): This is where you place your trades. You’ll choose the order type, set your price, and define the amount you want to buy or sell.
- Open Orders (bottom): Tracks all your unfilled trades. You can also view recent transactions and cancel or adjust open orders here.
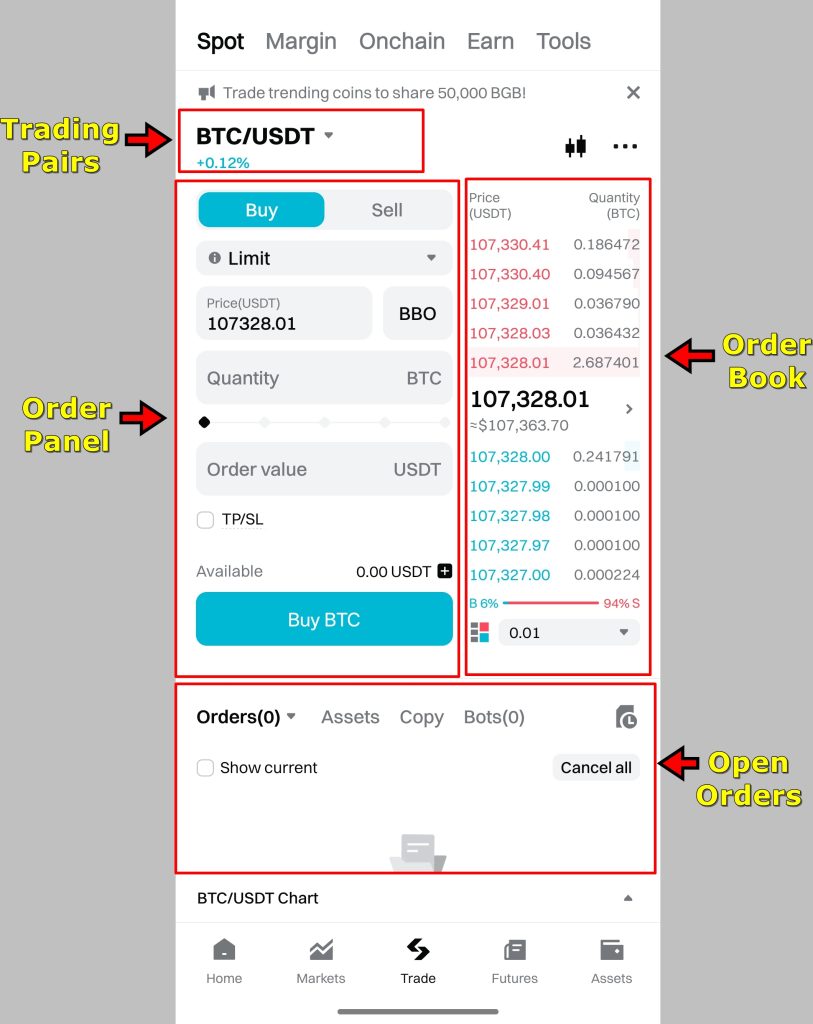
Understanding how each piece fits together helps prevent mistakes, especially when you’re trading a market as volatile as the crypto market.
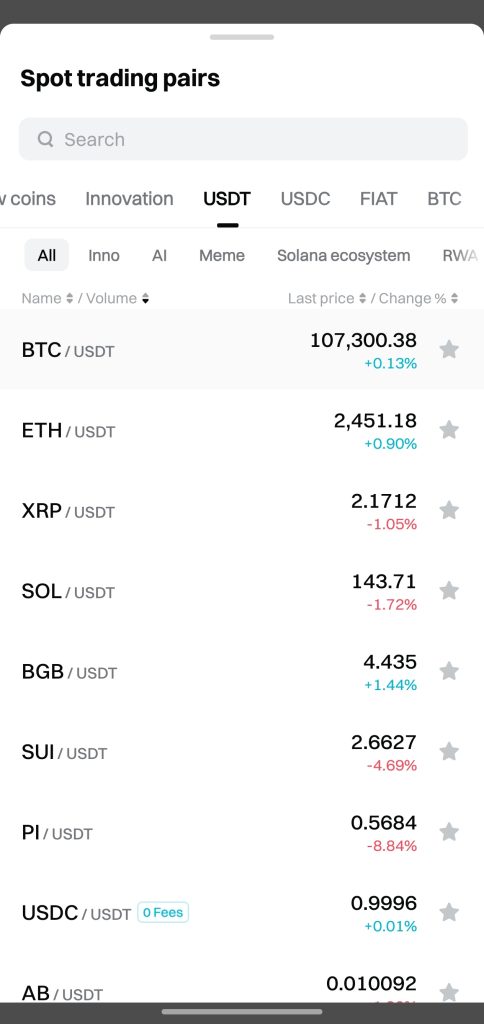
3. Select a Trading Pair
Tap the pair displayed in the top-left corner. A list of trading markets will open. Use the search bar to find your desired pair. For example, BTC/USDT or ETH/BTC. Once selected, the screen refreshes with live data for that market, including the current price chart, order book, and trade history.
4. Set Up Your Trade
In the Order Panel, pick your preferred order type. A Limit Order is usually the best starting point because it lets you set the exact price you’re willing to pay or accept.
Enter the limit price in the field provided, then choose how much of the crypto you want to buy or sell. You can either type in a specific amount or use the slider to select a percentage of your available balance.

Before hitting confirm, double-check your input. Make sure the trading pair, price, and order size are correct. It’s easy to type an extra zero or choose the wrong asset if you’re not paying attention.
5. Execute the Trade
Once everything looks good, tap “Buy” or “Sell.” Your order now appears in the Open Orders section. It stays there until the market reaches your specified price. When that happens, the order fills automatically.
If the market moves and your price no longer makes sense, you can cancel the order or adjust it right from the same screen.
To skip the wait and execute immediately, you can switch to a Market Order instead. This fills your trade using the best available prices in the order book. Once completed, your new crypto balance shows up in your Spot Wallet, ready to be withdrawn, traded again, or transferred as needed.
Bitget is giving out up to 6,200 USDT in welcome bonuses. Join now, make your first move, and start stacking rewards.
Bitget App Futures Trading Tutorial
Futures trading on Bitget gives users access to higher leverage, more flexibility, and advanced risk tools. It’s built for traders looking to go beyond simple buy-and-hold strategies. In this section, we'll walk through how to open a USDT-Margined Futures trade using isolated margin on the Bitget app.
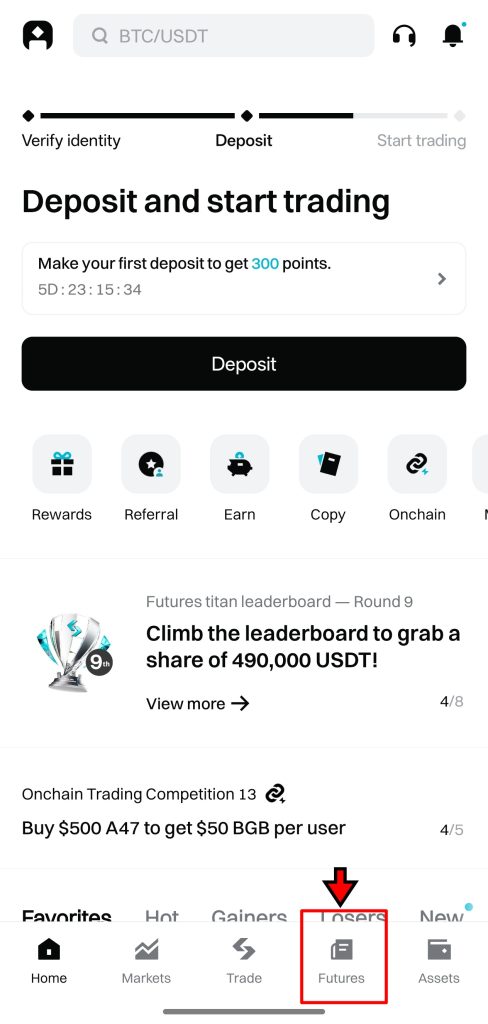
1. Access the Futures Market
Open the Bitget app and tap the “Futures” icon in the bottom navigation bar. This takes you straight into the futures section. The screen loads up with all the key tools: price charts, live market data, leverage settings, and the order panel. Everything is placed logically so you’re not wasting time looking for controls.
2. Get Familiar with the Interface
The futures trading screen has a few key areas worth noting:
- Order Book (right side): Lists current buy and sell orders with live updates. Green for buys, red for sells.
- Trading Pair Selector (top left): Lets you pick the contract you want to trade. You’ll find BTC/USDT, ETH/USDT, and many others here.
- Margin Mode and Leverage Settings: Found below the selected pair. You can switch between Isolated and Cross margin and set leverage here.
- Order Panel (left side): This is where you define trade details including price, order type, and whether you’re going long or short.
- Positions and Orders Tab (bottom): Lets you keep track of active positions, open orders, and trade history.
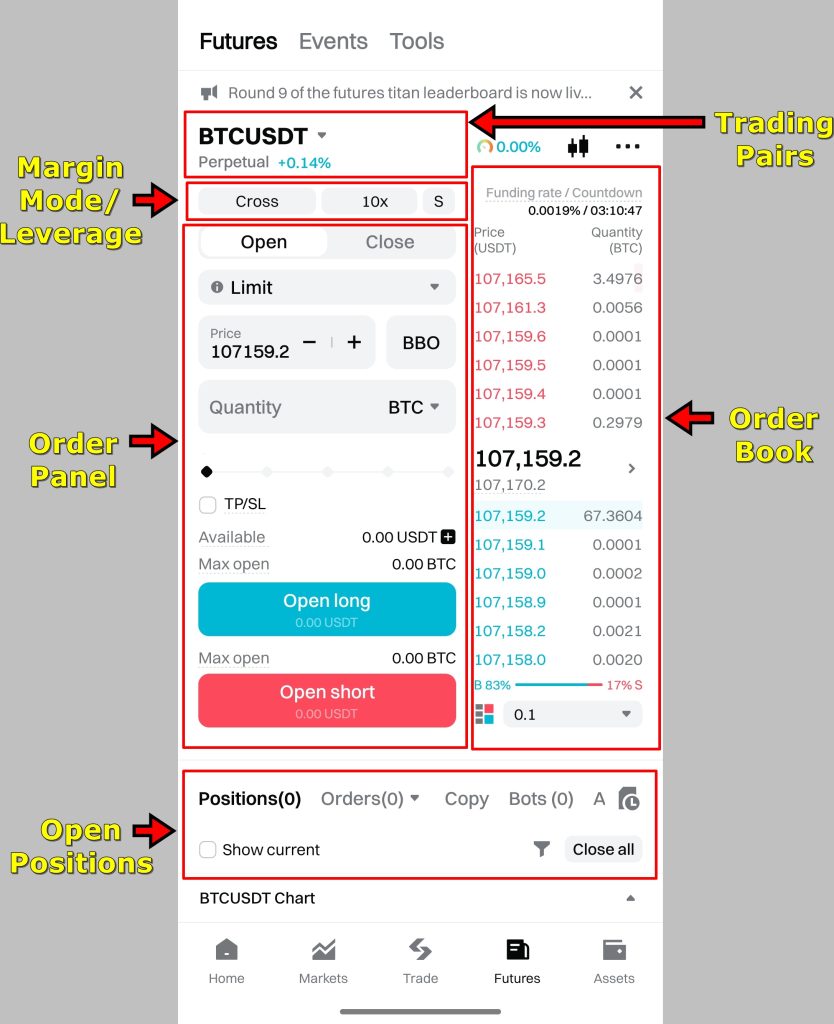
Spend a few minutes here. The better you understand the screen layout, the quicker you’ll be able to react when prices move.
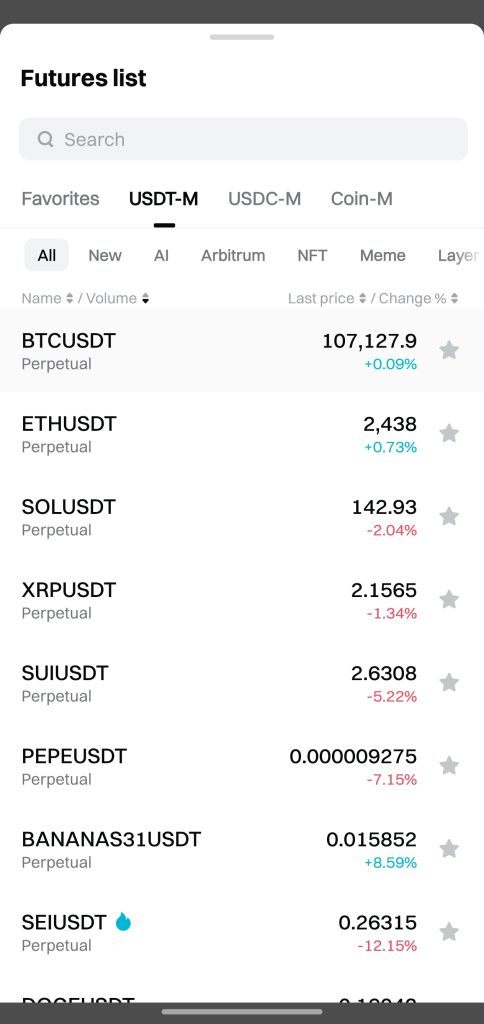
3. Select a Trading Pair
Tap the trading pair name at the top-left corner. A list of available futures contracts will pop up. Scroll or search to find the pair you want. For this example, select BTC/USDT (Perpetual). The trading screen updates with real-time data for your selected pair.
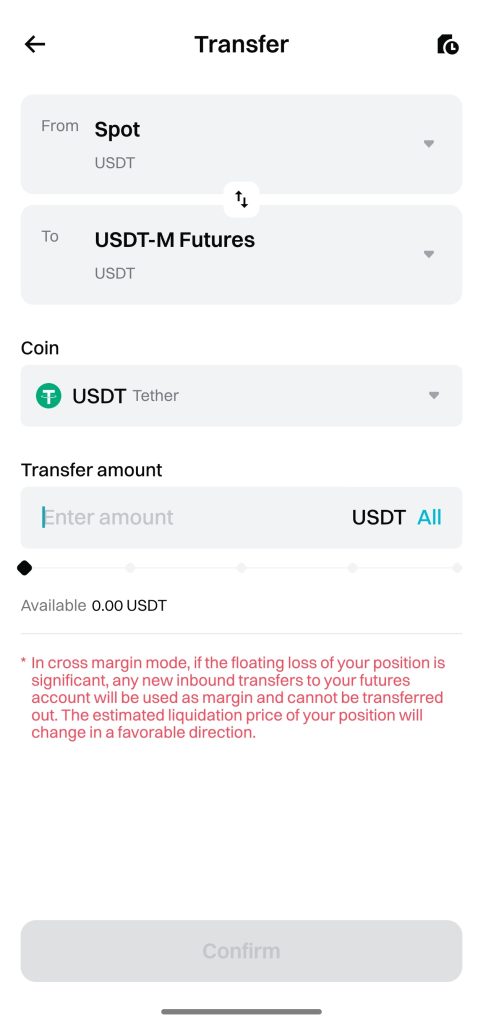
4. Move Funds to Your Futures Wallet
To trade futures, your funds need to be in the Futures Wallet. On the Order Panel, look for the “+” sign next to your balance. Tap it to transfer USDT or other assets from your Spot Wallet. Choose the amount, confirm the transfer, and your balance will appear instantly in the futures account.
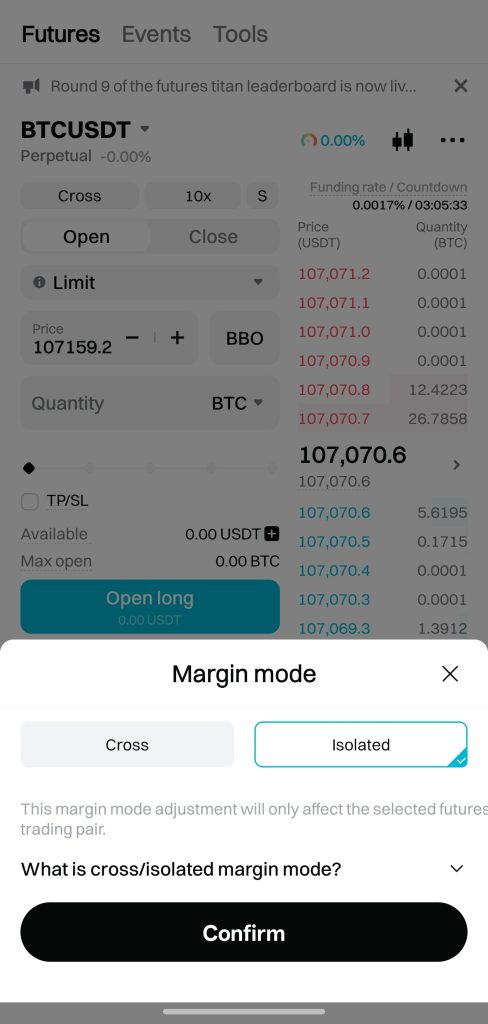
5. Set Margin Mode and Leverage
Bitget offers two margin types:
- Isolated Margin: Risk is limited to the funds assigned to a single position. If it gets liquidated, your other funds stay safe.
- Cross Margin: Uses your full futures balance to support all positions. This can lower the chance of liquidation, but it increases exposure.
For this tutorial, we are sticking with Isolated. Tap the margin setting just below the trading pair to switch if needed.
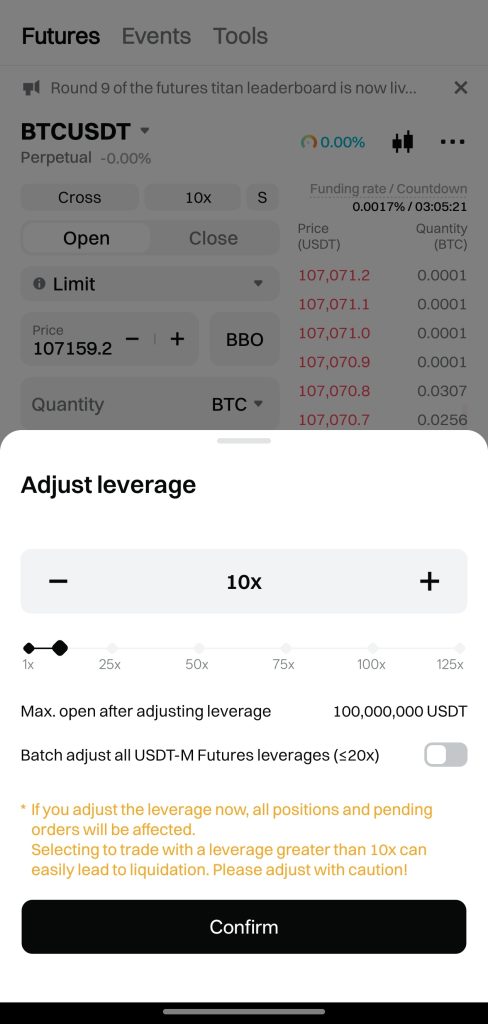
Next, adjust yourleverage. Tap the leverage field and either use the slider or type in the value. A typical starting point for new users is between 5x and 10x. Avoid going higher unless you’re comfortable managing fast market swings.
6. Set Up the Trade
Now you’re ready to build your trade.
- Choose Long if you expect the price to rise.
- Choose Short if you expect it to fall.
- Select Limit Order if you want to set an exact entry price.
- Choose Market Order if you want to open the position immediately.
Enter the Entry Price and Quantity. You can toggle between inputting in USDT or crypto units. For example, using 100 USDT at 10x leverage means you’re opening a $1,000 position.
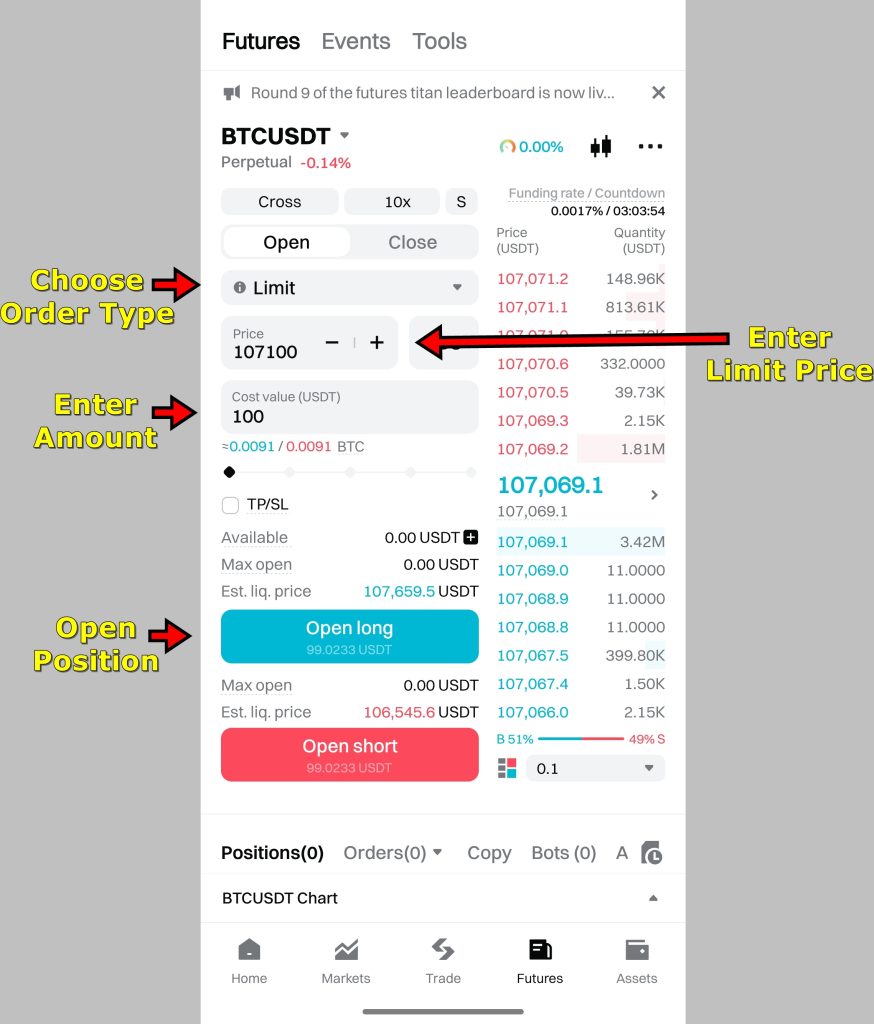
Before continuing, double-check your inputs. A small mistake in the order type or entry price can result in an unintended trade.
7. Add Take Profit and Stop Loss
To manage risk, Bitget lets you attach Take Profit (TP) and Stop Loss (SL) to each order.
- Tick the TP/SL box in the order panel.
- Enter your target price for taking profit.
- Set your stop loss level to limit potential downside.
For example, if you go long at 107,100 USDT, you might set TP at 110,000 and SL at 106,000. These settings help you manage risk without constant monitoring. You can also modify them later under the Positions tab.

Once everything looks good, tap “Open Long” or “Open Short” to place the order. If it's a Limit Order, it will remain pending until the price hits your entry level.
Monitor Your Position
After the order fills, it moves to the Positions tab. Here, you can:
- Track live profit and loss
- Update TP or SL
- Add margin to reduce liquidation risk
- Close the trade manually
To close the trade, tap Close, then choose either Limit or Market to exit. Market Close sells your position at the best available rate immediately.
Start trading on Bitget and claim your welcome bonus of up to 6,200 USDT. Sign up now and explore one of the leading crypto trading platforms.
Bitget App Copy Trading Tutorial
Bitget has made copy trading simple to understand and even easier to use. The entire setup feels more like a hands-off collaboration than a blind automation tool. It connects beginners who want to follow, with traders who already have strategies in play. You don’t need to know technical analysis or watch the charts all day. Once you pick a trader, the system mirrors their trades based on your settings.
That said, the feature still needs your input. The right setup makes a big difference, especially when real funds are involved. Here’s how to get started the right way.
1. Go to the Copy Trading Section
Launch the Bitget app and sign in. From the home screen, tap on “Copy.” This opens the main copy trading dashboard. You’ll see dozens of lead traders, each with visible stats like win rate, profit percentage, follower count, and recent activity.
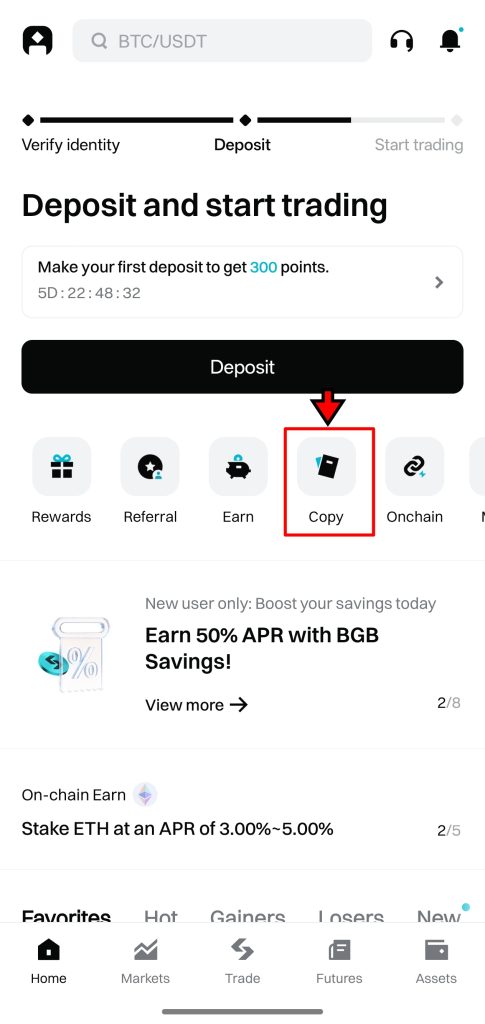
The dashboard updates in real time, so what you see is current performance. Scroll through the list to begin exploring.
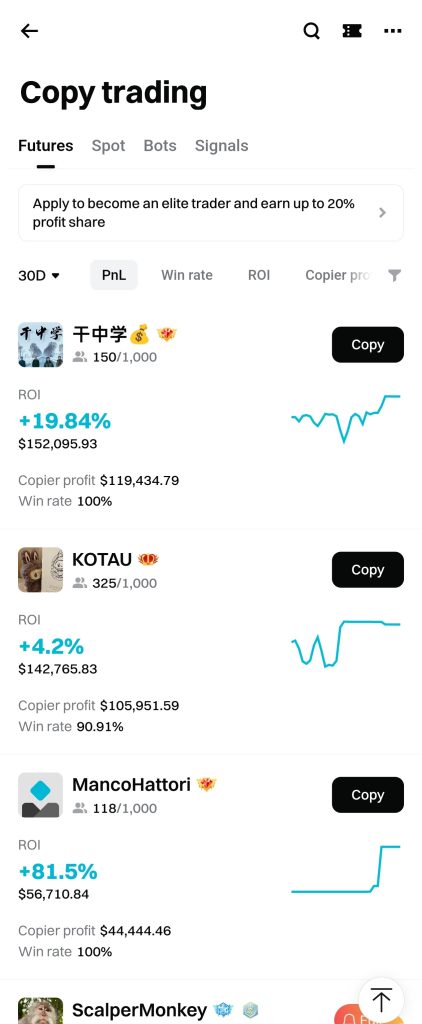
2. Choose a Lead Trader
Picking the right trader isn’t about chasing the highest gains. It’s about finding someone whose style fits your risk level. Tap on a trader’s name to open their full profile. You’ll see useful metrics like number of trades, success rate, drawdown, average return per trade, and how long they’ve been active.
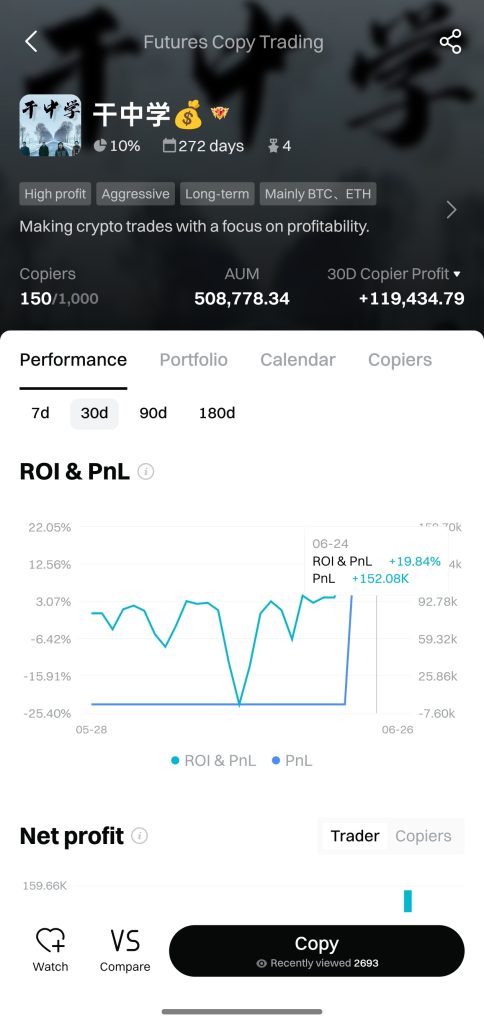
Study a few profiles. If someone has made 400 percent in a week but only has five trades, that might be luck. Consistency matters more. Once you find someone you trust, tap “Copy Trade” to begin.
3. Configure Copy Trade Settings
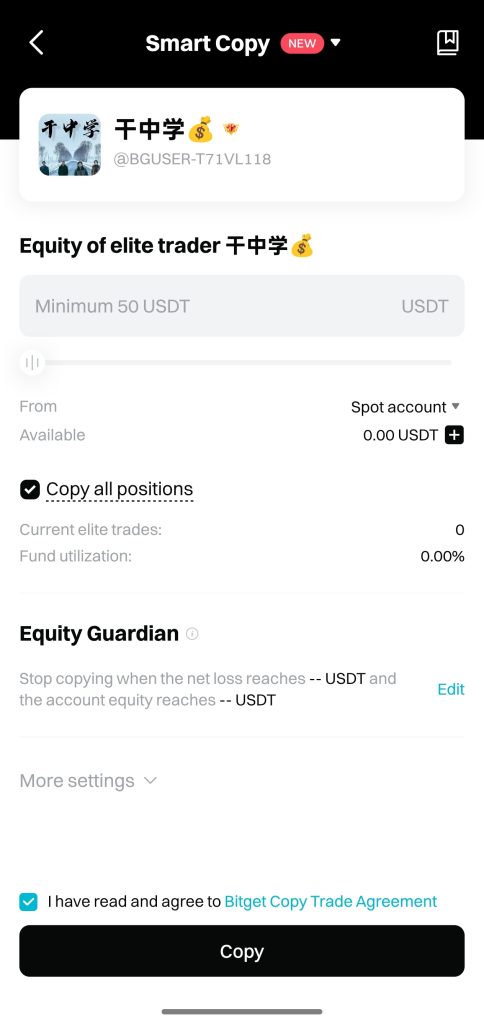
Now comes the most important part. Bitget will take you to the Smart Copy setup screen, where you define how the system handles trades.
Start by entering the amount of USDT you want to allocate. This is the balance that will follow the lead trader’s positions. You can increase or decrease this anytime later.
Choose your copy mode. You can mirror all trades or choose to follow only new positions. The second option is useful if you want to avoid jumping into trades that are already mid-way through.
If you want to protect your funds with a safety net, turn on Equity Guardian. This lets you set a maximum loss limit. If your account balance falls below this amount, Bitget will stop all copy trades, close positions, and move the rest of the funds back to your wallet.
4. Adjust Advanced Settings (Optional)
If you want more control, tap “More Settings” under the Equity Guardian section. These advanced options let you fine-tune how the system operates.
You can choose specific trading pairs to copy or leave it open to all. You can also decide whether to copy new trades only or include currently open ones. There’s even an option to set your own Take-Profit and Stop-Loss levels, or customize the leverage per trade.
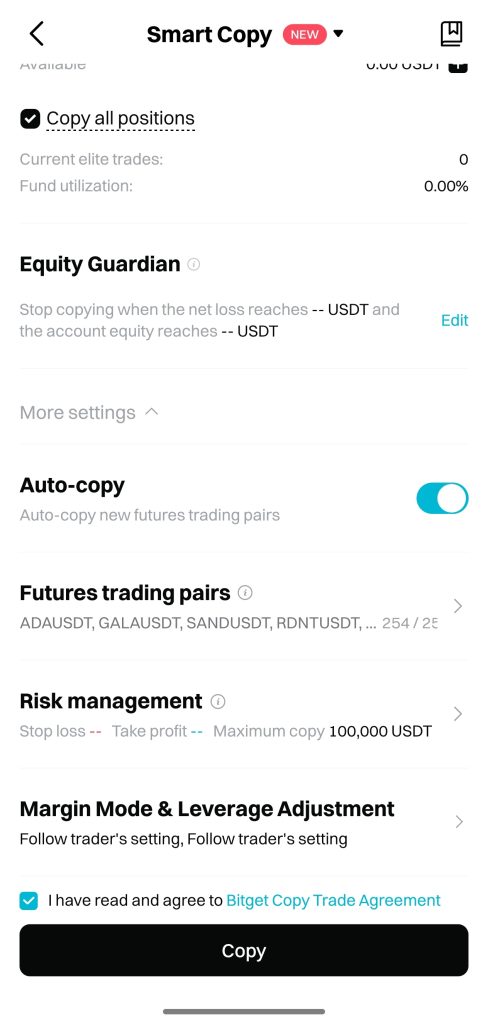
If you’re just starting out, keeping the default settings is usually a safe choice. Experienced users might prefer tweaking them to match their strategy or risk appetite.
5. Activate Copy Trading
Once all settings are in place, tap “Copy” to confirm. Bitget will begin copying the trader’s positions into your account. The trades will appear in your futures section with full visibility. You’ll be able to see entry prices, position sizes, and live profit and loss just like you would with a manual trade.
You can stop copy trading at any time with one tap. If you want to switch traders or change allocation, everything can be managed directly from the Copy tab.
How to Withdraw Funds on Bitget App?
Bitget gives users the ability to move both crypto and fiat out of the exchange. The process is pretty straightforward and easy to follow. But like any transfer involving money, a small mistake can cause delays or worse, lost funds. Here’s how to do it properly.
Withdrawing Crypto from Bitget
- Open the Withdrawal Page
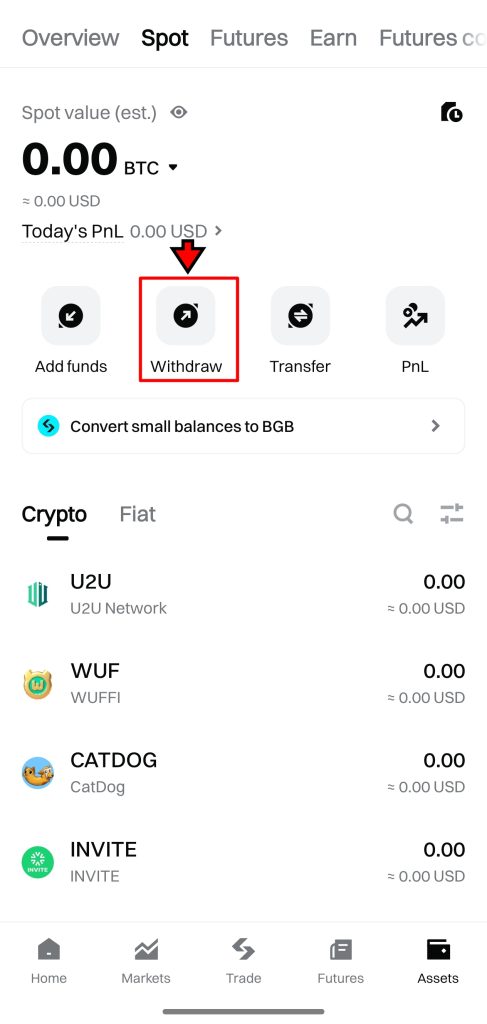
Start by launching the Bitget app and logging in. From the home screen, tap the “Assets” button in the bottom-right corner. This opens your Bitget wallets. You’ll see a full list of your holdings. Tap “Withdraw” on any of the wallets to proceed.
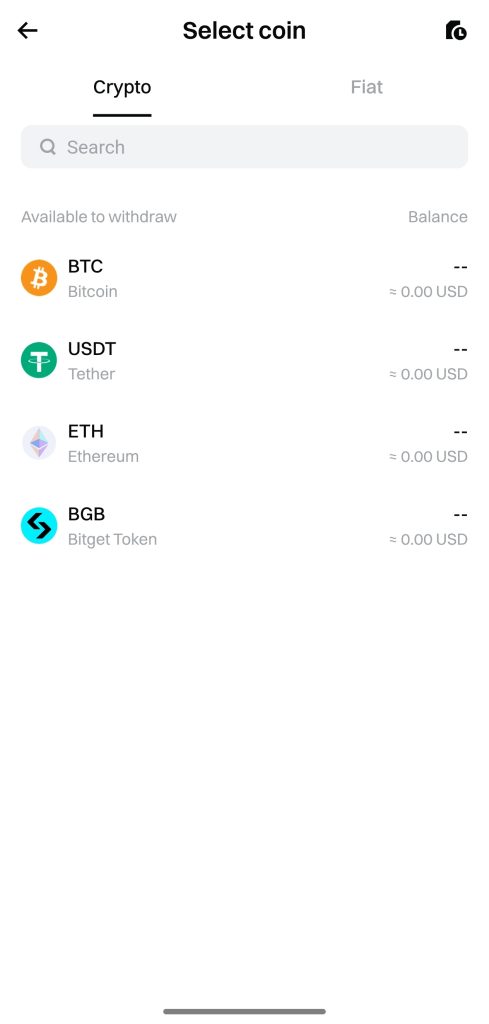
- Select the Cryptocurrency
The app will now prompt you to pick which token to withdraw. Scroll through the list or search for it by name or symbol. USDT, BTC, and ETH are the most commonly used, but Bitget supports hundreds of options.
- Choose Withdrawal Method
After selecting your token, Bitget will ask how you want to send it. You’ll get two choices:
• On-chain Withdrawal: Sends funds to an external wallet or another exchange.
• Internal Transfer: Sends funds instantly to another Bitget user by UID or email.
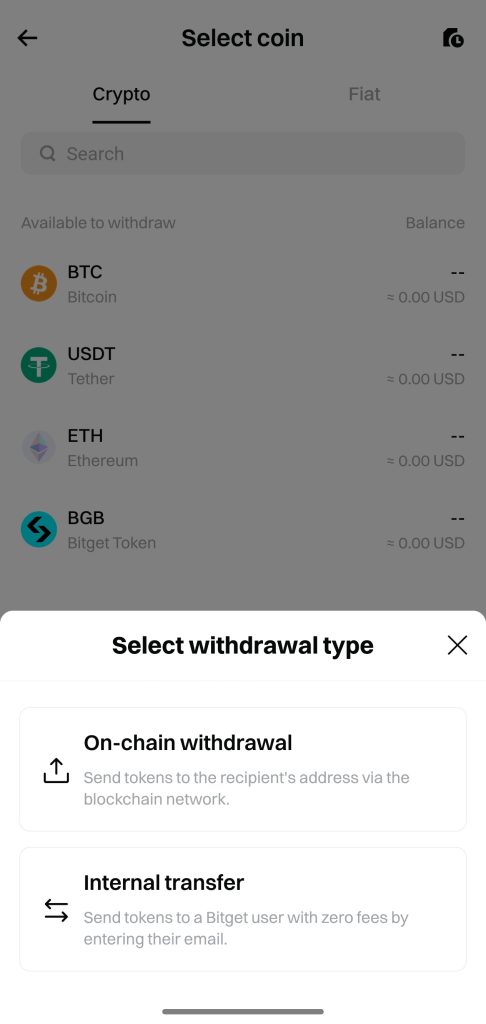
For most cases, go with On-chain Withdrawal. This opens the full crypto transfer interface.
- Enter Wallet Address and Select Network
Paste the destination address into the wallet address field. This must come from the wallet or exchange you’re sending funds to. Then choose the correct blockchain network. Bitget gives you a list of supported networks based on the token you selected.
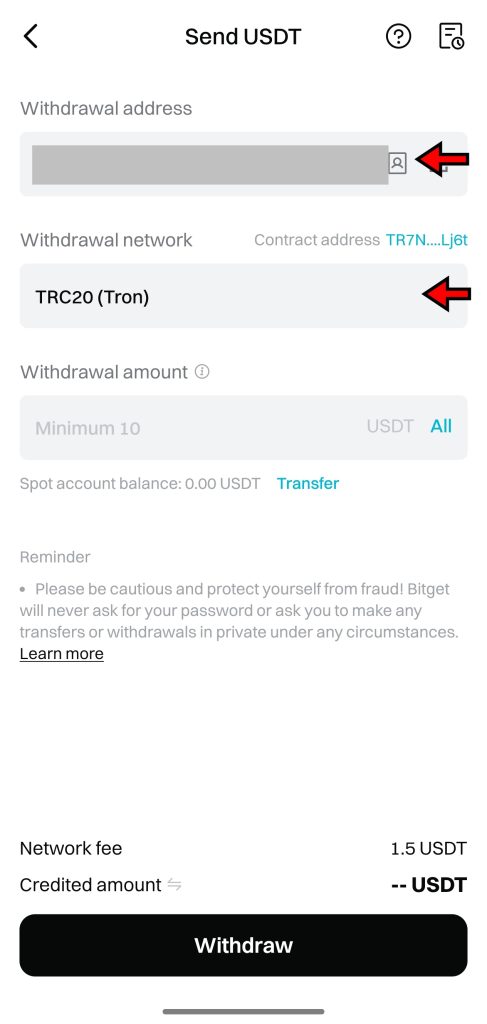
This step needs your full attention. The network must match exactly between Bitget and the receiving wallet. For example, if you’re sending USDT to a TRC20 wallet, you must select TRC20 on Bitget, too. Using the wrong network could cause a permanent loss of funds.
- Enter Withdrawal Amount and Confirm
Type in the amount you want to send. The app will show you the network fee and final amount after the deduction. Tap “Withdraw” when ready.
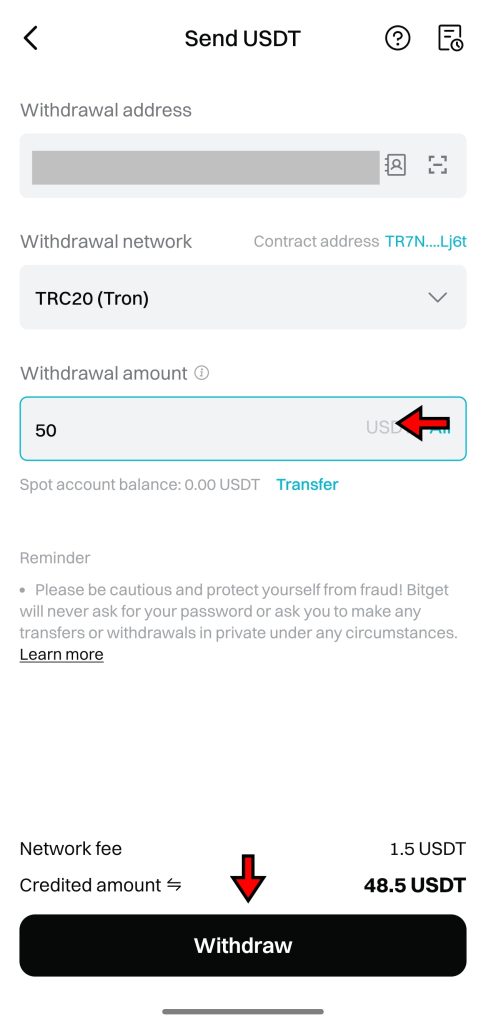
Depending on your account settings, Bitget will now ask for two-factor authentication. Complete the verification and your request will be submitted. Once the blockchain confirms it, the funds will arrive at the destination wallet.
Withdrawing Fiat on Bitget
Fiat withdrawals are limited by region, but if available in your country, they allow you to send funds directly to your bank account. Here's how it works.
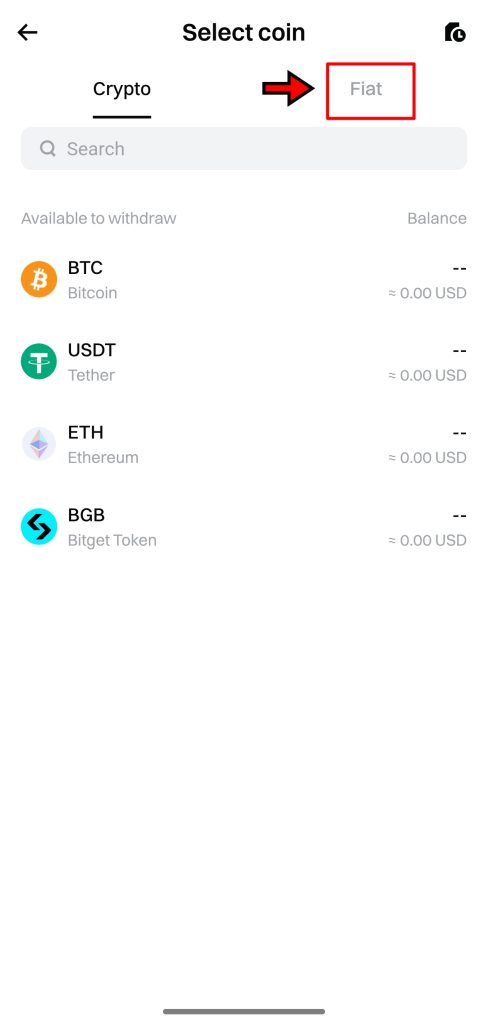
- Go to Fiat Withdrawals
Return to your Assets section and tap “Withdraw” again. This time, switch to the Fiat tab using the toggle at the top. You’ll now see the list of supported fiat currencies.
- Choose Fiat Currency
Pick the currency you want to withdraw. If you don’t see your local currency listed, fiat withdrawals may not be supported in your region.
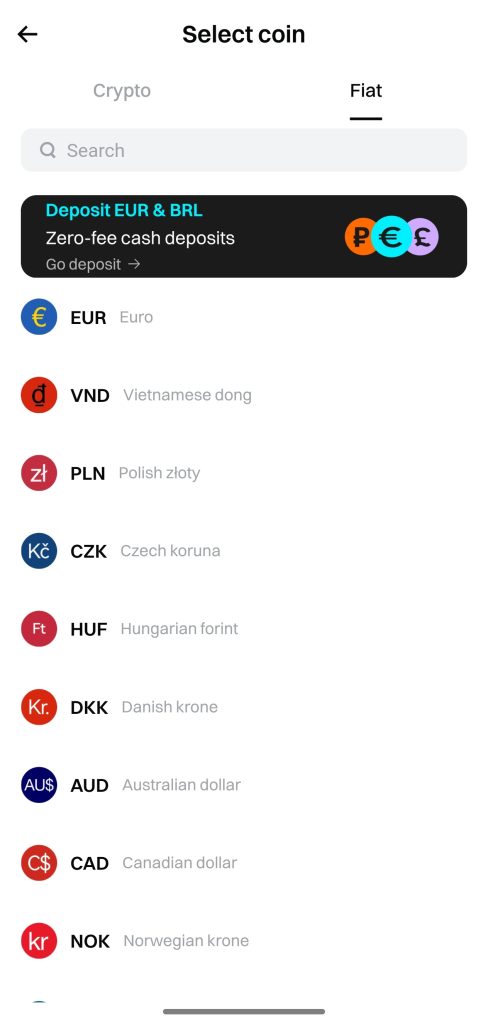
After selecting the currency, you’ll land on the fiat withdrawal setup page.
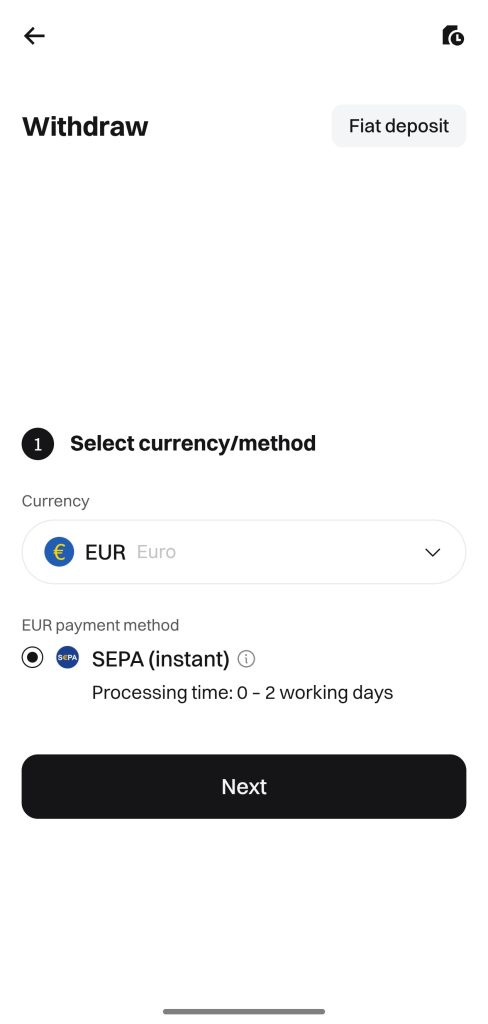
- Choose Withdrawal Method
Available methods vary by currency. For EUR, the app will show SEPA Transfer as an option. Tap on it to continue. If you're using a different currency, you’ll see local alternatives if Bitget supports them.
- Confirm Account Details and Withdraw
If this is your first fiat withdrawal, you’ll need to enter your bank details. For SEPA, this includes your IBAN and account holder name. If you’ve already saved a bank account, simply select it from the list.
Tap “Withdraw” to confirm the transfer. Processing times vary, but SEPA transfers usually complete within 1 to 2 business days.
Bitget makes the withdrawal process clear, but it’s not completely foolproof. Always double-check the address, network, and withdrawal type before submitting. A few extra seconds here can save you a lot of trouble later.
Bitget App Fees
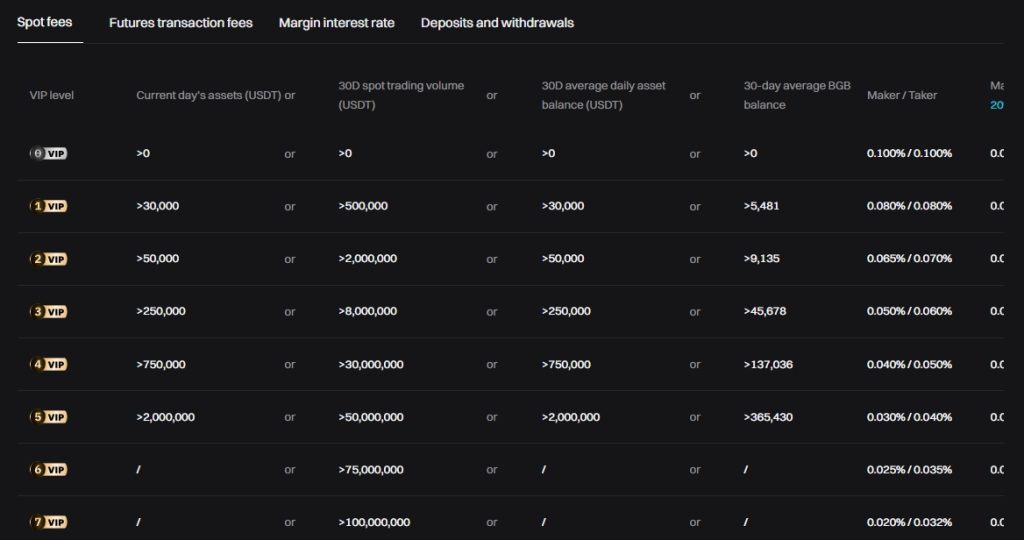
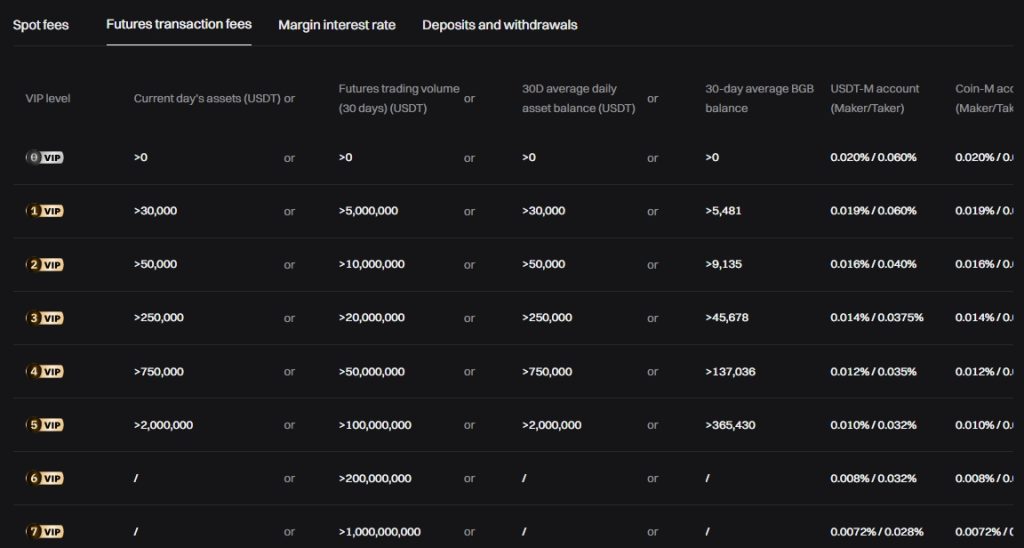
Bitget keeps its fee structure relatively straightforward, sticking to a maker-taker model that most traders will already be familiar with. If you’re trading on spot or futures, the standard fee sits at 0.1% for both makers and takers. That’s a flat base rate, but it doesn’t stay that way for everyone. Bitget runs a tiered VIP system that adjusts fees depending on how much you trade and how many BGB tokens you hold. The more active you are, the cheaper it gets. For instance, traders at VIP Level 3 only pay 0.050% as a maker and 0.060% as a taker, which is a noticeable drop from the default rate.
There’s also a discount built in for users who pay their fees using BGB, Bitget’s native token. It knocks off 20% from your trading fees, whether you’re buying or selling on spot or futures. It’s a small touch, but one that adds up over time if you're actively trading. It also gives the token some utility beyond just holding it in your wallet.
Below is a breakdown of both spot and futures fees on Bitget:
Deposits are free across the board, which is expected but still worth noting. Withdrawals, however, come with variable fees. These aren’t set in stone and depend on both the asset and the blockchain network you’re using. For example, withdrawing USDT on Ethereum costs more than doing it on TRON. Since network congestion plays a role, these fees can shift daily. The app does a decent job of showing the current rates before you hit confirm, but if you want to be sure, check the withdrawal fee table available on Bitget’s support section. It’s always better to double-check than get surprised by a higher-than-expected fee after the fact.
Is Bitget App Secure?
Bitget checks off most of the major boxes when it comes to security and compliance. It operates under regulatory approval in several jurisdictions, including the UK, Italy, Poland, Lithuania, and Bulgaria. This gives it some legitimacy, especially for users who are cautious about where they trade. The app also requires full KYCfor all users and enforces anti-money launderingandcounter-terrorist financing measures. Anonymous accounts aren’t allowed, which helps reduce exposure to shady activity and aligns with how most major platforms now operate.
On the infrastructure side, Bitget claims to keep most user funds in cold storage. That means the wallets aren’t connected to the internet, making them less vulnerable to external attacks. The exact percentage stored offline isn’t disclosed, which is one area where more transparency would be helpful. Users generally like to know how much of their deposits are actually out of reach from hackers, and Bitget could do a better job here.
Technically, the platform performs well. Bitget has earned twelve A+ scores from SSL Labs, which speaks to the strength of its encryption. It also works with outside security firms like Qingsong Cloud Security, Armors, HEAP, and Suntwin Technology for added protection. On Certified’s exchange security ranking, Bitget currently sits in fourth place. That’s not a bad position and puts it in line with more established names in the industry.
It was a little late to publish proof-of-reserves data, but it eventually got there. As of now, Bitget reports a reserve ratio of 213%. That’s a strong number and suggests it holds more than double the amount needed to cover user balances. It also maintains a $300 million protection fund, designed to provide backup in case of unexpected events like system outages or losses from operational risks. All of this points to a platform that takes user safety seriously, even if there’s still some room for clearer communication on the cold storage breakdown.
Bitget is giving out up to 6,200 USDT in welcome bonuses. Join now, make your first move, and start stacking rewards.
Final Takeaway
If you're new to Bitget or just exploring whether it's the right exchange for you, this guide should give you a complete picture of what to expect. We’ve gone through every part of the app and broken down the entire trading process in simple terms. From creating an account to trading spot and futures, and even setting up copy trades, every section in this tutorial is based on actual steps taken inside the app.
Nothing was skipped or glossed over. We walked through each screen, each button, and each setting so that you don’t have to guess your way through it. This isn’t a sales pitch. It’s what we would explain to anyone trying to figure out how Bitget works for the first time.
Once you’ve followed this guide, you should be able to start using Bitget without running into the usual confusion that comes with learning a new trading platform. The app has a clean layout, solid tools, and enough flexibility to suit different styles of trading. As long as you follow the steps as laid out, you’ll be up and running without much trouble.
Frequently Asked Questions – FAQs
Bitget is a crypto exchange based in Singapore offering spot, futures, and copy trading features.
Yes, Bitget supports users in over 150 countries, but availability may vary by region.
Download the app, tap “Get Started,” enter your email or phone, set a password, and verify your account.
Yes, KYC is required for withdrawals and unrestricted trading access.
Yes, you can deposit crypto directly or buy it using fiat through cards, bank transfers, or P2P.
Bitget supports market, limit, trigger, post-only, trailing stop, and TP/SL orders.
Select a trading pair, choose your order type, set the amount, and confirm the trade.
Yes, Bitget supports USDT-M, Coin-M, and USDC-M futures with up to 125x leverage.
You can choose between Cross Margin and Isolated Margin.
Pick a lead trader, set your allocation, adjust settings, and Bitget mirrors their trades for you.
Go to Assets, tap Withdraw, select the asset, enter the address, choose the network, and confirm.
Trading fees start at 0.1% and can be reduced through VIP levels or by using BGB tokens.
Yes, Bitget uses cold storage, holds a $300M protection fund, and reports over 200% reserve ratio.
Disclaimer: All content on The Moon Show is for informational and educational purposes only. The opinions expressed do not constitute financial advice or recommendations to buy, sell, or trade cryptocurrencies. Trading involves significant risk and may result in substantial losses. Always seek independent financial advice before making investment decisions. The Moon Show is not responsible for any financial losses or decisions made based on the information provided.
Please view the full disclaimer at: https://themoonshow.com/disclaimer

Binance App Tutorial – Everything You Need to Know
Cryptocurrency exchanges are platforms for trading digital currencies, such as Bitcoin (BTC), E...

MEXC App Tutorial – How to Trade Crypto on MEXC App?
MEXC is a full-featured cryptocurrency trading app that supports a wide range of tools, includi...

Bitunix App Tutorial – Learn How to Trade Cryptocurrencies
Bitunix is a renowned cryptocurrency exchange that offers crypto trading services to crypto ent...