MEXC App Tutorial – How to Trade Crypto on MEXC App?
MEXC is a full-featured cryptocurrency trading app that supports a wide range of tools, including spot trading, futures, staking, and more. It’s built for speed and offers access to hundreds of crypto assets with high liquidity and responsive performance. The interface is designed to support both new users and active traders, though it can feel complex at first glance.
The app opens with a fast-moving dashboard filled with real-time data, trading pairs, and multiple sections that require some orientation. For users launching it for the first time, figuring out where to begin can be difficult without guidance.
This tutorial provides a clear walkthrough of the core features of the MEXC app. It starts with account setup and moves step by step through identity verification, depositing funds, trading on the spot and futures markets, and using other key functions. Each section includes specific instructions with screenshots to help users understand the process visually. Let’s take a look:
Trade on MEXC without KYC and unlock welcome rewards worth $30,000. Register now and start earning your bonuses from day one.
What is MEXC?
MEXC is a global cryptocurrency exchange that launched in 2018. It was built by a team with experience in both traditional finance and blockchain technology. Within its first year, MEXC accounted for roughly 5 percent of global digital asset trading volume, marking a strong entry into a competitive market. Since then, the exchange has grown steadily and now serves more than 35 million users in over 170 countries and regions.
The platform supports a wide range of trading features. Users can access spot trading, futures, and copy trading from within the app. MEXC doesn’t cater only to one type of trader. Its tools are accessible enough for beginners and detailed enough for more experienced users. The exchange is also known for its broad selection of altcoins. It lists a variety of low-cap tokens and meme coins early, which often attracts traders looking to enter new markets ahead of the curve.
Security has been a consistent priority for MEXC. The platform implements advanced protection protocols and maintains regulatory relationships in several jurisdictions. It also offers multilingual support to serve a diverse global audience. In 2021, MEXC received the “Best Crypto Exchange Asia” award at Crypto Expo Dubai, highlighting its strong regional presence.
In 2023, regulatory warnings from authorities in British Columbia, Austria, and Germany, along with a license cancellation in Estonia, raised questions about compliance. Despite these setbacks, the platform has continued to operate normally and remains a go-to exchange for a large number of users around the world.
| Read Our MEXC Exchange Review | Read Our MEXC Exchange Tutorial |
Trade on MEXC without KYC and unlock welcome rewards worth $30,000. Register now and start earning your bonuses from day one.
How to Sign Up on the MEXC App?
Getting started on the MEXC app is a short, direct process. Whether you’re opening your first crypto account or moving from another exchange, registration takes only a few minutes. Here’s a step-by-step breakdown of how to create an account using the mobile app.
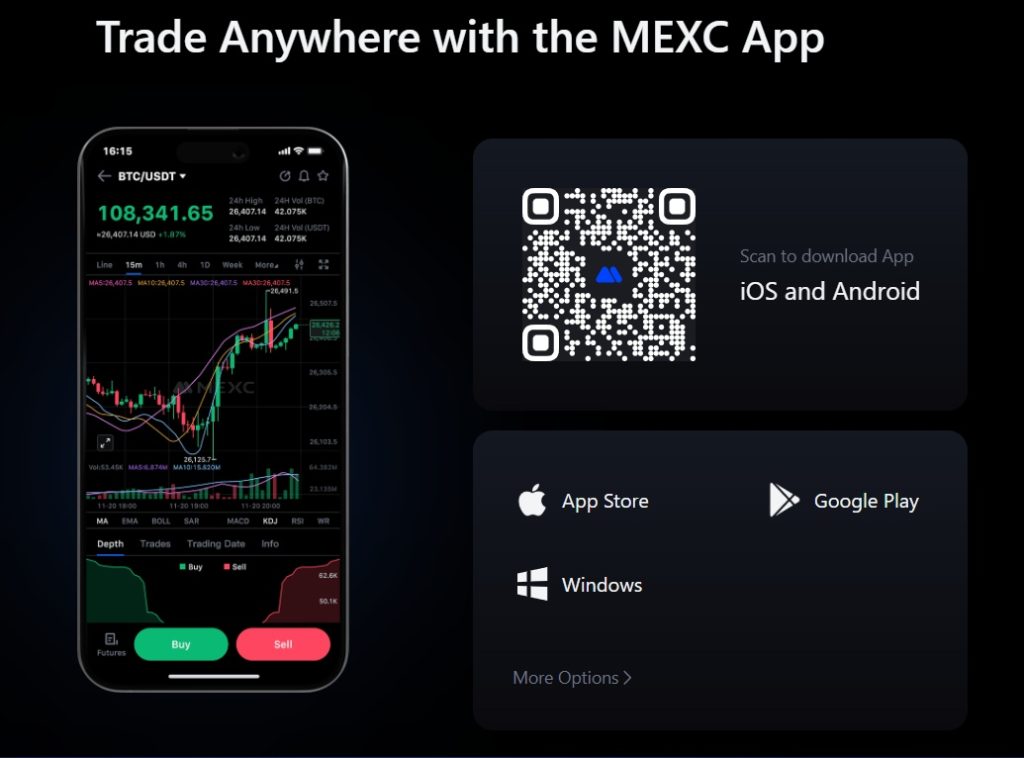
1. Download the MEXC App
Start by installing the app on your smartphone. If you’re using Android, open the Google Play Store. For iPhone users, head to the App Store. Search for “MEXC” and look for the official app published by MEXC Global. Tap the install button and wait for the download to complete. The app is lightweight, so it won’t take long to install. You can also scan the QR code below to access the download page directly.
2. Launch the App and Start Registration
After installation, open the app. You’ll land on a welcome screen with a clear “Sign Up” button. Tap it to begin. The app will then take you to a registration page where you’ll choose how to open your account.
3. Provide Email or Phone Number and Create Password
Here, you’ll enter either your email address or phone number. Choose the option you prefer. Next, create a password. MEXC requires a strong one, so include uppercase and lowercase letters, numbers, and special characters. This helps protect your account against unauthorized access. Once your password meets the criteria, tap “Next” to proceed.

4. Verify Your Email
After you submit your sign-up details, MEXC will send a six-digit code to the email address you provided. Go to your inbox, find the message, and copy the code. Return to the app and enter the code into the field provided. Tap “Confirm” to complete this step.

5. Your Account is Created
Once the code is verified, your account is officially registered. You’ll now have access to the app’s basic features. However, before you can begin trading or access the full range of tools, you’ll need to complete identity verification. The next section will walk through the KYC process in detail.
How to Complete KYC on the MEXC App?
KYC, short for “Know Your Customer,” is a standard identity verification process used across financial platforms. On MEXC, completing KYC improves account security, increases withdrawal limits, and unlocks access to restricted features. The app supports two levels of verification: Primary and Advanced. The Primary level requires an identity document, while the Advanced level adds facial recognition for added security. Here's a step-by-step guide to completing the full KYC process through the MEXC app.
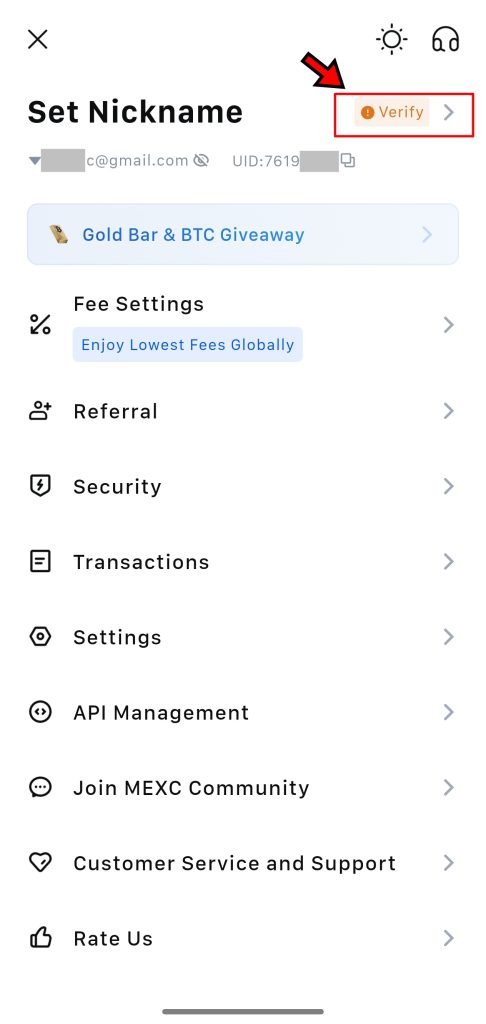
1. Go to the Verification Screen
Open the MEXC app and tap the user icon in the top-left corner of the home screen. This opens the main account menu. On the next screen, tap the "Verify" button located in the top-right. This will take you directly to the KYC verification page, where both Primary and Advanced options are listed.
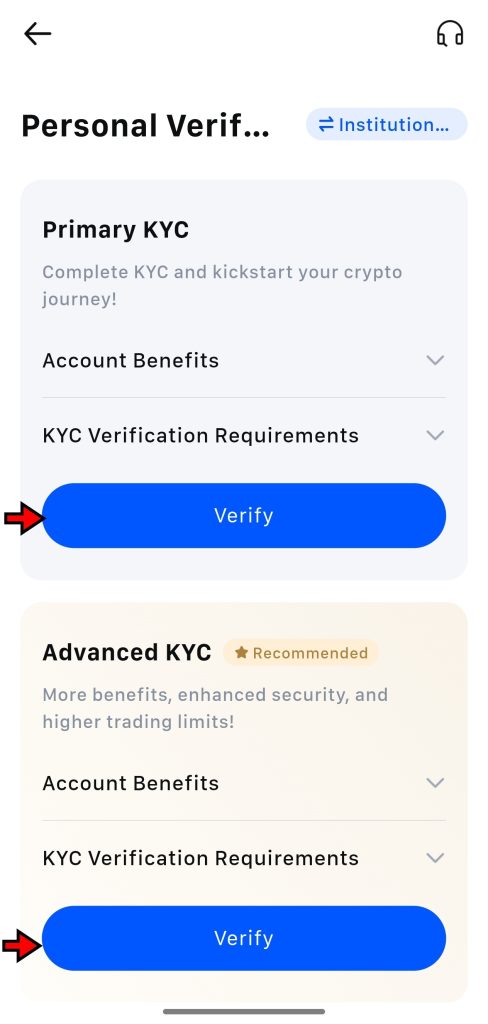
2. Choose Verification Type
You’ll now see the two available options for verification: Primary and Advanced. If you're only planning to deposit and trade small amounts, the Primary level might be enough. For full access to all features and higher withdrawal limits, Advanced verification is recommended. This tutorial covers the Advanced process since it includes all required steps.
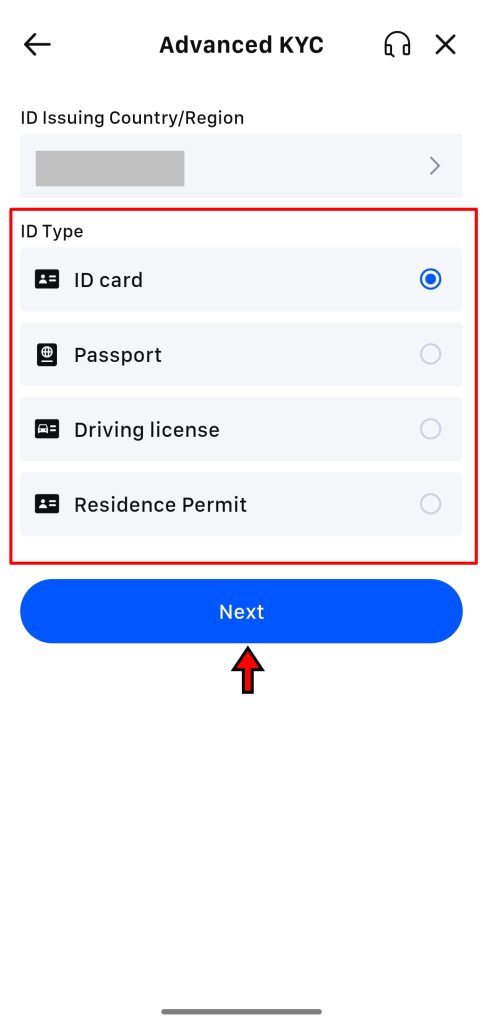
3. Choose Country and ID Type
The first step in the form is selecting your country of residence. Once you choose your country, MEXC will display a list of accepted identity documents based on local regulations. Common options include national ID cards, passports, and driver’s licenses. Select one from the list and tap “Next” to proceed.
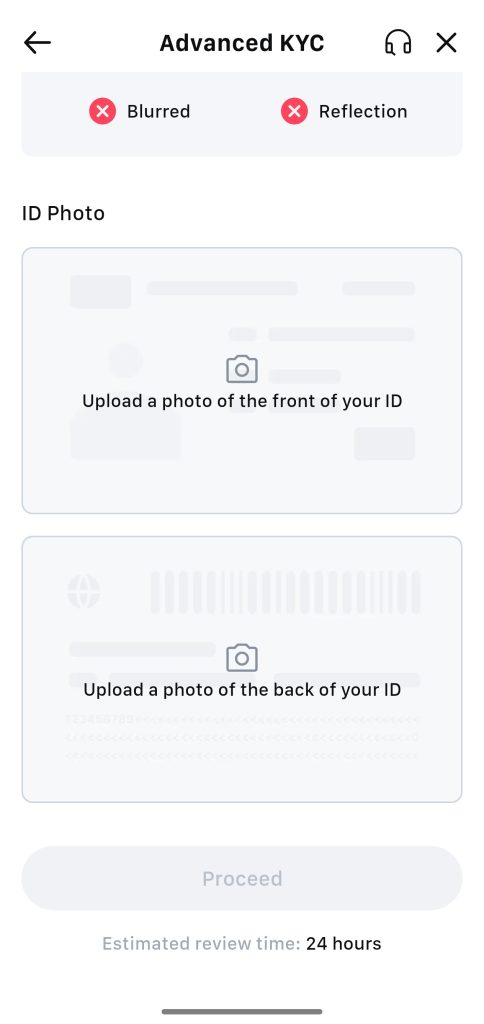
4. Upload Photo of Your ID
Now, the app will prompt you to upload a photo of the ID you selected. If the document has two sides, like a national ID card, you’ll need to take photos of both the front and back. Make sure each image is clear and readable. Avoid glare, blur, or any cropped edges. Once the photos are uploaded, tap “Proceed.” If you selected Primary verification, your process ends here. If you chose Advanced, there’s one more step.
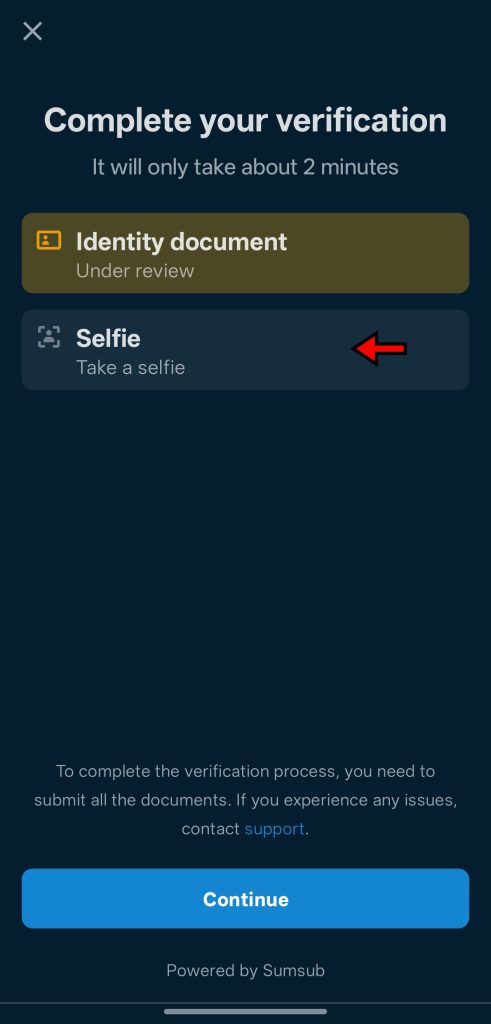
5. Facial Verification
The final step for Advanced KYC is facial recognition. On the next screen, you’ll see an option labeled “Selfie” or “Facial Scan.” Tap it to activate your phone’s front camera. Make sure you’re in a well-lit area. Hold the camera steady and center your face in the frame. The app will take the photo automatically once it confirms that the image is clear.

6. Verification Time
Once all steps are completed, your documents and selfie will be submitted for review. MEXC usually processes KYC requests within 24 hours. You’ll receive a notification once your identity has been verified and your account is fully unlocked.
How to Deposit Funds on the MEXC App?
MEXC gives users multiple ways to fund their accounts. You can either deposit existing crypto from another wallet or buy digital assets directly using fiat currency. Each method is built into the app and only takes a few minutes to complete. Below is a breakdown of all the available deposit options and how to use them.
Buying Crypto with Fiat
MEXC supports over 50 fiat currencies and allows you to buy more than 99 different tokens directly through bank transfers and card payments. Here's how to get started.
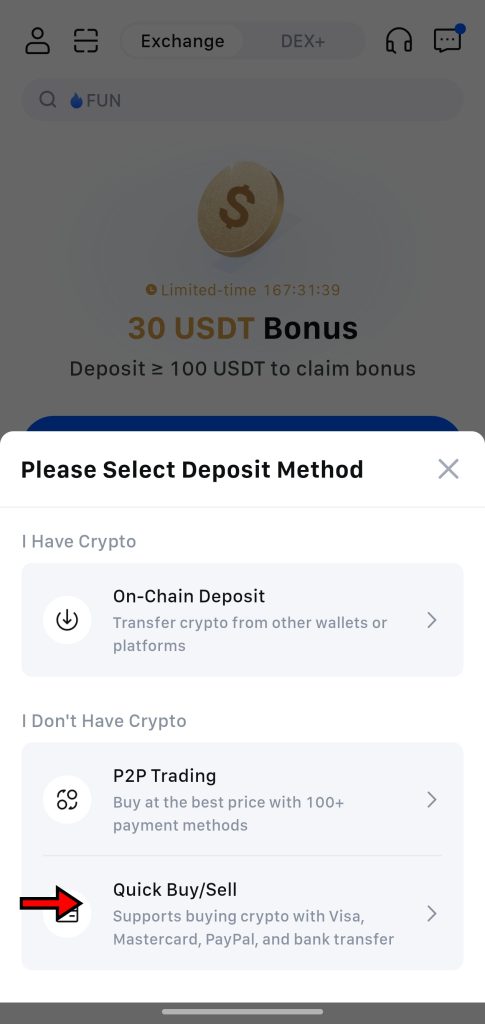
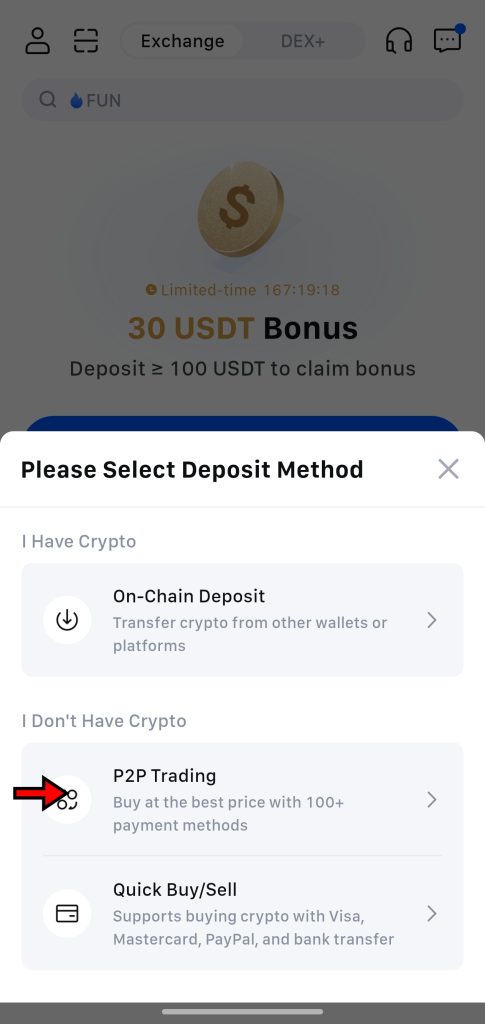
- Go to the Quick Buy/Sell Page:
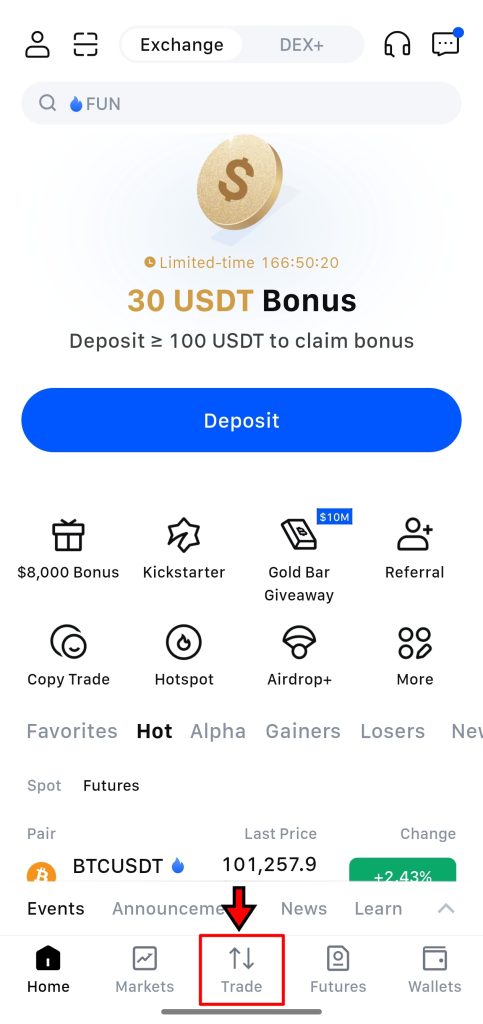
On the app’s home screen, tap the “Deposit” button located at the center of the screen. A pop-up will appear showing multiple deposit options. Select “Quick Buy/Sell” to enter the fiat purchase section.
- Select Currencies and Enter Amount
In the Quick Buy section, choose the fiat currency you want to pay with and the cryptocurrency you want to purchase. For example, you can buy USDT using EUR, USD, or other supported currencies. Once selected, enter the amount you wish to spend. The app will automatically display the current conversion rate.
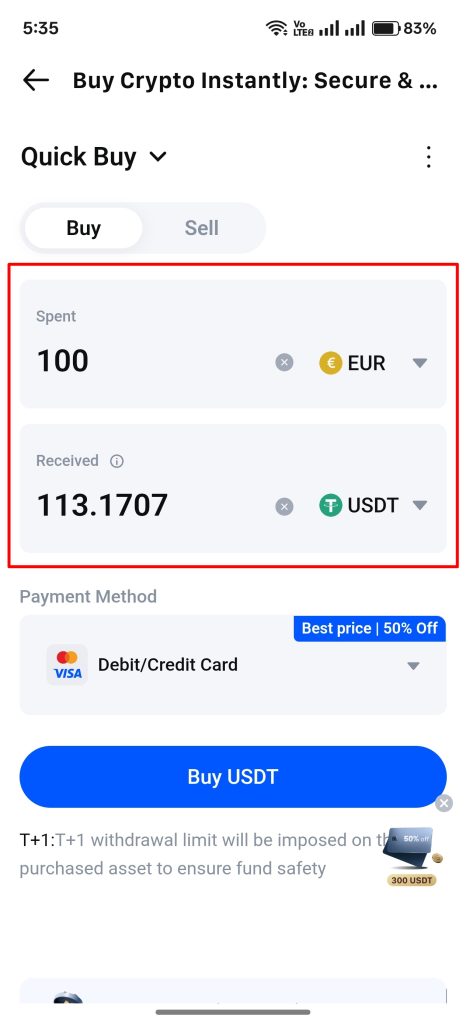
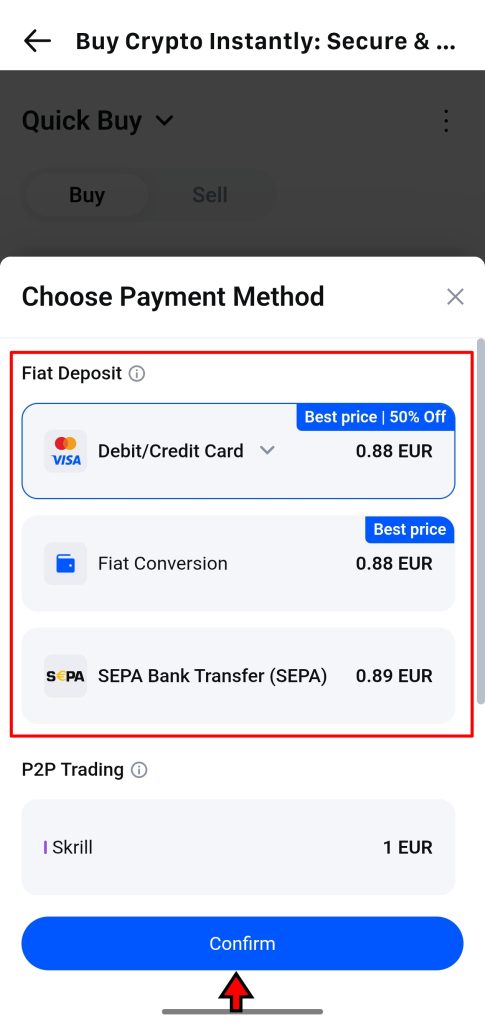
- Select Payment Method
Next, tap the payment method field to see available options. MEXC supports both debit or credit card transactions and SEPA bank transfers for certain regions. Choose your preferred method. You’ll then be prompted to enter your card or account details. Fill in this information carefully, then tap “Confirm” to continue.
- Complete the Transaction
After confirming your payment details, tap “Buy Crypto” to finish the purchase. Your crypto will appear in your MEXC wallet once the payment is successfully processed.
Depositing Cryptocurrency to MEXC
If you already own crypto, you can transfer it to your MEXC wallet by selecting the appropriate network and using your unique wallet address. This is one of the most common methods to deposit cryptocurrency on any exchange app.
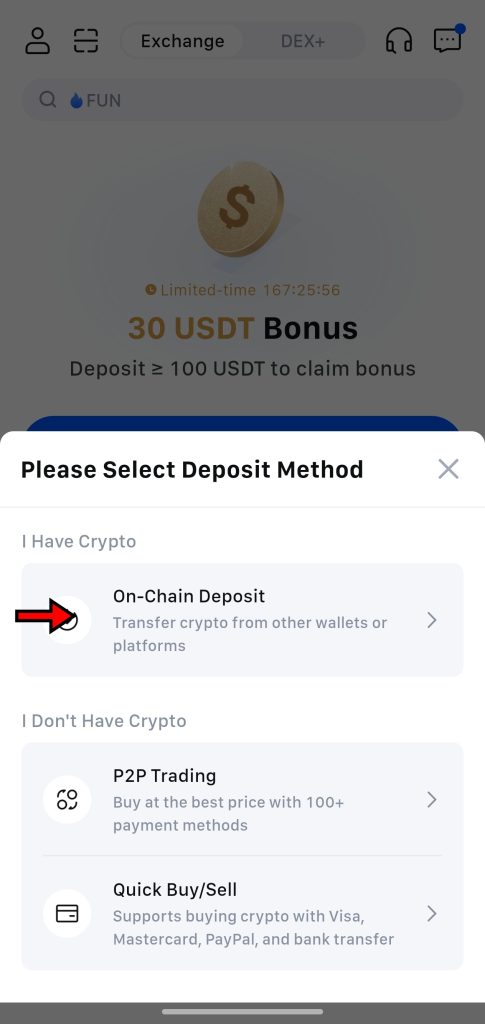
- Go to the On-Chain Deposit Page
From the home screen, tap the “Deposit” button again. In the pop-up, select “On-chain Deposit” to access the crypto deposit interface.
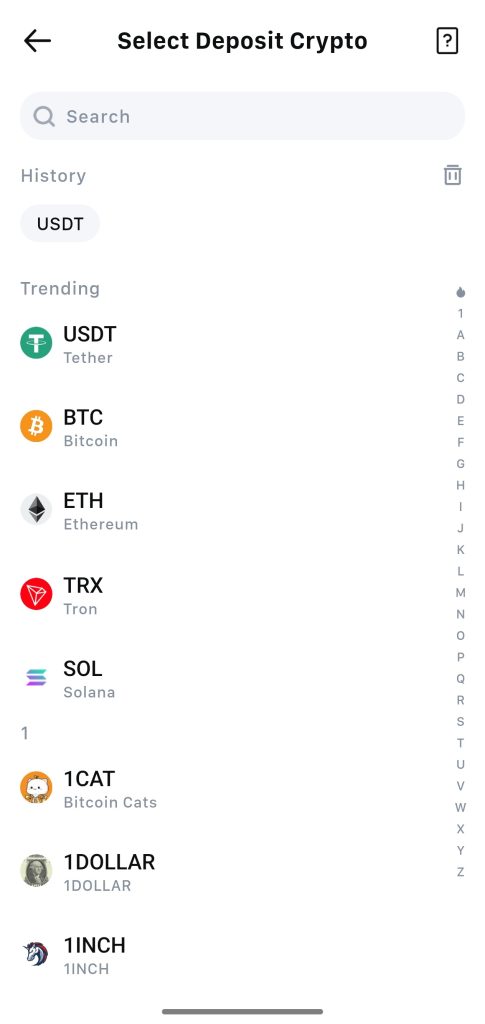
- Select the Cryptocurrency to Deposit
Choose the asset you want to deposit from the list. MEXC supports a wide range of tokens, including BTC, ETH, USDT, and many lesser-known altcoins.
- Select Network
After choosing the token, select the blockchain network you will use to make the deposit. This step is important. The network you choose in MEXC must match the one selected in the wallet or exchange you're sending funds from. For example, if you plan to deposit USDT using the TRC20 network, make sure your external wallet is also set to TRC20. A mismatch can result in lost funds.
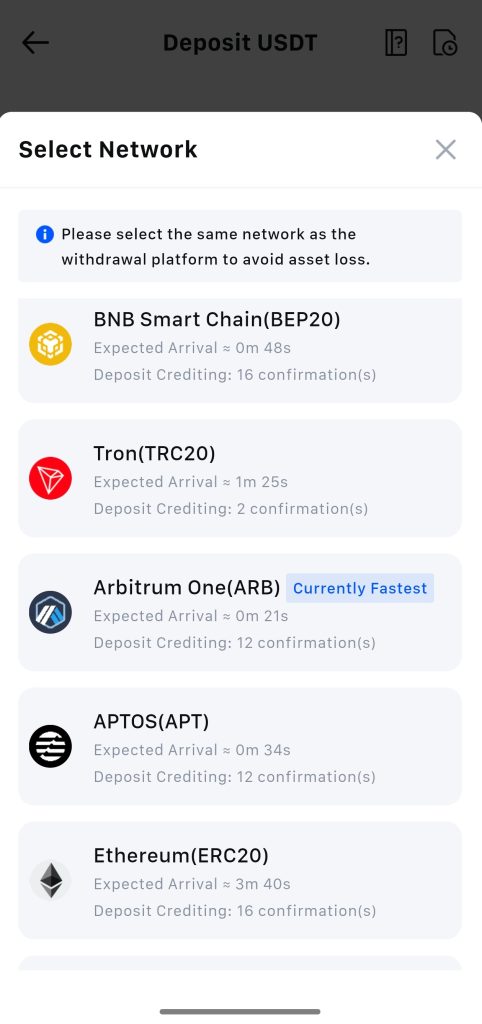
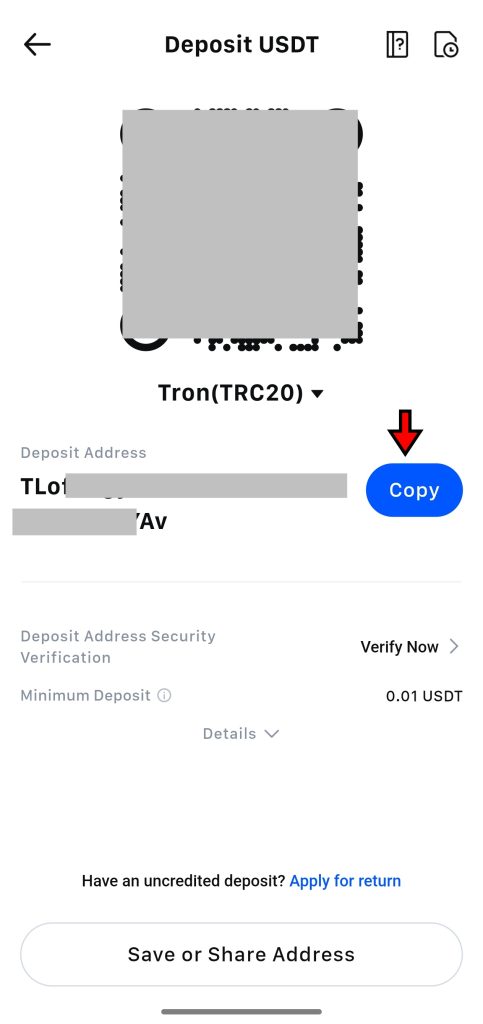
- Copy or Scan Wallet Address
MEXC will now generate a wallet address for the selected token and network. You can copy this address or scan the QR code if your external wallet supports it. Paste or scan this address into the wallet you're sending funds from. Once the transaction is confirmed on the blockchain, the crypto will appear in your MEXC wallet.
Buying Crypto with P2P
MEXC’s P2P (peer-to-peer) trading platform allows users to buy crypto directly from other users using local currency. It’s available in multiple regions and supports over 30 payment methods with no added fees.
- Go to the P2P Page
On the app’s home screen, tap the “Deposit” button. From the options that appear, select “P2P Trading” to access the peer-to-peer market.
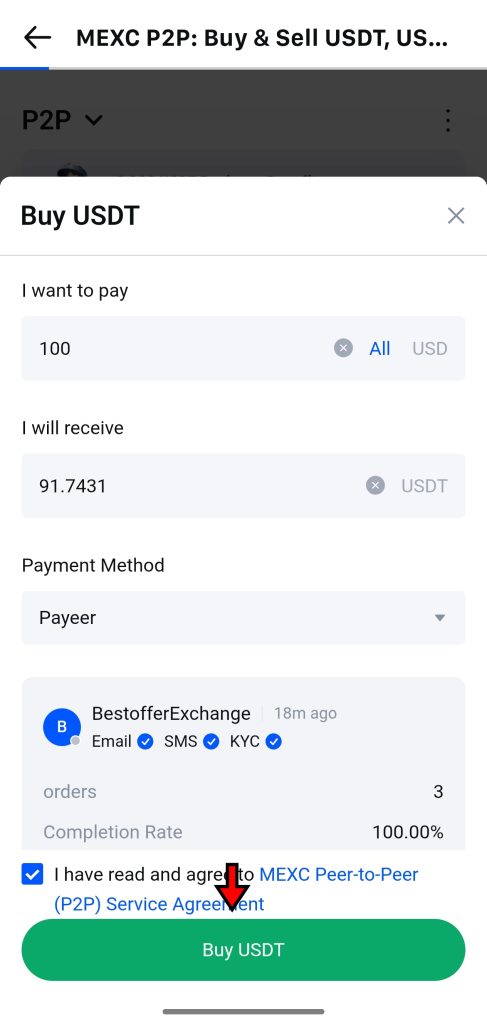
- Select Currencies
Once inside the P2P section, choose the crypto asset you want to buy. Most users start with USDT since it’s stable and widely available. Then, select the fiat currency you plan to use for payment.

- Choose an Offer
Scroll through the list of available sellers. Each offer displays the exchange rate, payment methods, and transaction limits. When you find a suitable offer, tap on it. Enter the amount you want to buy and review the amount of crypto you’ll receive. If everything looks good, tap “Buy USDT” to begin the transaction.
Once payment is confirmed and the seller releases the crypto, the funds will appear in your MEXC wallet.
Order Types on MEXC App
Before placing trades on MEXC (whether in spot or futures markets) it’s important to understand how different order types work. Each type controls how and when a trade executes, and using the right one can make a big difference in both timing and outcome. Below is a clear breakdown of the order types available on the MEXC app, including how they work and when to use them.
Limit Order
A limit order lets users control the exact price at which they want to buy or sell a cryptocurrency. The trade will only go through if the market reaches that price or a better one. If the price doesn't match immediately, the order stays open until it's filled or canceled.
Example: A user wants to buy BTC at 60,000 USDT. They place a limit buy order at that price. If the market drops to 60,000 USDT or below, the order executes. If not, it stays pending.
Market Order
Market orders focus on speed. They execute instantly at the best price available. You only need to enter the quantity; the app takes care of the rest. This type is ideal when quick entry or exit is more important than hitting an exact price.
Example: A user places a market order to buy 5 ETH. If ETH is trading around 2,000 USDT, the order fills immediately. Due to market movement during execution, the actual price may vary slightly.
Stop-Limit Order
This type involves two prices. The stop price triggers the action, and the limit price defines the terms. Once the stop price is reached, the system places a limit order based on the user’s input.
Example: BTC is trading at 61,000 USDT. A user sets a stop-limit sell order with a stop at 60,000 and a limit at 59,500. If the price drops to 60,000, the system places a limit sell order at 59,500.
Trigger Limit Order
This order type watches a selected benchmark price such as market, index, or fair price. When that benchmark reaches the defined trigger level, the system places a limit order using the price and quantity set by the user.
Example: A user wants to buy ETH if the price hits 1,800 USDT. They set a trigger at 1,800 and a buy limit at 1,790. Once the trigger is reached, a buy order is placed at 1,790 USDT.
Post-Only Order
Post-only orders are placed into the order book without executing immediately. If they match with an existing order right away, the system cancels them. This ensures the user always acts as a maker, which can reduce trading fees.
Example: A user places a post-only buy order for SOL at 150 USDT. If someone is already selling at that price, the order gets canceled to prevent instant execution.
TP/SL (Take Profit / Stop Loss)
Take Profit and Stop Loss orders help automate exits from trades. They can be used to secure gains or minimize losses, either while opening a trade or managing an active position.
- While Opening a Position: You can pre-set a TP/SL before placing a trade. Once the position is live, the app sets up the trigger automatically.
- While Holding a Position: You can assign TP/SL to an open trade. When the price hits the target, a market order executes to close the position.
Example: A user buys BTC at 60,000 USDT. They set a take-profit at 63,000 and a stop-loss at 58,000. If the market reaches either point, the system exits the position.
Trailing Stop Order
A trailing stop moves with the market. It activates only when the price hits the activation level and then pulls back by a set distance. This allows traders to ride price movements while protecting profits in case of a reversal.
Example: A user sets a trailing stop to sell ETH when it hits 2,000 USDT with a trailing distance of 50. If ETH rises to 2,100 and then drops to 2,050, the system sells automatically.
Each of these order types plays a specific role in how trades are handled. Learning when and how to use them can give you better control over your positions.
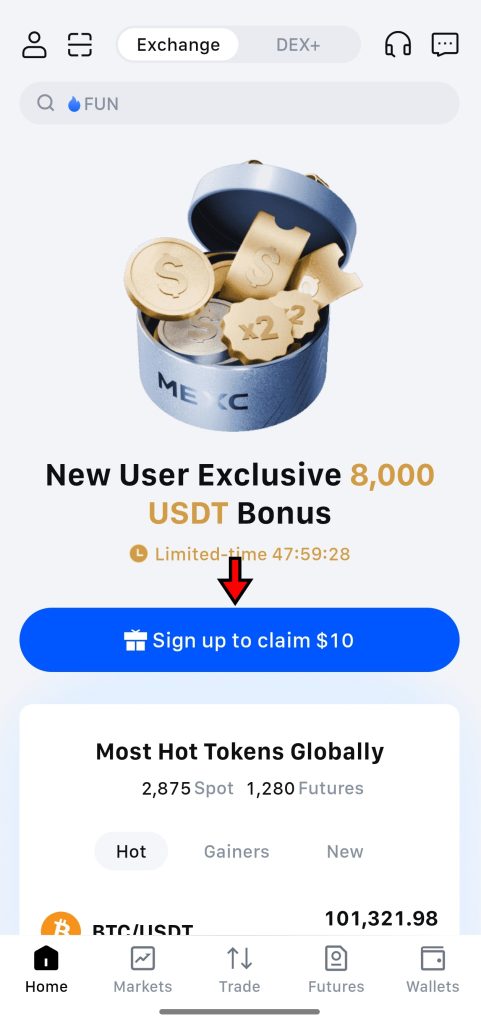
MEXC makes onboarding simple. Sign up without KYC, trade right away, and claim up to $30,000 in welcome rewards.
MEXC App Spot Trading Tutorial
Spot trading on MEXC allows users to exchange cryptocurrencies at current market prices, with no leverage involved. With support for more than 2,900 tokens and trading pairs, including stablecoin pairs like USDT/ETH and direct crypto pairs like BTC/ETH, the platform offers one of the most extensive selections on the market. In this tutorial, we’ll walk through how to place a spot trade using a limit order on the MEXC app.
1. Go to the Spot Trading Interface
Open the MEXC app and tap the “Trade” button from the bottom navigation bar. This takes you to the spot trading screen. The interface is clean and functional. It displays price charts, order entry panels, and market data in a layout that balances simplicity with flexibility.
2. Get Familiar with the Interface
Once you land on the trading screen, it helps to understand the key components:
- Order Book (right side): Shows current buy orders in green and sell orders in red. This live feed gives you insight into market depth and how close your order might be to filling.
- Trading Pair Selector (top left): Displays the currently selected trading pair. Tap it to browse or search for another pair like BTC/USDT, ETH/USDT, or SOL/USDT.
- Order Panel (left side): This is where you’ll place your order. You can select the order type, set your price, and enter the amount of crypto to buy or sell.
- Open Orders (bottom): Lists your pending trades and recent transactions so you can track your activity without switching screens.
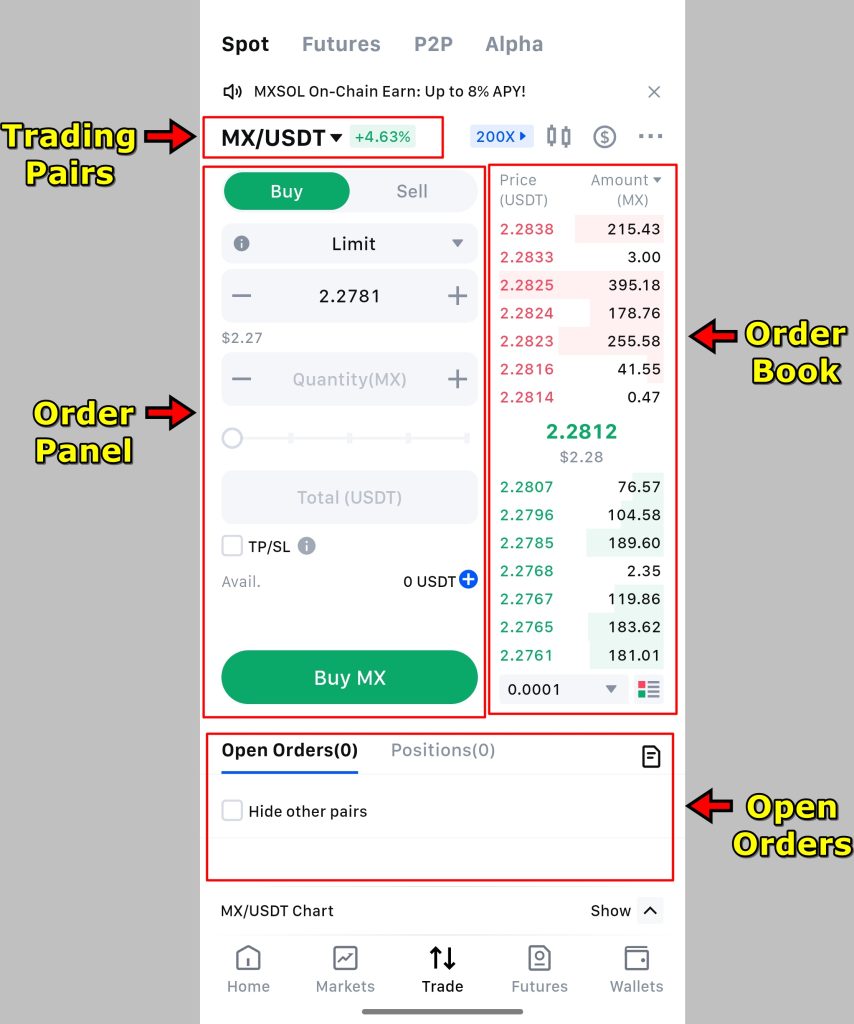
Learning how each part of the interface works helps reduce mistakes, especially when trading volatile pairs or adjusting order size on the fly.
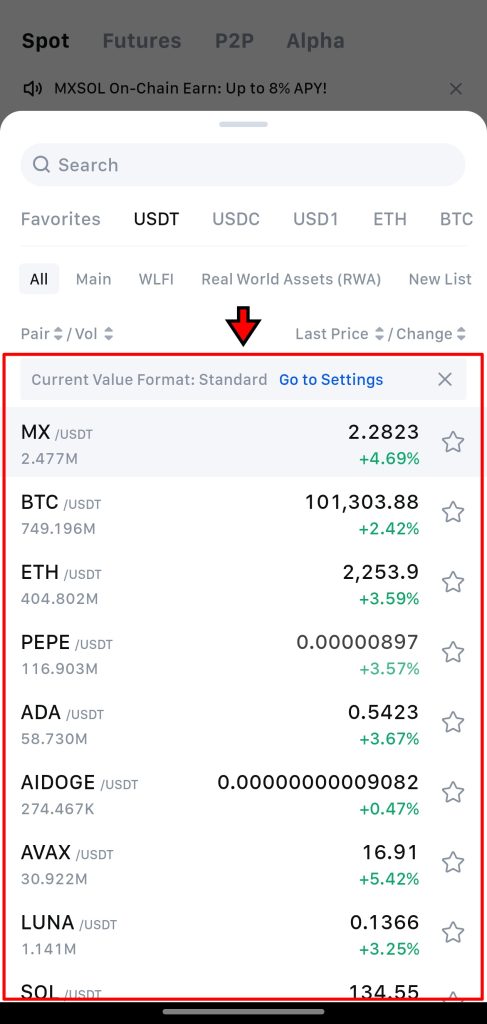
3. Select a Trading Pair
Tap the trading pair field in the top-left corner. A list of supported markets will appear. Use the search bar to find the pair you want, such as BTC/USDT or DOGE/ETH. Once selected, the trading screen updates automatically with the current price, order book, and chart data for that market.
4. Set Up Your Trade
Inside the Order Panel, select your preferred order type. For most use cases, a Limit Order offers more control. It lets you define the price you're willing to pay or accept.
Enter the limit price in the price field. Then input the amount of crypto you want to buy or sell. You can type the value directly or use the slider to select a percentage of your available balance.
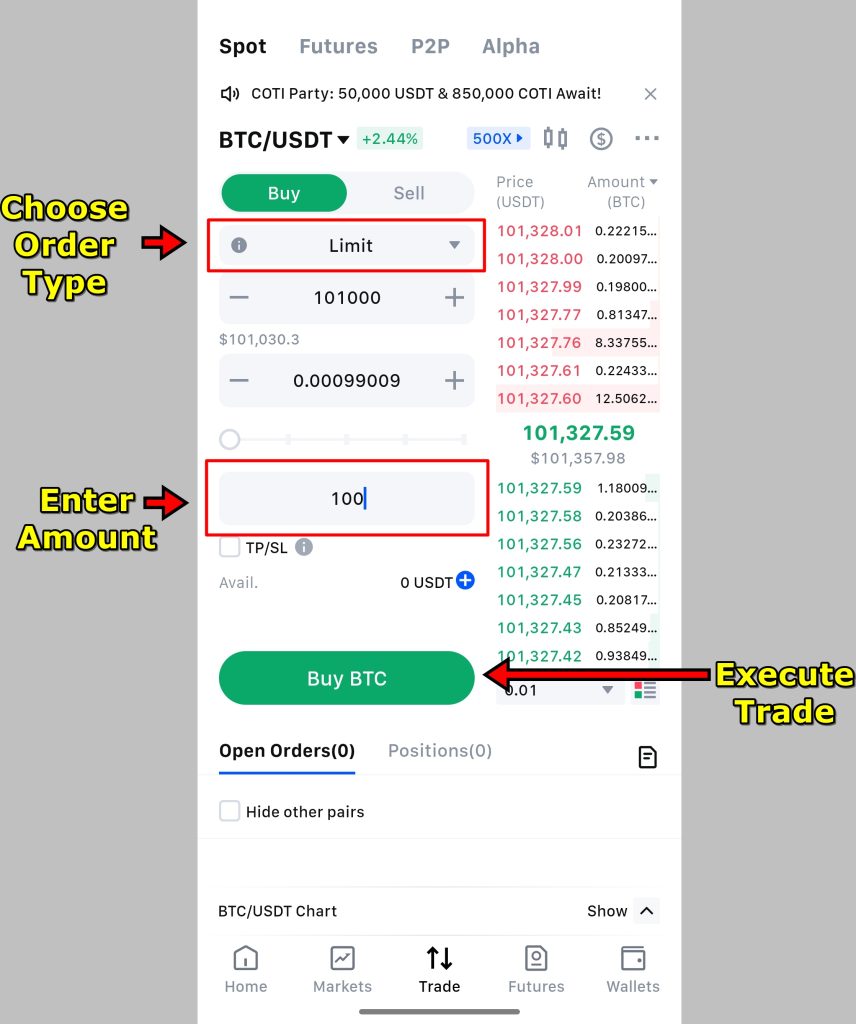
Before placing the order, double-check all details. Make sure the trading pair, price, and amount match what you intend to trade. A small oversight here can lead to buying the wrong token or spending more than planned.
5. Execute the Trade
Once you tap “Buy” or “Sell,” the order appears under the Open Orders section. It will remain there until the market reaches your set price. When it does, the system automatically fills the trade.
If market conditions change or you want to modify your order, you can cancel it or adjust the price and amount directly from the same screen.
To execute a trade instantly without setting a price, switch to a Market Order instead. This option fills your order immediately at the best available market rate. Once a trade is completed, the crypto will show up in your Spot Wallet and is ready for withdrawal, conversion, or further trading.
MEXC App Futures Trading Tutorial
Futures trading on the MEXC app opens the door to more advanced strategies, including leverage and short selling. With support for over 300 perpetual futures pairs and leverage options that go up to 500x (and higher for select contracts), the platform caters to both experienced traders and those just stepping into derivatives. This tutorial will guide you through opening your first futures position using a Limit Order.
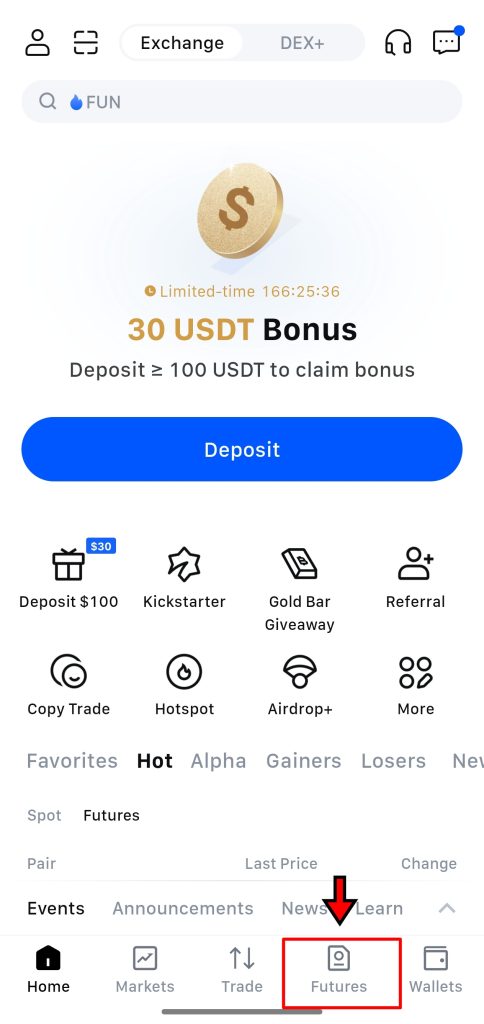
1. Access the Futures Market
Open the MEXC app and tap the “Futures” button in the bottom navigation bar. This brings up the dedicated futures trading screen. The layout is focused on precision. You’ll see price charts, order entry options, live data, and controls for margin and leverage, all placed for quick access.
1. Get Familiar with the Interface
The futures trading screen has a few core components:
- Order Book (right side): Displays real-time buy and sell activity. Green rows show buy orders, red rows show sell orders. It gives a live snapshot of supply and demand at different prices.
- Trading Pair Selector (top left): Tap to switch contracts. All pairs (BTC/USDT, ETH/USDT, SOL/USDT, and many more) are organized and searchable.
- Margin Mode and Leverage Settings: Located just under the selected pair. You can toggle between Isolated and Cross margin here and set your preferred leverage level.
- Order Panel (left side): This is where you set your price, quantity, order type, and direction (Long or Short).
- Positions and Orders (bottom tab): View your active trades, pending orders, and order history in one place.
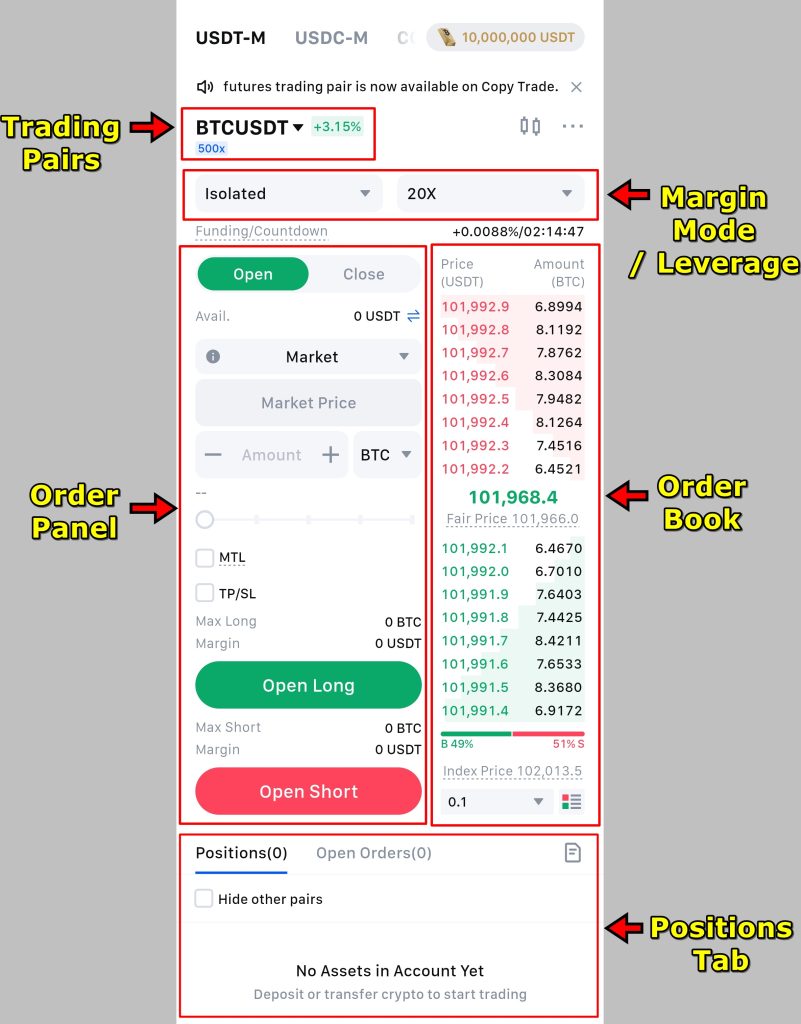
Spend a few moments understanding the layout. Familiarity helps when it’s time to react quickly to price changes.
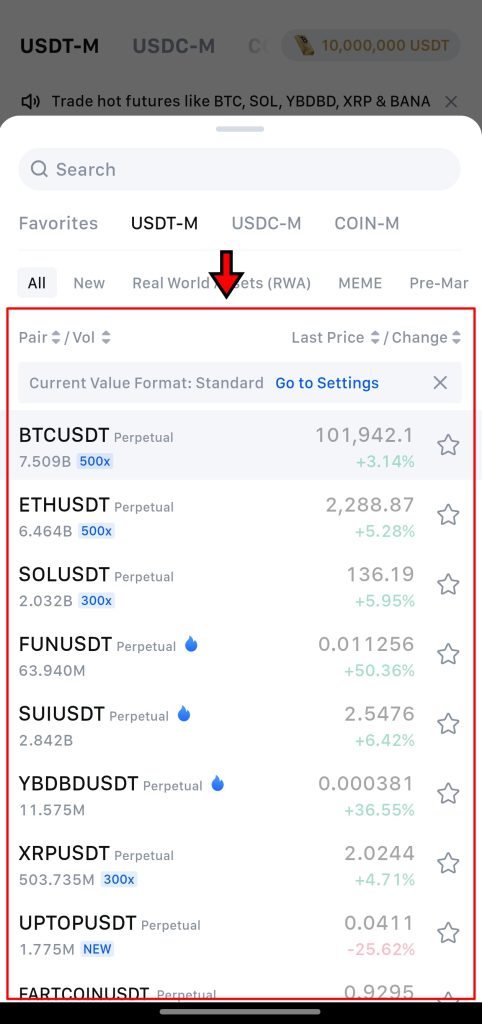
3. Select a Trading Pair
Tap the trading pair name at the top left. A menu will appear showing all available future contracts. Browse the list or search directly. For this example, we’ll use the BTC/USDT perpetual pair. Once selected, the app updates automatically with live price, chart, and market data for that contract.
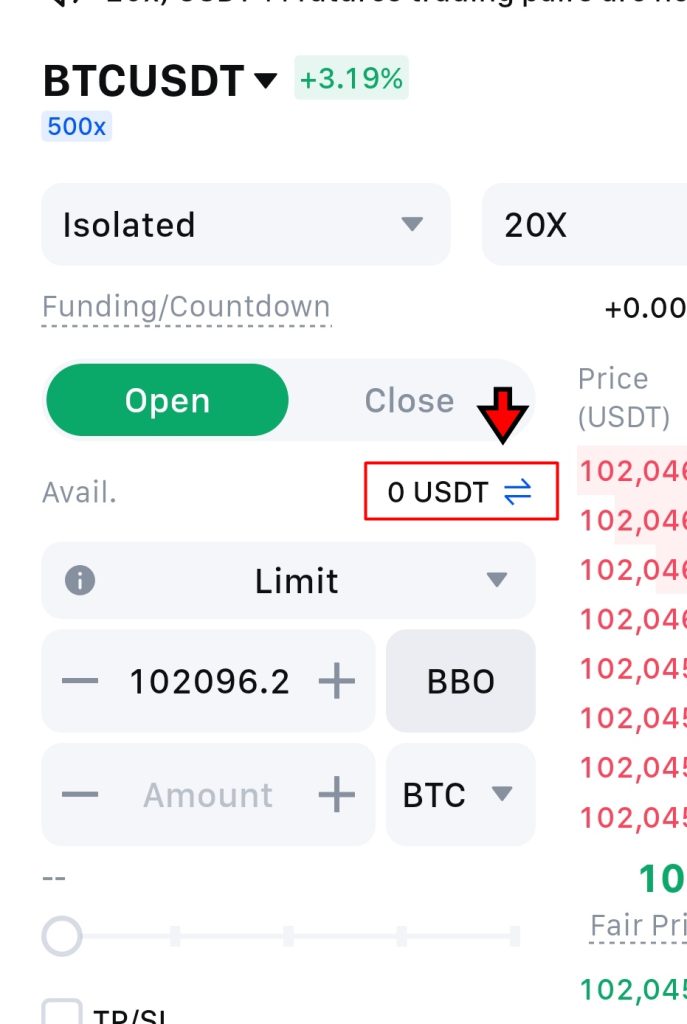
4. Move Funds to Your Futures Wallet
To place a trade, your funds must be in your Futures Wallet. In the Order Panel, look for the line labeled “Avail” next to your balance. Tap the transfer icon. A window opens where you can move assets from your Spot Wallet. Choose the amount, confirm the transfer, and your balance updates instantly. You’re now ready to trade.
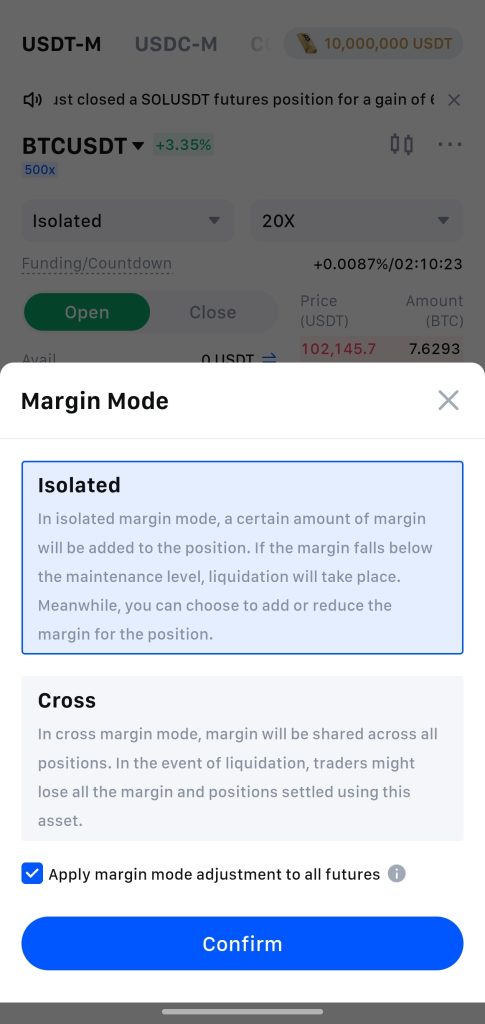
5. Set Margin Mode and Leverage
MEXC gives you two choices for margin:
- Isolated Margin only uses the funds allocated to a specific position. Only that portion is affected if it gets liquidated.
- Cross Margin shares your total futures balance across all open trades. It provides flexibility but increases risk.
We’re sticking with Isolated Margin here for better risk management.
Next, tap the leverage setting beside the margin mode. Use the slider or input box to set your leverage. For example, if you select 5x leverage, $100 of your funds becomes a $500 position. Green indicates long leverage, red for short.
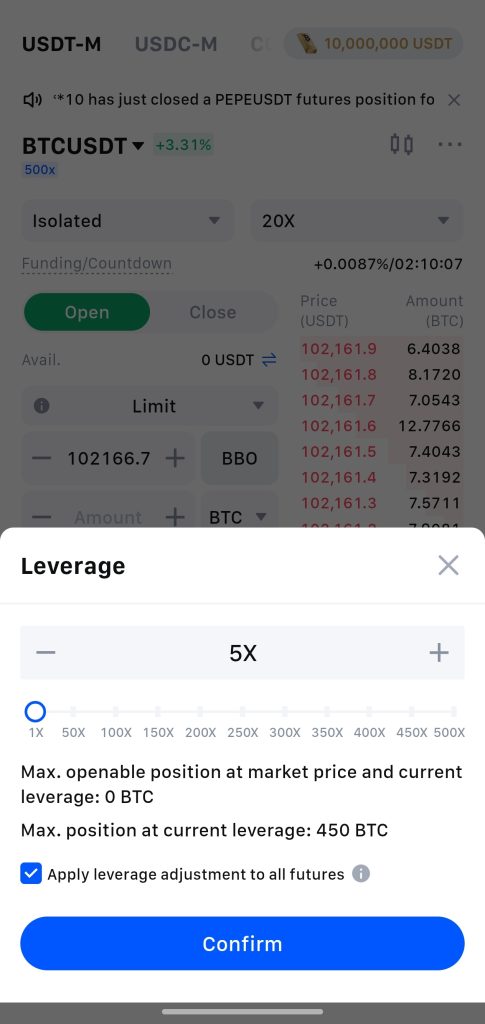
Stick with lower leverage unless you’re confident in managing risk.
6. Set Up the Trade
With funds transferred and leverage set, it’s time to place the trade.
- First, decide the trade’s direction: go with Long if you expect the price to rise, or Short if you expect it to fall.
- Next, select Limit Order. This lets you define the exact price at which you want to enter. If you want to open a position instantly, at the current market price, you can choose a Market order instead.
- Enter the Entry Price and the Quantity. Use the toggle beside the quantity field to switch between USDT and coin units. For instance, inputting 100 USDT with 5x leverage gives you a $500 position.
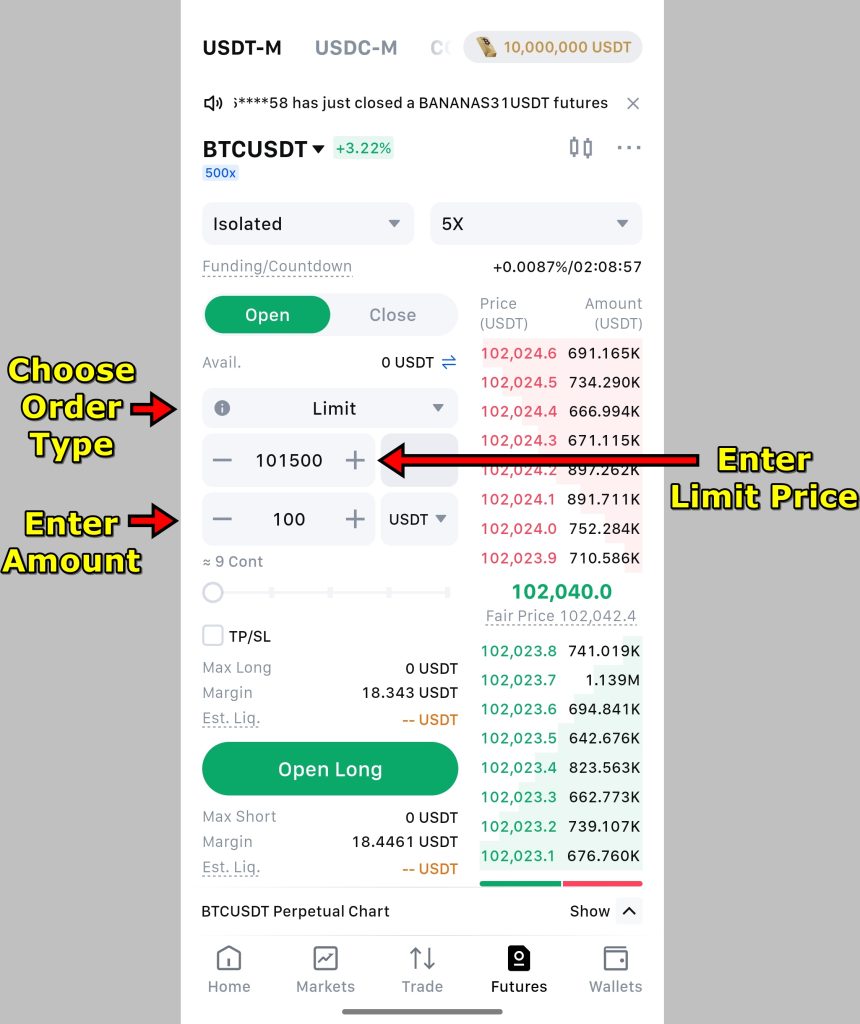
Before confirming, take a second to review all fields, pair, price, order type, and amount. A small mistake here can trigger an unwanted position.
7. Add Take Profit and Stop Loss
MEXC allows built-in TP and SL settings for each position. These help automate your exit and control risk.
- Check the TP/SL box in the order panel.
- Set your Take Profit level (the price where the position will close in profit).
- Set your Stop Loss level (the price that triggers a sell to minimize loss).
For example, if you go long at 101,500 USDT, you might set TP at 106,000 and SL at 99,500. These settings can be changed later from the Positions tab if needed.
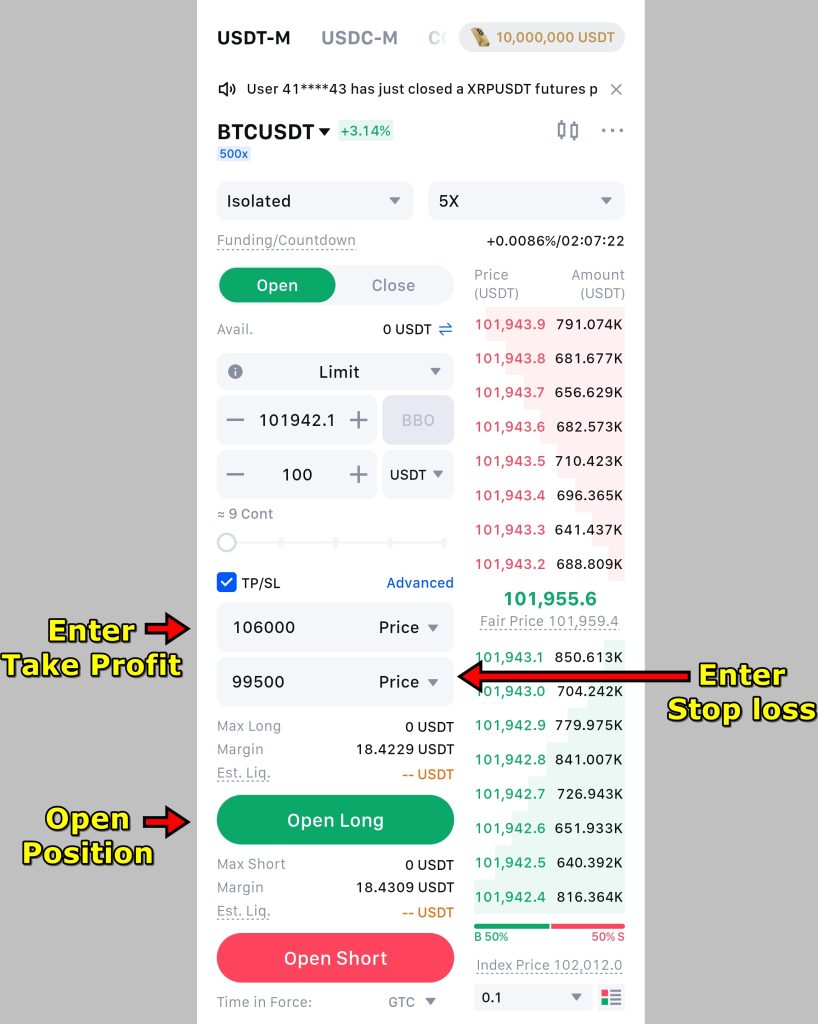
After double-checking your trade details, tap “Open Long” or “Open Short” depending on your strategy. The order will be placed. If it’s a Limit Order, it stays pending until the market price hits your entry level.
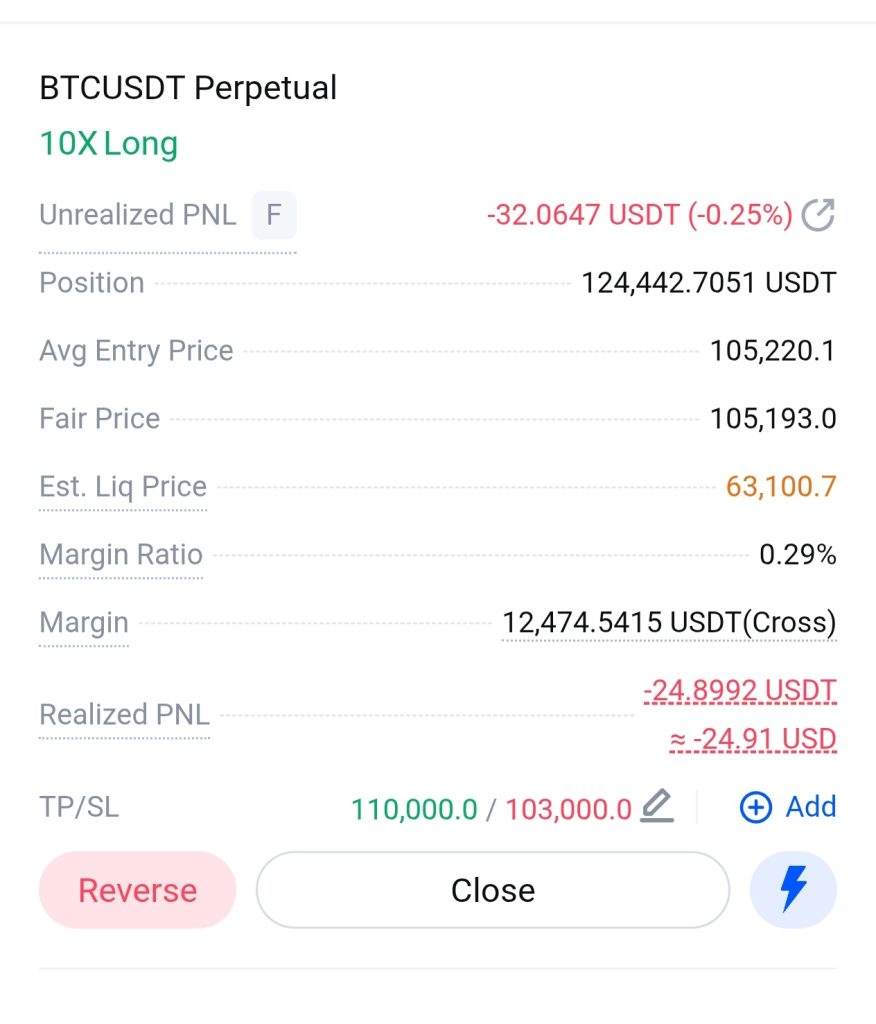
8. Monitor Your Position
Once the market hits your entry price, the position becomes active and moves to the Positions tab. Here, you can:
- Watch real-time profit and loss
- Modify or remove TP/SL levels
- Add or remove margin to adjust liquidation risk
- Close your position manually
To close, either tap Close and set your exit price, or choose Market Close for an immediate exit at the best available price. Keeping an eye on your active trades here ensures you stay in control, especially in fast-moving markets.
Start on MEXC with no KYC and unlock welcome rewards worth up to $30,000. Fast sign-up, easy trading, and instant access to bonuses.
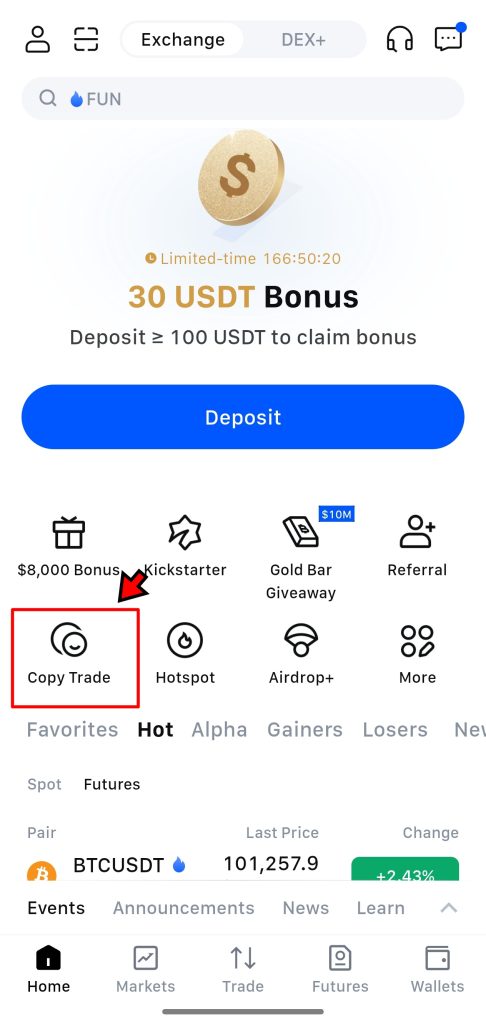
MEXC Copy Trading Tutorial
Copy trading on MEXC lets users follow and automatically mirror the trades of experienced futures traders. It’s a simplified way for beginners to get involved in futures markets without having to build or manage their own strategy. Here’s how to set it up through the MEXC app.
1. Go to the Copy Trading Section
Open the MEXC app and log in. From the home screen, tap on “Copy Trade.” This will take you to the copy trading dashboard where all available lead traders are listed.
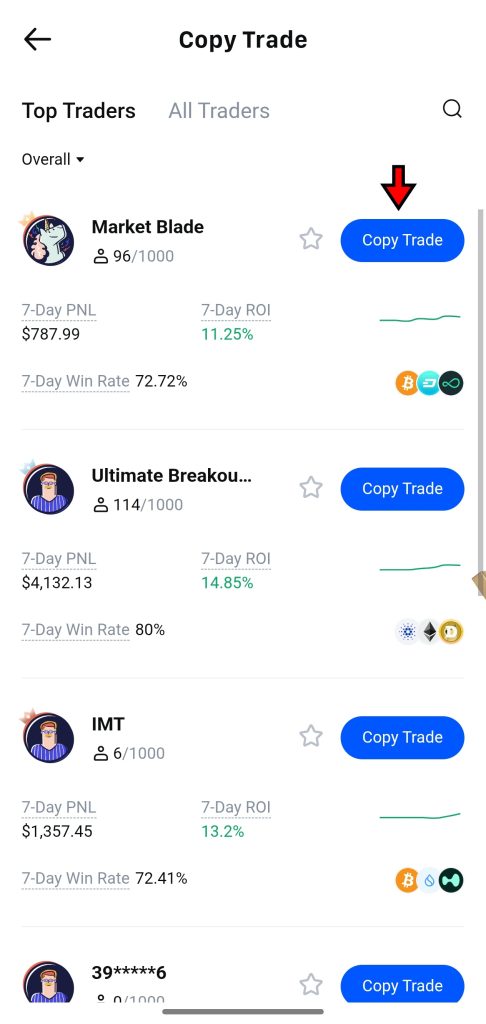
2. Choose a Lead Trader
You’ll see a list of traders, each showing key performance stats such as win rate, total profit, and follower count. Tap on any profile to see more detailed metrics including trade history, average return per trade, and how long they’ve been active.
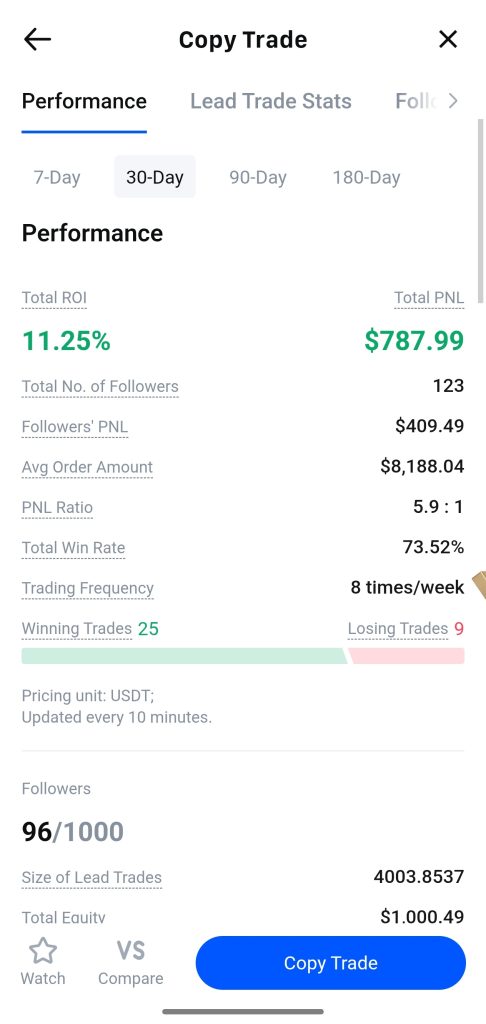
Browse through a few profiles. The stats are updated in real time, so take your time to compare. Once you’ve found a trader that fits your risk appetite, tap “Copy Trade” next to their name.
3. Configure Copy Trade Settings
Now it’s time to define how your trades will be mirrored. MEXC provides three options:
- Smart Ratio: Automatically adjusts your trade size based on the trader’s margin ratio.
- Fixed Amount: Uses the same margin amount for every trade regardless of trader's position size.
- Fixed Ratio: Multiplies your order size based on how much larger or smaller you want to go compared to the trader’s actual order.
After choosing a method, enter the Amount you want to allocate for copy trading. You’ll also set an Account Stop-Loss. This is a risk control setting. If your copy trading equity falls to the stop-loss value, the system will exit all active positions and return funds to your spot account.
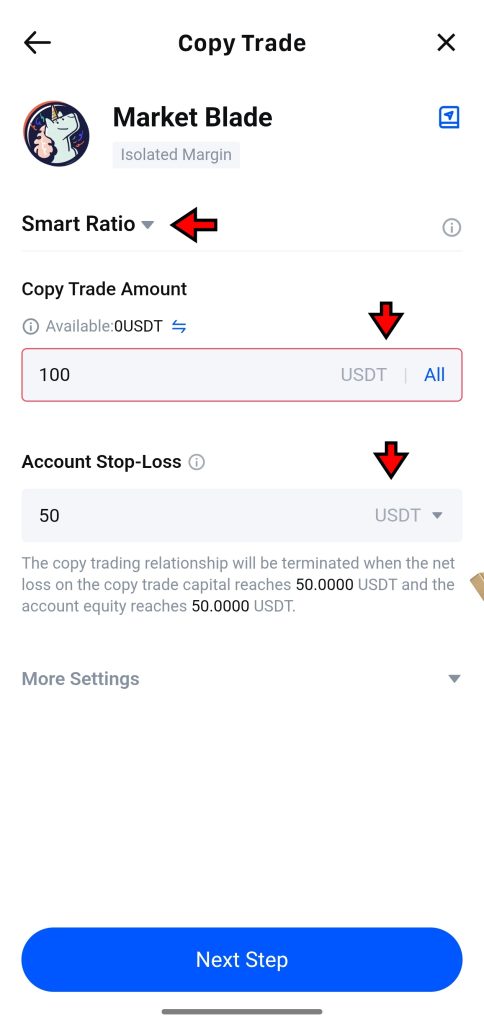
Once everything is filled in, tap “Next Step.”
4. Final Review and Activation
The final screen shows a summary of your copy trade settings. Double-check the trader you selected, the copy method, allocation, and stop-loss value. If everything looks correct, tap “Confirm.”
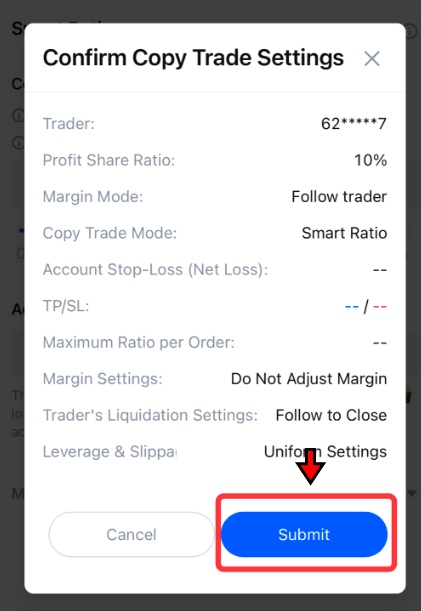
At this point, your account is now linked to the trader. Their future trades will be mirrored in your account automatically, using the rules you’ve just defined.
How to Withdraw Funds on MEXC App?
MEXC makes it simple to withdraw crypto to an external wallet or another exchange. The platform currently doesn’t support fiat withdrawals, but the crypto withdrawal process is clear and easy to follow. Below is a step-by-step guide to help you complete your withdrawal without errors.
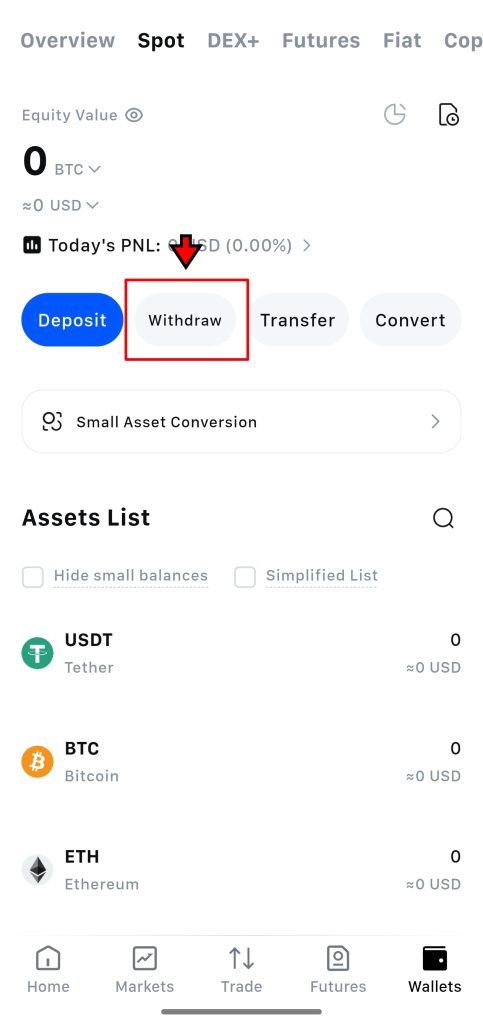
1. Open the Withdrawal Page
Open the MEXC app and log in. Tap “Wallets” in the bottom-right corner of the home screen. This takes you to the assets section, where you can see your balance and transaction history. Tap the “Withdraw” button on any of the available wallets with funds to move forward.
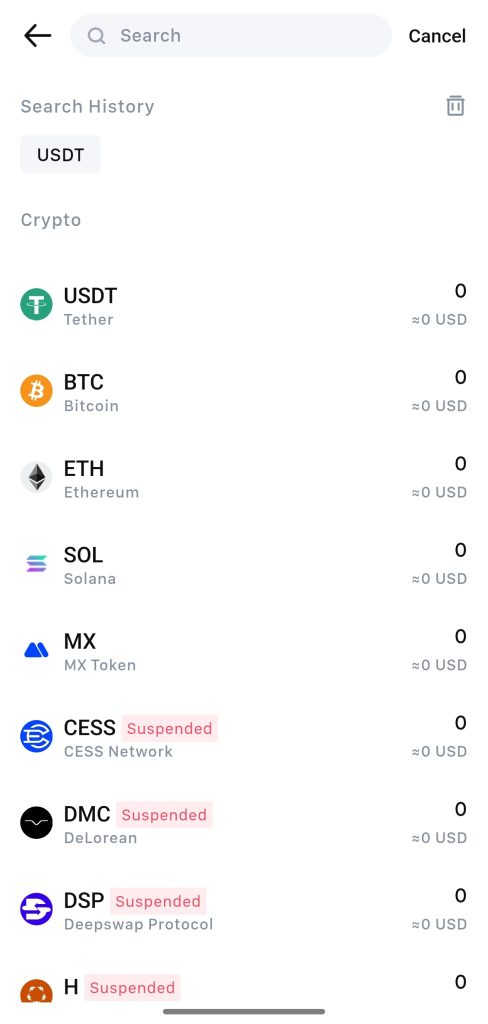
2. Select the Cryptocurrency
After tapping “Withdraw”, you’ll be prompted to choose which cryptocurrency to transfer. Scroll through the list or use the search bar to find your token. Most users commonly withdraw USDT, BTC, or ETH.
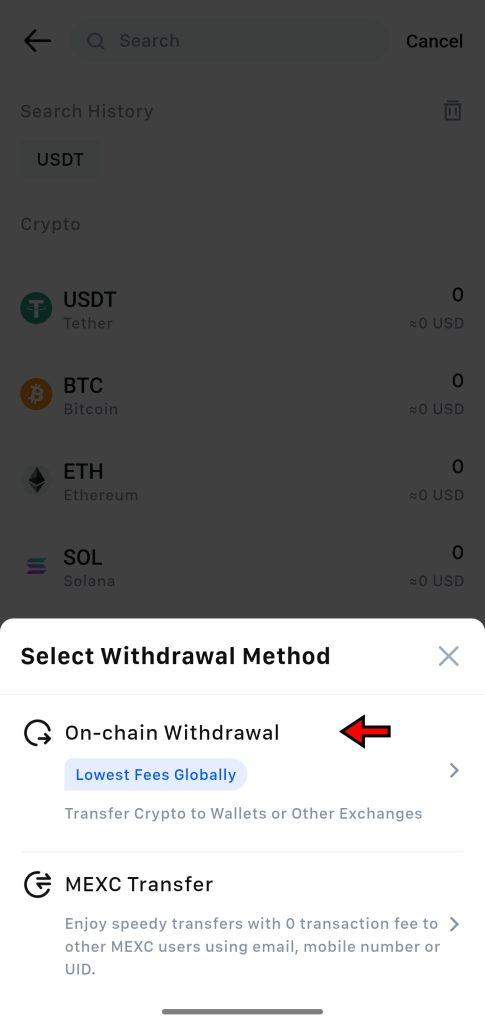
3. Choose Withdrawal Method
Once you select a token, a pop-up will ask how you want to proceed. You’ll see two options:
- On-chain Withdrawal: Sends crypto to an external wallet or another exchange.
- MEXC Transfer: Sends crypto instantly to another MEXC user using their UID or email.
For external transfers, choose “On-chain Withdrawal.” The app will take you to the crypto withdrawal interface.
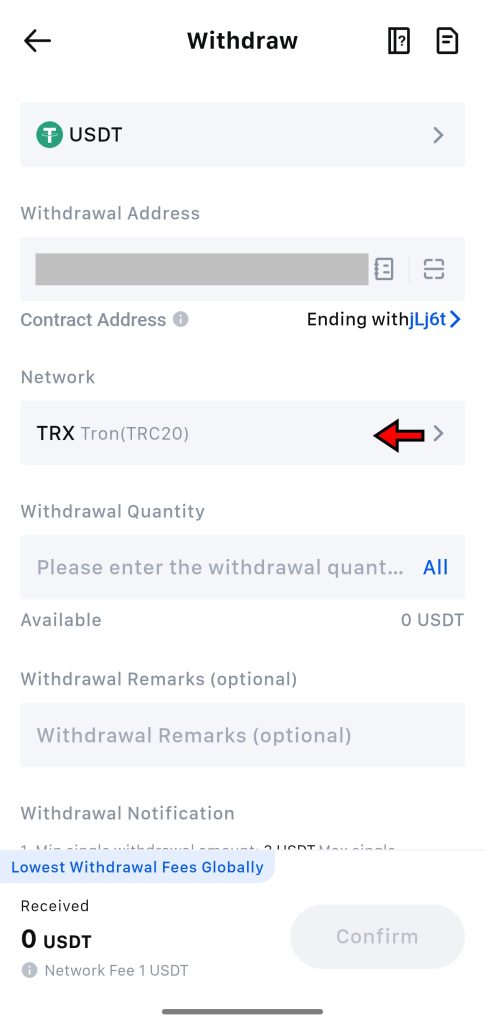
4. Enter Wallet Address and Select Network
Copy the receiving address from the wallet or exchange where you’re sending funds. Paste it into the Wallet Address field.
Below that, select the correct Network. This step is critical. The network you choose on MEXC must match the network supported by the receiving wallet. For example, if you're sending USDT to a wallet that only accepts TRC20, make sure to choose TRC20 here. A mismatch can result in permanent loss of funds.
5. Enter Withdrawal Amount and Confirm
Once the address and network are set, input the amount you want to withdraw. The app will display the transaction fee and the final amount you’ll receive.
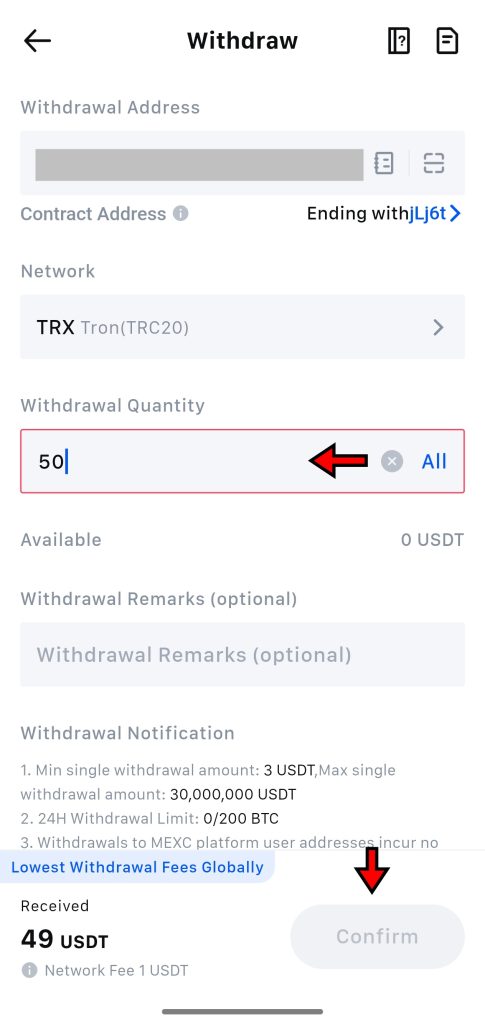
Tap “Confirm” to continue. Depending on your security settings, you may be prompted to complete two-factor authentication. Once verified, your transaction will be processed and sent to the blockchain. Most withdrawals are complete within minutes, depending on network traffic.
MEXC App Fees
MEXC keeps its fee structure simple and competitive, which works well for both casual users and active traders. Deposits are completely free across all supported cryptocurrencies, so moving funds into your MEXC account won’t cost anything.
Withdrawal fees vary depending on the asset and the network being used. These fees are based on current blockchain conditions, so they can change depending on network congestion. Always check the exact fee displayed before confirming a withdrawal.
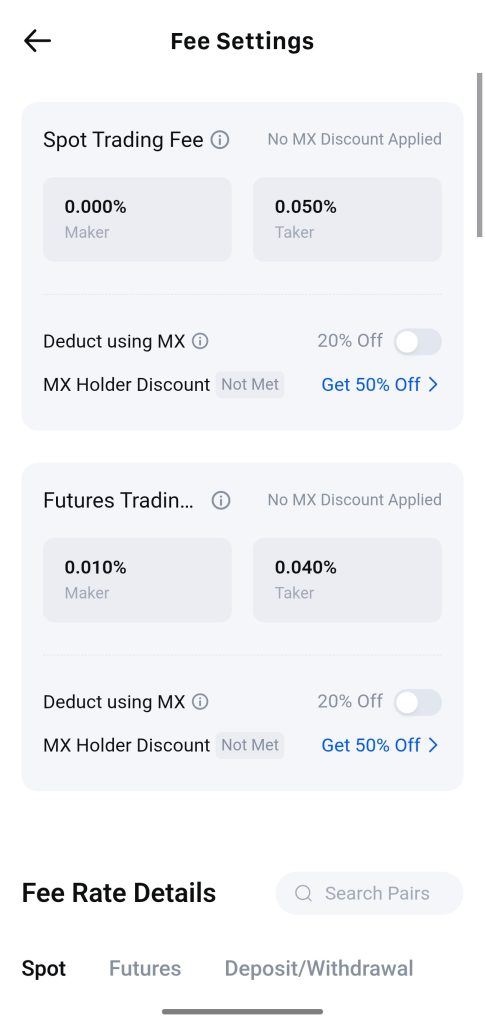
For spot trading, makers pay zero fees. If you place a limit order that adds liquidity to the order book, there is no charge. Takers, who match existing orders using market or limit orders, pay a 0.050 percent fee.
Futures trading follows a similar model. Makers pay 0.010 percent, and takers are charged a fee of 0.040 percent. These low rates are consistent across all supported futures pairs, making MEXC a cost-efficient choice for leveraged trading.
For the most up-to-date fee breakdown, users can check the full schedule in the app’s settings or visit this link.
Is MEXC App Secure?
MEXC takes user security seriously and applies multiple safeguards to protect accounts and funds. Two-factor authentication is required for actions like withdrawals and password changes. Users can choose between email verification or the Google Authenticatorapp to receive their security codes.
The majority of user funds are stored in cold wallets, which are kept offline and out of reach from potential online threats. Only a limited portion of assets remains online to handle real-time transactions and withdrawals. This reduces exposure in case of a cyberattack.
All data transfers, including login details and transaction information, are encrypted using SSL and AES-256 standards. This ensures that sensitive data cannot be intercepted or read during communication with the app.
MEXC also lets users enable an anti-phishing code, which appears in official emails from the platform. This small feature helps confirm that messages are genuine and not attempts to steal login credentials. Additionally, withdrawal address whitelisting can be activated so that funds can only be sent to trusted wallets set by the user.
The exchange runs regular internal security checks and encourages community participation through a bug bounty program. This approach helps identify and resolve potential vulnerabilities early. Overall, MEXC is a solid crypto app when it comes to security.
Trade on MEXC without KYC and unlock welcome rewards worth $30,000. Register now and start earning your bonuses from day one.
Final Takeaway
Using the MEXC app becomes a lot less intimidating once you understand how everything fits together. In this tutorial, we’ve gone through every major step, from signing up and completing KYC to depositing funds and placing trades in both the spot and futures markets. We also explored how copy trading works for users who prefer to follow experienced traders instead of building their own strategy.
The goal was to simplify the process and break it down in a way that makes sense, especially for someone opening the app for the first time. Each section was written to be practical, not theoretical, based on how the app actually functions during day-to-day use.
If you’ve followed along, you should now be able to set up your account, fund it, and place your first trade without running into guesswork. The features are there, the tools are in place, and now you know how to use them. Happy trading!
Frequently Asked Questions – FAQs
MEXC is a global crypto exchange offering spot, futures, copy trading, and support for thousands of assets.
Yes. MEXC uses 2FA, cold wallet storage, encryption, and withdrawal whitelisting to protect user accounts and funds.
Download the app, tap “Sign Up,” enter your email or phone number, set a password, and verify with the code sent to you.
Basic features are available without KYC, but verification is required to unlock full functionality and higher limits.
You can deposit crypto through on-chain transfer or buy assets using fiat via Quick Buy, SEPA, or P2P.
No. MEXC currently supports only crypto withdrawals to external wallets.
MEXC supports limit, market, stop-limit, trigger, post-only, TP/SL, and trailing stop orders.
Select a pair, choose an order type, set price and amount, then confirm the trade on the spot interface.
Move funds to the Futures Wallet, set margin mode and leverage, pick your contract, and place a long or short order.
It lets you mirror trades of professional traders automatically by selecting a lead trader and adjusting copy settings.
Spot and futures trading have low fees. Makers pay zero, takers pay 0.050% for spot and 0.020% for futures.
It typically takes up to 24 hours after submitting your documents and facial scan.
Yes. With clear sections and copy trading options, beginners can start trading without needing advanced strategies.
MEXC makes onboarding simple. Sign up without KYC, trade right away, and claim up to $30,000 in welcome rewards.
Disclaimer: All content on The Moon Show is for informational and educational purposes only. The opinions expressed do not constitute financial advice or recommendations to buy, sell, or trade cryptocurrencies. Trading involves significant risk and may result in substantial losses. Always seek independent financial advice before making investment decisions. The Moon Show is not responsible for any financial losses or decisions made based on the information provided.
Please view the full disclaimer at: https://themoonshow.com/disclaimer

Binance App Tutorial – Everything You Need to Know
Cryptocurrency exchanges are platforms for trading digital currencies, such as Bitcoin (BTC), E...

Bitget App Tutorial – How to Trade Crypto on Bitget App?
Bitget is a multi-functional crypto trading app that combines spot, futures, and margin trading...

Bitunix App Tutorial – Learn How to Trade Cryptocurrencies
Bitunix is a renowned cryptocurrency exchange that offers crypto trading services to crypto ent...