MEXC Exchange Tutorial 2026: A Complete Step-by-Step Guide
MEXC lists over 3,000 tokens, charges zero maker fees on both spot and futures, and offers leverage up to 200x. That is a lot of firepower, and the interface does not hold your hand through all of it.
This is a step-by-step guide for navigating the MEXC exchange from scratch. It covers account creation, identity verification, depositing funds, and placing your first spot and futures trades, with screenshot references throughout so you can follow along on the actual platform.
We also have a comprehensive review of the MEXC exchange covering fees, security, and how it compares against other platforms, which you can read here.
How to Create Your MEXC Account
Registration on MEXC takes about two minutes. You can sign up with an email, phone number, or through Google, Apple ID, MetaMask, or Telegram.
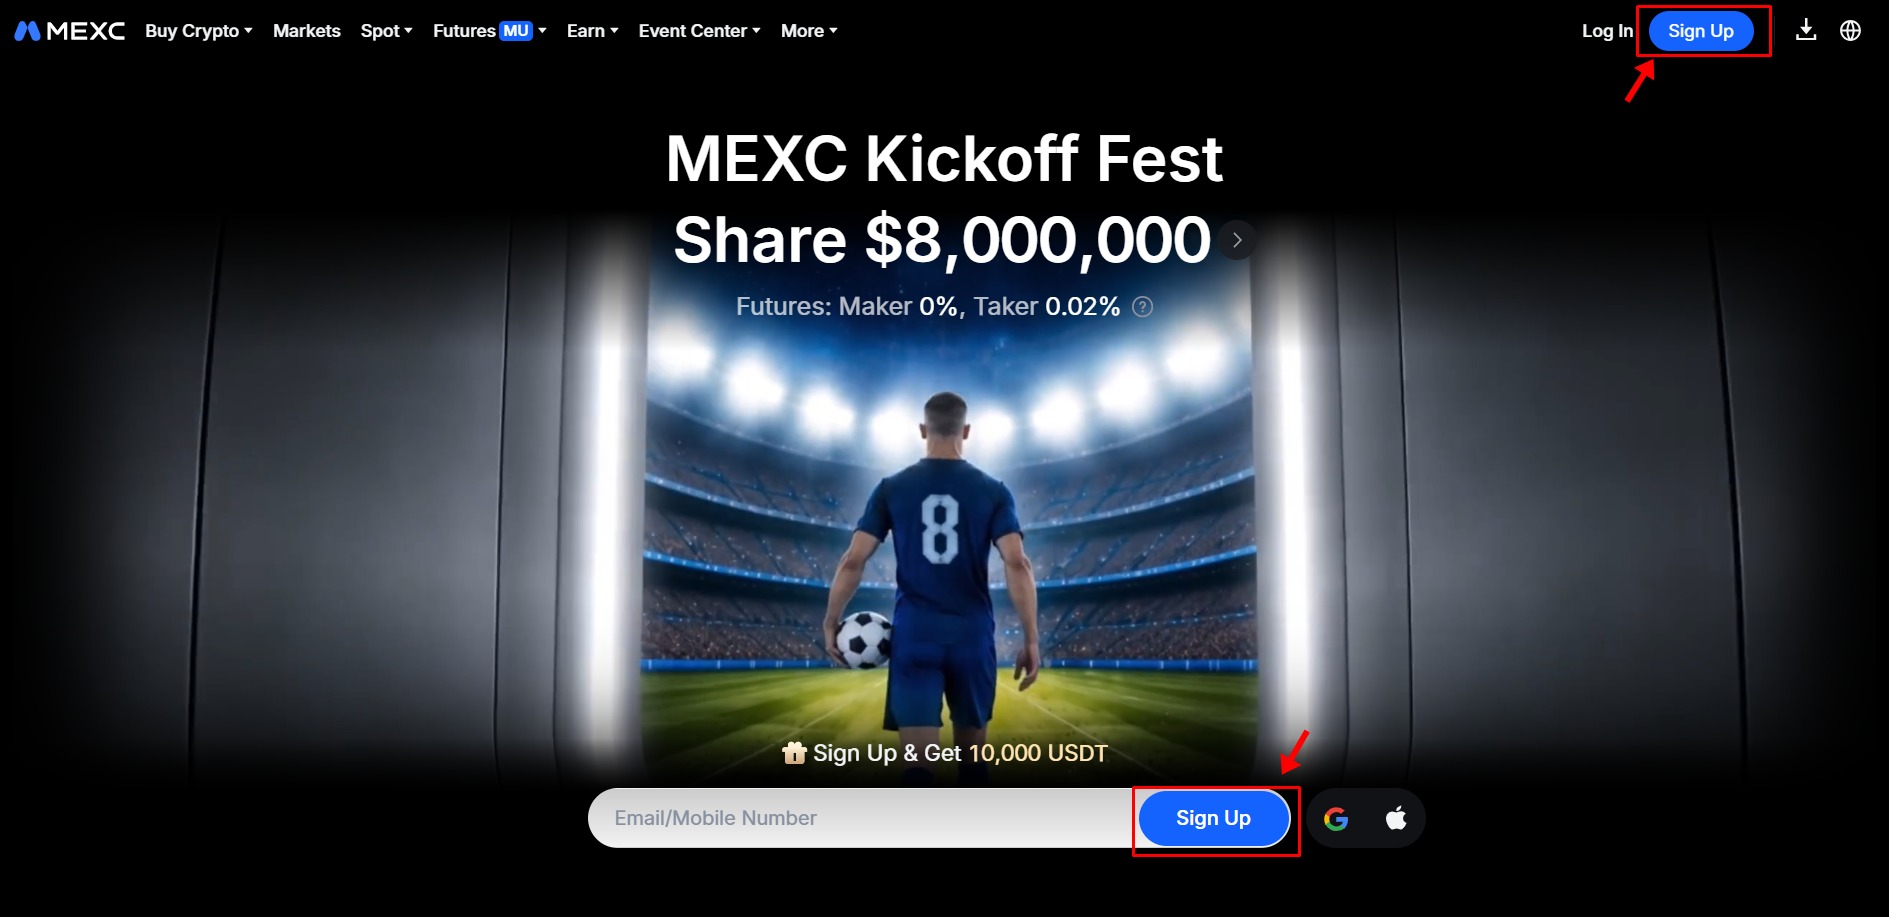
1. Go to mexc.com and click the “Sign Up” button in the top left corner of the homepage.
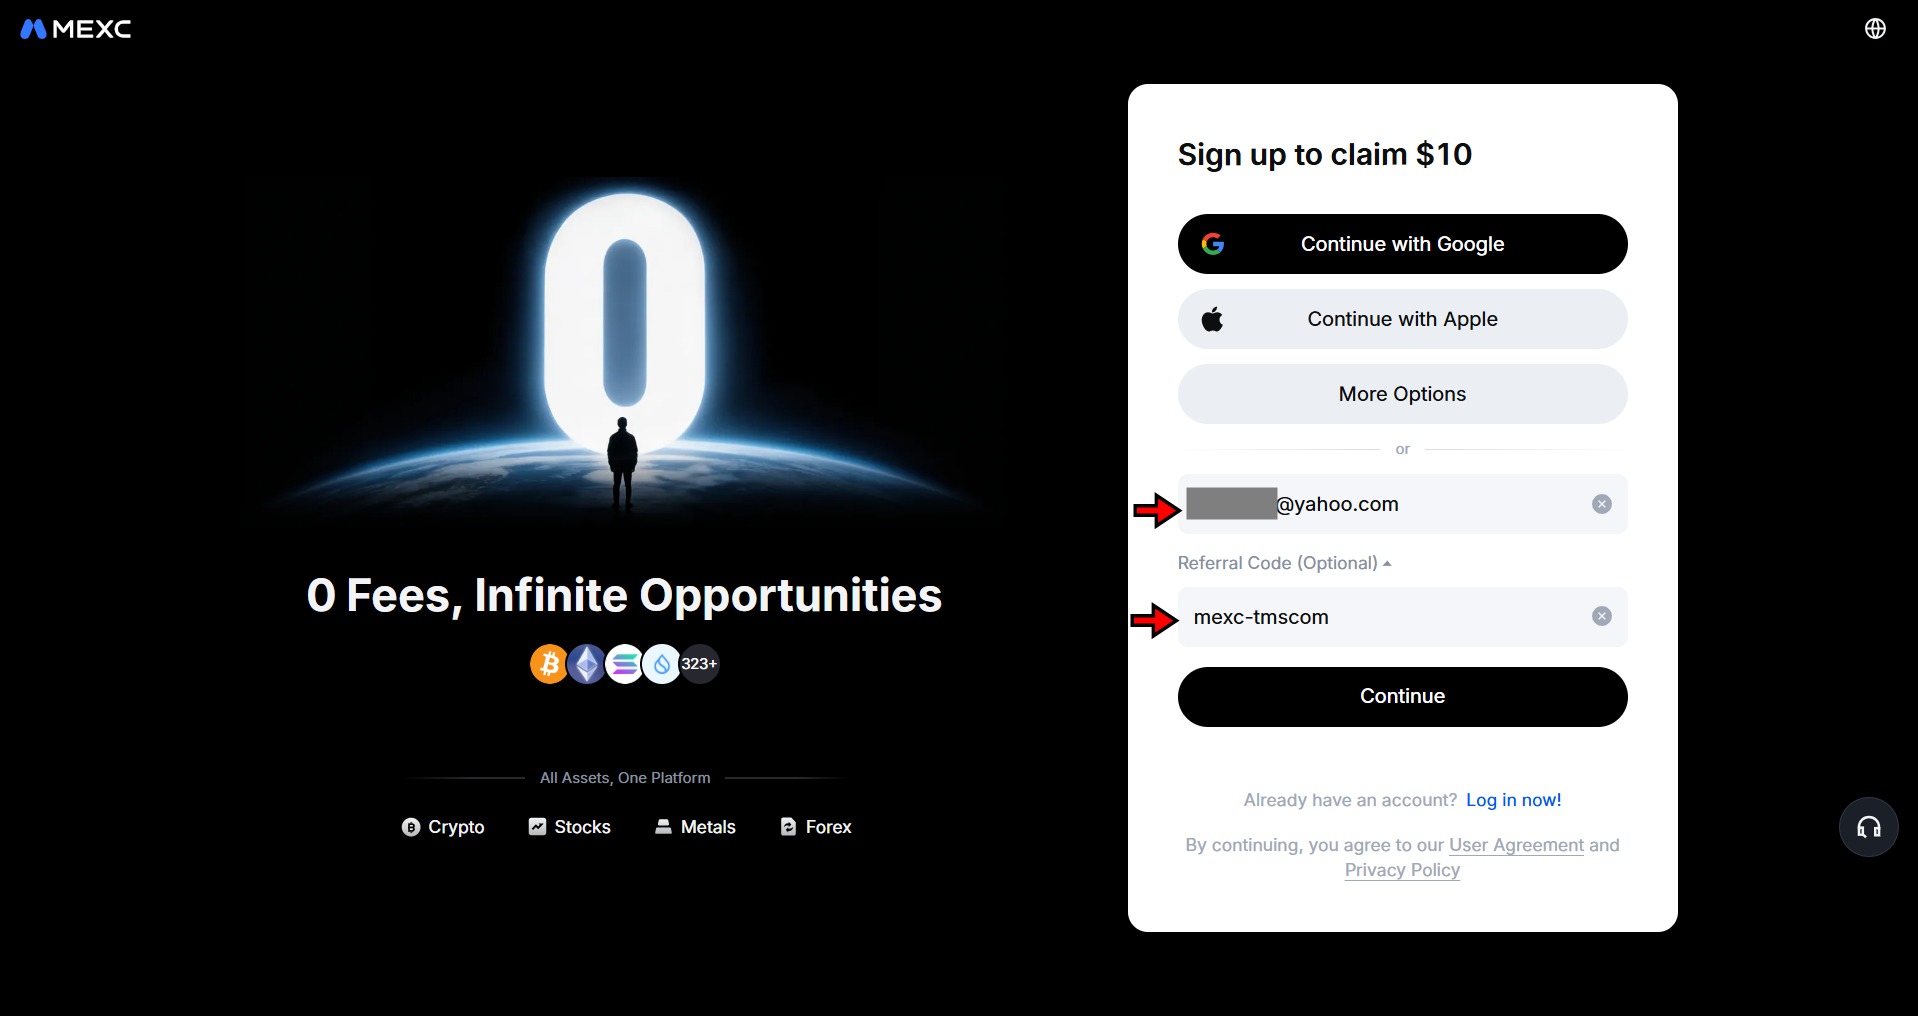
2. Enter your email address and click “Continue”. If someone gave you a referral code, enter it in the optional field below. You can also use our referral code “mexc-tmscom” to start with a bonus.
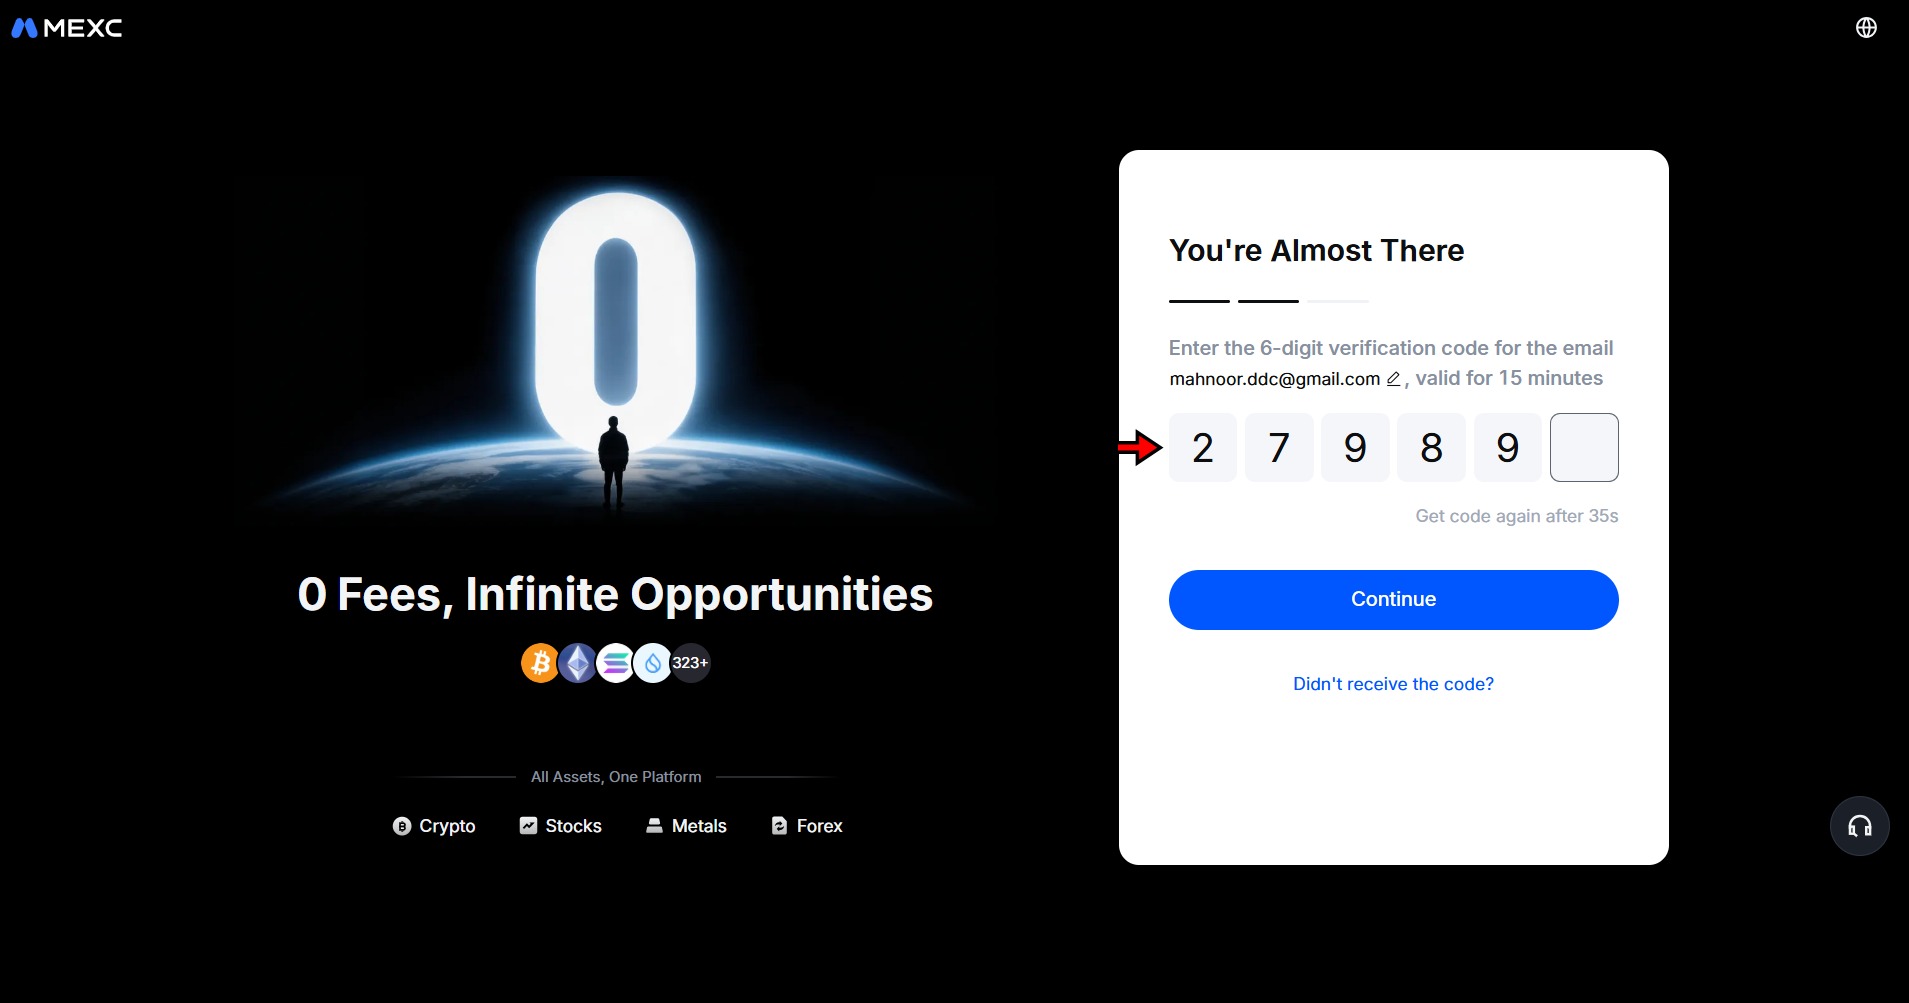
3. MEXC will send you a 6-digit verification code to your email. Open your inbox, copy the code, paste it on the verification page, and click “Continue”.
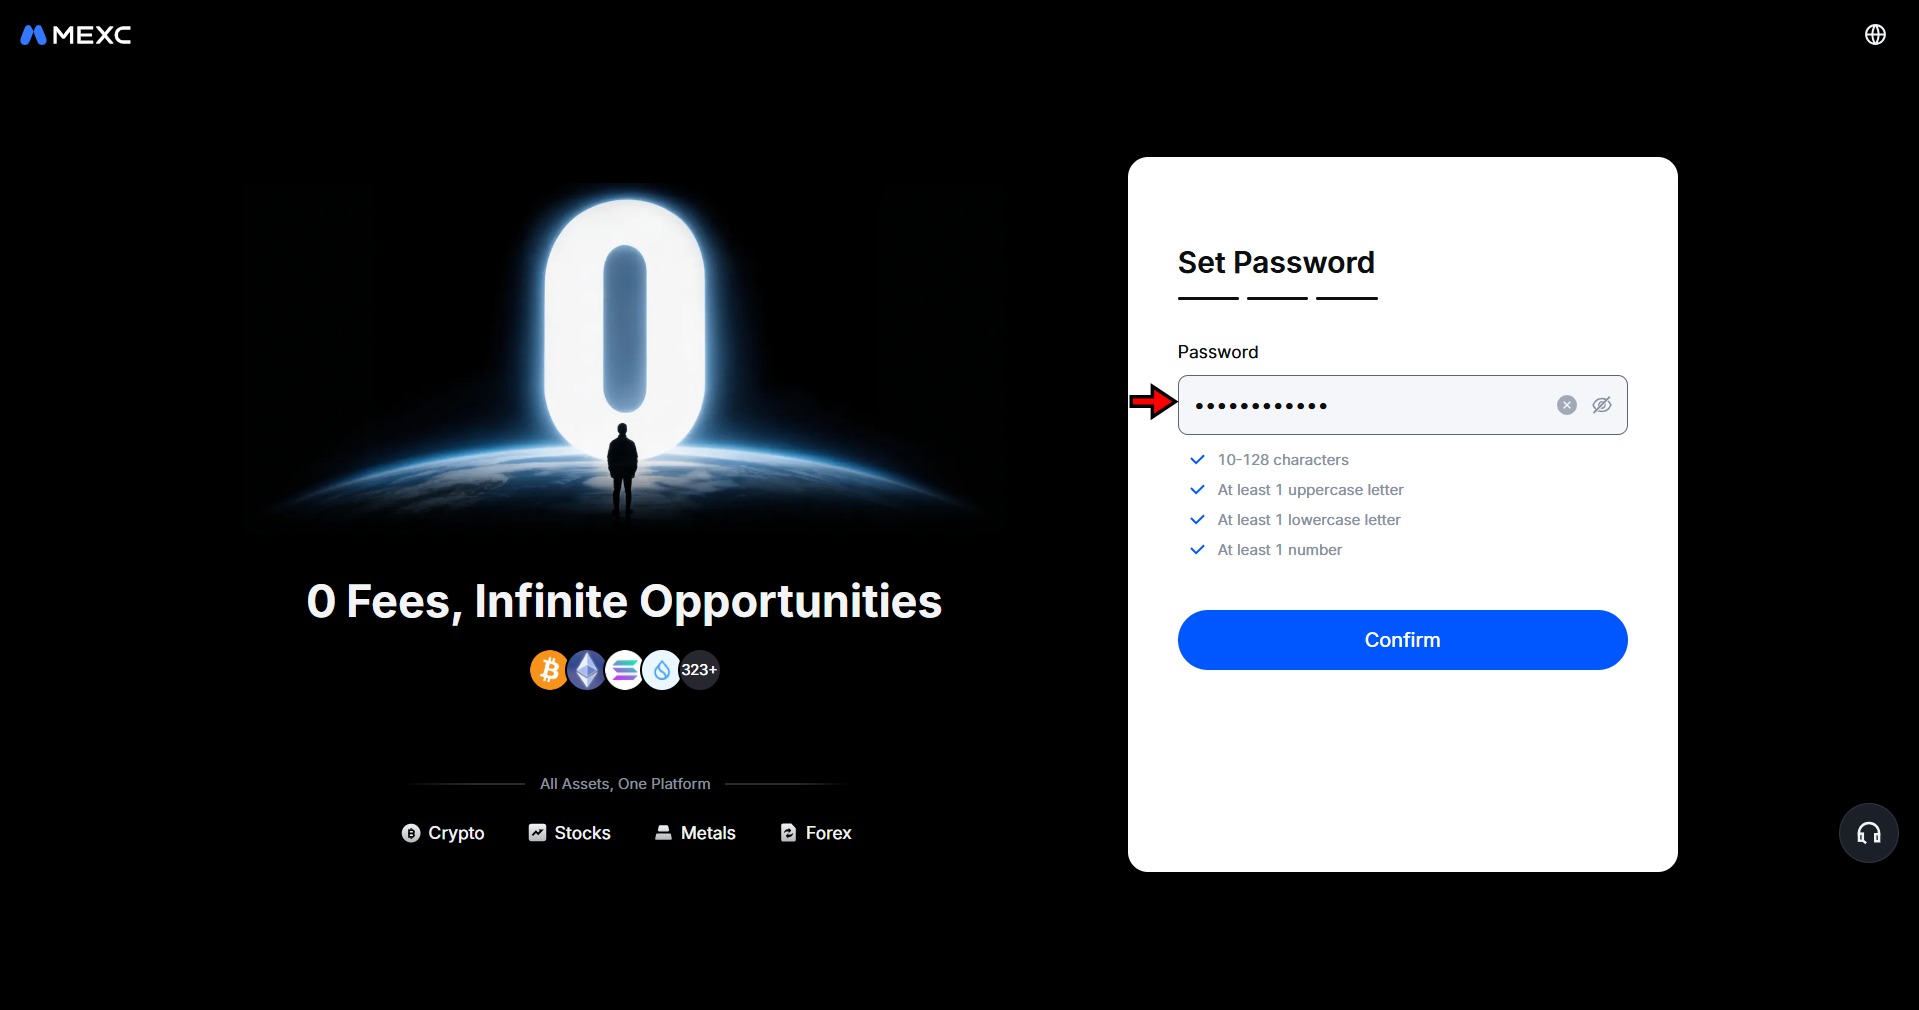
4. In the next step you will be required to create a password. The password needs at least 10 characters with a mix of uppercase, lowercase, numbers, and special characters. Click “Confirm” and your account will be created.
Your account is live. You can browse the platform and get familiar with the layout, but you will need to complete identity verification before you can withdraw anything.
Your account is live. You can browse the platform and get familiar with the layout, but you will need to complete identity verification before you can withdraw anything.
How to Complete KYC on MEXC
KYC (Know Your Customer) unlocks withdrawals and fiat deposits. MEXC offers two levels, and Primary is enough to get started.
Primary KYC (80 BTC Daily Withdrawal Limit)
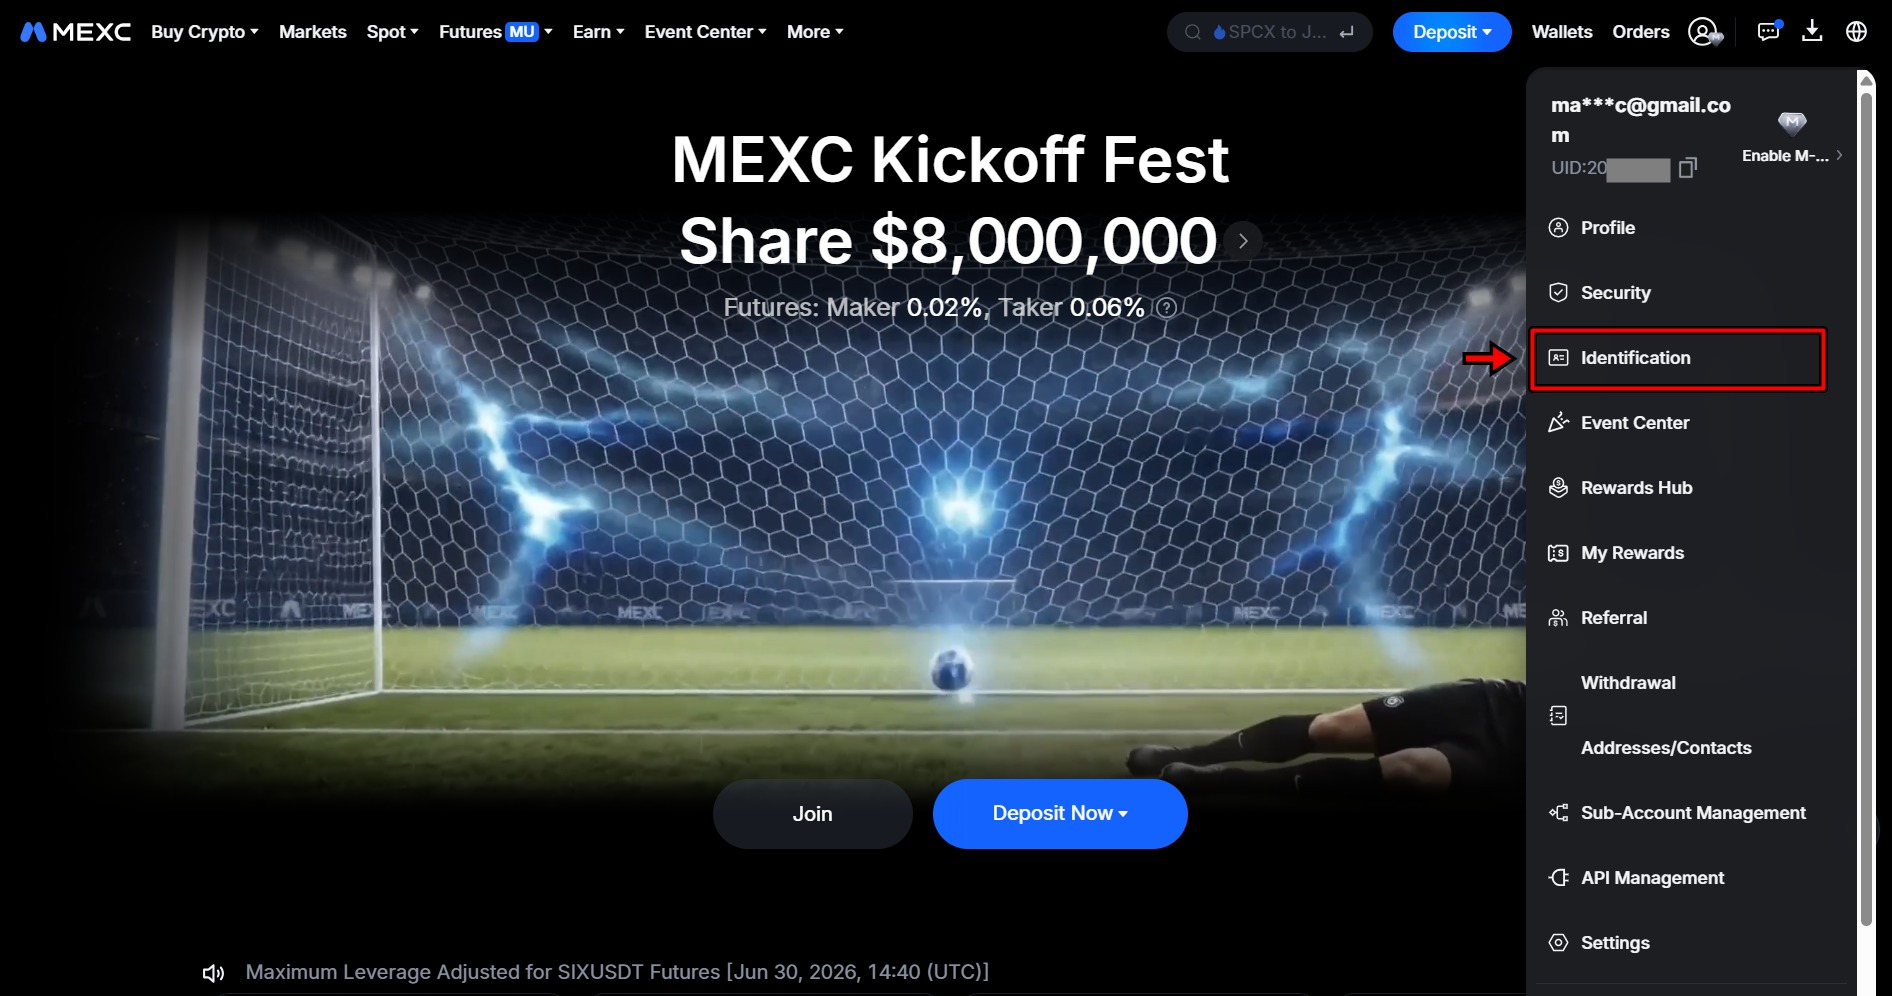
1. Click the user icon in the top right corner and select Identification from the dropdown.
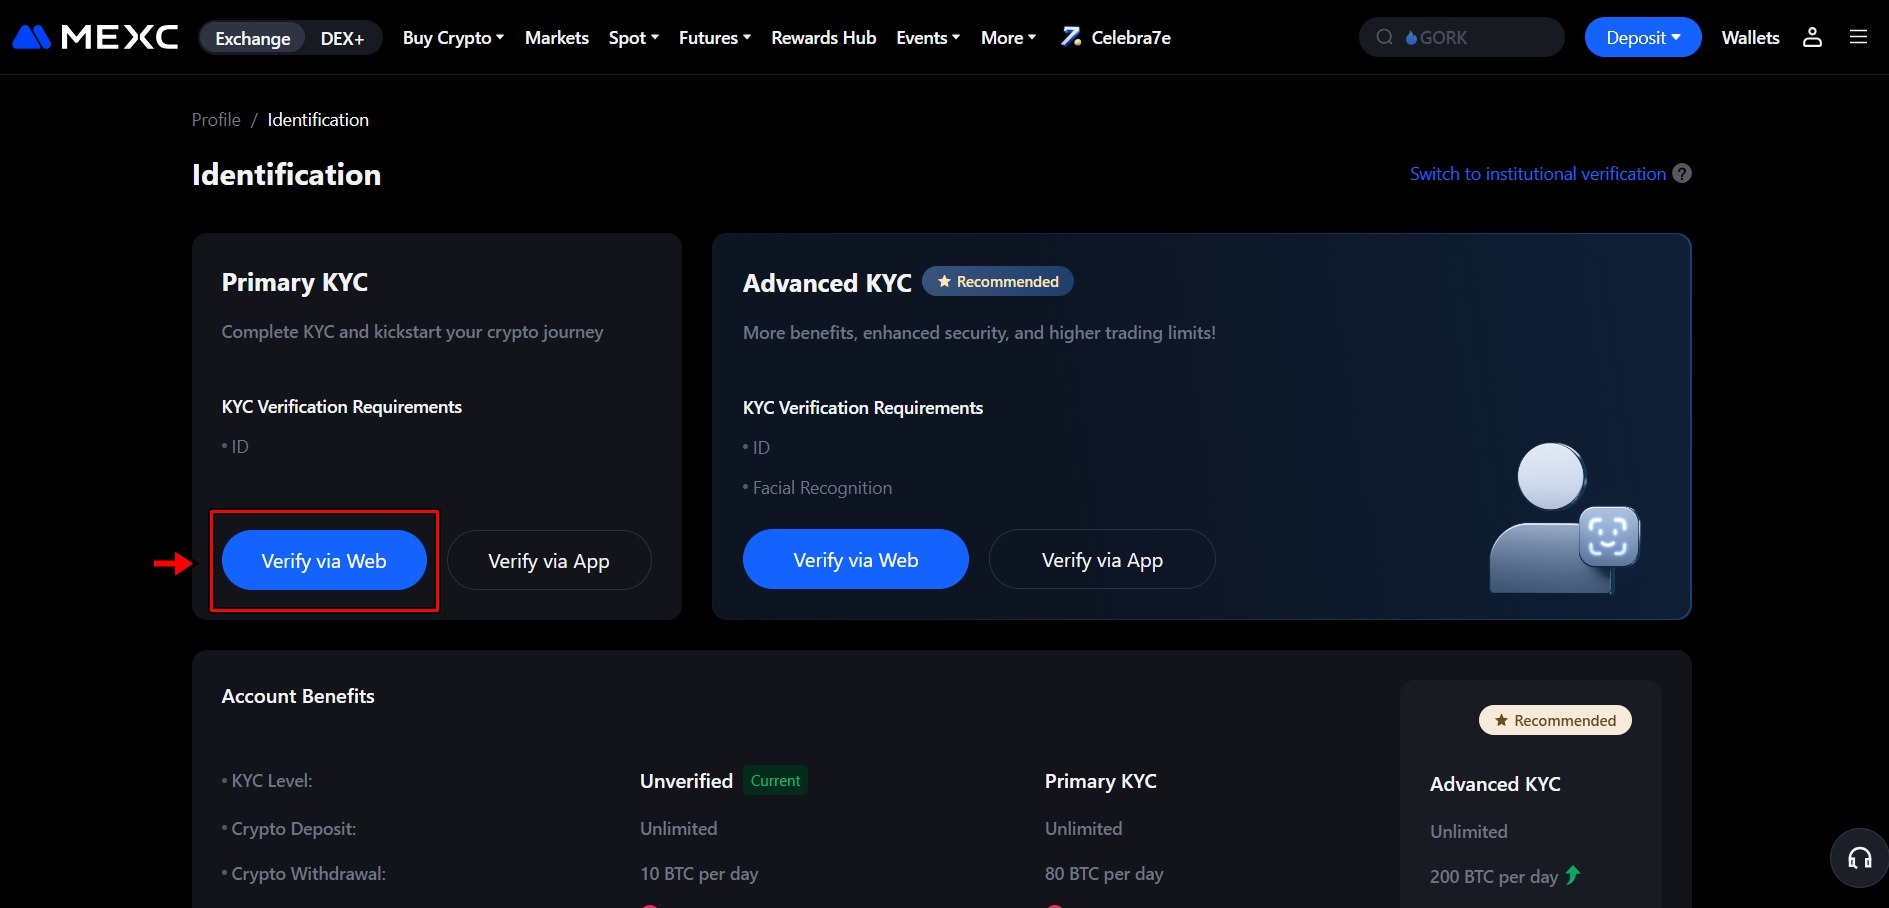
2.Click Verify via Web next to the Primary KYC section.
3. Select your country and choose the ID type you are submitting (passport, national ID, or driver's license).
4. Upload clear photos of the front and back of your ID. All four corners need to be visible and the text needs to be legible. Blurry photos get rejected.
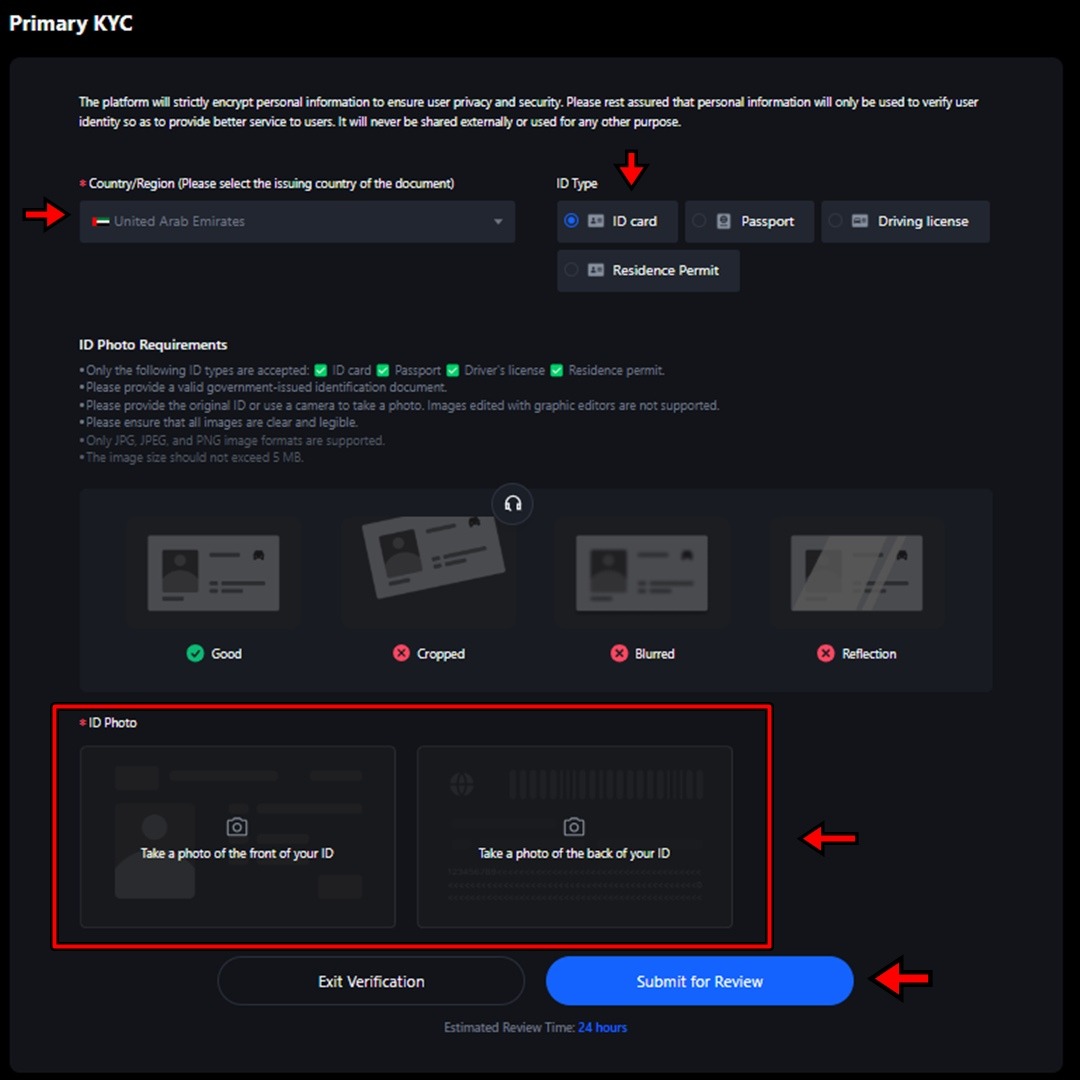
5. Click Submit for Review. Verification typically completes within 24 hours.
Advanced KYC (200 BTC Daily Withdrawal Limit)
Advanced KYC adds facial recognition and unlocks fiat withdrawals.
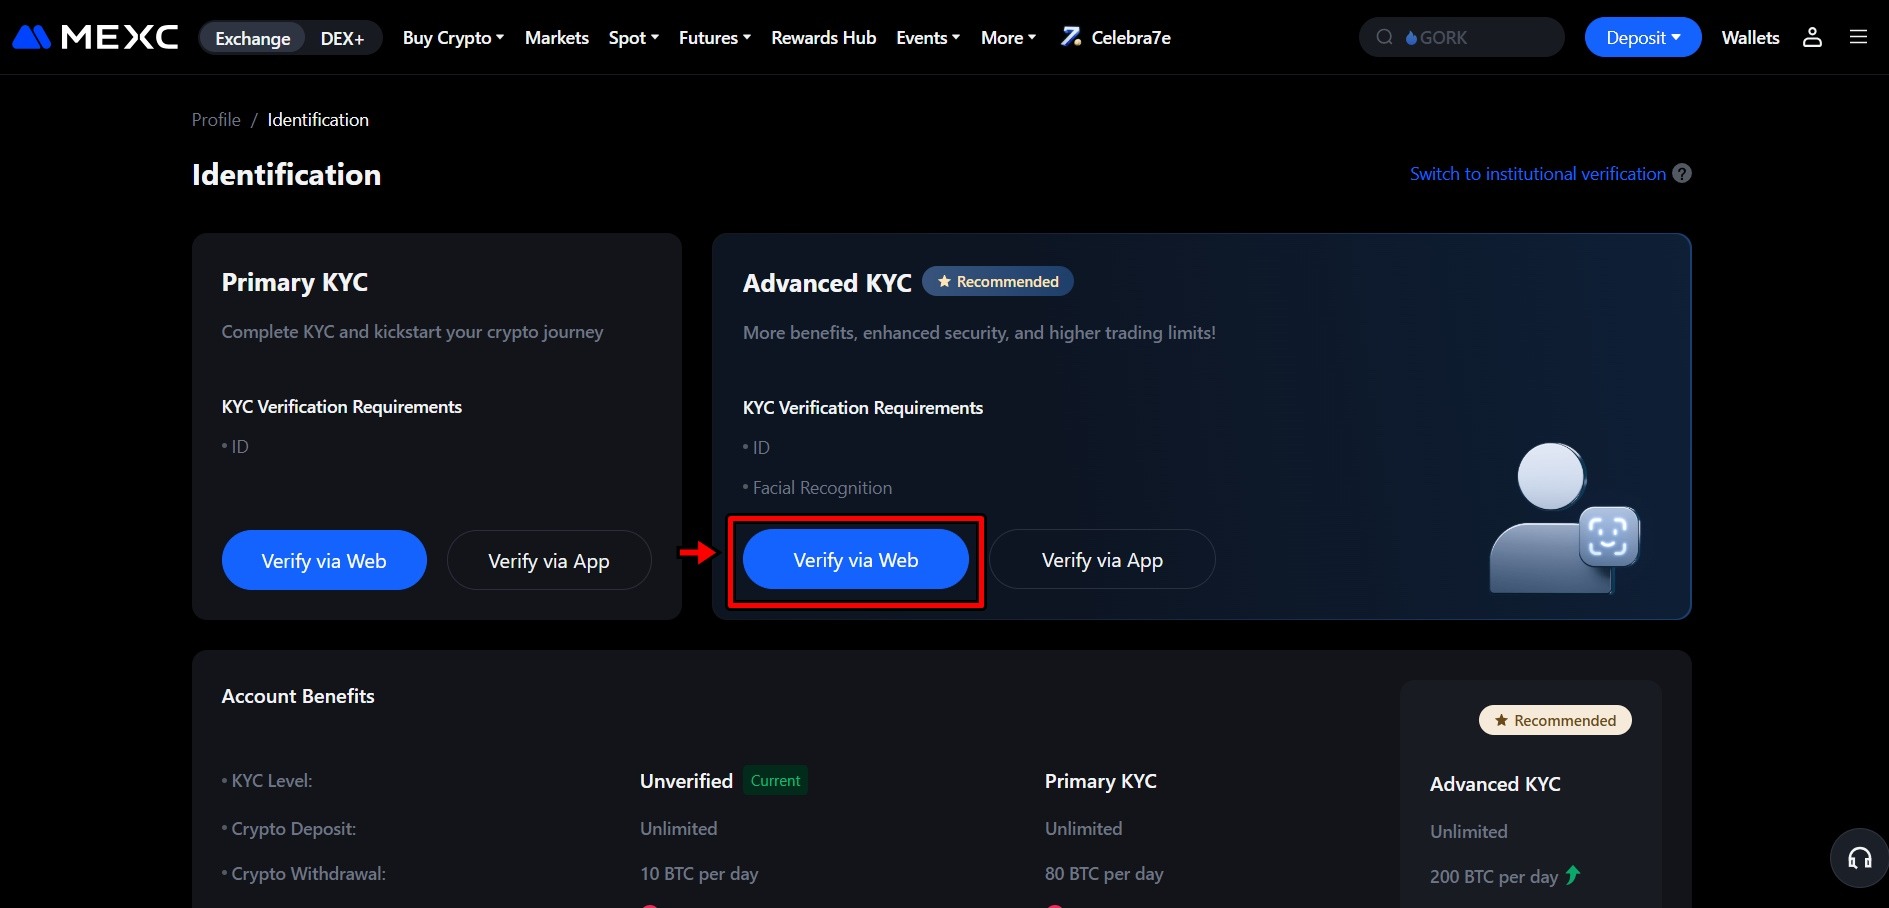
1. Go back to the Identification page and click Verify via Web under the Advanced KYC section.
2. Follow the on-screen prompts for the facial scan. Move to a well-lit area and remove glasses or anything covering your face. Natural light near a window works better than overhead room lights.
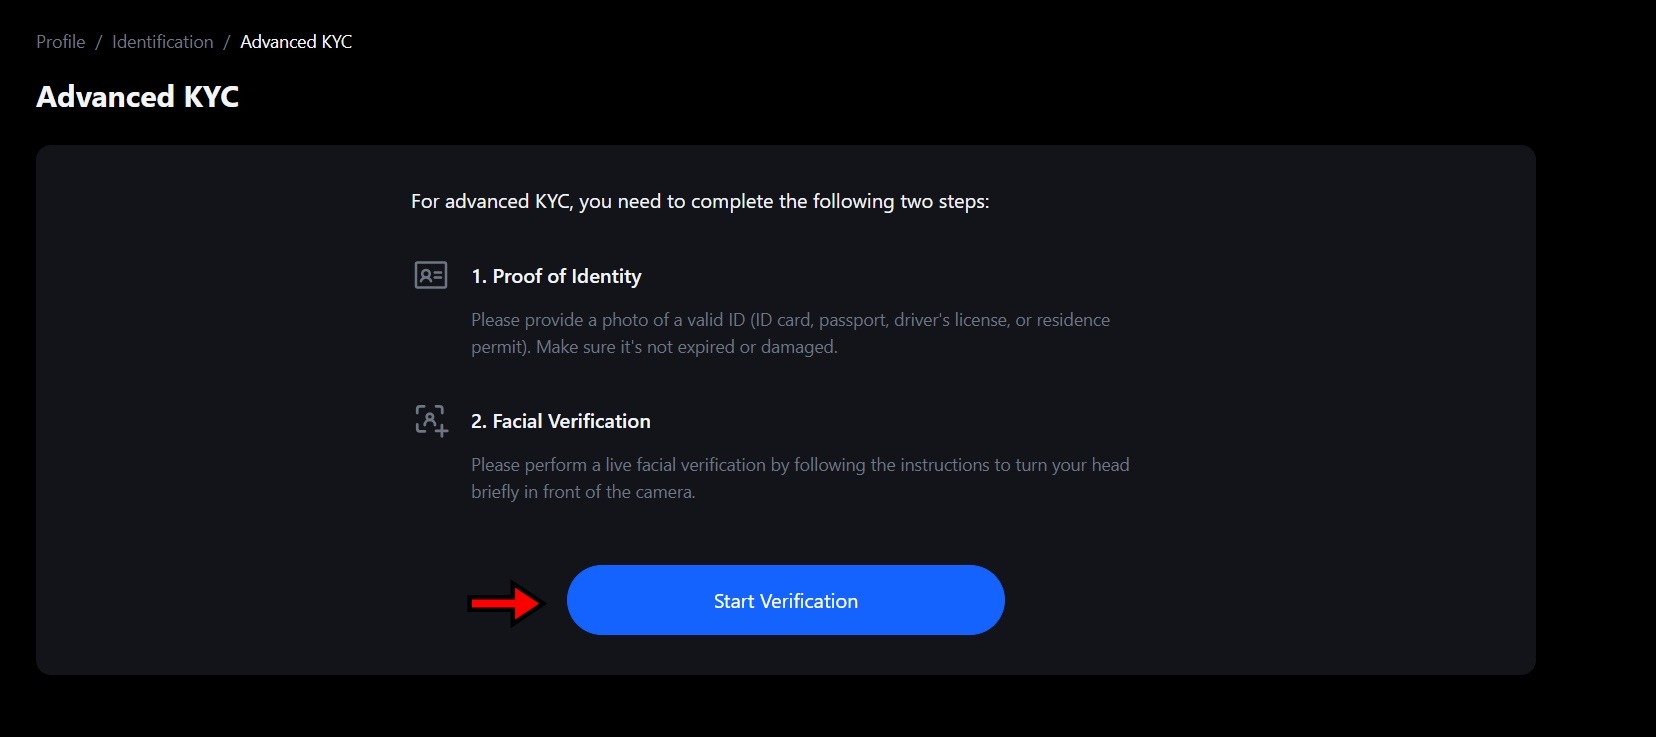
3. Enter your residential address when prompted and submit. This also processes within 24 hours.
How to Deposit Funds on MEXC
You need funds in your account before you can trade. MEXC supports both fiat and crypto deposits. If you already hold crypto in another wallet, a crypto deposit is the fastest route.
Fiat Deposit
1. From the top navigation bar, click Buy Crypto and select FIAT Deposit from the dropdown.
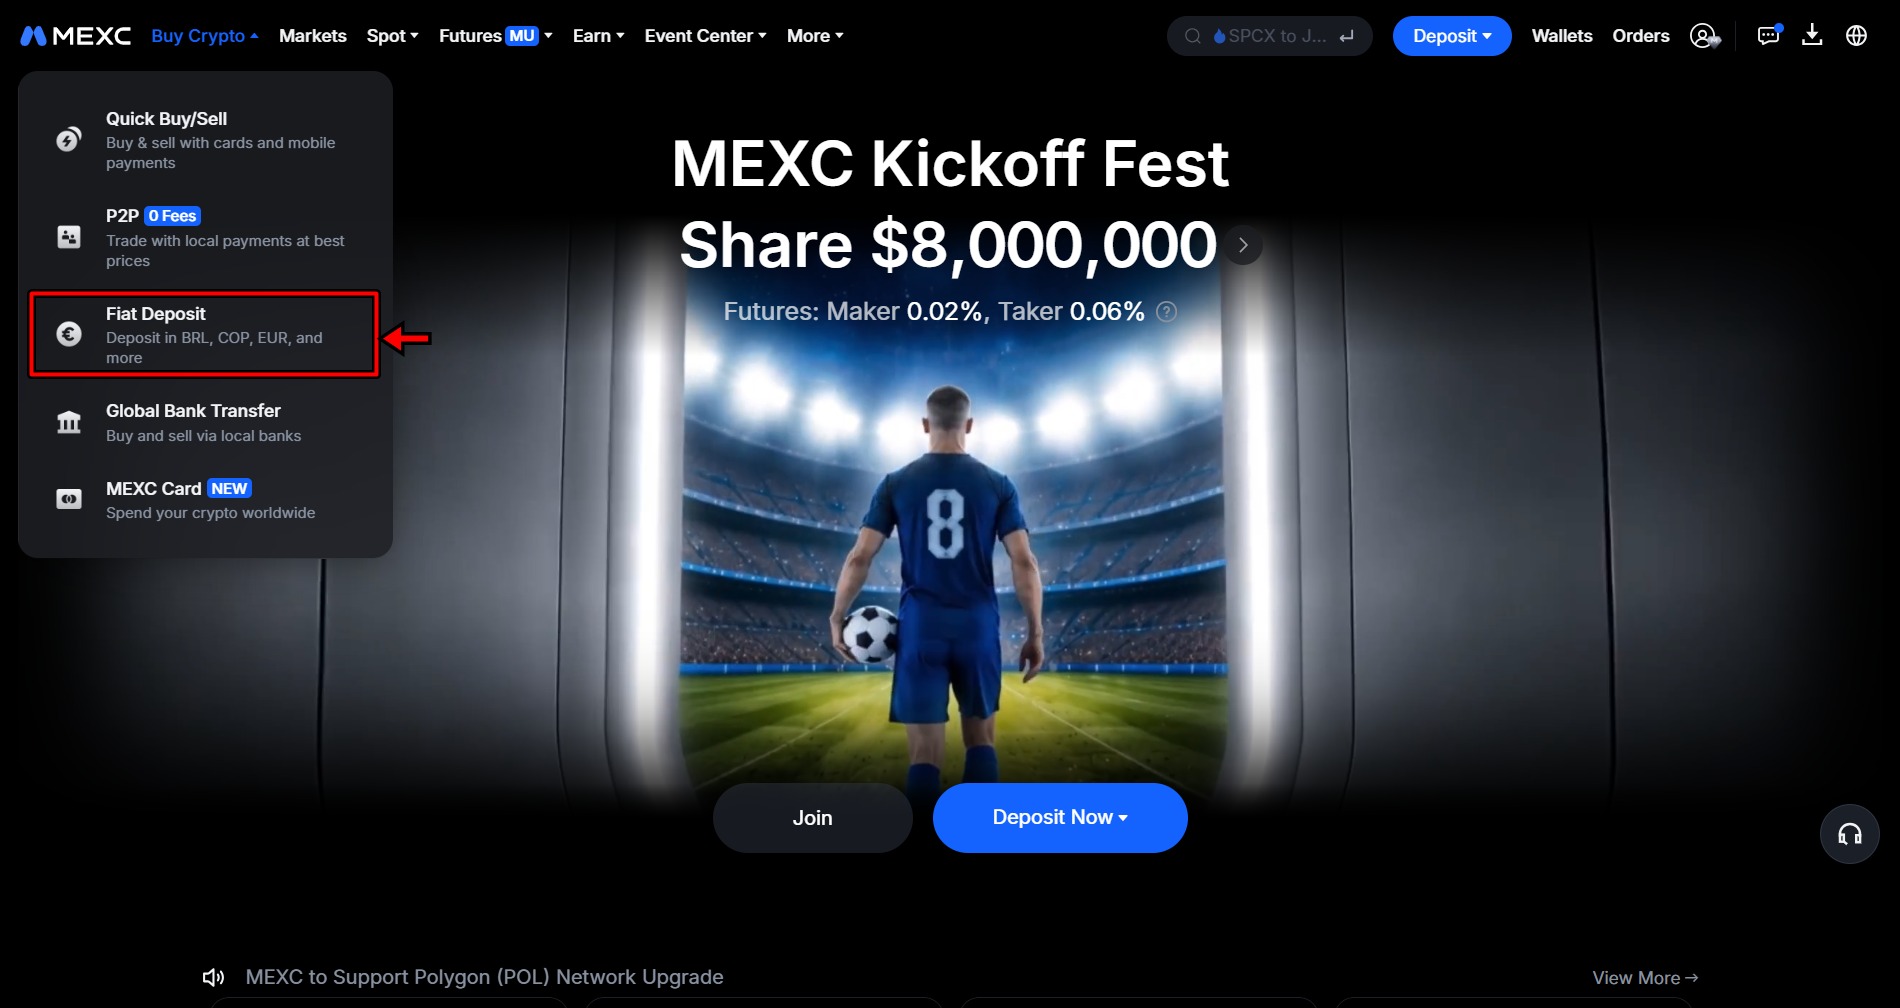
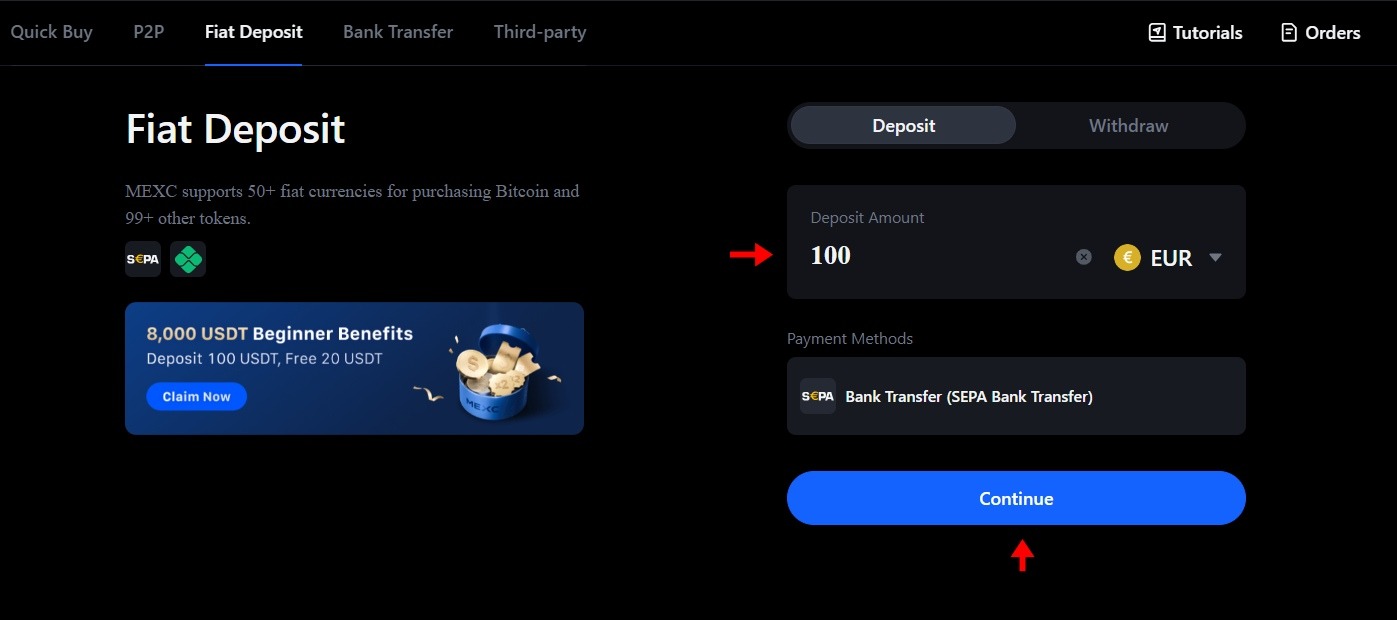
2. Choose your currency (for example, EUR), enter the amount you want to deposit, and click Continue.
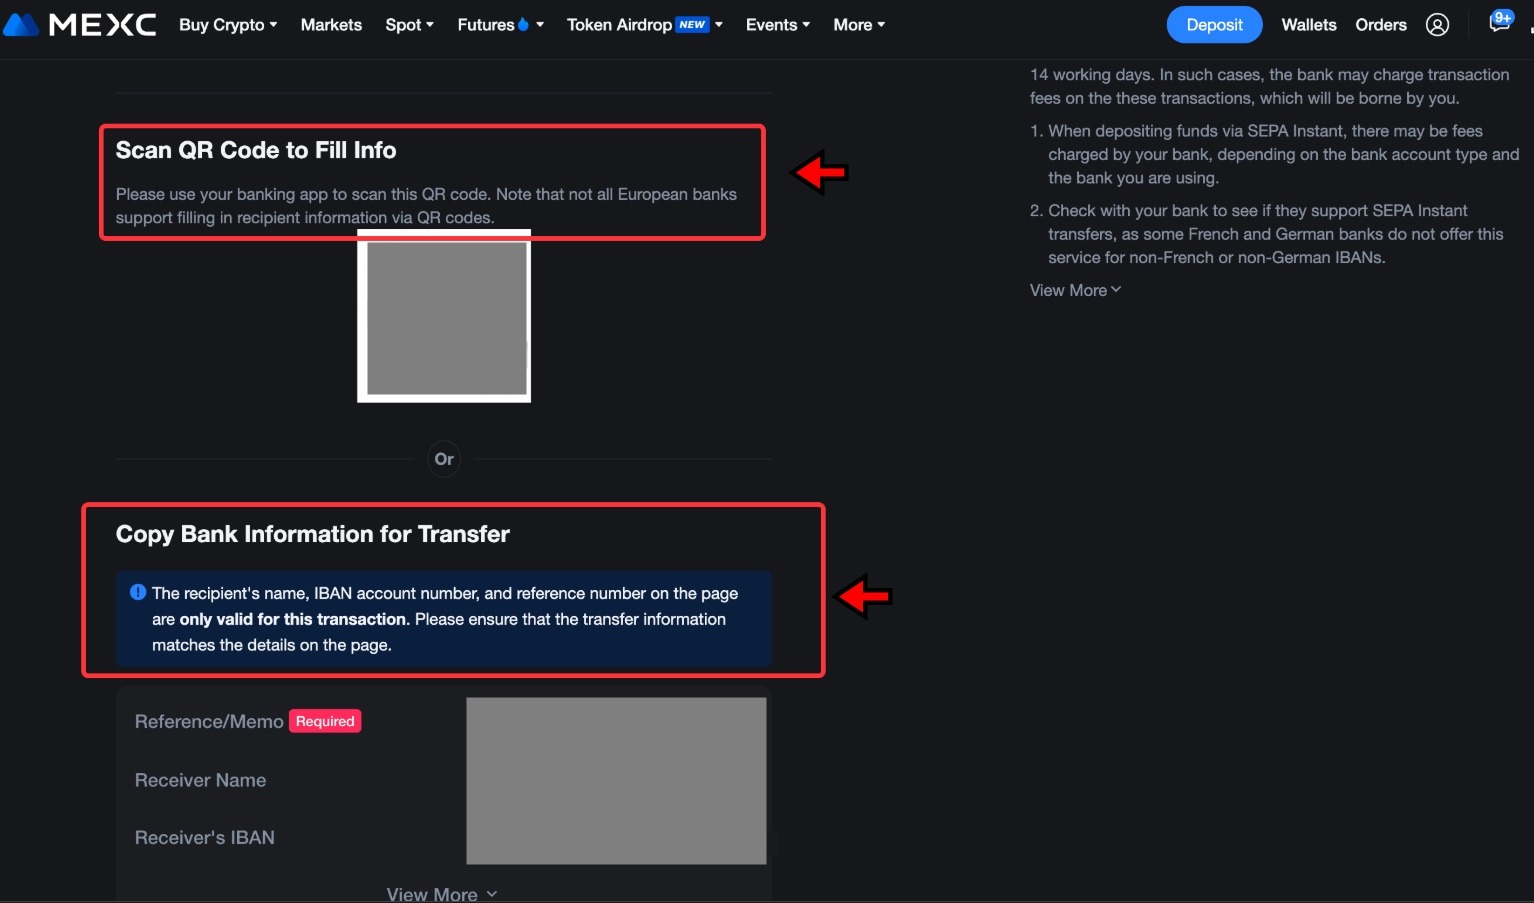
3. MEXC generates bank details for your transfer. If this is your first fiat deposit, the platform creates an IBAN account under your name through a third-party provider. This is normal and only happens once. You might also be prompt to provide more info to finish this step.
This is normal and only happens once. You might also be prompt to provide more info to finish this step.
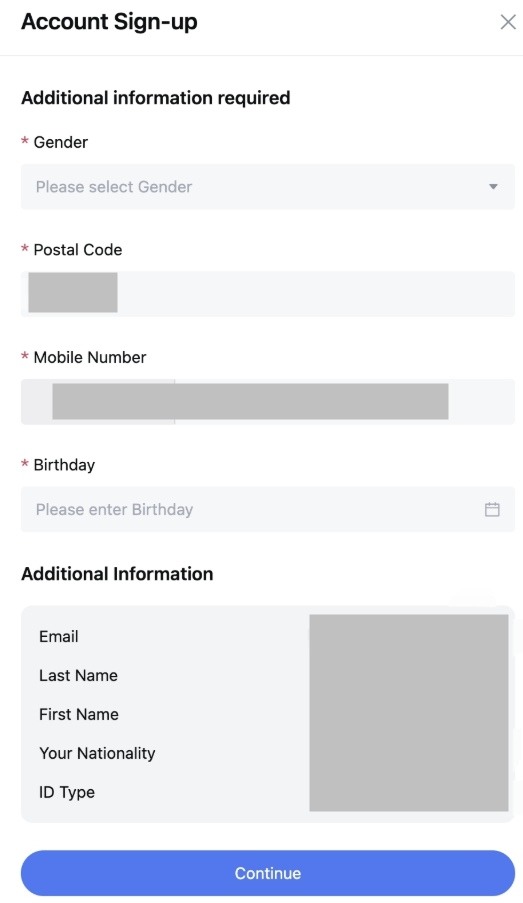
Transfer the funds from your bank using the details shown. The bank account must be in the same name as your MEXC account. Transfers from a different name get rejected.
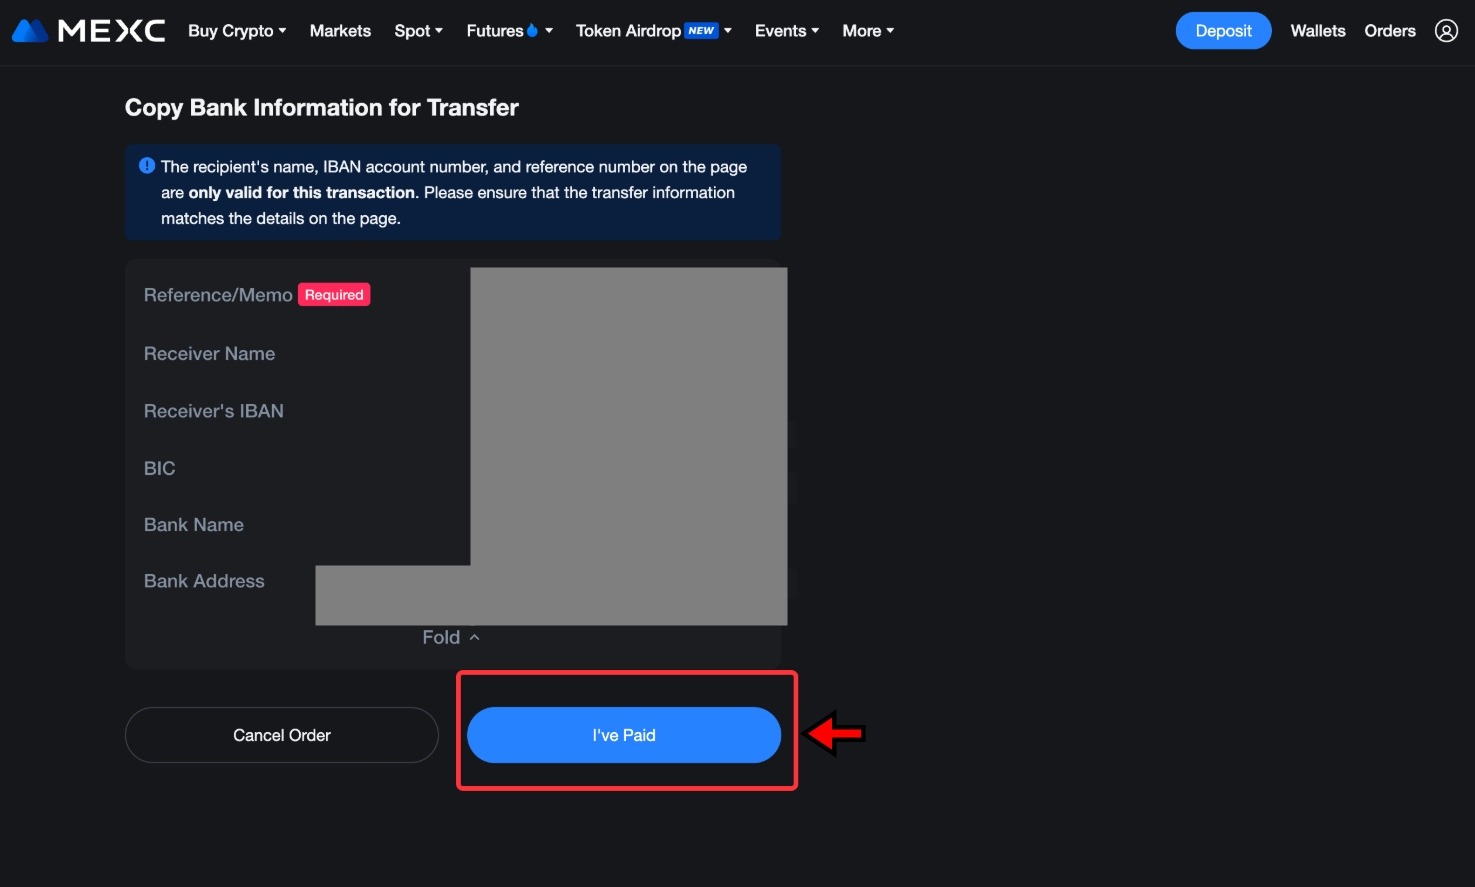
5. Once the payment is sent, click I've Paid on the MEXC order page. SEPA Instant transfers usually process within 2 hours. Standard SEPA can take up to 2 business days.
Crypto Deposit
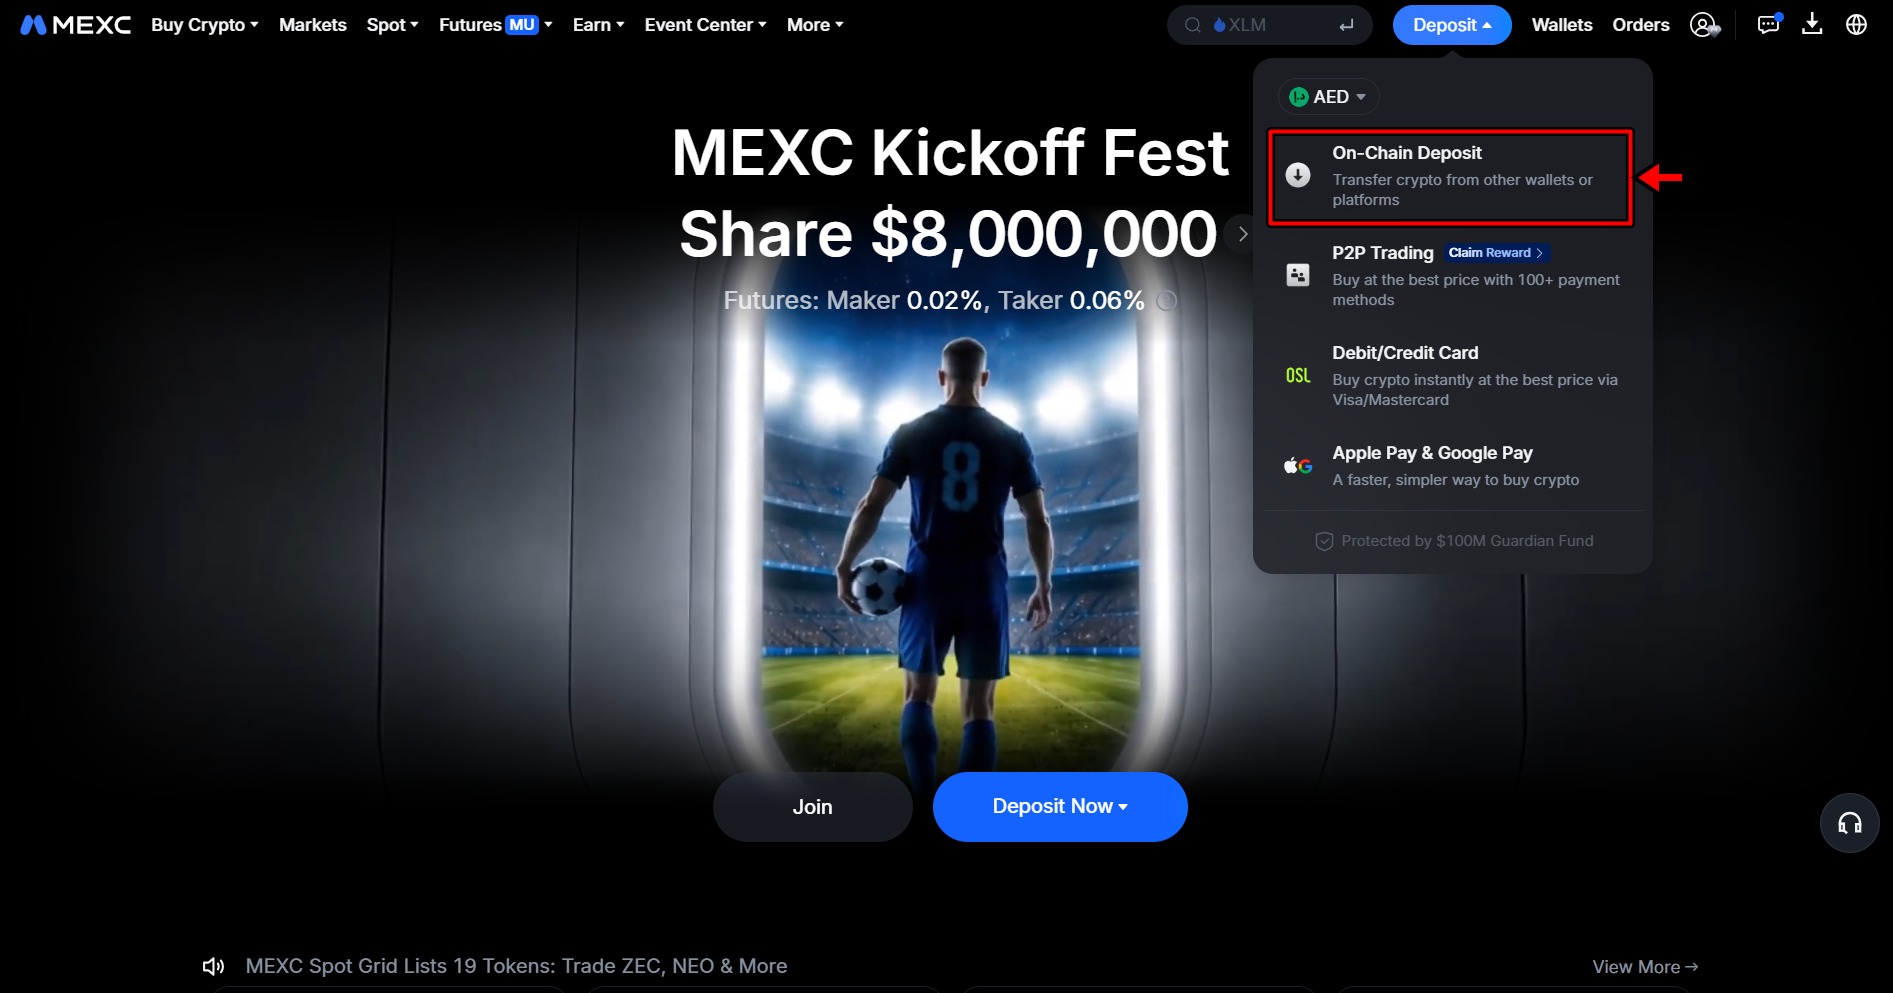
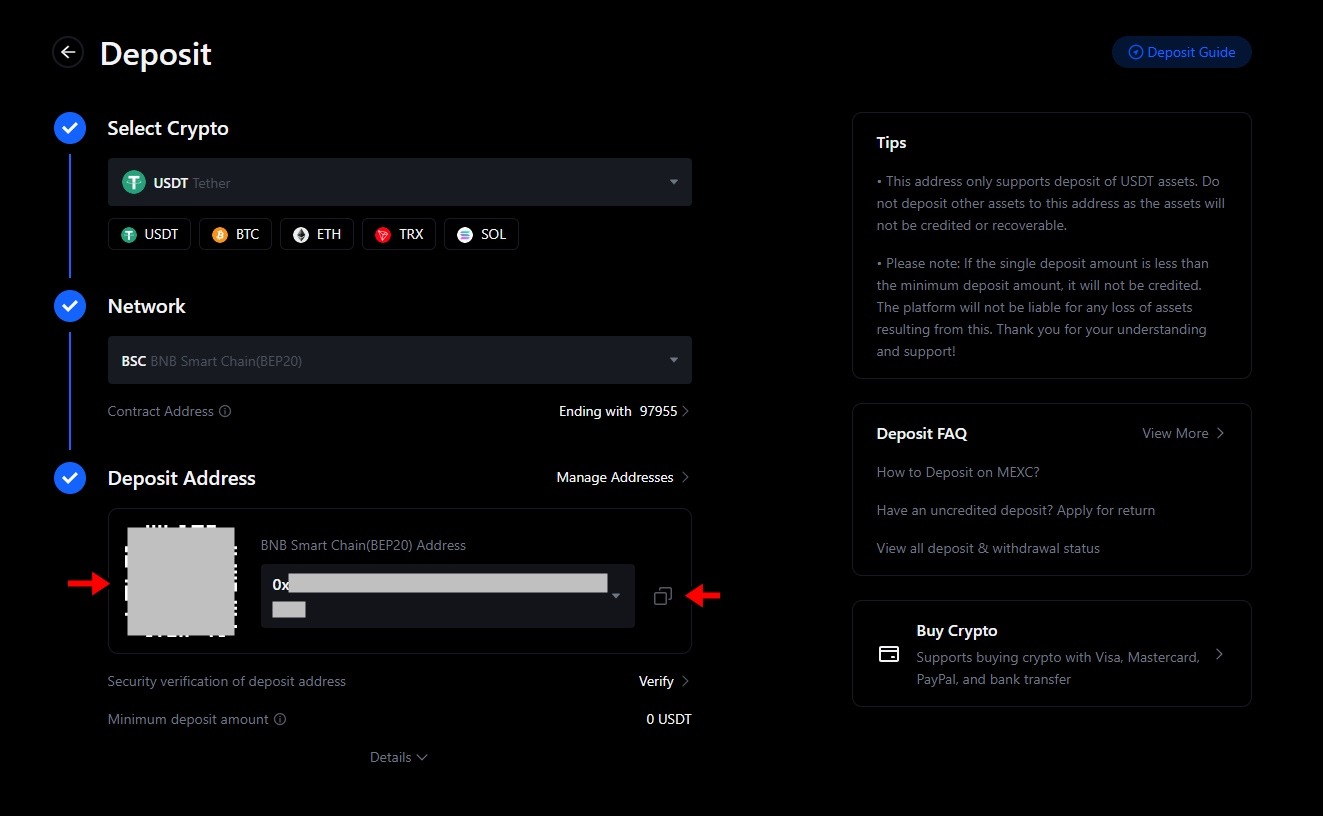
1. Click Deposit in the top right corner of the homepage. In the pop-up, choose On-Chain Deposit.
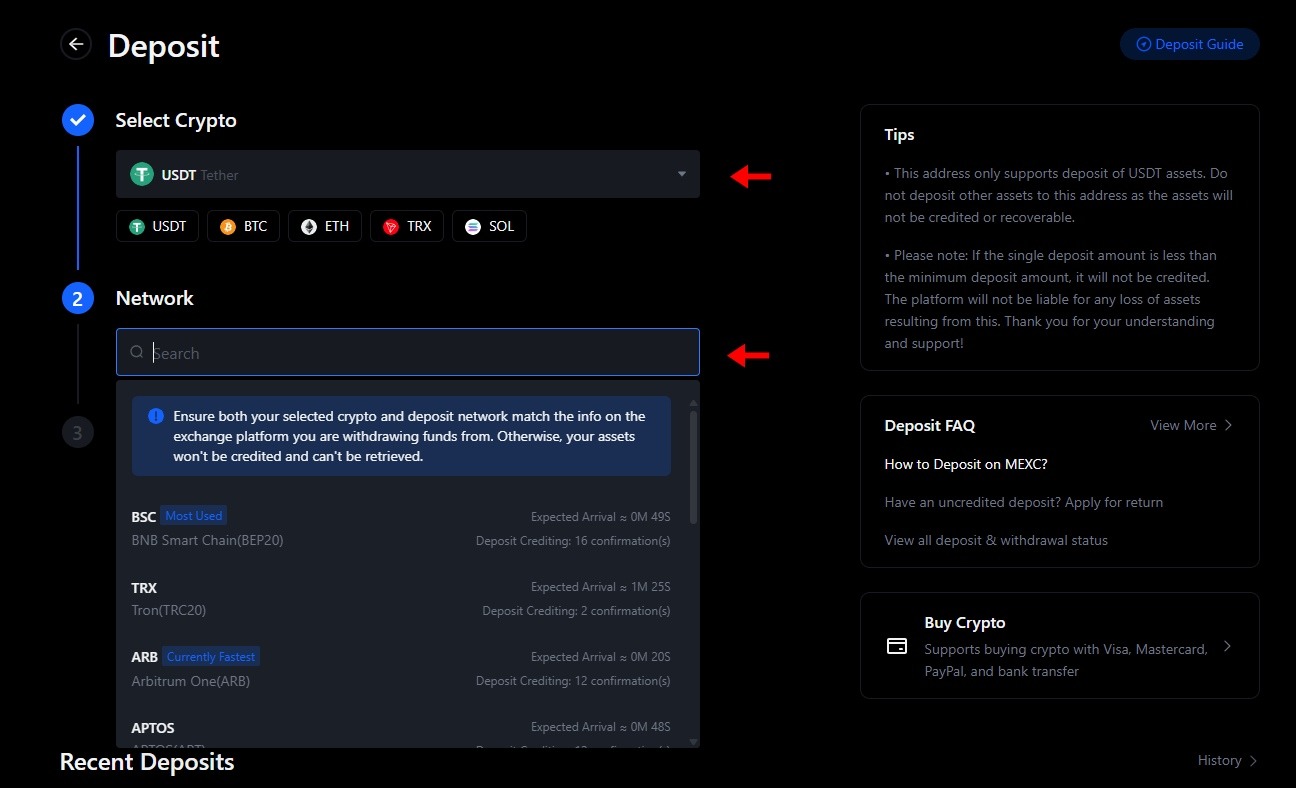
2. Select the cryptocurrency you want to deposit, then select the blockchain network. This part is critical. If you select the wrong network, your funds are lost permanently. When depositing USDT, you will see options like ERC-20 (Ethereum), TRC-20 (Tron), and BEP-20 (BNB Chain). The network you choose on MEXC must match the network you send from. When in doubt, TRC-20 is usually the cheapest and fastest for USDT.
3. Copy the wallet address MEXC generates (or scan the QR code). Go to your external wallet, paste the address, verify the network matches, and send.
How to Spot Trade on MEXC
Spot trading is the most straightforward form of crypto trading. You buy a coin at the current price with your own money. No leverage, no contracts, no borrowed funds. If the price goes up, you sell for a profit. If it drops, you hold at a loss until you decide to sell or wait it out. Every beginner should start here.
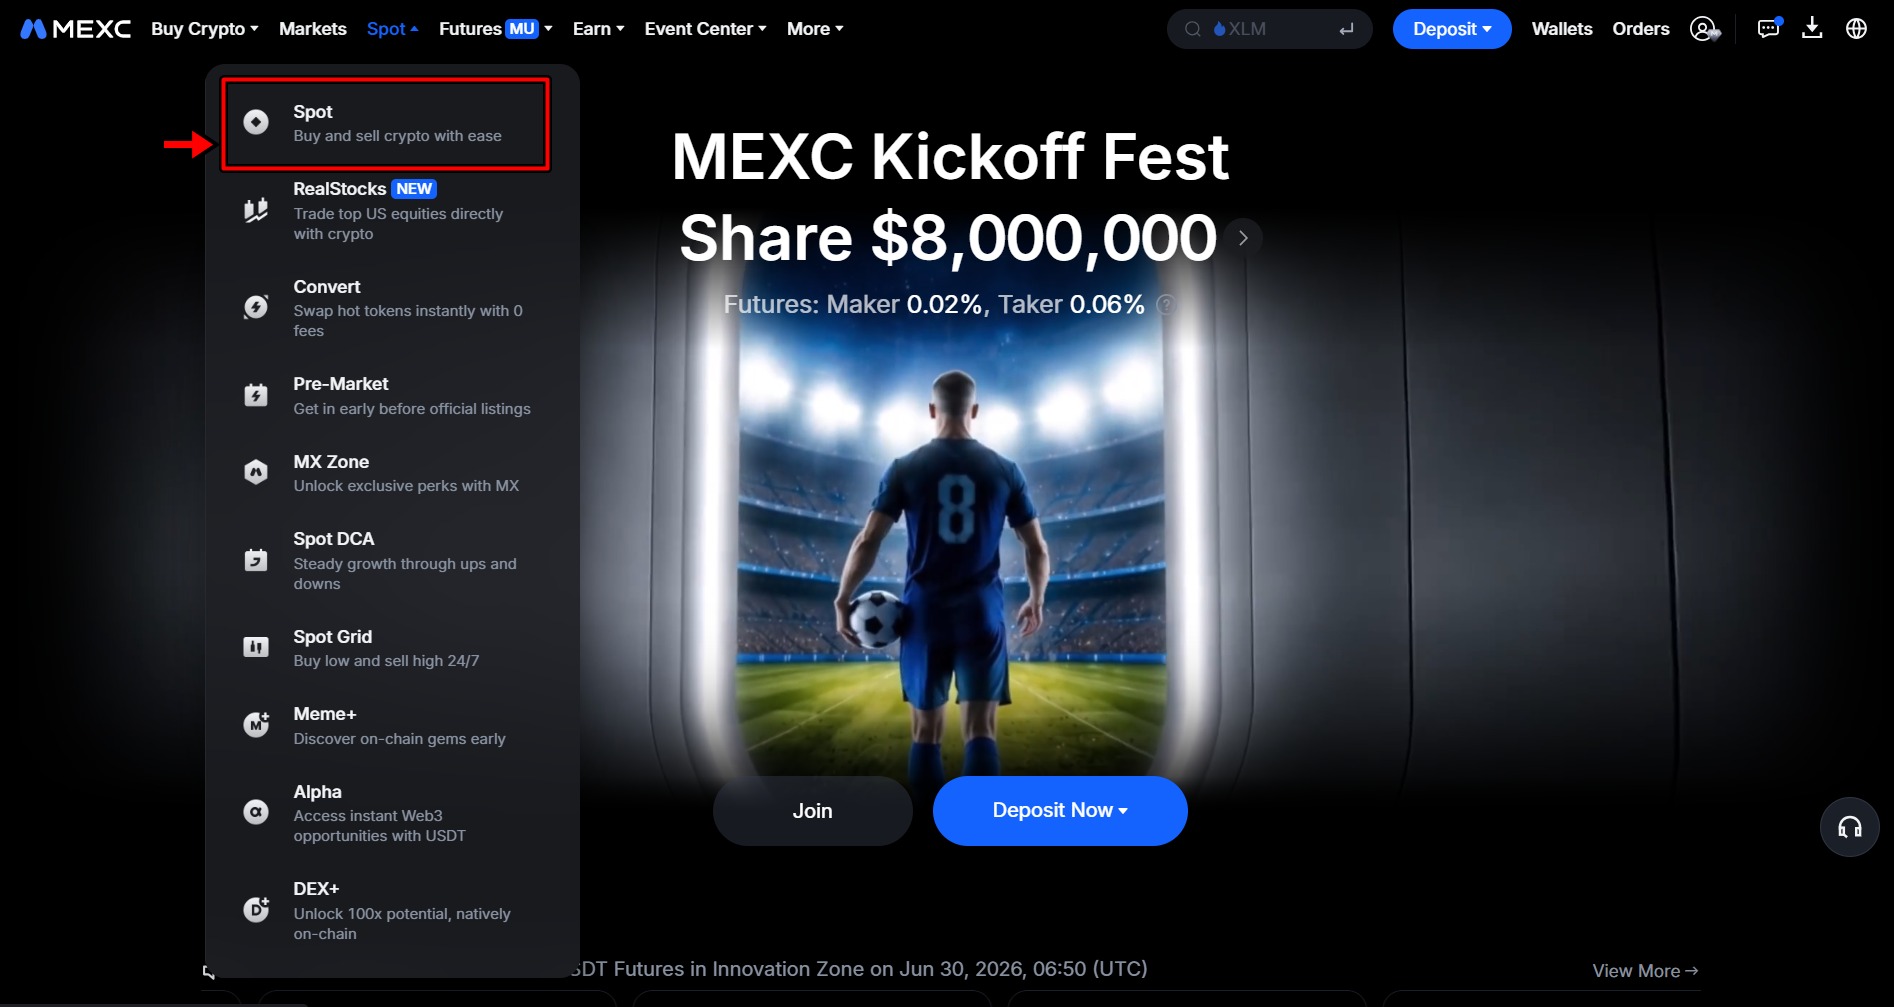
1.From the homepage, hover over Spot in the navigation bar and click Spot. This opens the full trading interface.
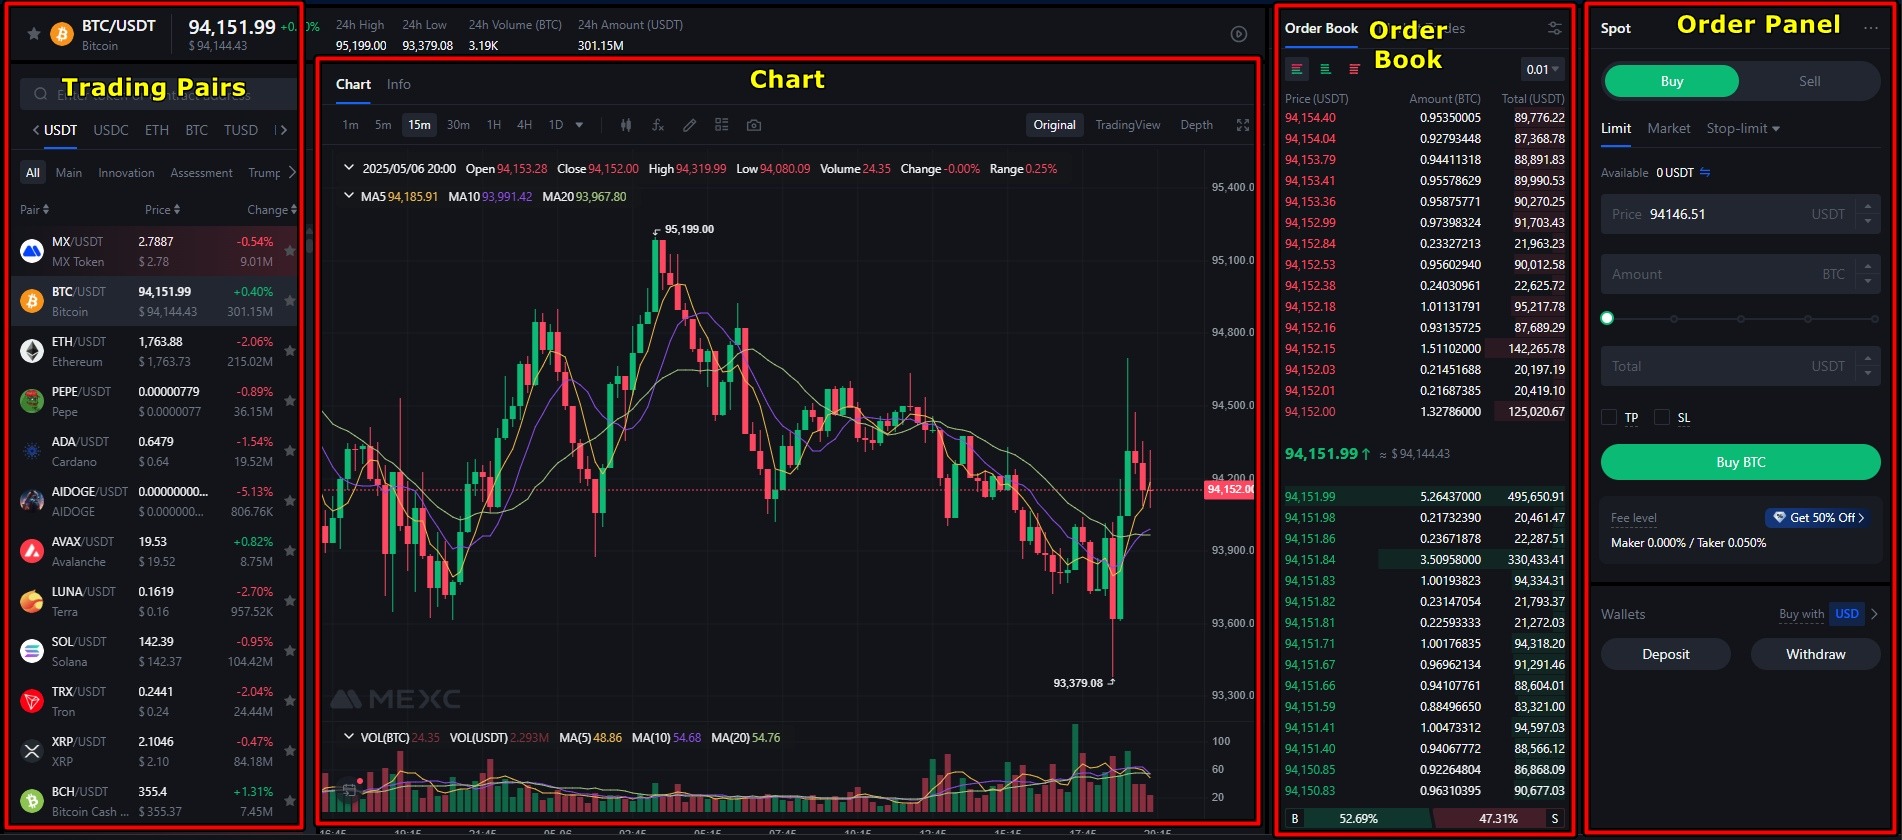
Before placing a trade, take a moment to understand the layout. The interface has four main sections.
- The left panel is for trading pair selection. You can search any of the 3,000+ pairs or browse by category (USDT, USDC, BTC pairs).
- The center chart is powered by TradingView. You can change timeframes and add technical indicators.
- The right panel shows the order book. Green numbers are buy orders, red are sell orders. The tighter the gap between the highest buy and lowest sell, the more liquid the pair.
- The bottom panel is the order panel where you input your trade details and execute.
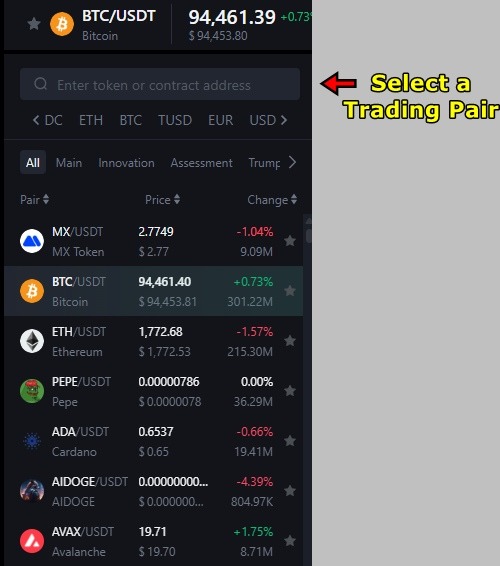
2. Choose a trading pair from the left panel and click on it. For this example, we will be demonstrating with the BTC/USDC pair.
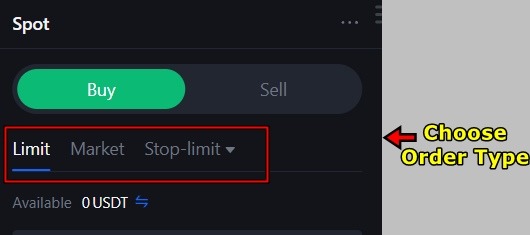
3. In the order panel, select your order type. You have three main options.
- Limit lets you set the exact price you want to buy at. The trade only fills when the market reaches that price. Best for beginners because it gives you full control over your entry.
- Market buys instantly at whatever the current price is. Faster but you have no say in the exact price.
- Stop-Limit triggers a limit order when a price level you define is hit. Useful for catching breakouts.
For your first trade, go with Limit as it will allow you to buy the selected cryptocurrency at your desired price.
4. Enter your limit price for BTC. Look at the chart and order book to pick a reasonable level. Then enter the amount of USDC you want to spend. Double-check both numbers and click Buy BTC.
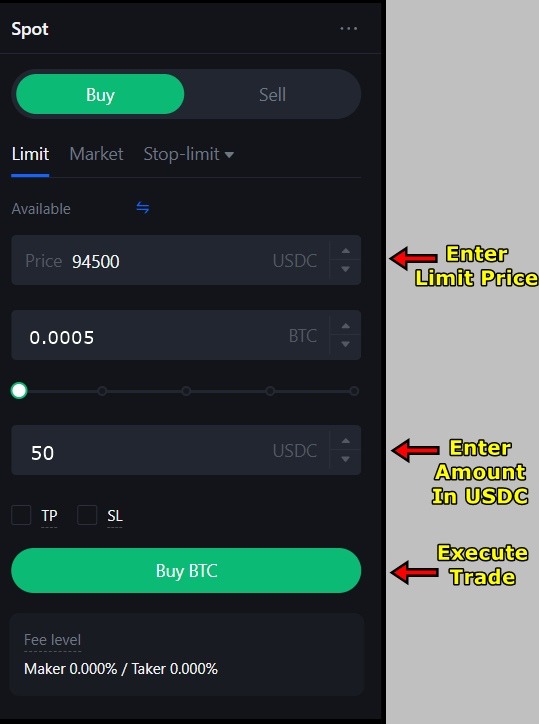
5. Your order now appears in the Open Orders section below the panel. Since this is a limit order, it sits there until the market hits your price. Once matched, BTC lands in your spot wallet automatically. To cancel a pending order at any time, click the X next to it.

If you want instant execution without waiting for a price match, switch to Market order and just enter how much USDC to spend. The trade fills in seconds.
How to Futures Trade on MEXC
Futures trading is a completely different ball game. It lets you speculate on price direction with leverage without owning the underlying asset. You are trading a contract that tracks its price. Long means you profit when the price rises. Short means you profit when it drops.
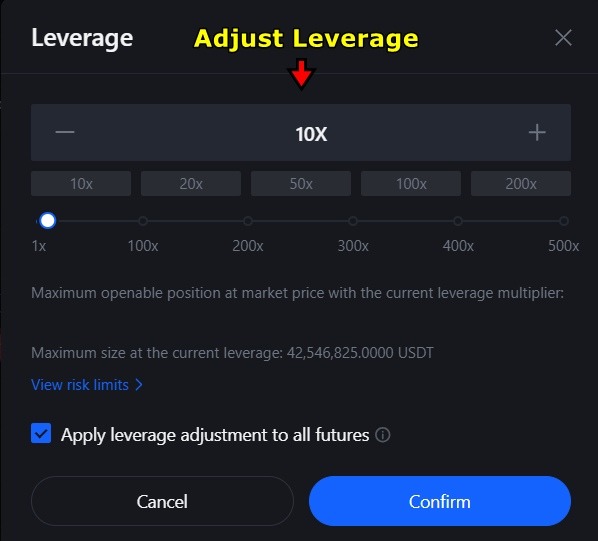
The leverage amplifies both gains and losses. At 10x leverage, a 1% move in your favor returns 10% on your margin. A 1% move against you costs 10%. If the price moves far enough against you, your position gets liquidated and you lose your margin entirely.
Futures trading is risky and if you have never traded futures before, MEXC offers a demo environment as well with 50,000 USDT in virtual funds. It simulates real market conditions using the same interface. Practice there before risking real capital. It will help you protect your capital while still being able to learn form your mistakes.
Transferring Funds to Your Futures Wallet
When you deposit funds on MEXC, they land in your spot wallet by default. You cannot trade futures with funds sitting in spot. You need to transfer them over first.
- Click the Wallet icon in the top right and select Transfer.
- Set the transfer from Spot Account to Futures Account. Choose the asset (usually USDT), enter the amount, and click Confirm.
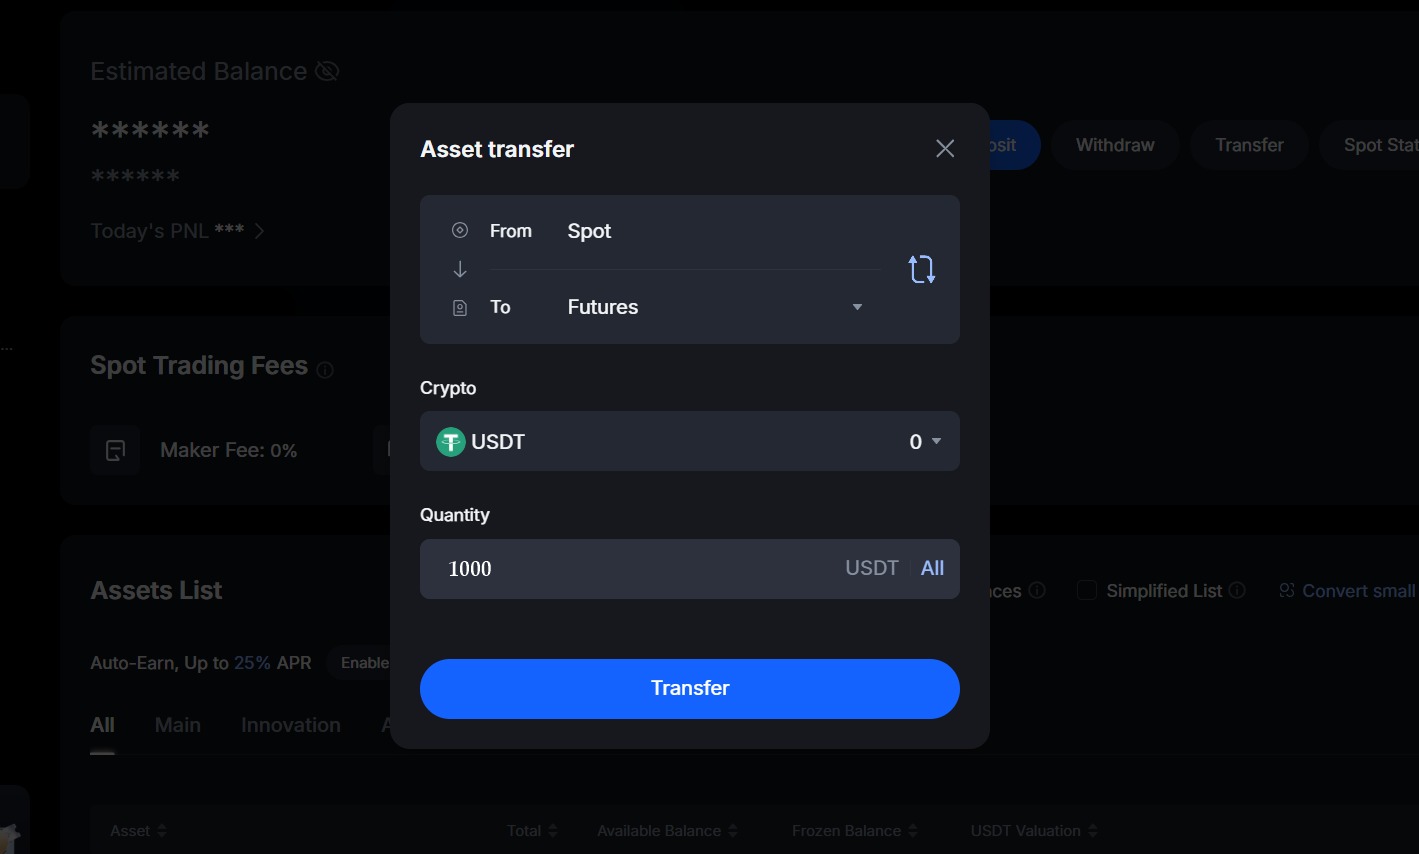
This is instant and free. You can move funds back and forth between spot and futures anytime.
Placing a Futures Trade
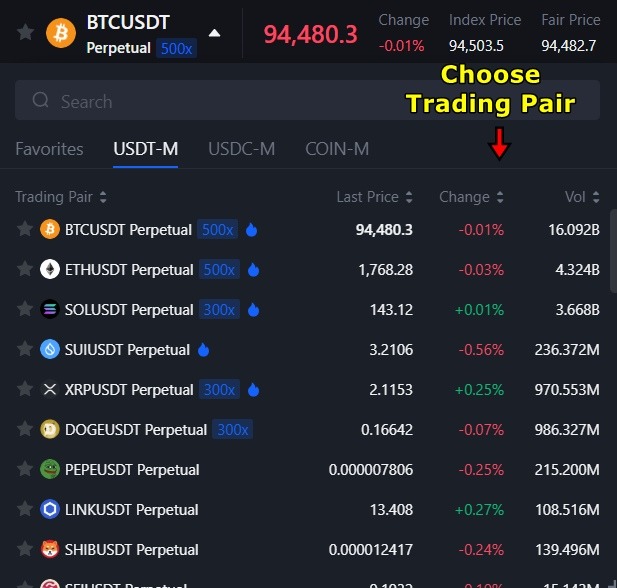
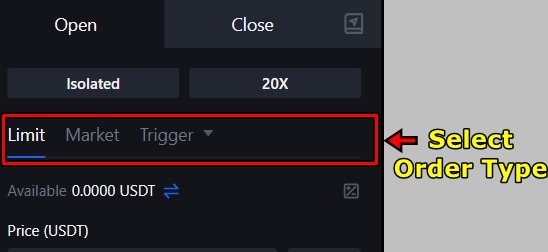
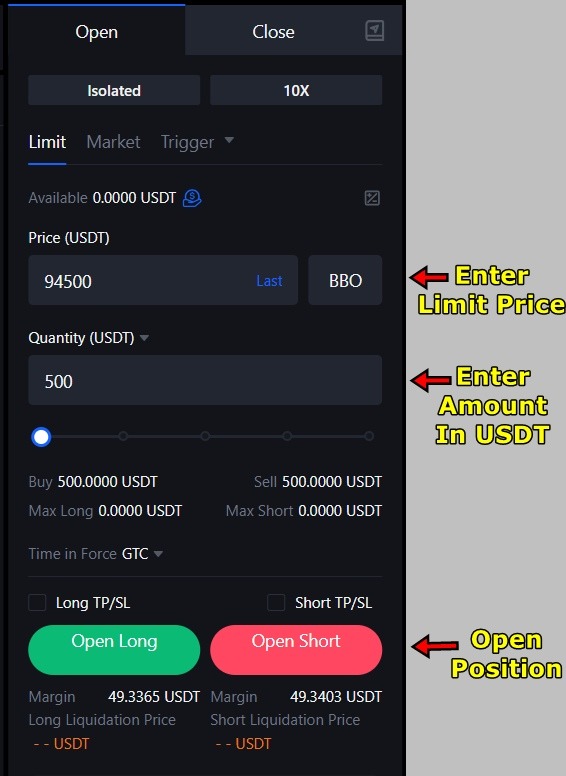
- From the homepage, hover over Futures and select USDT-M Futures. This is the most common contract type where both margin and PnL are denominated in USDT.
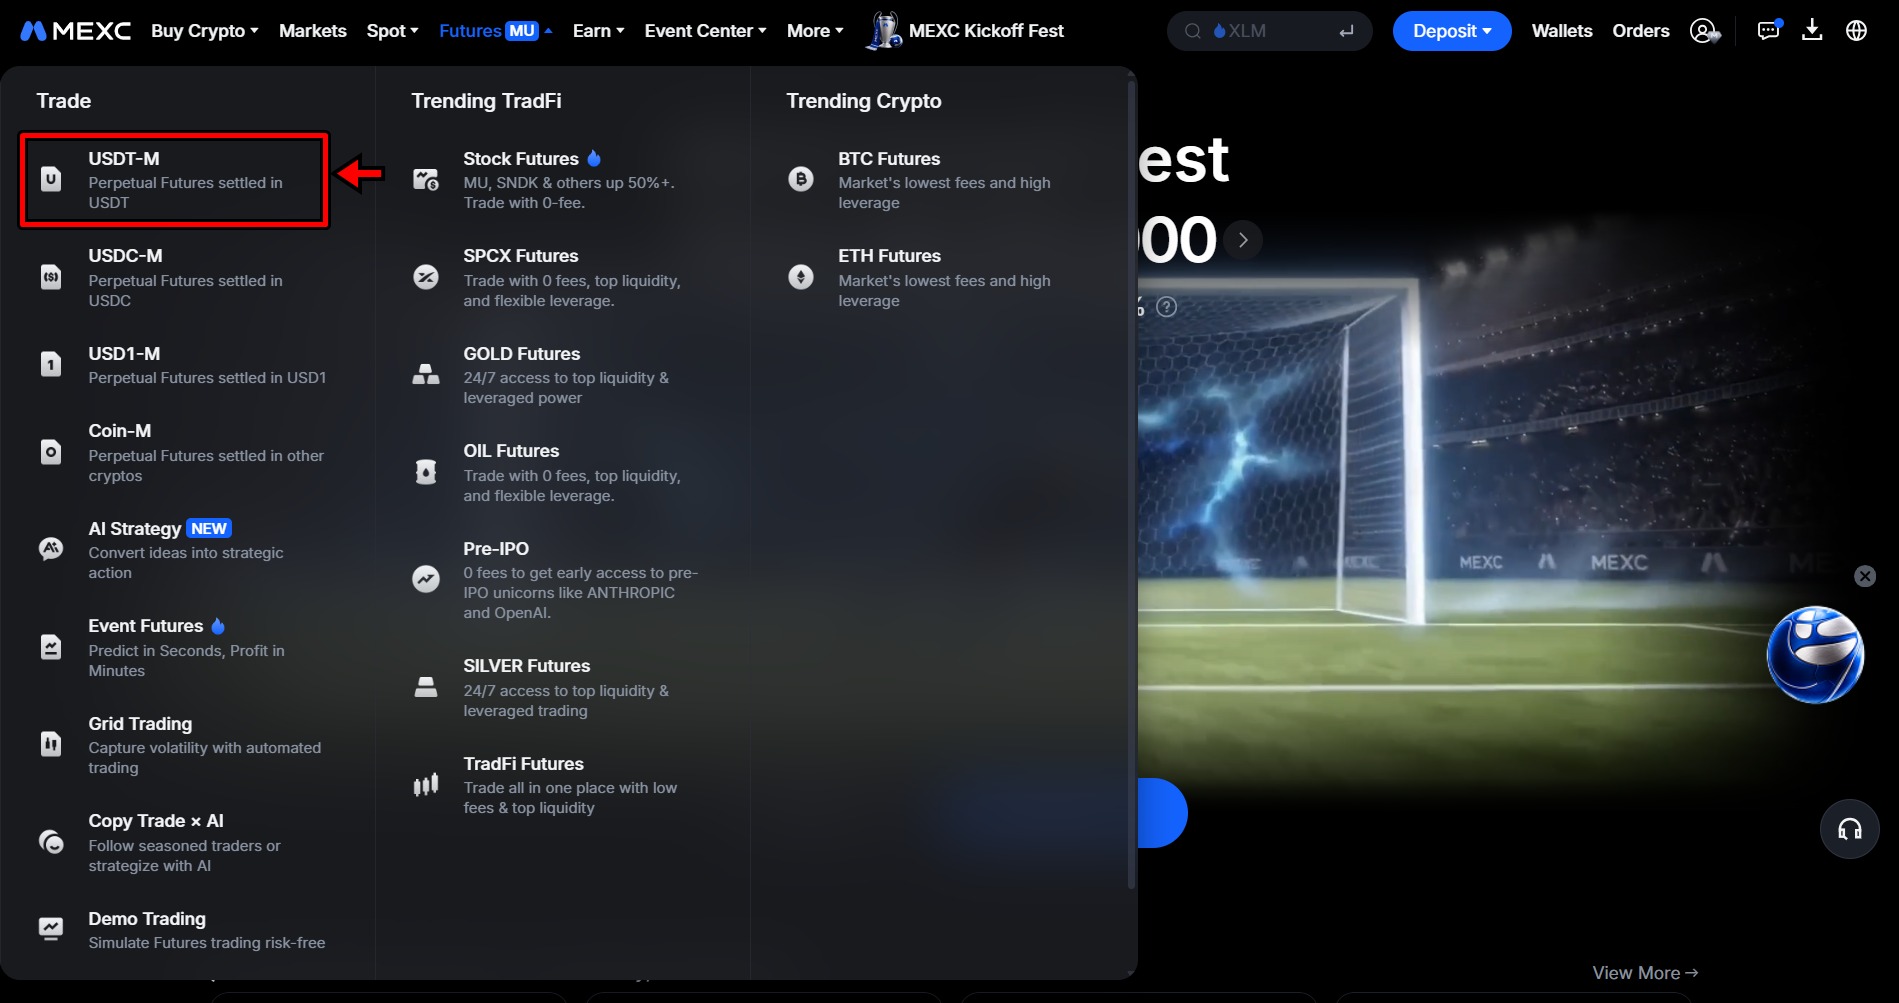
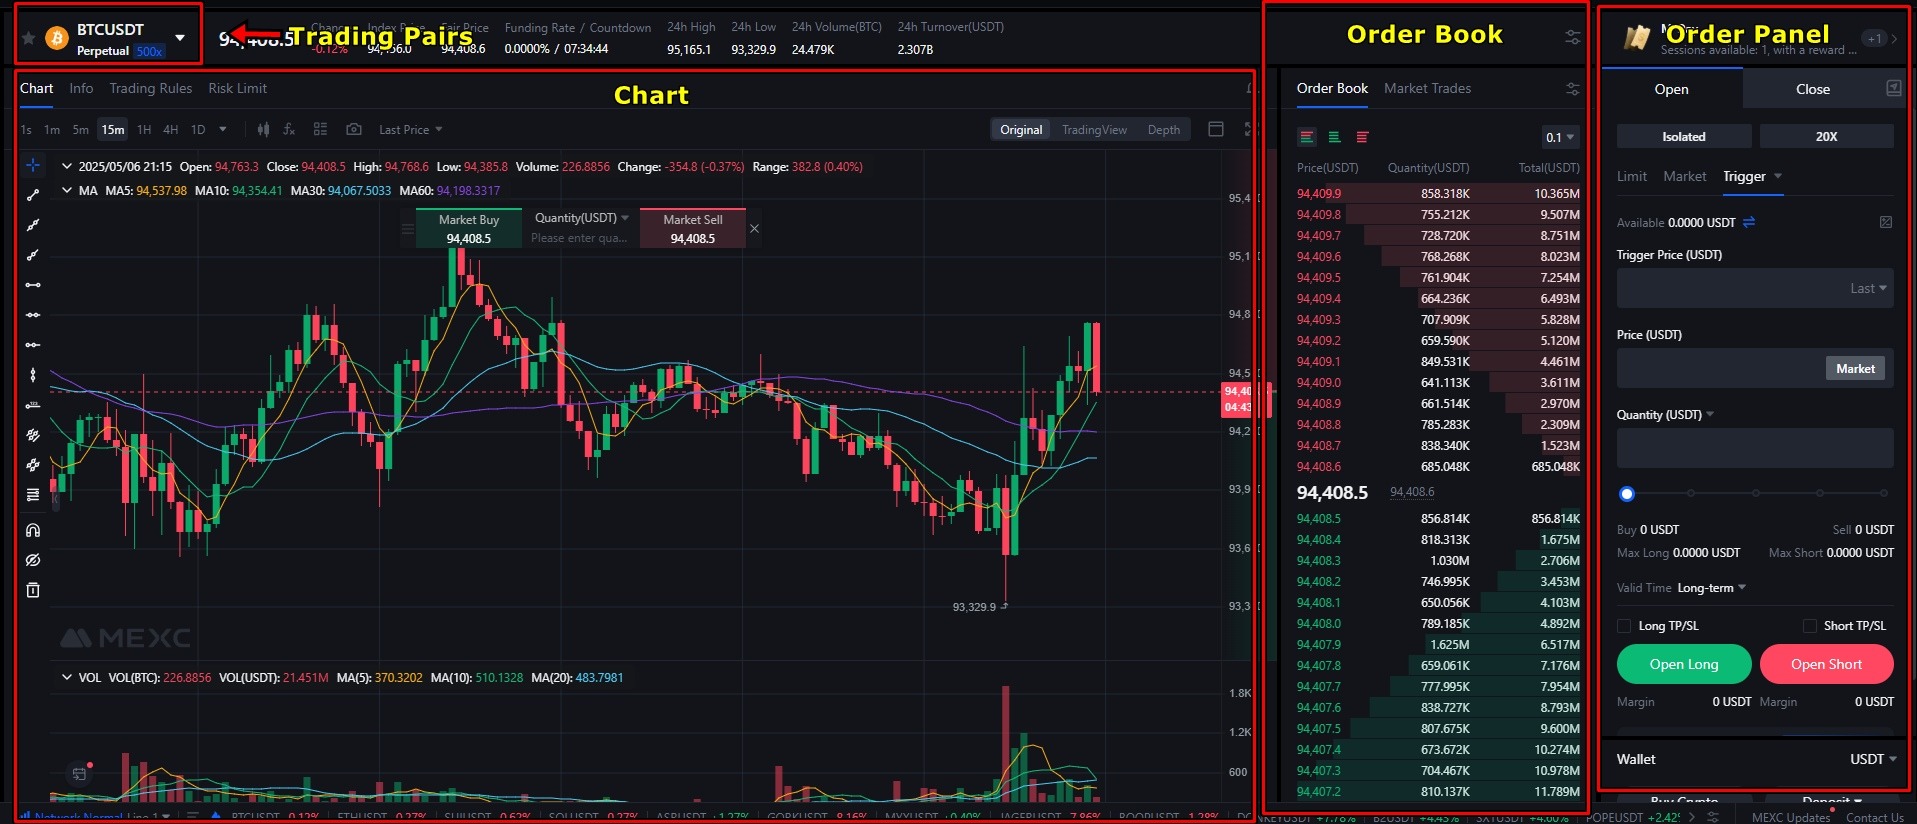
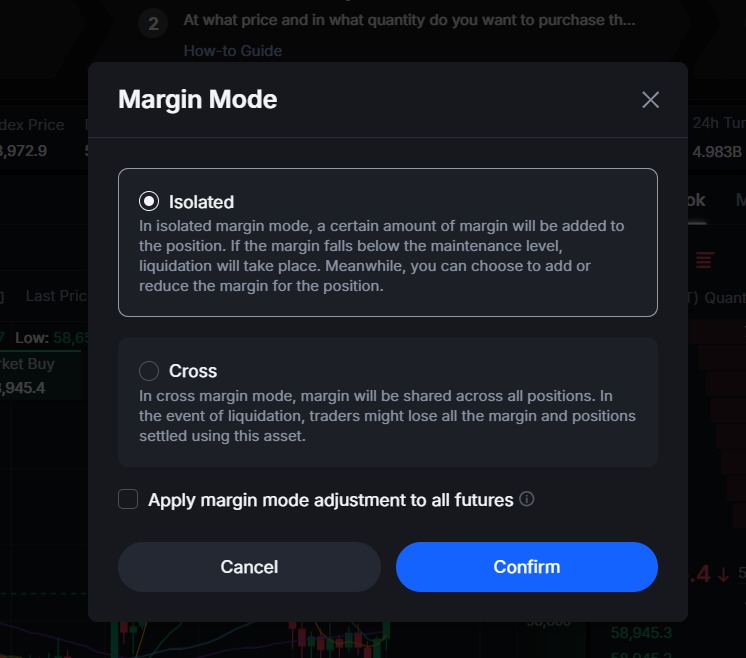
The layout is similar to spot but with extra controls. The chart and order book work the same way. The order panel now includes margin mode and leverage settings, and the Positions tab at the bottom shows your open trades with live PnL and liquidation price.
Setting Take Profit and Stop Loss
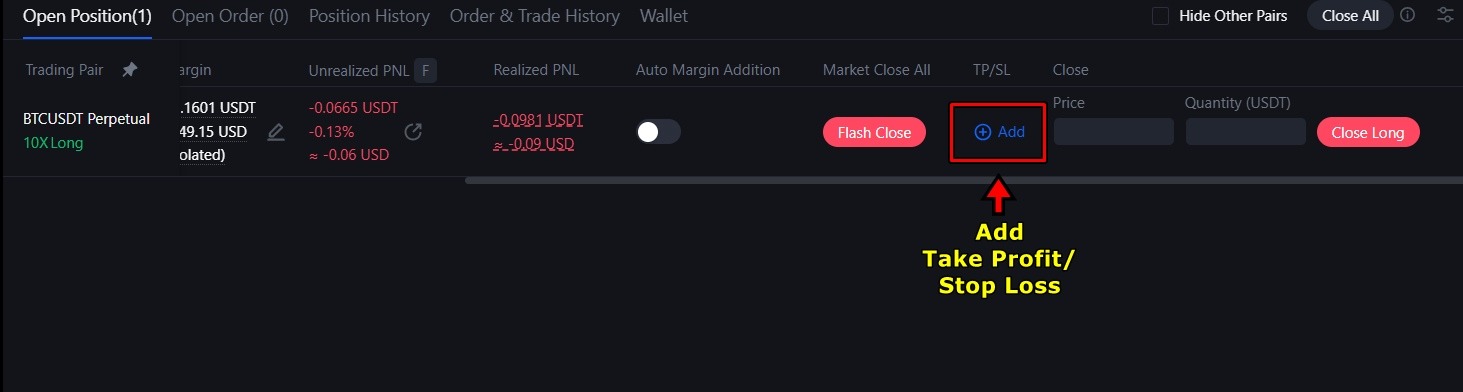
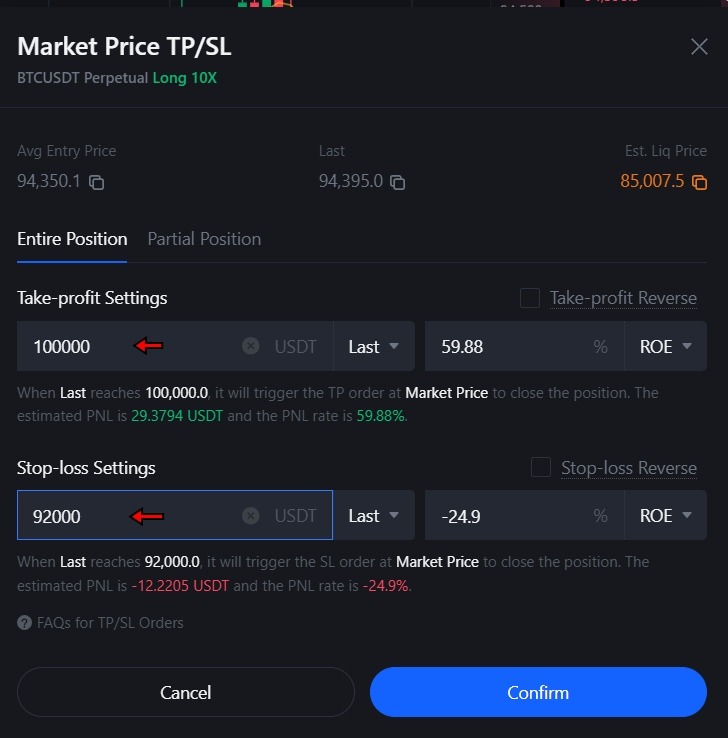
Once your order fills, the position moves to the Open Positions tab. The first thing you should do is set a Take Profit and Stop Loss. Do not skip this.
1. In the Open Positions tab, scroll right and click Add TP/SL next to your position.
To close a position manually, you have two options. Flash Close shuts it instantly at market price. Or click Close Position, enter a specific price and quantity, and close with more control. Both options are in the Open Positions tab.
Once you are comfortable with these basics, you can explore additional features like Trigger orders, Trailing Stops, and MEXC's demo trading environment to refine your strategy without risking real capital.
How to Withdraw From MEXC
Once you are ready to move funds off the platform, MEXC supports both fiat and crypto withdrawals. The processes are different, so here is how each one works.
Fiat Withdrawal
- From the top navigation, click Buy Crypto and select Fiat Deposit. Switch to the Fiat Withdrawal tab.
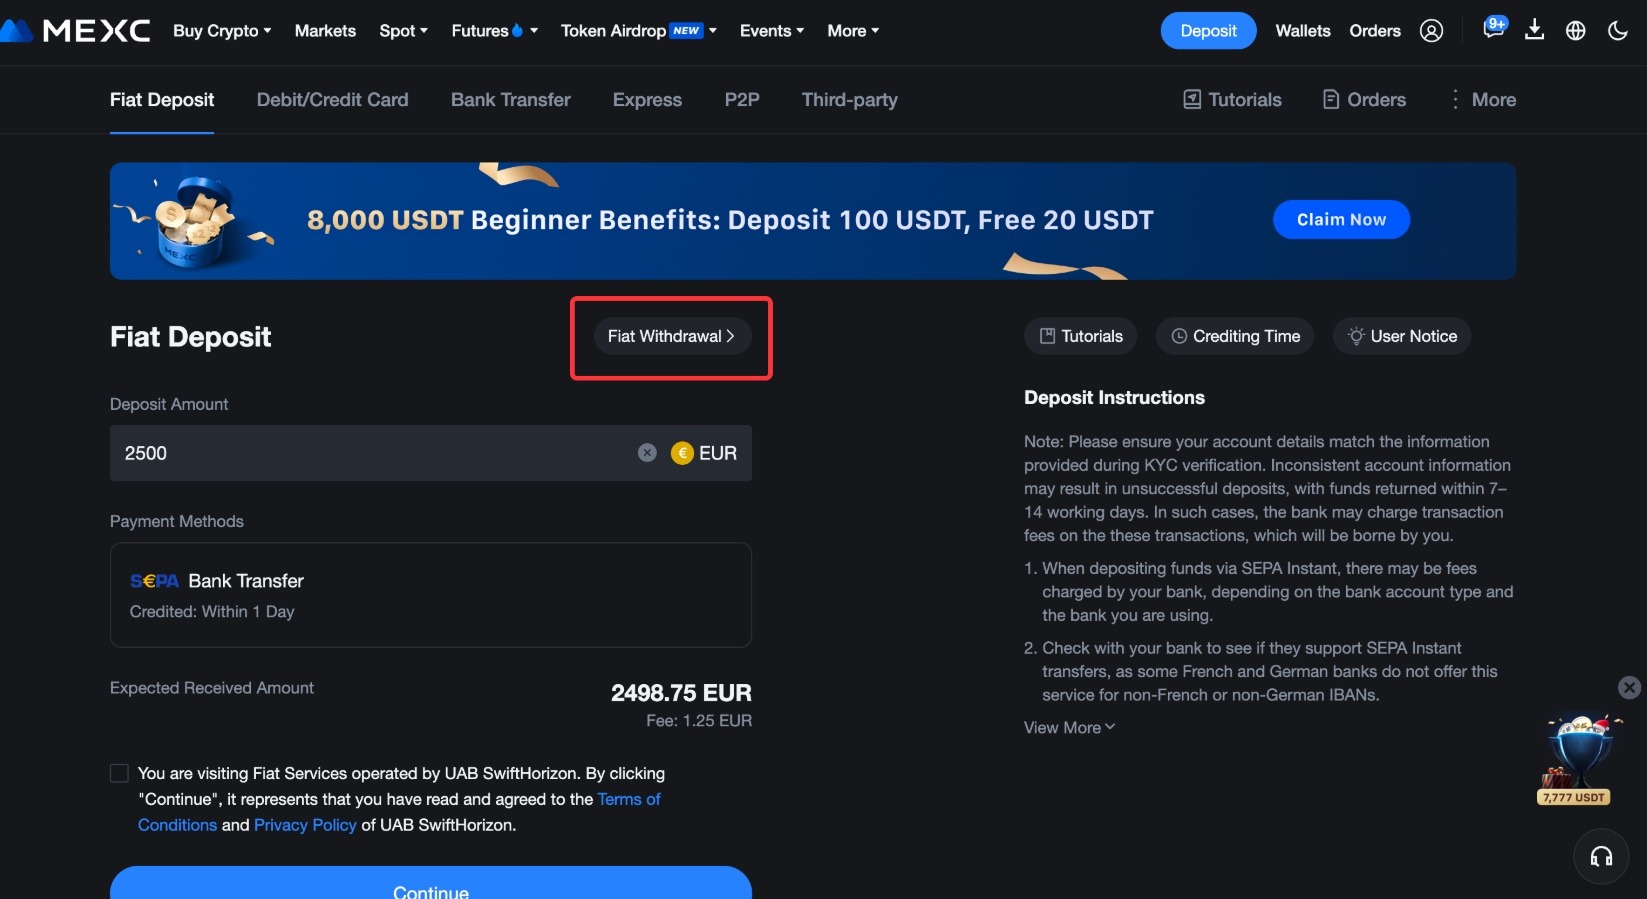
3. Enter the withdrawal amount and click Continue. Confirm the order details in the popup and complete 2FA verification using your Google Authenticator code.
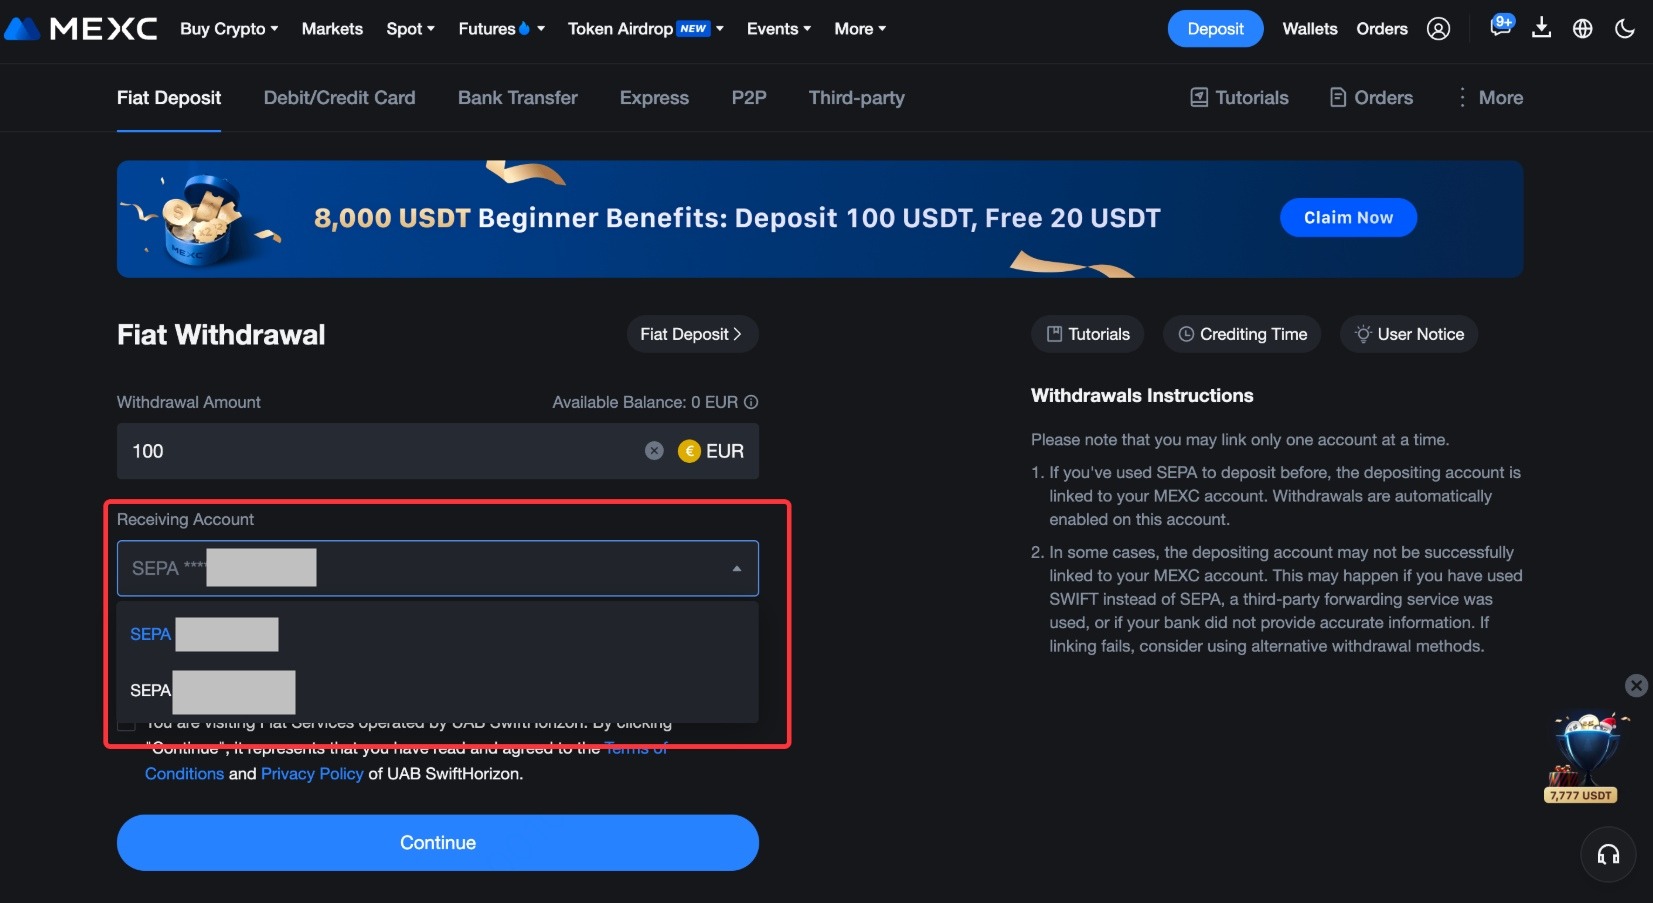
Fiat withdrawals typically arrive within two business days.
Crypto Withdrawal
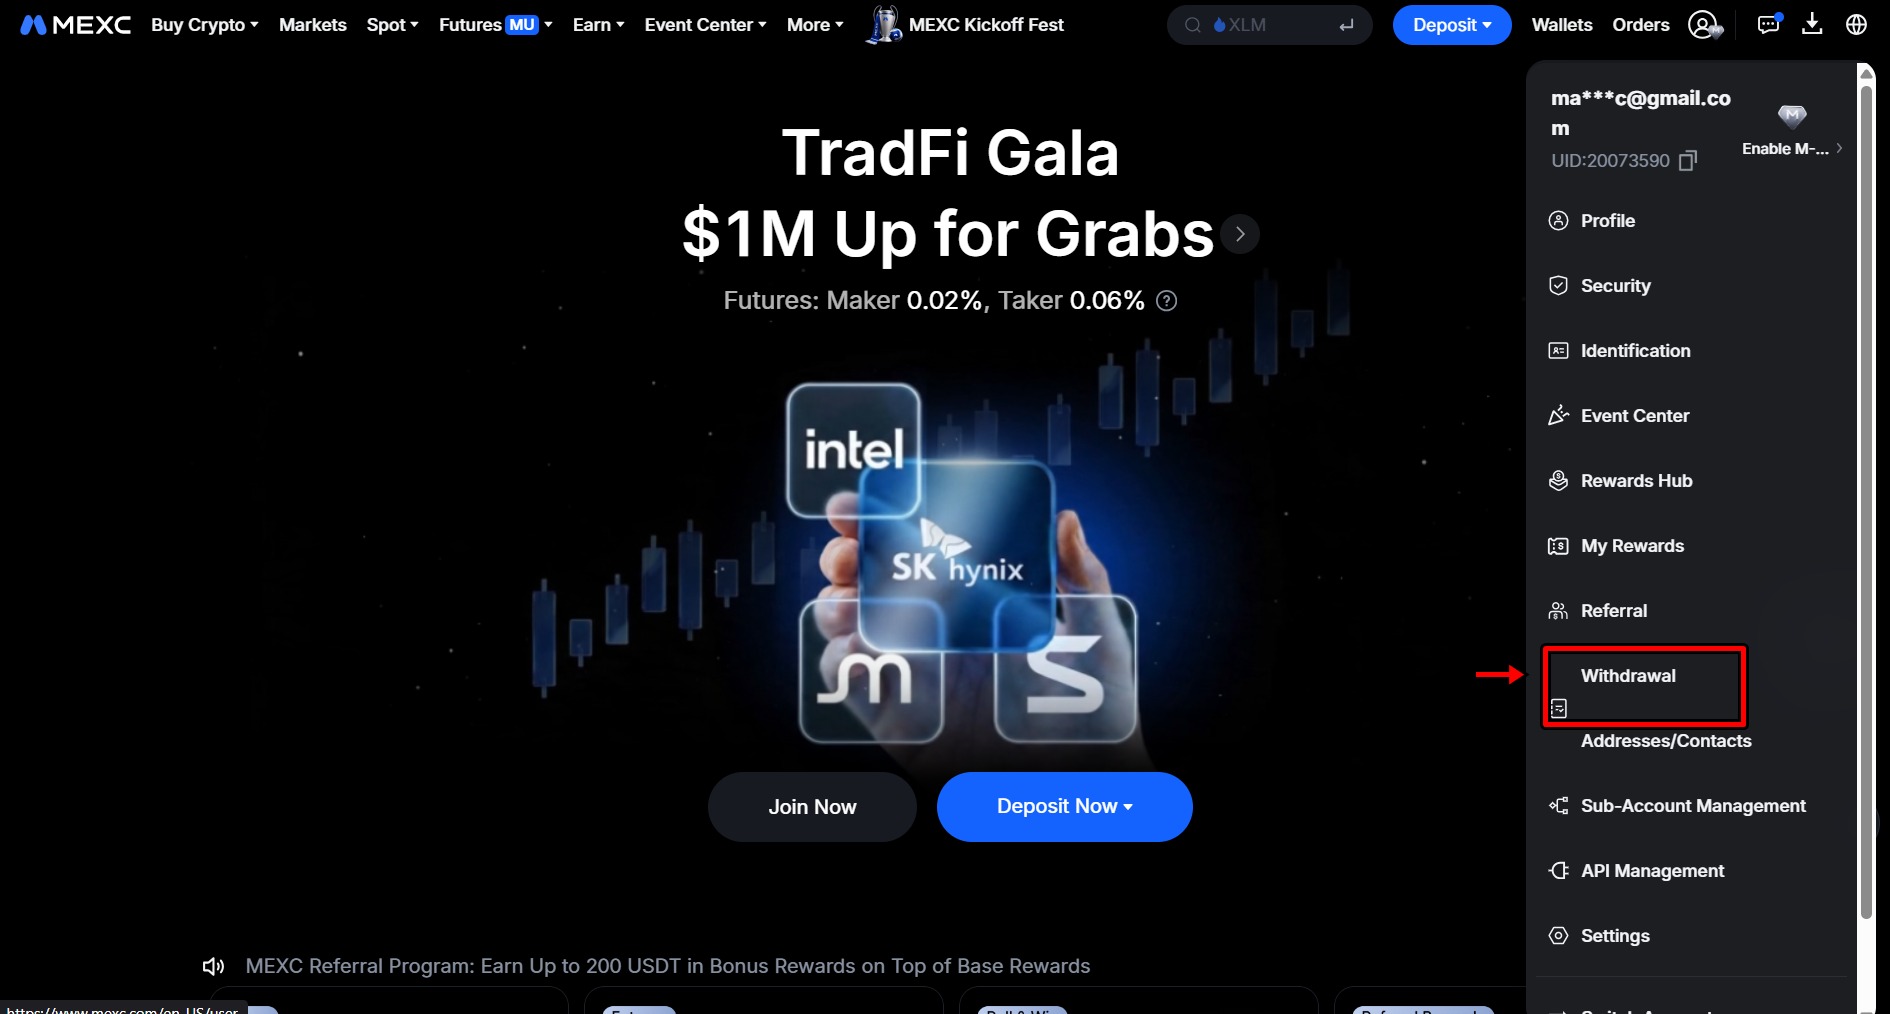
1. Hover over Wallet in the top navigation and click Withdraw.
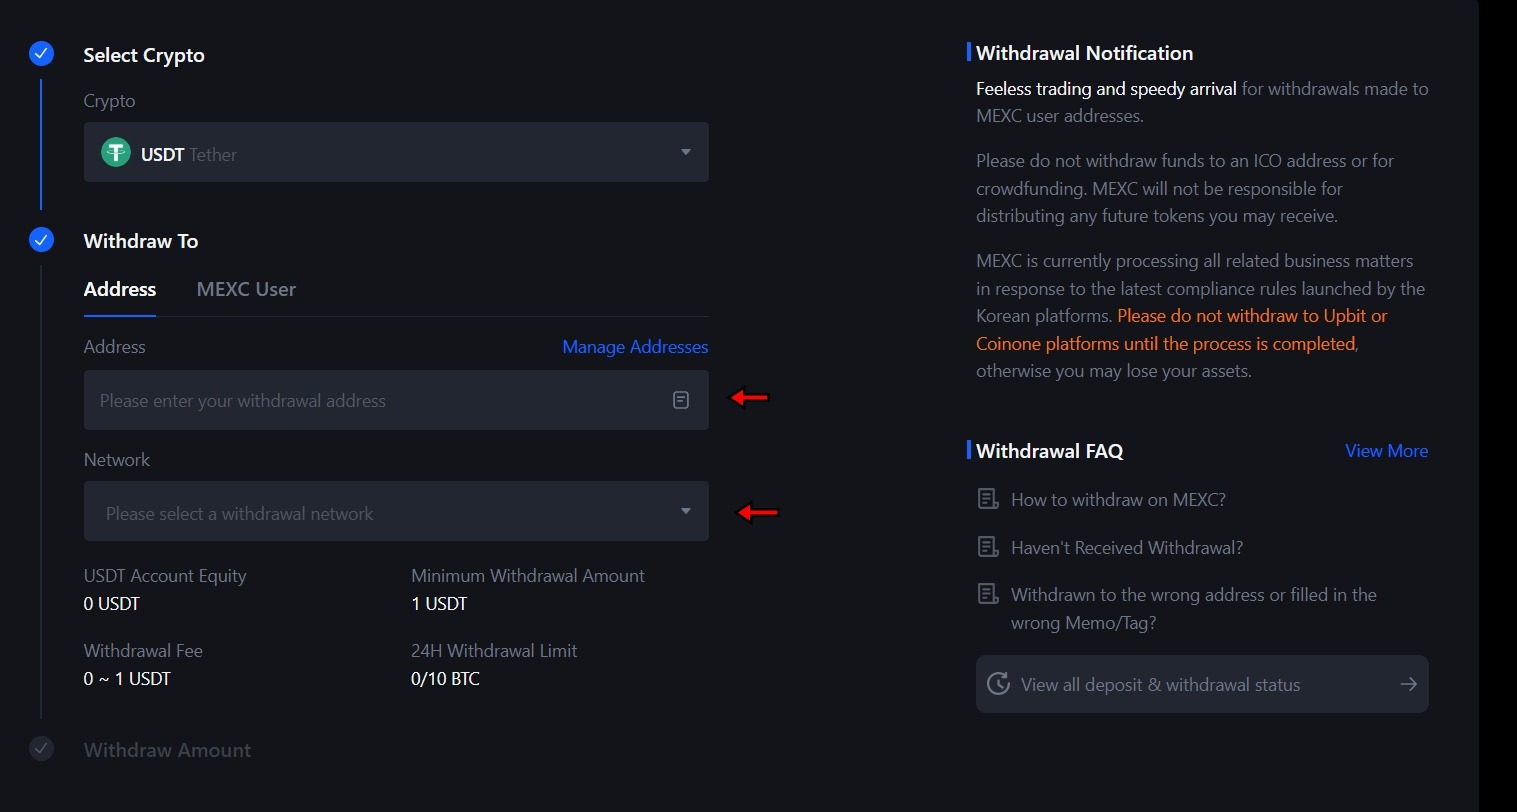
3. Choose the blockchain network. Same rule as deposits. The network must match the receiving wallet. Wrong network means permanent loss.
4. Enter the recipient wallet address and the amount. Triple-check the address and network before submitting.
5. Click Submit and complete 2FA verification.
If you are withdrawing to another exchange, confirm the receiving exchange supports the same network you are sending on. This is a common source of lost funds so be careful.
How Does MEXC Stack Up
How does MEXC compare? It charges zero maker fees on both spot and futures, which is lower than Binance (0.10%), Bitget (0.10%), and KuCoin (0.10%). The 3,000+ token selection is roughly triple what Binance lists and six times what Coinbase offers. The trade-off is weaker regulatory standing and a Trustpilot score below 2.0, which is something the full review breaks down in detail.
Before You Place Your First Trade
You now have everything you need to navigate MEXC from your first deposit to your first trade. If you are new to crypto, start with spot. Get comfortable reading the chart and the order book before touching futures. When you do move into futures, start with low leverage, use isolated margin, and always set a stop loss before you walk away from a position. The platform gives you a lot of tools, but the ones that protect your capital matter more than the ones that amplify it.
For a detailed breakdown of fees, security, and how MEXC compares against other exchanges, read the full MEXC exchange review.

WEEX Exchange Tutorial 2026: A Complete Step-by-Step Guide
WEEX is not among the largest cryptocurrency exchanges. It does not match the trading volume of...
How to Use Bybit in 2026 - Step-by-Step Beginner Guide
Cryptocurrency trading continues to evolve with time. Today, crypto users can access several ex...
The Ultimate LeveX Exchange Tutorial: Step-by-Step Guide for Beginners
LeveX is a newer cryptocurrency exchange built to deliver a fast and focused trading experience...