The Ultimate HTX Exchange Tutorial: Step-by-Step Guide for Beginners
HTX Exchange ranks among the top cryptocurrency trading platforms by volume. It offers a secure and efficient environment for trading digital assets and supports a wide range of features suited for both beginners and experienced users. From spot and futures trading to staking and earning products, the platform brings together all the essentials a trader might need under one interface.
The goal of this tutorial is to walk you through the platform in a way that’s clear and easy to follow. Whether you're signing up for the first time or switching from another exchange, this guide will help you move from creating your account to placing your first trade. We are also adding screenshots for every section for better clarity.
By the end of this tutorial, you should feel comfortable using HTX to manage your crypto activity. The focus is on making each step understandable without skipping over important details. Let’s get started.
What is HTX?
HTX is a global cryptocurrency exchange that consistently ranks among the top ten platforms by trading volume. It was initially launched in 2013 under the name Huobi by founders Leon Li and Du Jun. Li brought technical experience from his time at Oracle, while Jun contributed a background in venture building through projects like Golden Finance and Node Capital.
In September 2023, the exchange rebranded from Huobi Global to HTX. The new name represents three key elements. The "H" stands for Huobi, the original brand. The "T" highlights the platform’s connection to the Tron blockchain. The "X" refers to its role as a cryptocurrency exchange. This change marked a new phase for the company while keeping its roots visible.
HTX first gained traction in Asian markets. It was initially based in China but later moved its headquarters to the Republic of Seychelles due to tightening regulations. The company has since expanded its global presence with offices in Japan, South Korea, Singapore, and Hong Kong. It also entered the U.S. market in 2018, although its U.S. operations were paused because of regulatory issues. Plans to re-enter the market are still underway.
The exchange currently operates under a set of regulatory licenses. These include a Virtual Currency Exchange Operator license in Lithuania, a Financial Services Permission (FMP) license from Dubai’s Virtual Assets Regulatory Authority, and a SIBA license issued in the British Virgin Islands.
HTX supports a wide range of trading services. Users can access spot trading, margin trading with up to 5x leverage, and futures trading with leverage up to 200x. The platform also offers a suite of earning features through HTX Earn. These include fixed and flexible staking, structured products like SharkFin, dual investment options, and on-chain staking services.
How to Create Your HTX Account?
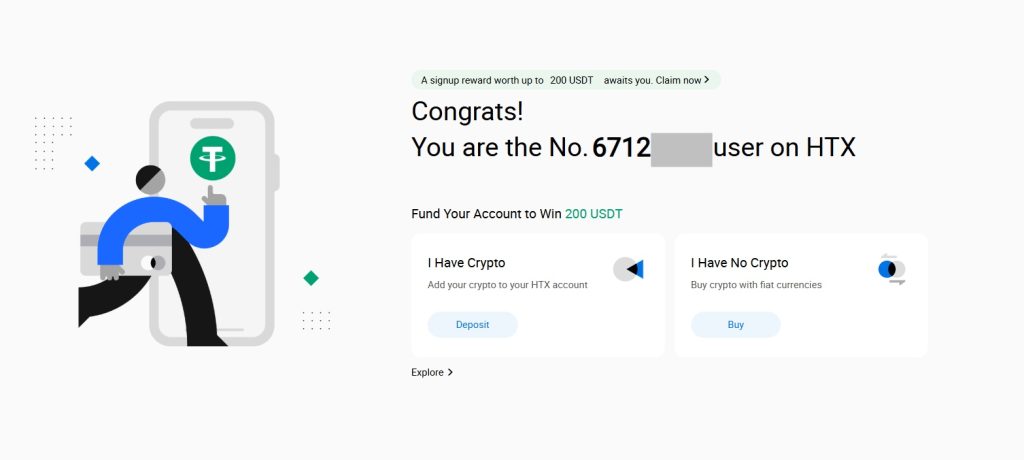
Creating an HTX account takes only a few minutes. The process is simple and doesn’t require advanced technical knowledge. Follow these steps to get started.
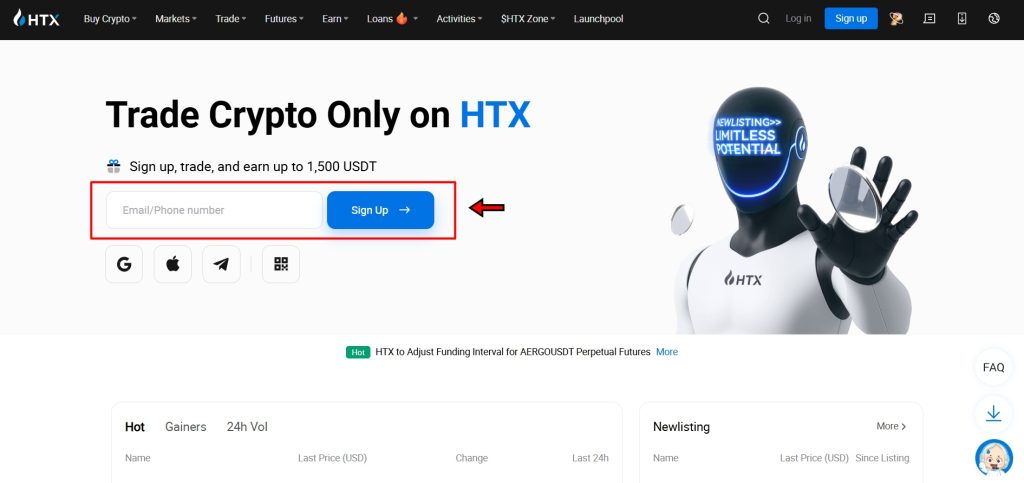
1. Visit the HTX Website
Begin by going to the official HTX website. On the homepage, you’ll find a field that prompts you to enter your email address or phone number. This is the first step in setting up your account. Once entered, click the “Sign Up” button to move to the next screen.
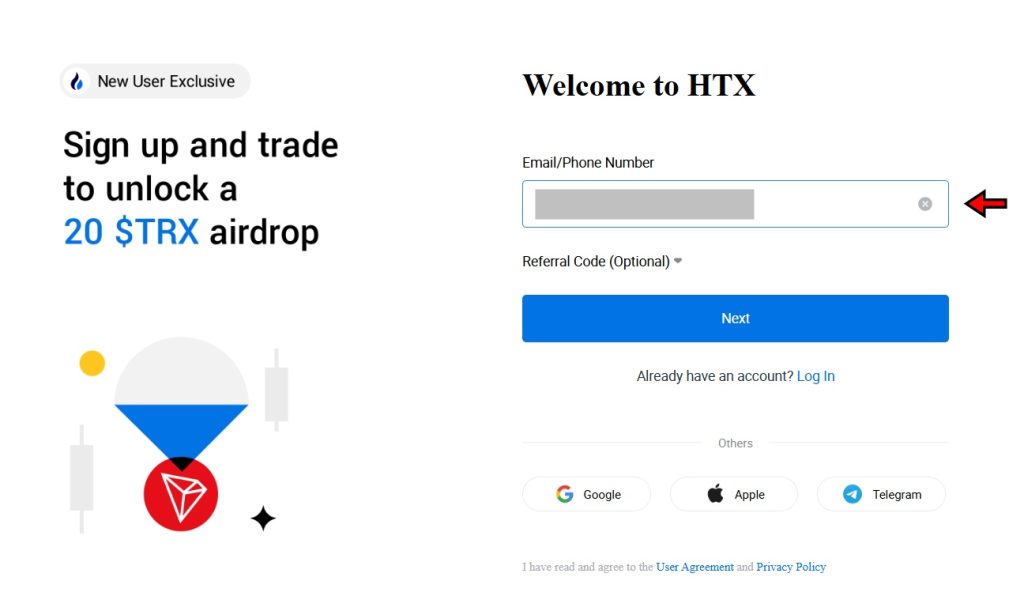
2. Verify Your Contact Information
After submitting your details, you’ll be asked to confirm the same email address or phone number. This step ensures that you have access to the contact method you're using. Re-enter your information and click “Next” to start the verification process.
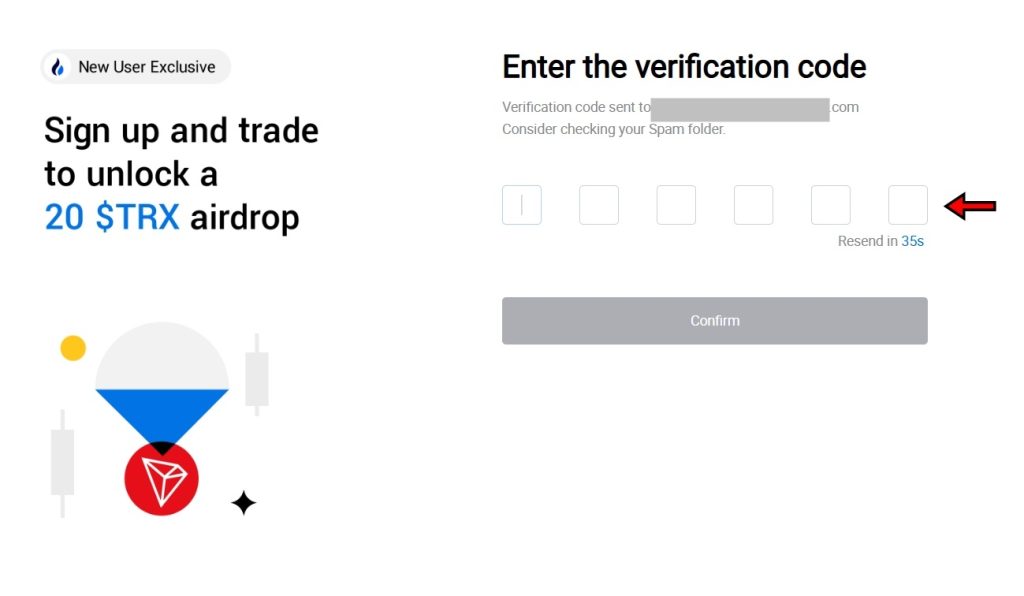
3. Enter the Verification Code
HTX will send a verification code either to your email inbox or via SMS, depending on which method you used. Check your messages, copy the code, and enter it on the screen. Once submitted, click “Confirm” to continue.
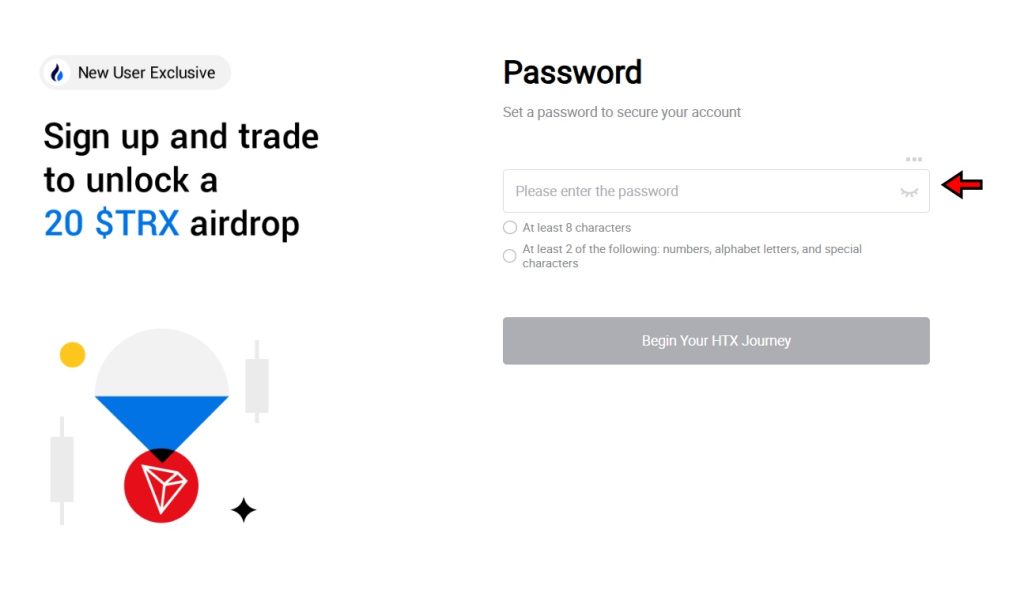
4. Create a Strong Password
Now you’ll be asked to set a password. Choose one that is strong and secure. A good password includes a combination of uppercase and lowercase letters, numbers, and special characters. Avoid using anything easy to guess or commonly used across your other accounts.
5. Start Trading
Once your password is set, the account setup is complete. You can now access the platform, explore its features, and begin trading. The dashboard offers a clean layout with access to markets, assets, and trading pairs. You’re now ready to use HTX.
How to Complete KYC on HTX?
HTX allows users to start trading with minimal friction. Basic activities, such as small deposits and limited withdrawals, can be done without complete identity verification. But if you plan to increase your trading volume or unlock more platform features, you’ll need to complete KYC.
Here’s a quick overview of what’s possible without verification:
- You can deposit up to $1,000 without verifying your identity.
- You can withdraw up to 0.006 BTC per day without submitting documents.
For higher limits and full access, HTX offers four KYC tiers.
- Tier 1: Only an email address is required.
- Tier 2: Requires basic personal info and an official ID.
- Tier 3: Includes additional questions about your trading activity, income, and source of funds.
- Tier 4: Requires proof of address and financial documents.
If you're ready to verify your account, follow these steps.
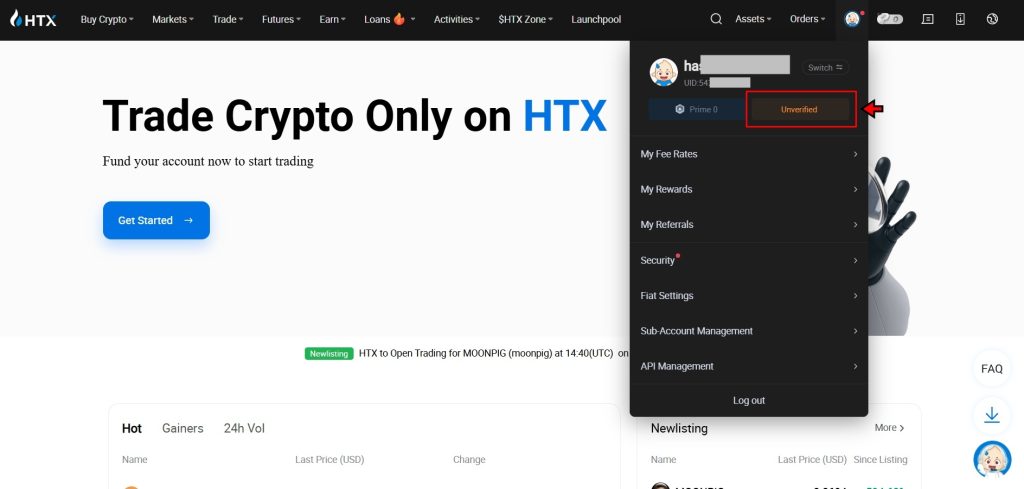
1. Visit the KYC Verification Page
On the HTX homepage, move your cursor to the user icon in the top-right corner. In the dropdown menu, locate your email and UID. Just below that, click the “Unverified” label to open the verification options.
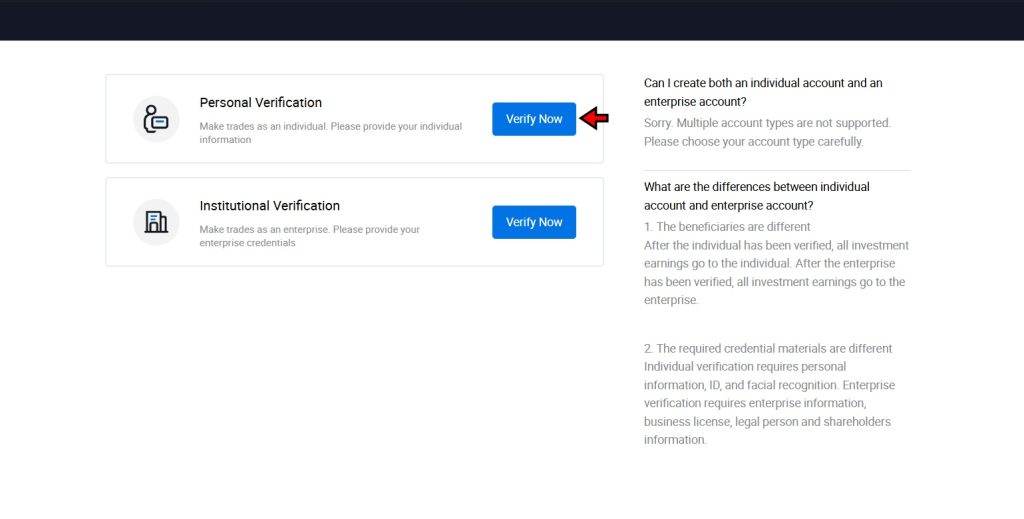
2. Click Verify to Start the Process
You’ll land on a page that offers two types of verification: Personal and Institutional. Most users will choose the “Personal” option. Click the “Verify” button next to it to get started.
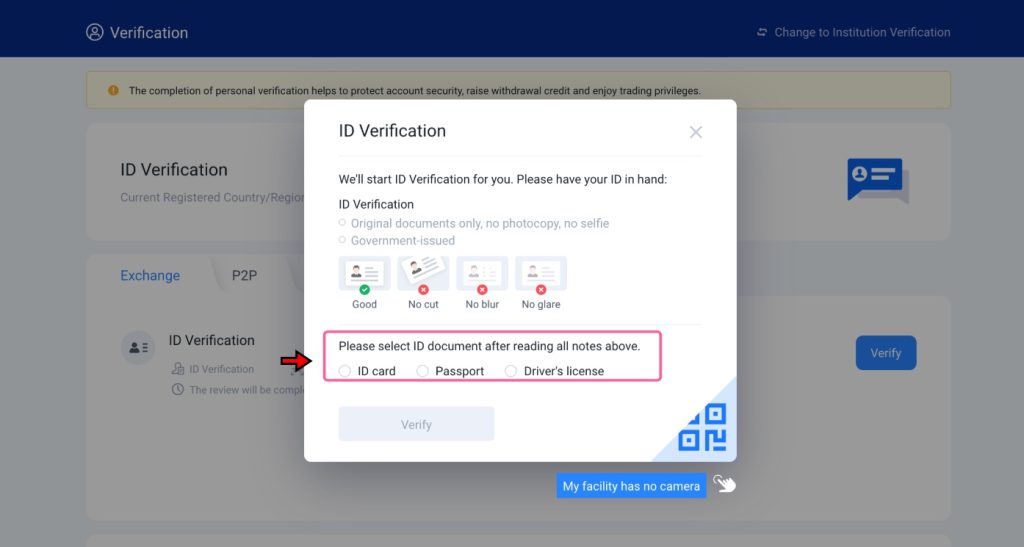
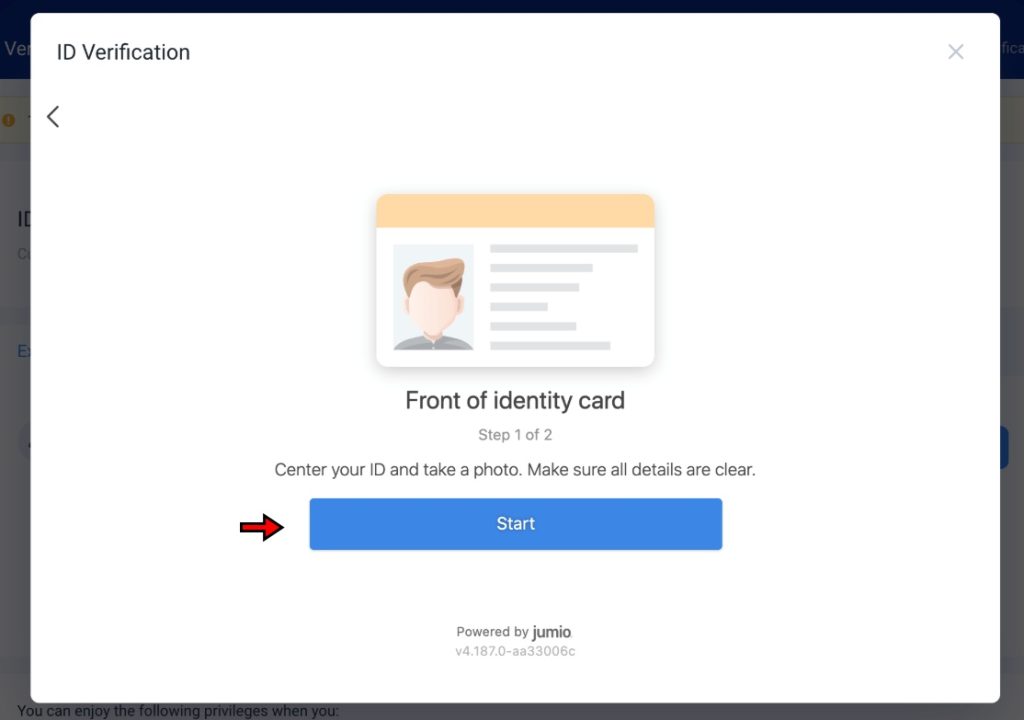
3. Choose Country and Document Type
You’ll first be asked to select your country or region. After that, pick the type of ID you want to use. HTX accepts passports, driver’s licenses, and national identity cards. Once selected, click “Verify” to move forward.
4. Upload Photos of Your ID
You can either upload pictures of your ID or take photos in real time using your device’s camera. Make sure the images are clear, and all details are easy to read.
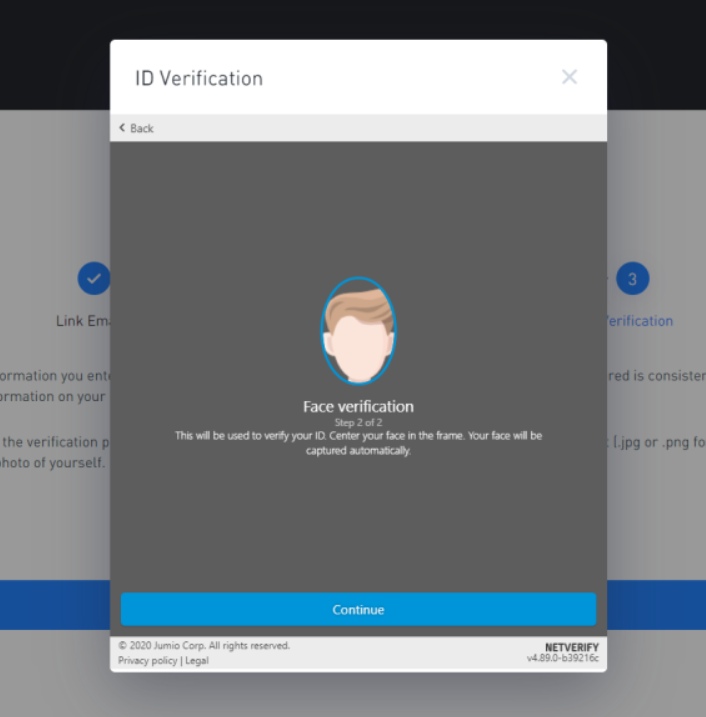
5. Complete Facial Verification
After uploading your ID, you’ll be prompted to complete facial verification. You can use your computer or phone camera. Follow the instructions on the screen and capture a clear image of your face.
6. Wait for Approval
Once everything is submitted, HTX will begin reviewing your application. In most cases, verification is completed within minutes. Occasionally, it may take longer (up to 7 days) depending on volume or if any documents need further review.

After approval, your account will be upgraded, and you’ll gain access to higher limits and additional trading features.
How to Deposit Funds on HTX?
Before placing any trades, you need to fund your HTX account. The platform supports both crypto deposits and fiat purchases. You can choose the method that works best for you. Below is a step-by-step guide for each option.
Depositing Crypto on HTX
Depositing cryptocurrency on HTX follows the same pattern you’ll see on most exchanges. Here’s how to get it done.
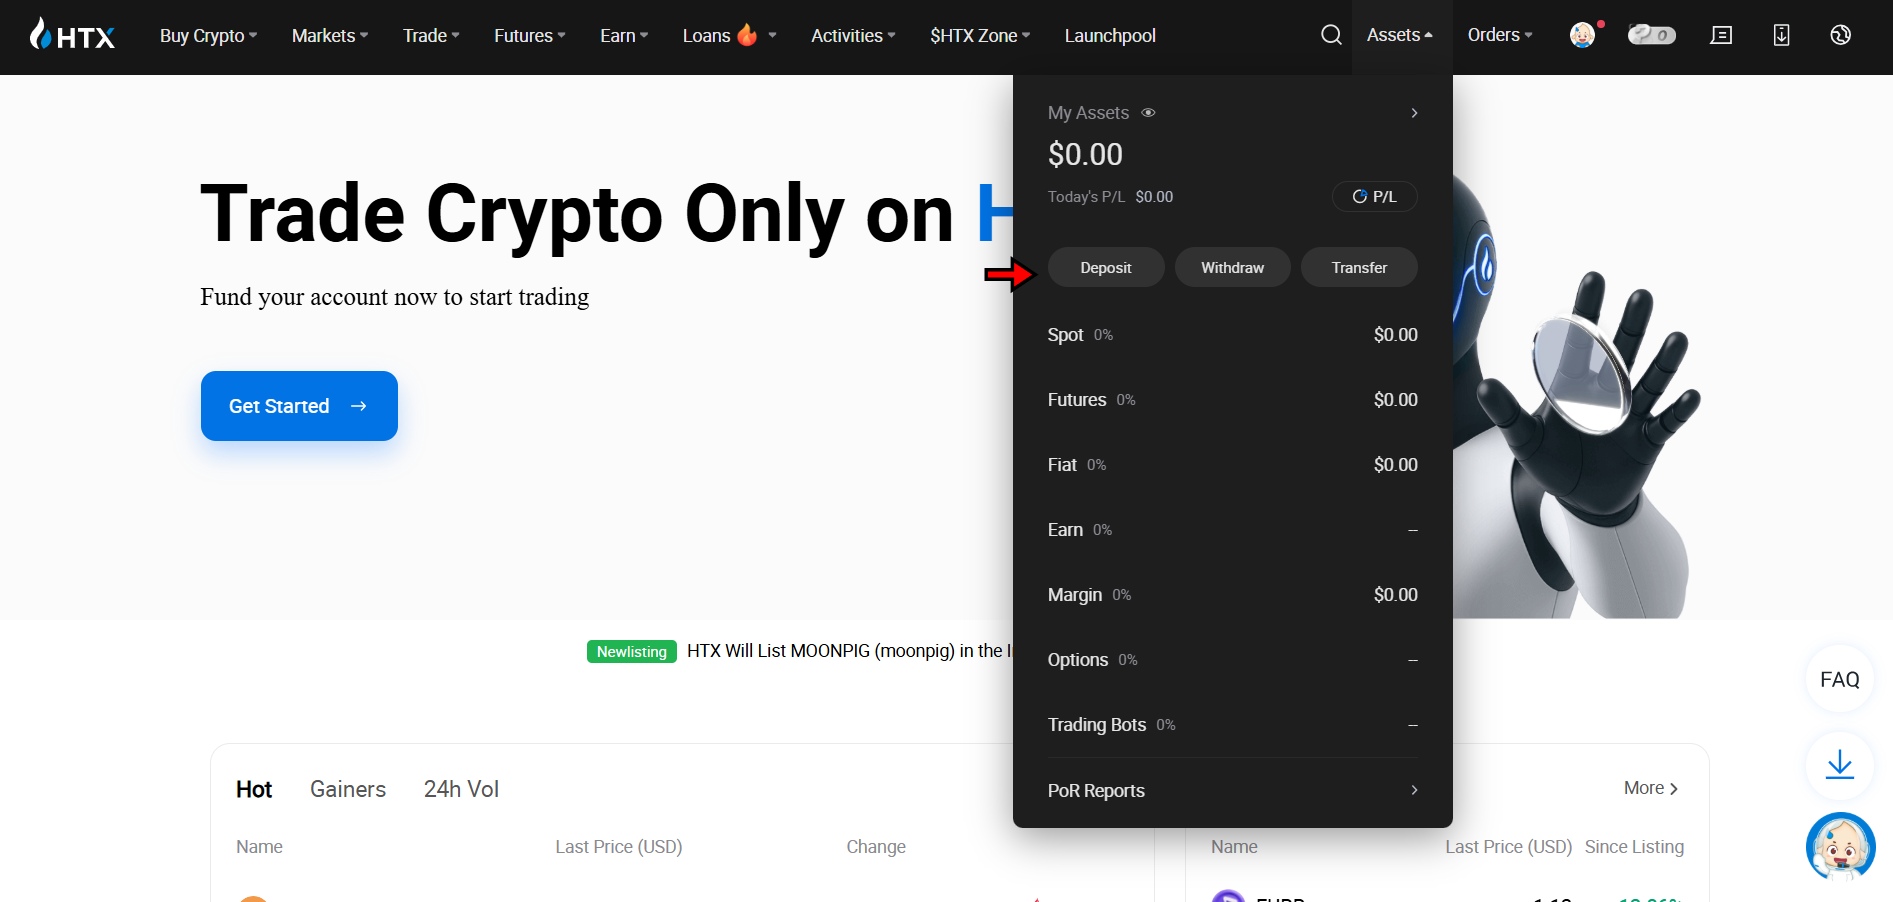
- Go to the Deposit Page: Start by going to the HTX homepage. Hover your cursor over the “Assets” tab in the top navigation bar. From the dropdown menu, click on “Deposit”. This will take you to the deposit interface.
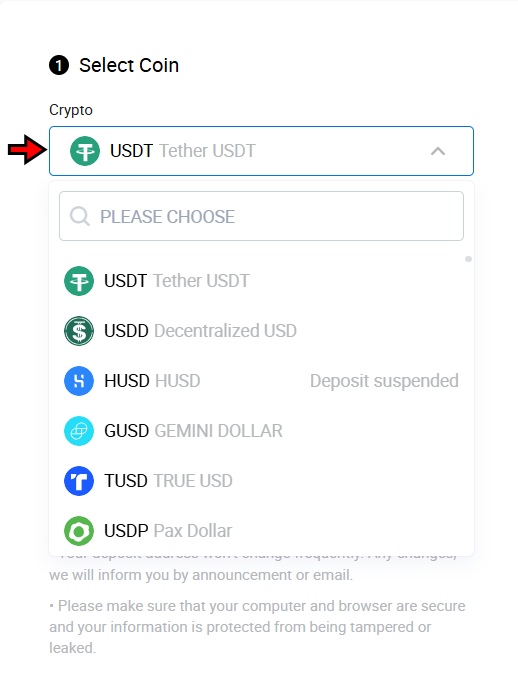
- Choose the Crypto You Want to Deposit: On the deposit page, use the dropdown menu to select the cryptocurrency you plan to transfer. Pick the right one to make sure your deposit goes through smoothly.
- Select Network and Generate Address: After choosing your coin, move to the right side of the screen. Select the blockchain network you’ll be using for the transfer. It’s critical that the network matches the one you’re sending from. For example, if you prefer using TRC20 to deposit USDT, make sure both wallets have selected TRC20 for this transaction. Once selected, click “Send Address” to generate your unique deposit address.
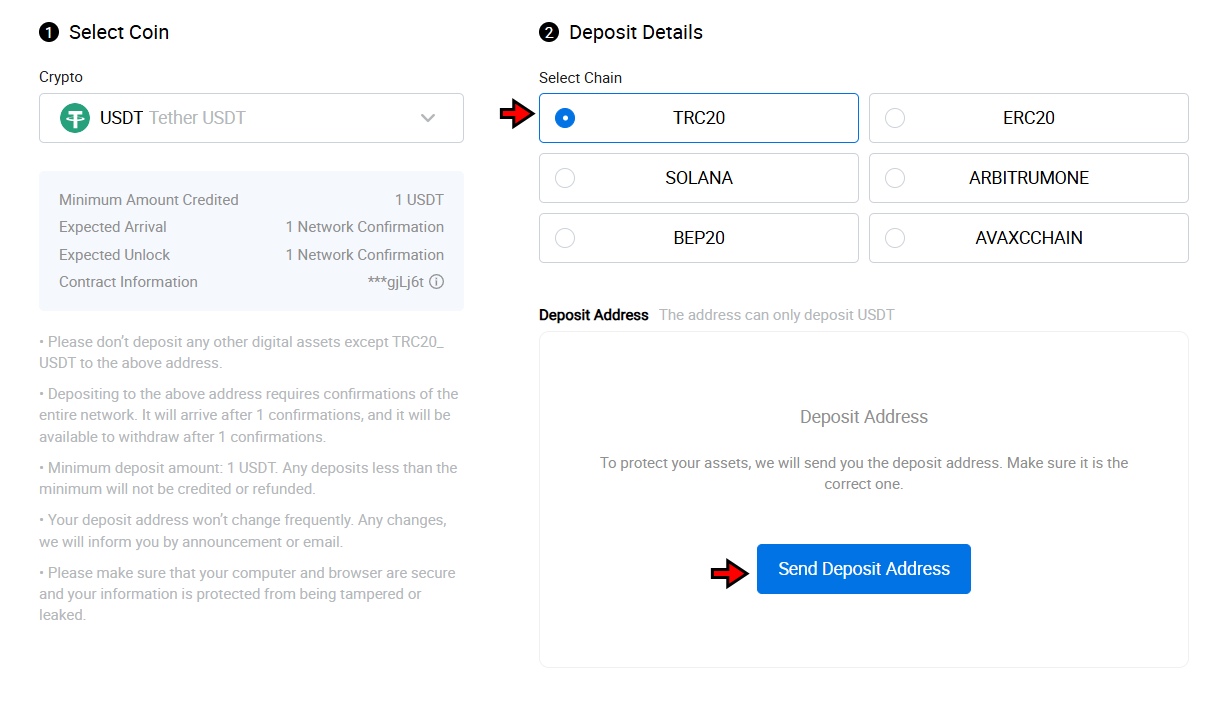
- Copy the Address and Send Funds: Now copy the wallet address shown on the screen. Head over to the wallet or exchange where your crypto is currently stored and paste the address. Complete the transaction. Once confirmed on the blockchain, the funds will appear in your HTX wallet.
Buying Crypto with Fiat on HTX
If you’re starting fresh without any crypto, HTX also allows you to buy digital assets using fiat currency. Here’s how to do that.
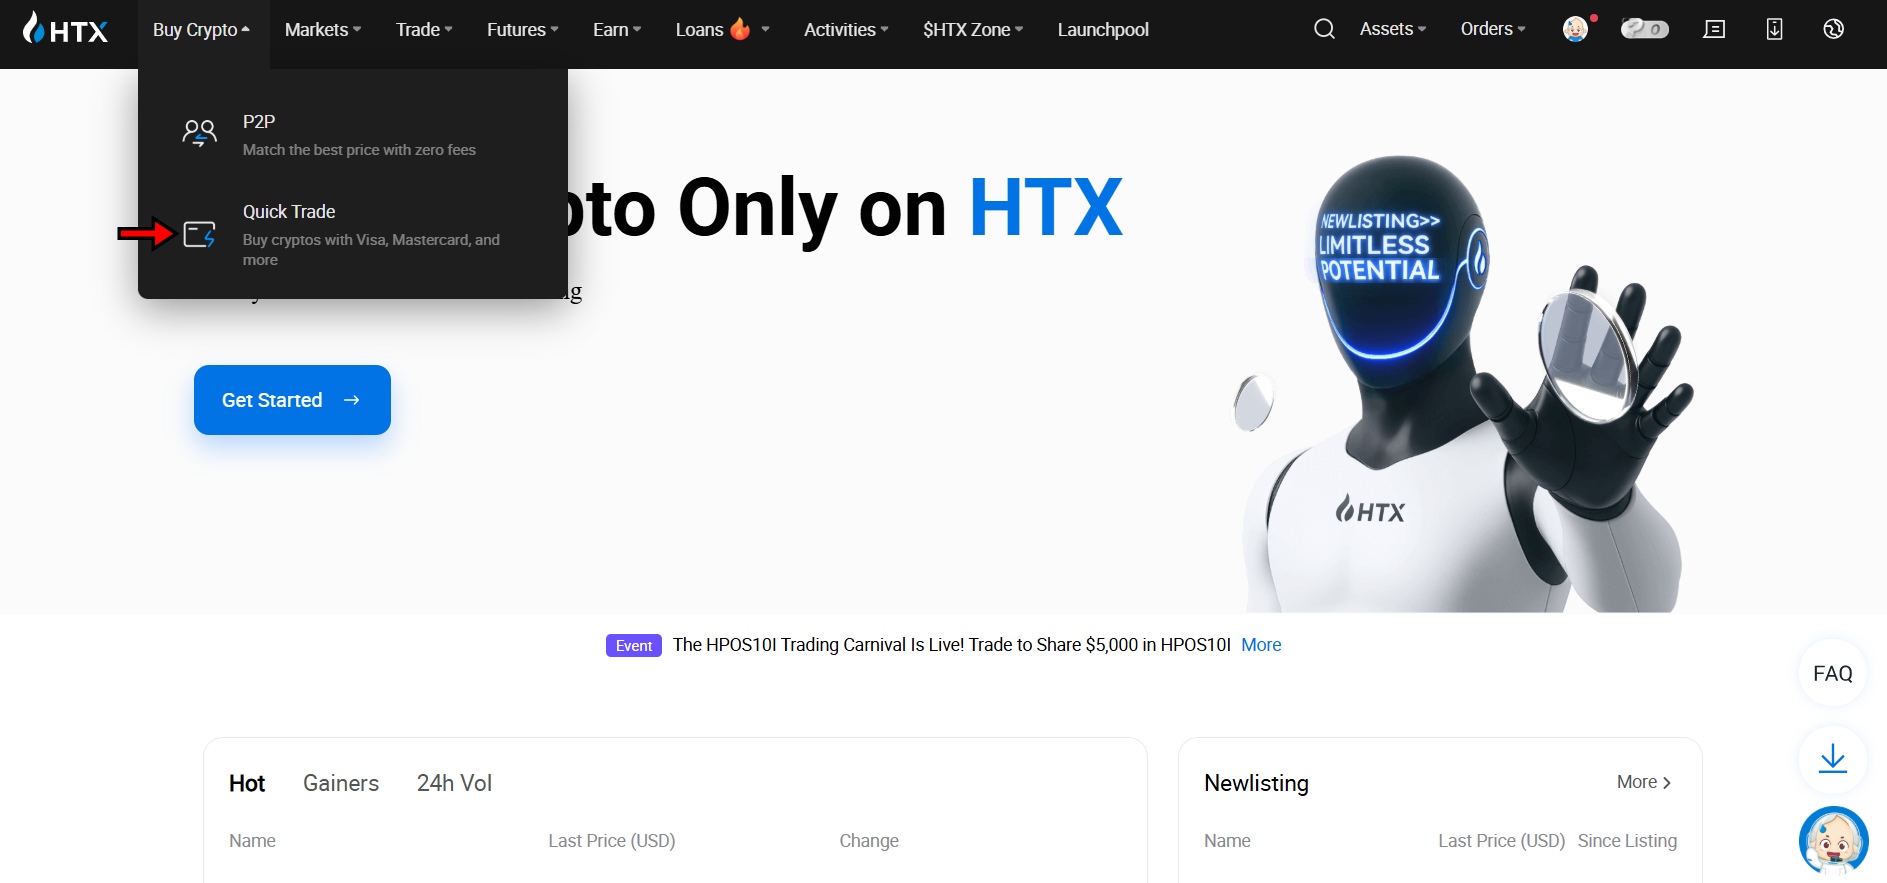
- Go to the Quick Trade Page: From the HTX homepage, hover over the “Buy Crypto” tab at the top. In the dropdown, click on “Quick Trade”. This brings you to a simple interface designed for fast purchases.
- Select Fiat Currency and Crypto: In the Quick Trade section, choose the fiat currency you plan to use. Then, select the crypto you want to buy. HTX will display the live exchange rate and show you how much crypto you’ll receive.

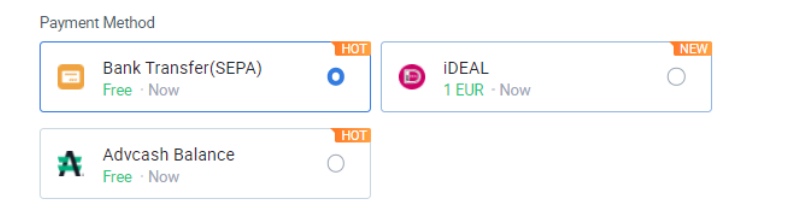
- Choose a Payment Method: Below the currency fields, select a payment method. If you haven’t added one yet, the platform will prompt you to set it up. Add your bank or card details, confirm your payment, and the crypto will be delivered directly to your HTX wallet.
Once your account is funded, you’re ready to start trading.
Understanding Order Types on HTX
Understanding how each order type works is critical to trading effectively on HTX. Each type serves a specific purpose, offering different levels of control, speed, and risk management. Below is a breakdown of the most commonly used order types on HTX, along with simple examples for clarity.
Limit Order
A limit order allows you to buy or sell at a specific price or better. This type of order does not execute instantly. Instead, it enters the order book and waits until the market price reaches your specified level.
This order type gives complete control over entry or exit points, making it useful for traders who want to avoid slippage or unfavorable market prices.
Example: The current price of Bitcoin is $100,000. You believe the price will drop slightly before rebounding. You place a buy limit order at $99,000. If the market reaches $99,000, your order will automatically execute.
Market Order
A market order executes immediately at the best available price. It does not wait in the order book. This type is straightforward and ideal for traders who prioritize speed over precision. Market orders are especially useful in fast-moving markets or when entering or exiting a position without delay.
Example: Bitcoin is trading at $100,000. You want to enter the market immediately. You place a buy market order, and the system fills it instantly at or near $100,000.
Stop-Limit Order
A stop-limit order combines the stop price and the limit price. Once the stop price is reached, the system places a limit order at the limit price.
This setup allows traders to define their risk and reward zones with precision. It won’t execute unless both conditions are met, so there’s more control, but also a risk the order won’t fill.
Example: Bitcoin is at $100,000. You want to enter only if it shows upward momentum. You set a stop price at $101,000 and a limit price at $101,200. When Bitcoin hits $101,000, a limit order is triggered. It will only execute if the price stays at or below $101,200.
Trigger Order
A trigger order lets traders pre-set conditions under which a market or limit order will automatically be placed. When the market reaches the trigger price, the system submits your selected type of order.
This type is ideal for those who want to automate trade entries or exits based on specific price movements.
Example: Ethereum is trading at $2,000. You expect a breakout at $2,100. You set a trigger order to place a market buy when the price reaches $2,100. Once ETH hits $2,100, the system immediately executes a market order.
Trailing Stop Order
A trailing stop automatically adjusts as the market moves in your favor, maintaining a set distance from the highest price reached. It locks in profits if the market reverses. This order is suited for trend-following strategies and minimizes manual adjustments.
Example: Bitcoin is at $100,000. You place a trailing stop sell order with a $2,000 trailing amount. If Bitcoin climbs to $105,000, the stop moves to $103,000. If the price drops to $103,000, the order triggers, locking in profits from the upward move.
TWAP (Time-Weighted Average Price)
TWAP divides a large order into smaller chunks and spreads them across a set time interval. This strategy reduces market impact and tries to match or beat the average price over that period.
Institutional traders often use TWAP to avoid sudden price moves caused by large transactions.
Example: You want to buy 1,000 ETH at around $2,000. Instead of placing a large single order, you use TWAP to spread the purchase over an hour. The system breaks it into smaller orders and executes them steadily, keeping the overall execution price near $2,000.
Each order type serves a strategic function. Beginners can start with limit and market orders, while advanced users may explore stop-limit, trigger, trailing stop, and TWAP for more control and automation.
HTX Spot Trading Tutorial
Spot trading on HTX involves buying or selling crypto at current market prices. HTX gives users access to a broad spot market with over 700 cryptocurrencies. What sets it apart is the option to trade with leverage directly in the spot market. More than 80 tokens support up to 5x leverage. This is useful for traders who want extra exposure without using futures. Below is a step-by-step guide to help you start your first spot trade.
1. Go to the HTX Spot Market
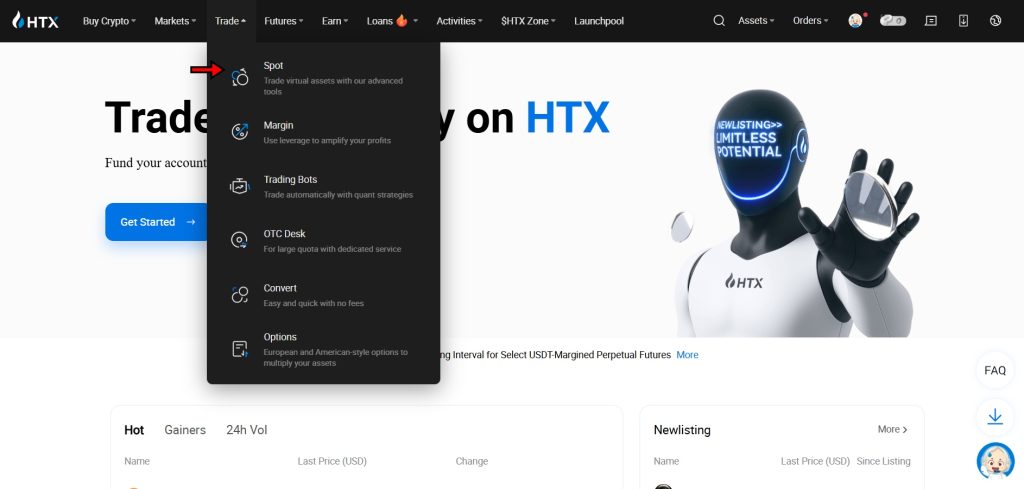
Start by opening the HTX homepage. Find the top navigation bar and hover over the “Trade” tab. In the dropdown, click on “Spot.” This takes you to HTX’s spot trading interface, where all trades are placed. The terminal shows real-time prices, charts, order books, and tools for managing trades.
2. Get Familiar with the Trading Interface
Take a few minutes to understand the layout, as it is important and can save you plenty of time later. Here’s a quick overview of what you’ll see:
- Trading Pair Selector: Found in the top left, this dropdown lets you search for any trading pair. You can type symbols like BTC or ETH to filter the list.
- Price Chart: This sits under the pair selector and shows live price movements. You can adjust timeframes and apply technical indicators for analysis.
- Order Book: On the right of the chart, the order book displays open buy and sell orders. Green indicates buys; red shows sells. This helps you gauge liquidity and momentum.
- Order Panel: On the far right, this is where you enter your trade details. It includes order type, price, and amount. This panel is where all orders are placed.
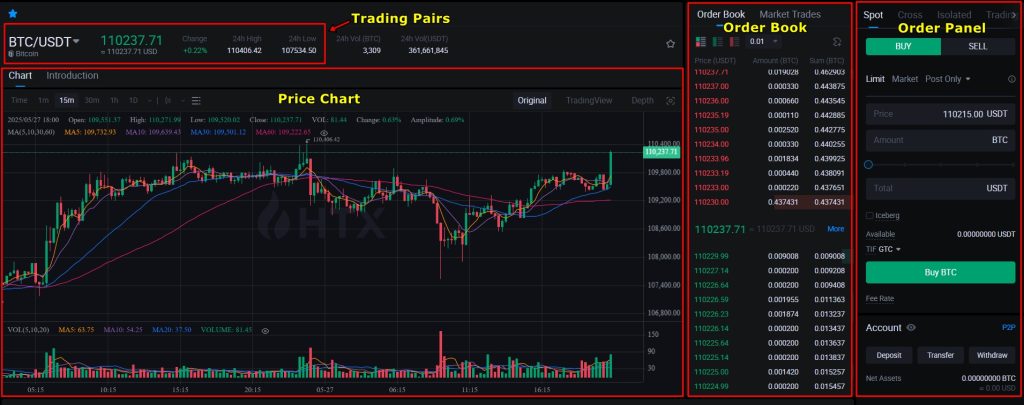
Understanding these areas will make your trading smoother and more accurate.
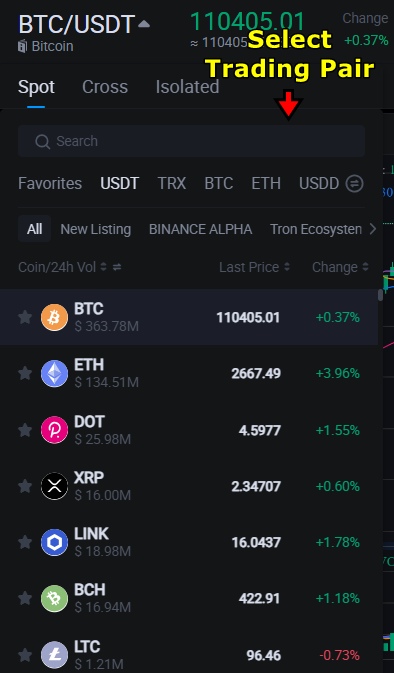
3. Choose a Trading Pair
Next, go to the trading pair selector. Scroll through the list or search directly using the search bar. For this example, we are choosing BTC/USDT. This pair allows you to trade Bitcoin using Tether. Once selected, the page updates to show BTC/USDT’s chart, order book, and trading options.
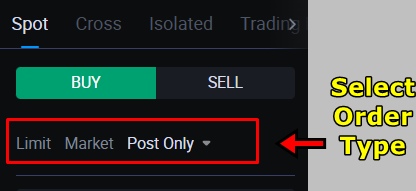
4. Select an Order Type
Head to the order panel on the right side of the screen and choose an order type. HTX supports multiple order types. For spot trading, the most common ones are:
- Limit Order: Lets you set your own buy or sell price. The order fills only when the market hits that price.
- Market Order: Buys or sells instantly at the current best available price.
For this example, we are going with the Limit Order as it gives you better control over your entry point.
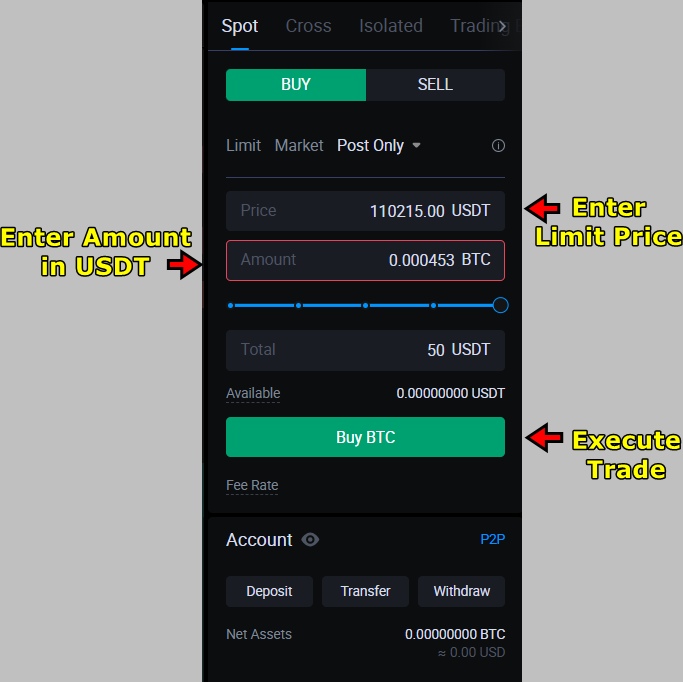
5. Enter Trade Details and Place the Order
Fill out the required fields in the order panel:
- Limit Price: Type the price you want to buy Bitcoin at. For example, if BTC is trading at $105,000, you might place a buy order at $104,000 to try getting a better deal.
- Amount: Decide how much BTC you want to buy or how much USDT to spend. The platform calculates the remaining value automatically.
Double-check everything. If it looks correct, click the “Buy BTC” button. This places your order on the market.
Note: If you want to use leverage in the spot market, HTX allows both Isolated and Cross margin trading. You can switch modes using the toggle above the order panel. More details on futures trading and leverage will be covered in the next section.
6. Wait for the Order to Fill
If you used a Limit Order, your trade won’t fill unless the market hits your price. The order will stay active in the Open Orders section. If the price moves in your favor, HTX matches your order and completes the trade.
Once filled, the asset (in this case, BTC) will appear in your Spot Wallet. You can view all filled trades under “My Trades” or track your past orders in the Order History tab. Now your first spot trade is complete, and your funds are available for holding, selling, or transferring.
HTX Futures Trading Tutorial
HTX supports futures trading for users who want to speculate on cryptocurrency prices without owning the actual asset. Futures contracts allow users to open positions based on their market view. They can go long if they expect the price to rise, or short if they expect it to fall. The exchange offers leverage, which amplifies both gains and losses. On HTX, leverage goes up to 200x, but beginners should start with a lower setting.
HTX offers two types of futures contracts: USDT-Margined and Coin-Margined. In this tutorial, the focus is on USDT-Margined contracts. These contracts use Tether (USDT) as margin, for settlement, and for calculating profit and loss.
Follow the steps below to open and manage a futures position using HTX's USDT-Margined trading interface.
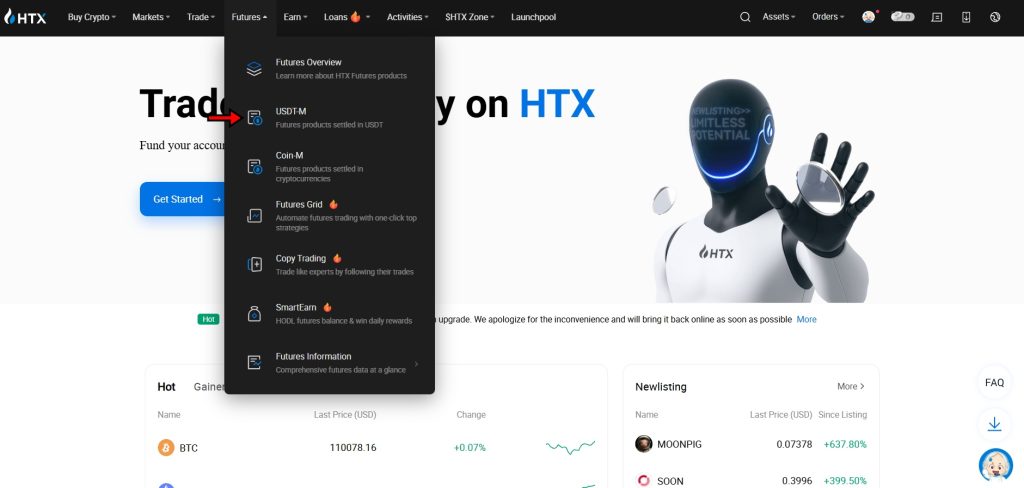
1. Go to USDT-Margined Futures Interface
After logging in to your HTX account, locate the top navigation bar. Hover your mouse over the “Futures” tab. A dropdown menu will appear. Click on “USDT-M Futures.” This opens the trading interface for all Tether-settled perpetual contracts.
2. Get Familiar with the Trading Interface
Before placing a trade, understand the layout. The interface contains four key areas:
- The trading pair selector appears at the top left. This allows you to switch between available contracts such as BTC/USDT, ETH/USDT, and others.
- The price chart is below the selector. This chart updates in real time and includes options for indicators and drawing tools.
- The order book sits to the right of the chart. It shows buy and sell orders currently placed by other traders, split by price level and volume.
- The order panel is on the far right. This is where you place and manage your trades. You can choose order types, select leverage, set margin mode, and input position size.
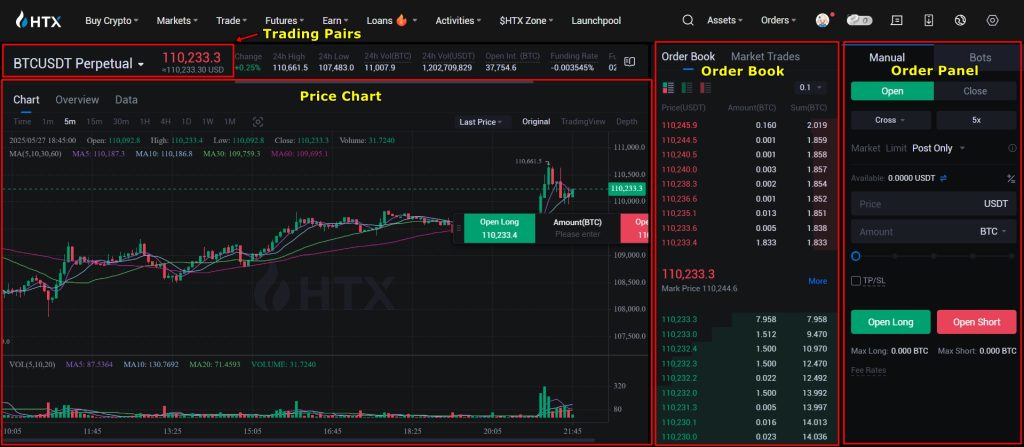
Spend a few minutes reviewing each section. Make sure you’re familiar with what each panel does before proceeding.
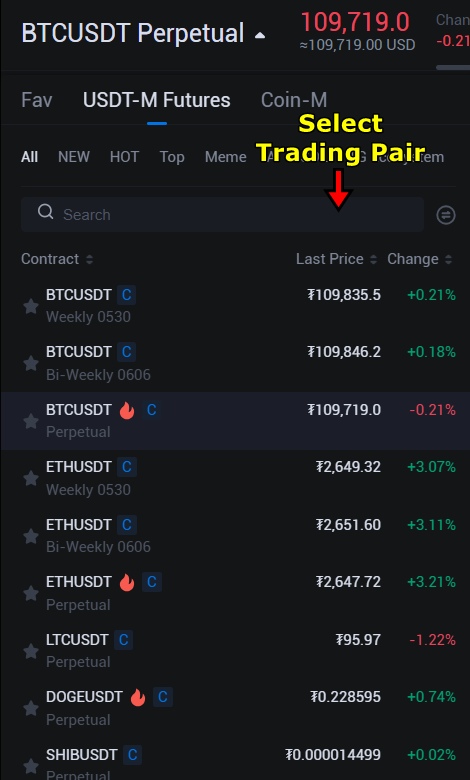
3. Choose a Trading Pair
By default, the platform loads the BTC/USDT pair. If you want to trade another contract, click on the trading pair at the top left. A list of available contracts will appear. Use the search bar to type the pair you want to trade and click to select it. This loads your desired perpetual contract, which is settled in USDT. For this tutorial, we will be selecting BTC/USDT.
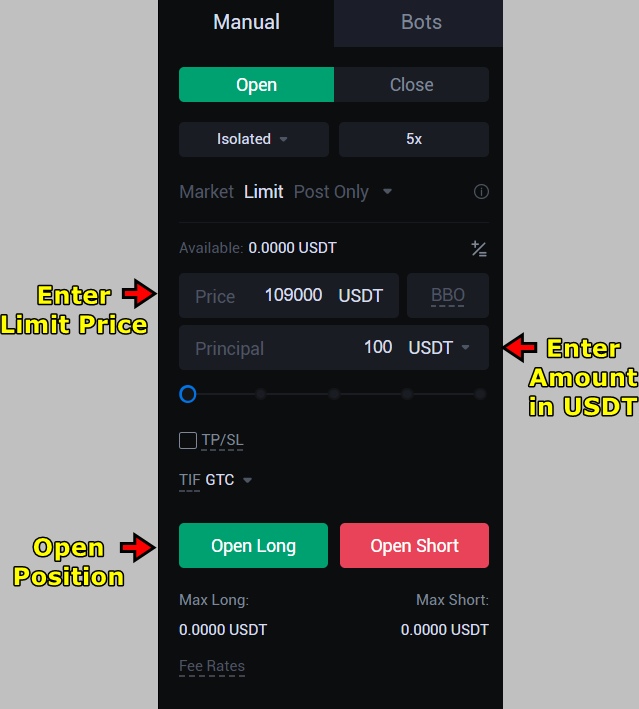
4. Select an Order Type
HTX offers several order types as mentioned earlier in the article. For this tutorial, use a Limit Order. This lets you specify the exact price at which you want to enter the market.
In the order panel, locate the dropdown menu labeled Order Type. Select “Limit.”
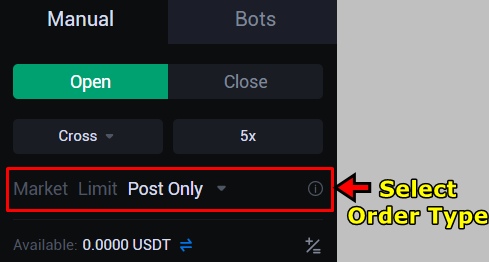
Next, input your desired entry price. For example, if Bitcoin is trading at 116,500 USDT and you want to enter at 116,400, type 116,400 in the price field.
5. Set Margin Mode and Leverage
Before entering the trade, choose your margin mode. Two options are available:
- Isolated Margin limits your risk to the specific amount used for that trade.
- Cross Margin uses all available funds in your futures account to cover potential losses.
For better control, select Isolated Margin. This reduces the chance of losing your entire balance if the market moves against your position.
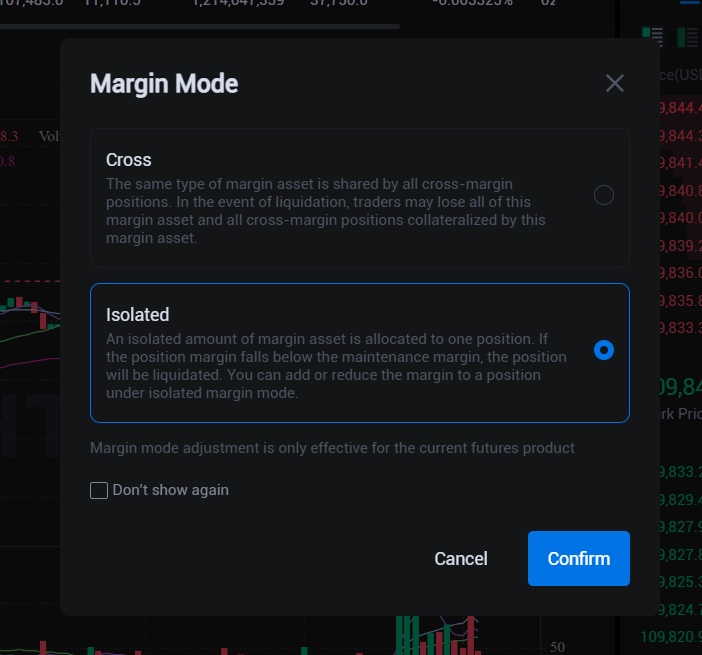
Once you select the margin mode, set your leverage. Click the current leverage number to open the adjustment window. Use the slider or enter a value manually. Select 5x leverage for this example. This means that a 100 USDT margin allows you to control a position worth 500 USDT.
Use low leverage when starting out. High leverage increases both risk and volatility.
6. Open a Position
Now that your order is configured, it’s time to decide the direction of your trade.
- If you expect the price to increase, click “Buy/Long.”
- If you expect the price to decrease, click “Sell/Short.”
Enter the amount of USDT you want to use for the trade. Review your order details. Make sure the price, margin, leverage, and direction are correct.
Click the “Buy/Long” button to place your order. Your order will now appear under the “Open Orders” tab. If the market reaches your set price, the position will automatically open and move to the “Positions” tab.
Note: If your futures wallet shows zero balance, click the “Transfer” button in the top-right corner of the interface. Move USDT from your Spot Wallet to your Futures Wallet.
7. Monitor Your Open Position
Once the order is filled, check the “Positions” tab to view your live trade. The platform displays key information:
- Position Size: Shows how much of the asset you are trading.
- Entry Price: This is the price at which your order was executed.
- Unrealized PnL: Shows your current floating profit or loss.
- Realized PnL: Appears if you partially close the trade.
- Liquidation Price: This is the level where HTX will force-close your position to prevent a negative balance.
Monitor these values while your trade is active. Use the information to decide when to exit or whether to adjust your strategy.
8. Set Take-Profit and Stop-Loss
Managing risk is critical. HTX allows you to add a Take-Profit (TP) and Stop-Loss (SL) to any active position.
- In the Positions tab, locate your open trade. Click the “TP/SL” button. A new window will appear.
- In the Take-Profit field, enter the price at which you want to secure profit.
- In the Stop-Loss field, enter the price where you want to limit your loss.
Click “Confirm” to activate these settings. The platform will automatically close your position once either target is reached.
If you prefer to exit manually, click “Limit” or “Market” under the “Close Position” section. Set the amount you want to close, then confirm.
HTX Copy Trading Tutorial
HTX offers a copy trading feature that allows users to automatically follow and replicate the strategies of experienced traders. This is useful for beginners or passive investors who want exposure to the market without managing trades directly. Here's how to start using HTX Copy Trading.
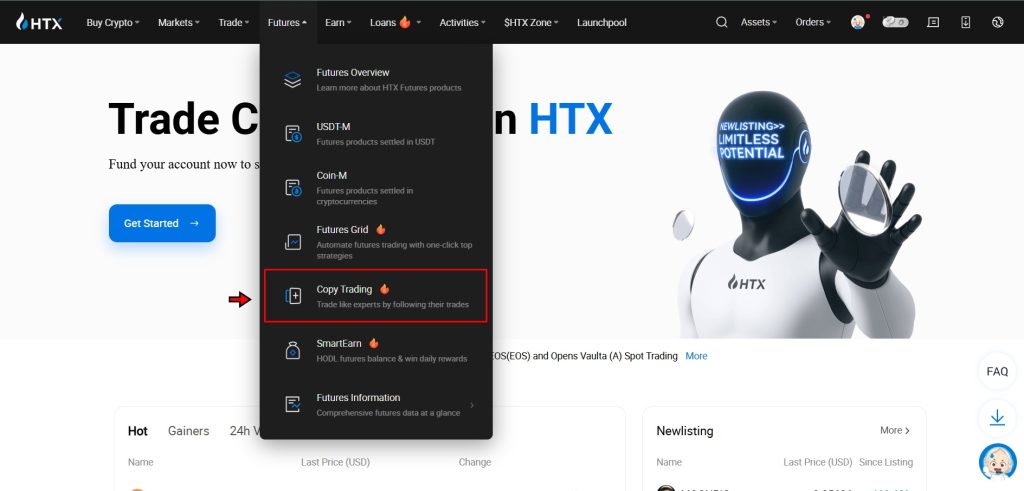
1. Go to the Copy Trading Page
Log in to your HTX account from the official website. On the homepage, move your cursor over the Futures tab in the top navigation bar. A dropdown menu will appear, select “Copy Trading” from this list. This will direct you to the dedicated copy trading section, where you can begin exploring available lead traders.
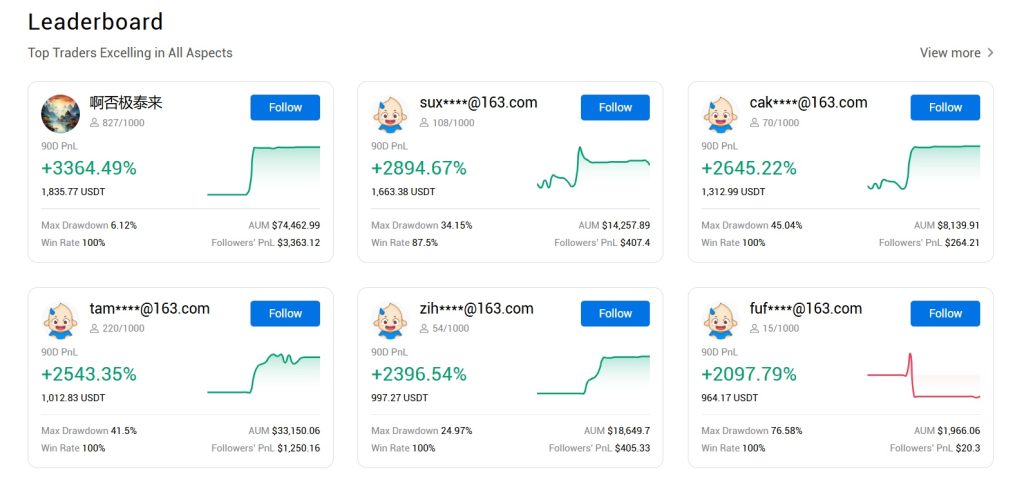
2. Choose a Trader to Copy
On the copy trading page, you’ll see a leaderboard of active traders ranked by performance metrics. Each trader profile displays detailed statistics, including historical returns, win rates, and follower count. Click on any trader’s profile to view their trading history and strategy. Once you find a trader whose performance aligns with your goals, click Follow to initiate copy trading with that individual.
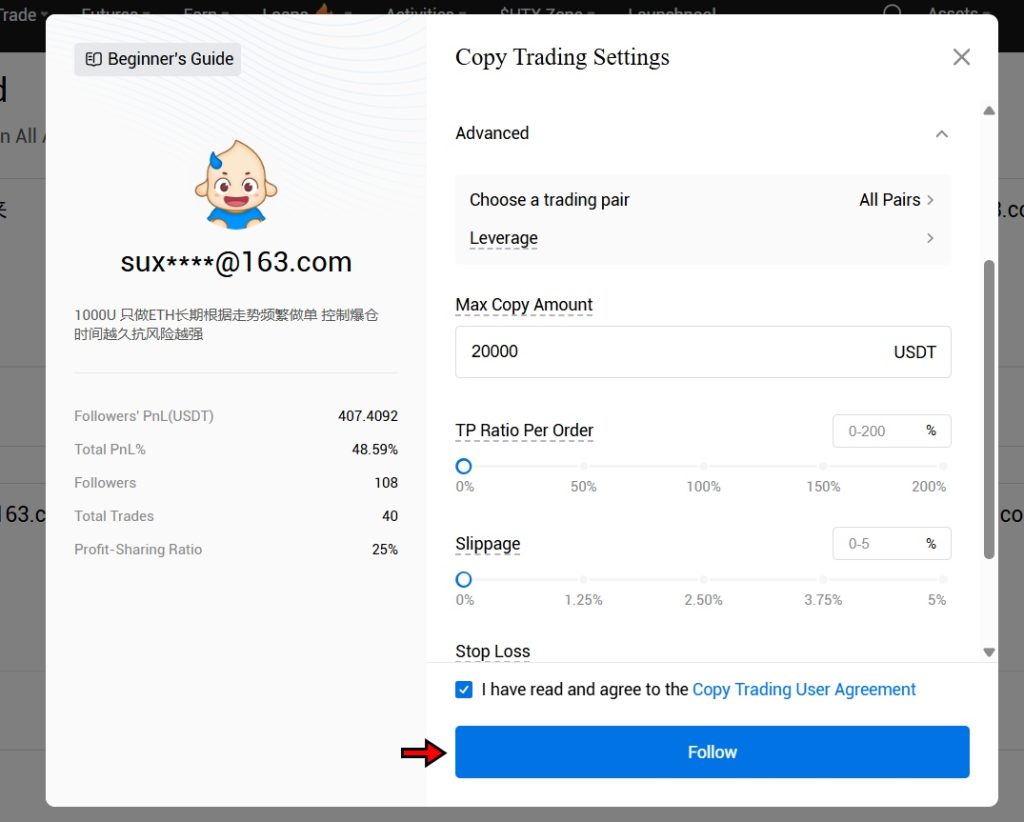
3. Adjust Copy Trading Settings
After selecting a trader to follow, configure your copy trading settings. These settings determine how your account mirrors the trader’s positions.
You’ll need to:
- Set the Order Cost and SL Percentage per Order: This defines how much you’re willing to allocate to each copied trade and the stop-loss level to limit losses.
- Ensure a Minimum Balance: You must have at least 10 USDT in your Copy Trading account to begin.
- Choose a Copy Mode: Fixed Amount Mode allows you to allocate a specific amount for each trade. Fixed Ratio Mode copies trades proportionally based on the lead trader’s position size relative to your available capital.
In the Advanced Settings, you can further customize parameters:
- Max Amount to Copy limits your total exposure to a single trade.
- Slippage Control helps you manage execution risk by preventing trades from triggering if the market price deviates too far from the lead trader’s price.
- Pair Selection, Take Profit Ratio, and Stop Loss can also be configured to align with your risk tolerance.
Once you’ve reviewed all settings, click Follow to activate automatic trade replication. From this point on, your account will mirror the selected trader’s moves in real-time based on your configured preferences.
HTX Key Trading Features
HTX provides a wide set of trading tools designed to support a variety of strategies and trader profiles. Beyond standard spot and futures markets, the platform offers advanced features like options contracts, peer-to-peer exchanges, and automated trading bots. These tools help traders hedge risk, manage local currency access, and automate repetitive tasks.
HTX Options Trading
Options trading on HTX allows users to speculate on price direction without directly buying or selling the crypto asset. Instead, traders buy a contract that grants the right (but not the obligation) to buy or sell a specific cryptocurrency at a fixed price, known as the strike price, within a certain period.
There are two types of options:
- Call Options: Traders buy this when they expect the asset’s price to rise.
- Put Options: Traders use this when they expect the asset’s price to fall.
There are also two styles of execution:
- American-style options: Can be exercised at any time before expiration.
- European-style options: Can only be exercised at expiration.
HTX users can choose a trading pair (e.g., BTC/USDT), select a strike price, and set the contract duration, which may range from a few minutes to several months. The platform then calculates a premium, which is the upfront cost to open the position. This fee depends on market volatility and time remaining until expiration.
For example, suppose BTC is trading at $100,000. A trader expecting a price increase might buy a call option with a strike price of $105,000. If BTC rises above $105,000 before expiration, the option can be exercised for profit. If not, the trader loses only the premium paid.
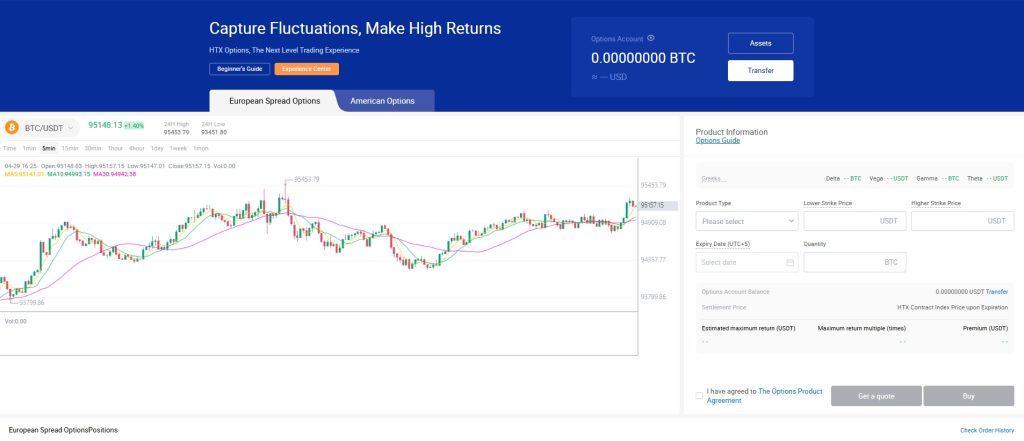
HTX options provide flexibility for both speculation and risk management. They’re often used to lock in potential gains or to limit exposure to price swings.
HTX Peer-to-Peer (P2P) Trading
HTX’s P2P trading system allows users to exchange crypto directly with one another without relying on an order book or centralized liquidity. Each user posts offers with their own terms—such as price, payment method, and supported fiat currency.
This system works through direct negotiation between buyers and sellers. Instead of matching through algorithms, users choose who they want to trade with, review their reputation, and complete the deal once payment is confirmed.
HTX supports a wide range of local and global fiat currencies. Depending on regional availability, traders can pay using:
- Bank transfers
- Mobile wallets
- Third-party services like PayPal
- Popular assets available for P2P include Bitcoin (BTC), Ethereum (ETH), and stablecoins like USDT.
To use P2P trading on HTX:
- Hover over the Buy Crypto tab and select P2P Trading.
- Choose your desired fiat currency and crypto.
- Browse available offers. Each offer lists the seller’s limits, rate, and accepted payment methods.
- Select an offer, complete payment, and confirm receipt before the crypto is released.
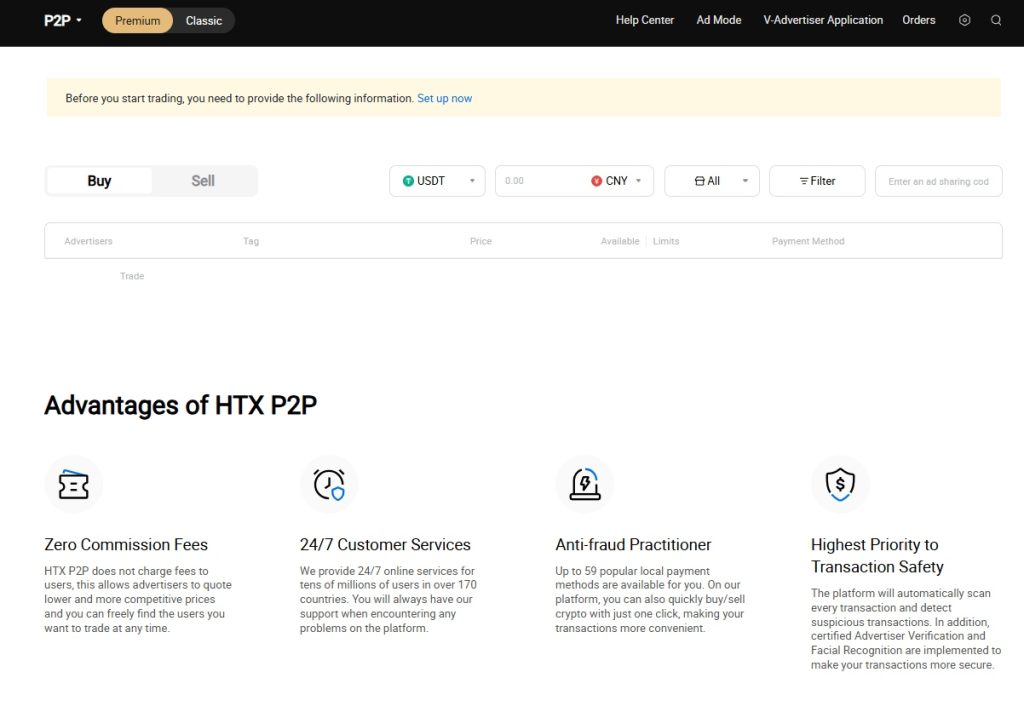
HTX also provides features like seller/buyer ratings, transaction histories, and dispute resolution to reduce risk. However, users are responsible for verifying payments and should only confirm once money is received.
P2P trading is useful for accessing local liquidity, bypassing banking restrictions, or purchasing crypto with payment methods not supported in standard markets.
HTX Trading Bots
HTX trading bots automate the execution of trading strategies based on user-defined rules. These bots operate continuously, day and night, executing trades without requiring manual input or supervision.
The most widely used bot on HTX is the Grid Trading Bot. It breaks a defined price range into multiple levels (grids) and places simultaneous buy and sell orders within that range. The bot earns small profits by buying low and selling high as the market fluctuates.
Here’s how it works:
- The user sets a low and high price to define the trading range (e.g., ETH between $1,900 and $2,100).
- The bot divides the range into several grids.
- As the price moves within the range, the bot automatically buys at the lower grid levels and sells at the upper ones.
If the price rises to $2,050, the bot sells ETH. If the price falls back to $1,950, it buys again, repeating this cycle and collecting profits from the volatility.

HTX bots connect securely through the exchange API. Funds remain in the user’s account, and all trades are executed under the user’s control. Users can pause or cancel bots at any time. Traders can also customize parameters such as number of grids, investment per grid, trading pair, stop-loss and take-profit thresholds
For developers or algorithmic traders, HTX offers WebSocket and REST API access to connect external trading bots or build custom solutions.
Trading bots suit users with experience in price pattern analysis and risk management. While automation simplifies execution, poor configuration can lead to losses. Effective use requires clear strategy and market awareness.
How to Withdraw Funds on HTX
HTX allows users to withdraw cryptocurrencies from their accounts directly to external wallets. The process is straightforward and mirrors how deposits work, but with a few extra steps to ensure accuracy and security. Below is a complete guide to withdrawing crypto on HTX.
1. Go to the Withdraw Page
Start by logging into your HTX account. On the homepage, move your cursor to the top navigation bar and hover over the “Assets” tab. From the dropdown list, click on “Withdraw”. This action opens the withdrawal interface, where you can initiate the transfer of funds from your HTX account to another wallet.
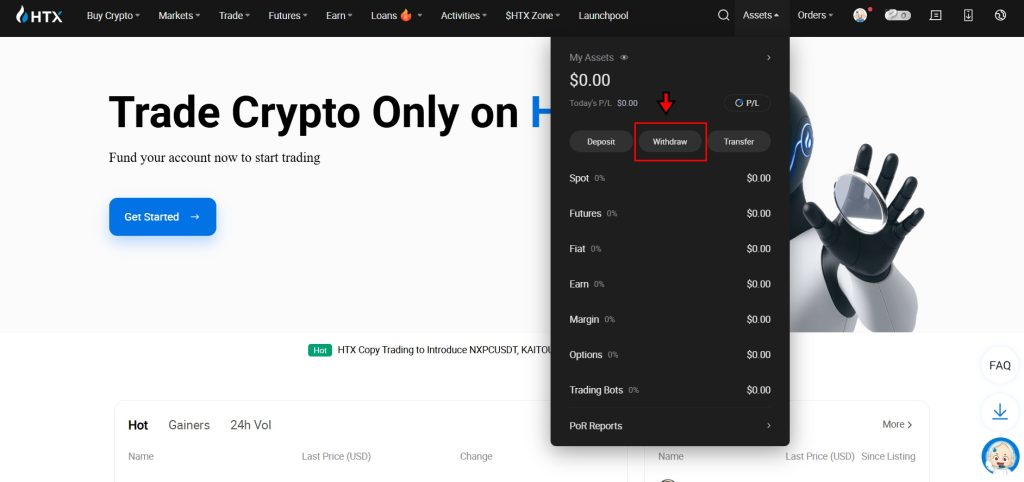
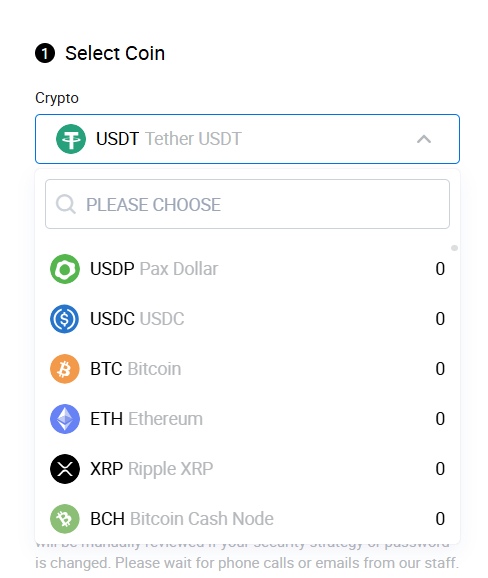
2. Choose the Crypto You Want to Withdraw
On the withdrawal page, you'll see a dropdown menu where you can select the specific cryptocurrency you want to withdraw. Choose the correct coin from the list, for example, USDT, BTC, or ETH. Make sure to select the exact crypto you plan to send, as choosing the wrong asset could result in failed or lost transactions.
3. Select Network and Add Address
After selecting the crypto, the next step is to pick the correct blockchain network for the withdrawal. Different coins may support multiple networks, such as ERC20, TRC20, BEP20, or others. It’s essential to match the withdrawal network with the one supported by the receiving wallet. If you're withdrawing USDT to a wallet using TRC20, ensure you also select TRC20 on HTX.
Once you’ve selected the network, go to your destination wallet and copy the receiving address. Paste this address into the withdrawal address field on HTX. Double-check the address to make sure it matches exactly, as crypto transactions are irreversible.
4. Enter the Amount to Withdraw
Next, enter the amount of cryptocurrency you want to withdraw. The system may display the minimum withdrawal amount and any applicable network fees. Review all details one more time before proceeding.
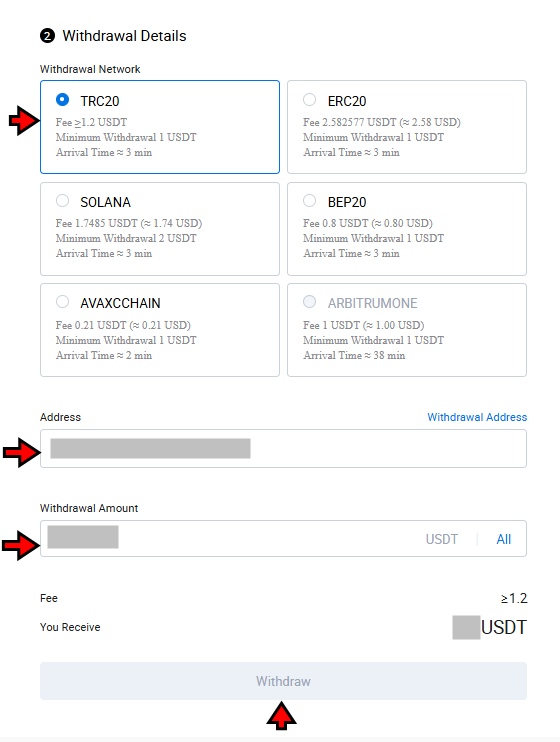
When you're confident everything is correct, click “Withdraw” to initiate the transaction. HTX may prompt additional security steps, such as 2FA verification, to complete the withdrawal.
Once confirmed, the withdrawal request is processed, and the funds are sent to your specified address. Processing time depends on the selected network and current network congestion.
Note: Withdrawal for certain cryptocurrencies might not work as HTX has temporarily disabled withdrawal for specific cryptocurrencies due to security reasons.
HTX Fees
HTX keeps its fee structure straightforward, with clear differences across deposit types, trading methods, and withdrawal processes.
Crypto deposits on HTX are free of charge. However, users still need to cover blockchain network fees, which are paid to miners or validators and not the exchange. For fiat deposits made using third-party providers such as PayPal or bank cards, HTX does not impose any additional fees. The payment processor may apply its own charges based on the selected currency and payment method.
Withdrawals follow a dynamic fee model. Instead of using a fixed fee, HTX recalculates withdrawal charges daily. The system determines fees by taking the current network cost and dividing it by the asset’s average price from the previous day. This keeps withdrawal costs aligned with real-time blockchain conditions.
In spot trading, HTX uses a maker-taker model. Makers place limit orders that add liquidity to the market and pay lower fees than takers, who execute market orders immediately. Both start with a base trading fee of 0.2%. Users who maintain higher 30-day trading volumes or hold HTX’s native token receive discounts on these rates.
Margin trading follows the same structure with a 0.2% fee for both makers and takers. Borrowing funds introduces hourly interest costs that vary depending on the cryptocurrency being borrowed.
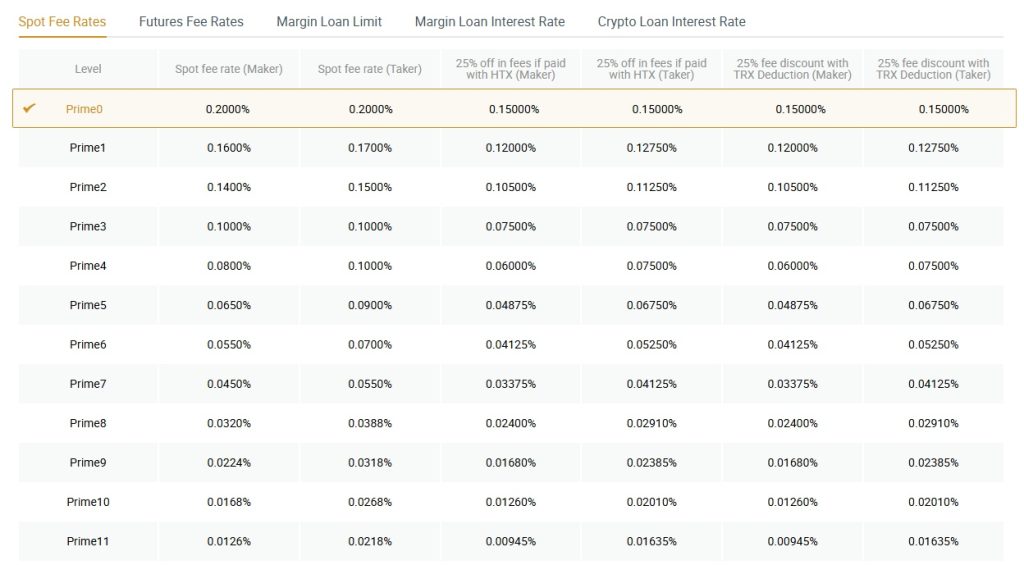
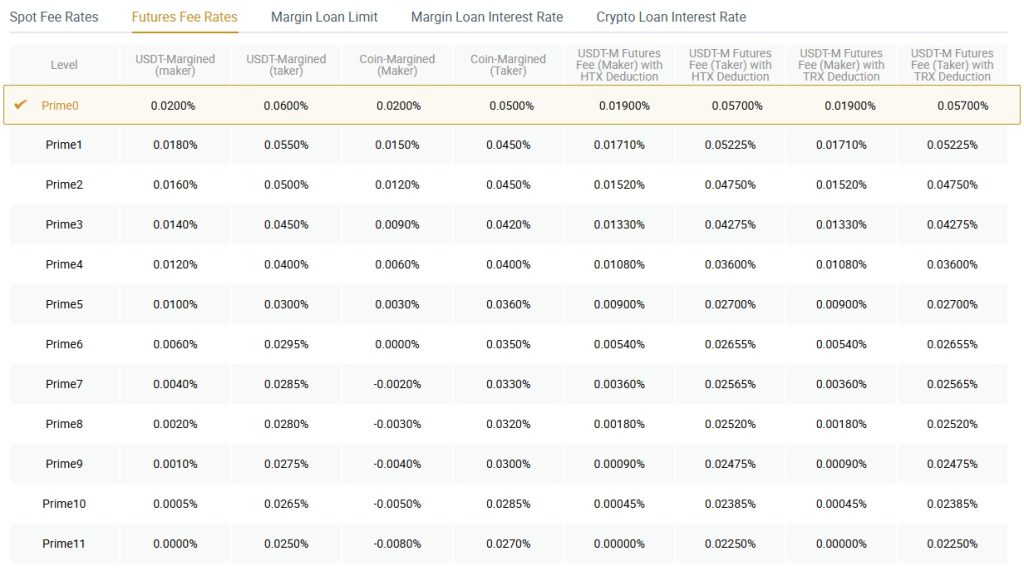
For futures trading, HTX applies different rates based on contract type. Coin-margined contracts have a 0.02% maker fee and a 0.05% taker fee. USDT-margined contracts follow a similar structure. The maker fee remains 0.02%, while the taker fee increases slightly to 0.06%.
HTX’s fee model is designed to reward active users, reflect current market conditions, and maintain transparency across all trading activities.
Is HTX Secure?
HTX applies a layered security strategy designed to protect both platform infrastructure and user funds. The majority of user assets are held in cold wallets, which remain offline and require multiple signatures to access. These wallets are not connected to the internet, which greatly limits the risk of hacking attempts. Only a small portion of assets is kept in hot wallets to ensure liquidity for daily trading operations.
User accounts are protected with two-factor authentication, giving users a choice between Google Authenticator and SMS verification. This added security step ensures that even if a password is compromised, account access remains blocked. HTX also offers anti-phishing codes. Users can assign a unique code that appears in all official emails from the platform. Any message missing this identifier should be treated as suspicious.
To provide transparency, HTX uses a Merkle Tree-based Proof of Reserves system. This allows public verification that all user deposits are fully backed by on-platform assets. These reports are issued every month. At the time of writing, the platform shows a reserve ratio of 101% for Bitcoin and 100% for Ethereum, with 29 consecutive reports made public.
HTX also takes steps to prevent exposure to tainted funds. It actively monitors wallet addresses linked to scams or illegal activity. In January 2025, the platform added 189 wallet addresses to its blacklist and blocked related deposits. This process helps isolate suspicious transactions before they affect honest users. Regular internal audits are carried out to detect system vulnerabilities and apply necessary fixes. In case of extreme events, HTX maintains a Security Reserve Fund of 20,000 BTC to reimburse affected users.
From a regulatory standpoint, HTX holds operational licenses in multiple jurisdictions. It has exchange and custody licenses in Lithuania, a preliminary Full Market Product license in Dubai, and regulatory approval in the British Virgin Islands. In South America, the exchange is licensed to provide payment and remittance services.
However, HTX has not been immune to attacks. In November 2023, the platform suffered a breach that resulted in an estimated loss of $85 million. Trading was halted and withdrawals were paused while the issue was addressed. Justin Sun, an advisor to HTX, confirmed the hack and stated that hot wallets would be replenished using platform funds. The incident raised concerns, but HTX continues to maintain active security practices. Its systems remain under constant review, and the platform takes visible steps to protect user assets and data.
Final Takeaway
HTX gets the basics right. The sign-up process is quick, identity verification works without hiccups, and the interface doesn’t overwhelm even if you're new to crypto. It’s easy to find your way around once you’ve logged in. Navigation is simple, and the platform doesn’t clutter the screen with unnecessary features.
Trading is straightforward. Spot and futures markets are clearly separated, and order placements are quick to execute. The trading fee structure is transparent, with volume-based discounts for high-volume users or HTX token holders. Margin and futures trading are well-integrated, though beginners should take time to understand the risks involved.
Deposits in crypto land instantly, and withdrawals follow a familiar structure used by most exchanges. Fiat deposits depend on third-party providers, so charges vary depending on the method. HTX itself doesn’t impose extra fees on deposits, which is a plus.
Security is where HTX puts in visible effort. Cold wallet storage, two-factor authentication, proof of reserves, and regular security audits create a solid safety net. Still, the 2023 breach is a red mark. HTX responded quickly, but the incident showed that even well-established platforms aren't immune. That said, the presence of a reserve fund and transparent updates helped restore confidence. HTX isn’t flashy, and it doesn’t overpromise. It offers core features that work consistently and gives users enough control without overcomplicating the process. If you’re looking for a reliable platform to trade crypto without distractions, HTX is a decent choice.
Frequently Asked Questions – FAQs
HTX is a global cryptocurrency exchange offering spot, margin, futures, and options trading, along with staking, trading bots, and P2P services.
Yes, HTX is the rebranded version of Huobi. The platform has updated its name and branding but retains core services.
Visit the HTX website, click “Sign Up,” enter your email or phone number, create a password, and complete the verification process.
Yes, HTX requires identity verification for most services, including withdrawals and fiat transactions.
Go to “Assets,” click “Deposit,” select your crypto, choose the correct network, and copy the deposit address to transfer funds.
Yes, you can purchase crypto using various fiat payment methods via third-party providers integrated into HTX.
HTX supports spot, margin, futures, and options trading. It also offers P2P trading and automated trading bots.
Spot and margin trades follow a 0.2% base fee for makers and takers. Futures fees start at 0.02% for makers and up to 0.06% for takers. Discounts apply based on trading volume or HTX token holdings.
Crypto deposits are free, but users cover blockchain network fees. Withdrawal fees vary daily based on network costs and asset prices.
Go to the “Withdraw” page, select the crypto, choose the correct network, enter your wallet address, input the amount, and confirm the transaction.
HTX uses cold wallet storage, two-factor authentication, proof of reserves, anti-phishing codes, and a security reserve fund to protect user assets.
HTX was hacked in November 2023, resulting in a loss of around $85 million. The platform paused trading, replenished hot wallets, and resumed services after addressing the breach.
Yes, HTX offers built-in trading bots like the Grid Bot, and also supports API connections for custom strategies.
Yes, HTX publishes monthly proof-of-reserve reports using a Merkle Tree system. These reports confirm that user balances are fully backed by platform-held assets.
Disclaimer: All content on The Moon Show is for informational and educational purposes only. The opinions expressed do not constitute financial advice or recommendations to buy, sell, or trade cryptocurrencies. Trading involves significant risk and may result in substantial losses. Always seek independent financial advice before making investment decisions. The Moon Show is not responsible for any financial losses or decisions made based on the information provided.
Please view the full disclaimer at: https://themoonshow.com/disclaimer

The Ultimate WEEX Exchange Tutorial: Step-by-Step Guide for Beginners
WEEX is not among the largest cryptocurrency exchanges. It does not match the trading volume of...

The Ultimate Bybit Exchange Tutorial - A Step-by-Step Guide for Beginners
Cryptocurrency trading continues to evolve with time. Today, crypto users can access several ex...

MEXC Exchange Tutorial: Step-by-Step Guide for Beginners
MEXC is a well-established cryptocurrency exchange that supports a wide range of trading featur...